JEEP RENEGADE 2023 Workshop Manual
Manufacturer: JEEP, Model Year: 2023, Model line: RENEGADE, Model: JEEP RENEGADE 2023Pages: 364, PDF Size: 18.65 MB
Page 51 of 364
GETTING TO KNOW YOUR VEHICLE 49
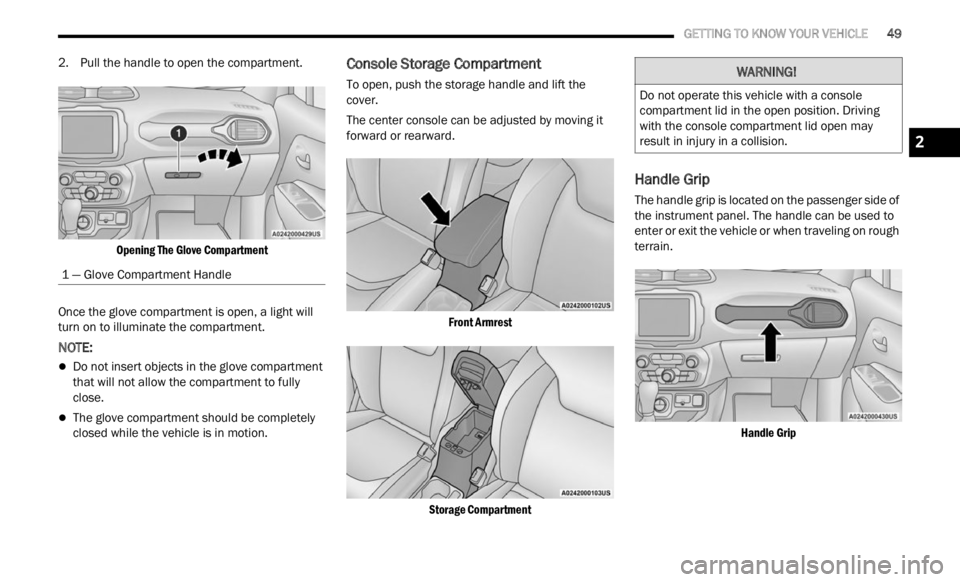
2. Pull the handle to open the compartment.
Opening The Glove Compartment
Once the glove compartment is open, a light will
turn on
to illuminate the compartment.
NOTE:
Do not insert objects in the glove compartment
that will not allow the compartment to fully
close.
The glove compartment should be completely
closed while the vehicle is in motion.
Console Storage Compartment
To open, push the storage handle and lift the
cover.
The center console can be adjusted by moving it
forward
or rearward.
Front Armrest
Storage Compartment
Handle Grip
The handle grip is located on the passenger side of
the instrument panel. The handle can be used to
enter or exit the vehicle or when traveling on rough
terrain.
Handle Grip
1 — Glove Compartment Handle
WARNING!
Do not operate this vehicle with a console
compartment lid in the open position. Driving
with the console compartment lid open may
result in injury in a collision.
2
Page 52 of 364
50 GETTING TO KNOW YOUR VEHICLE
USB/AUX CONTROL
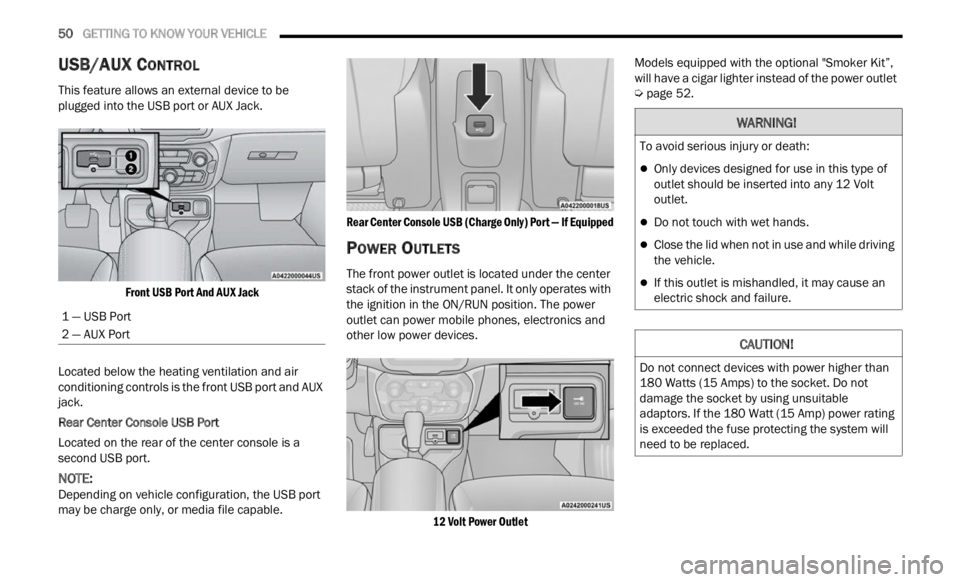
This feature allows an external device to be
plugged into the USB port or AUX Jack.
Front USB Port And AUX Jack
Located below the heating ventilation and air
condit i
oning controls is the front USB port and AUX
jack.
Rear Center Console USB Port
Located on the rear of the center console is a
s econd
USB port.
NOTE:
Depending on vehicle configuration, the USB port
may b e
charge only, or media file capable.
Rear Center Console USB (Charge Only) Port — If Equipped
POWER OUTLETS
The front power outlet is located under the center
stack of the instrument panel. It only operates with
the ignition in the ON/RUN position. The power
outlet can power mobile phones, electronics and
other low power devices.
12 Volt Power Outlet
Models equipped with the optional "Smoker Kit”,
will h
ave a cigar lighter instead of the power outlet
Ú page 52.
1 — USB Port
2 — AUX Port
WARNING!
To avoid serious injury or death:
Only devices designed for use in this type of
outlet should be inserted into any 12 Volt
outlet.
Do not touch with wet hands.
Close the lid when not in use and while driving
the vehicle.
If this outlet is mishandled, it may cause an
electric shock and failure.
CAUTION!
Do not connect devices with power higher than
180 Watts (15 Amps) to the socket. Do not
damage the socket by using unsuitable
adaptors. If the 180 Watt (15 Amp) power rating
is exceeded the fuse protecting the system will
need to be replaced.
Page 53 of 364
GETTING TO KNOW YOUR VEHICLE 51
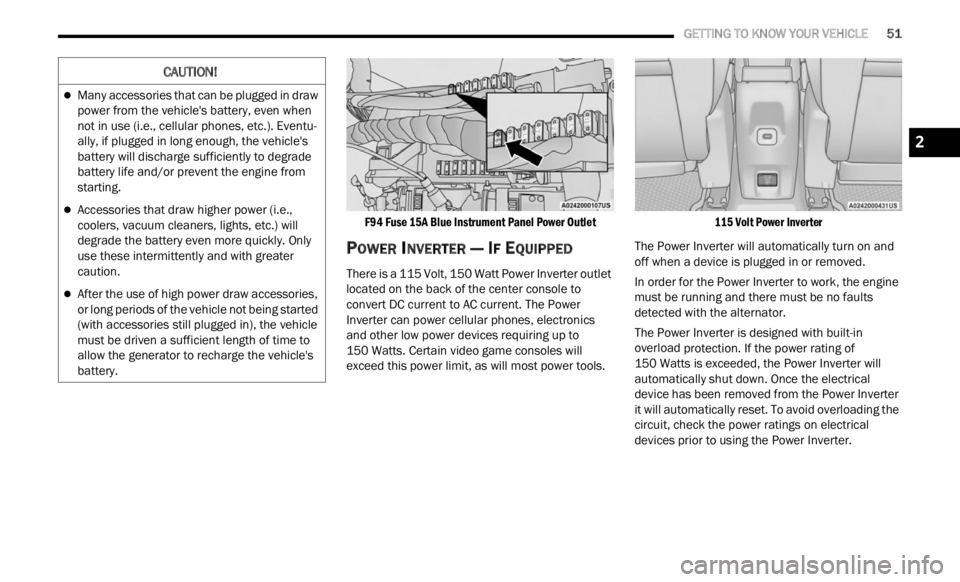
F94 Fuse 15A Blue Instrument Panel Power Outlet
POWER INVERTER — IF EQUIPPED
There is a 115 Volt, 150 Watt Power Inverter outlet
located on the back of the center console to
convert DC current to AC current. The Power
Inverter can power cellular phones, electronics
and other low power devices requiring up to
150 Watts. Certain video game consoles will
excee d
this power limit, as will most power tools.
115 Volt Power Inverter
The Power Inverter will automatically turn on and
off wh e
n a device is plugged in or removed.
In order for the Power Inverter to work, the engine
must b
e running and there must be no faults
detected with the alternator.
The Power Inverter is designed with built-in
overloa d
protection. If the power rating of
150 Watts is exceeded, the Power Inverter will
a utomat
ically shut down. Once the electrical
device has been removed from the Power Inverter
it will automatically reset. To avoid overloading the
circuit, check the power ratings on electrical
devices prior to using the Power Inverter.
CAUTION!
Many accessories that can be plugged in draw
power from the vehicle's battery, even when
not in use (i.e., cellular phones, etc.). Eventu -
ally, if plugged in long enough, the vehicle's
batte r
y will discharge sufficiently to degrade
battery life and/or prevent the engine from
starting.
Accessories that draw higher power (i.e.,
coolers, vacuum cleaners, lights, etc.) will
degrade the battery even more quickly. Only
use these intermittently and with greater
caution.
After the use of high power draw accessories,
or long periods of the vehicle not being started
(with accessories still plugged in), the vehicle
must be driven a sufficient length of time to
allow the generator to recharge the vehicle's
battery.
2
Page 54 of 364
52 GETTING TO KNOW YOUR VEHICLE
CIGAR LIGHTER — IF EQUIPPED
NOTE:
Cigar lighters can be purchased at an authorized
deale r
through Mopar® parts.
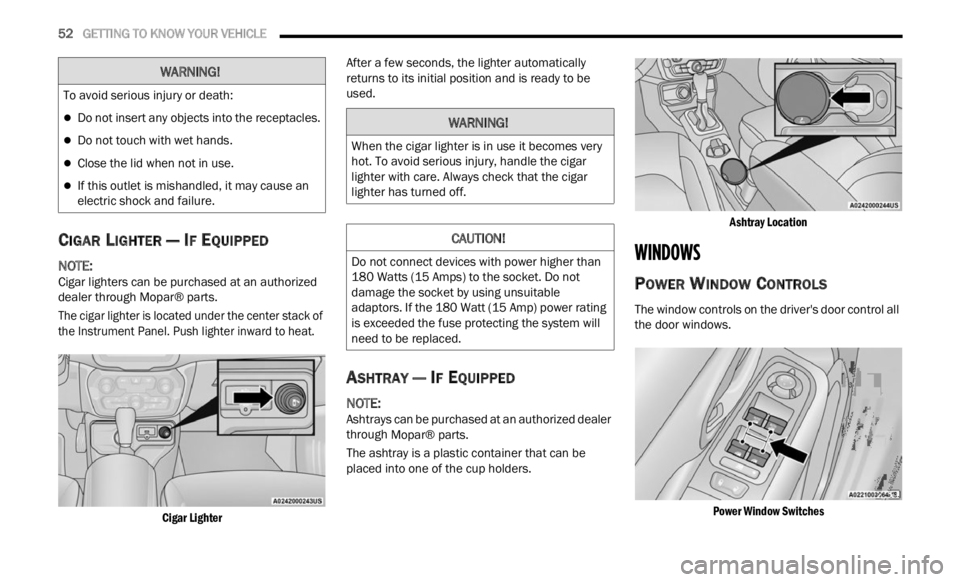
The cigar lighter is located under the center stack of
the In
strument Panel. Push lighter inward to heat.
Cigar Lighter
After a few seconds, the lighter automatically
retur
n
s to its initial position and is ready to be
used.
ASHTRAY — IF EQUIPPED
NOTE:
Ashtrays can be purchased at an authorized dealer
throug h
Mopar® parts.
The ashtray is a plastic container that can be
placed
into one of the cup holders.
Ashtray Location
WINDOWS
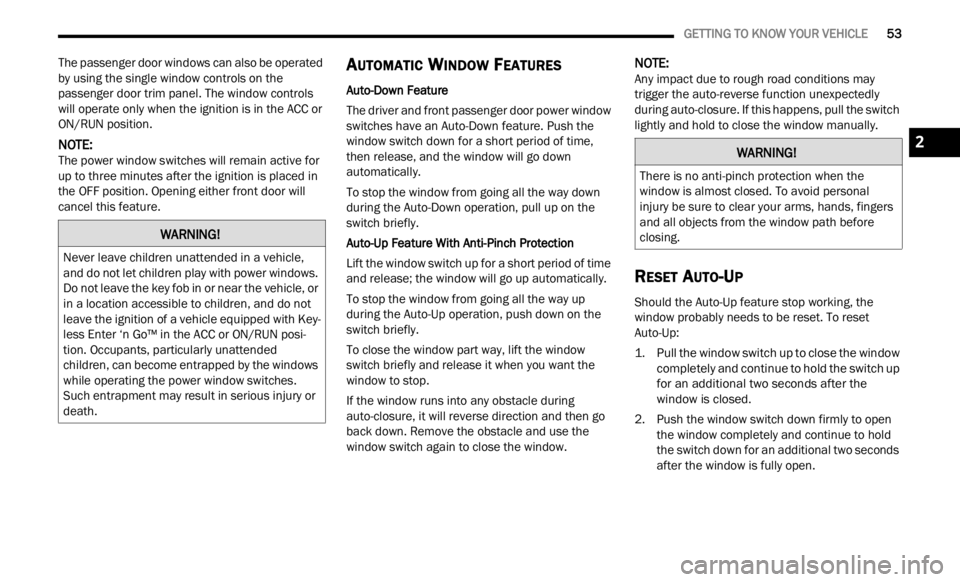
POWER WINDOW CONTROLS
The window controls on the driver's door control all
the door windows.
Power Window Switches
WARNING!
To avoid serious injury or death:
Do not insert any objects into the receptacles.
Do not touch with wet hands.
Close the lid when not in use.
If this outlet is mishandled, it may cause an
electric shock and failure.
WARNING!
When the cigar lighter is in use it becomes very
hot. To avoid serious injury, handle the cigar
lighter with care. Always check that the cigar
lighter has turned off.
CAUTION!
Do not connect devices with power higher than
180 Watts (15 Amps) to the socket. Do not
damage the socket by using unsuitable
adaptors. If the 180 Watt (15 Amp) power rating
is exceeded the fuse protecting the system will
need to be replaced.
Page 55 of 364
GETTING TO KNOW YOUR VEHICLE 53
The passenger door windows can also be operated
by using the single window controls on the
passenger door trim panel. The window controls
will operate only when the ignition is in the ACC or
ON/RUN position.
NOTE:
The power window switches will remain active for
up to t
hree minutes after the ignition is placed in
the OFF position. Opening either front door will
cancel this feature.
AUTOMATIC WINDOW FEATURES
Auto-Down Feature
The driver and front passenger door power window
switc h
es have an Auto-Down feature. Push the
window switch down for a short period of time,
then release, and the window will go down
automatically.
To stop the window from going all the way down
durin g
the Auto-Down operation, pull up on the
switch briefly.
Auto-Up Feature With Anti-Pinch Protection
Lift the window switch up for a short period of time
a nd re
lease; the window will go up automatically.
To stop the window from going all the way up
during
the Auto-Up operation, push down on the
switch briefly.
To close the window part way, lift the window
switc h
briefly and release it when you want the
window to stop.
If the window runs into any obstacle during
auto-c l
osure, it will reverse direction and then go
back down. Remove the obstacle and use the
window switch again to close the window.
NOTE:
Any impact due to rough road conditions may
trigg e
r the auto-reverse function unexpectedly
during auto-closure. If this happens, pull the switch
lightly and hold to close the window manually.
RESET AUTO-UP
Should the Auto-Up feature stop working, the
window probably needs to be reset. To reset
Auto-Up:
1. Pull the window switch up to close the window comp l
etely and continue to hold the switch up
for an additional two seconds after the
window is closed.
2. Push the window switch down firmly to open the w
indow completely and continue to hold
the switch down for an additional two seconds
after the window is fully open.
WARNING!
Never leave children unattended in a vehicle,
and do not let children play with power windows.
Do not leave the key fob in or near the vehicle, or
in a location accessible to children, and do not
leave the ignition of a vehicle equipped with Key -
less Enter ‘n Go™ in the ACC or ON/RUN posi -
tion. Occupants, particularly unattended
c hildr
en, can become entrapped by the windows
while operating the power window switches.
Such entrapment may result in serious injury or
death.
WARNING!
There is no anti-pinch protection when the
window is almost closed. To avoid personal
injury be sure to clear your arms, hands, fingers
and all objects from the window path before
closing.
2
Page 56 of 364
54 GETTING TO KNOW YOUR VEHICLE
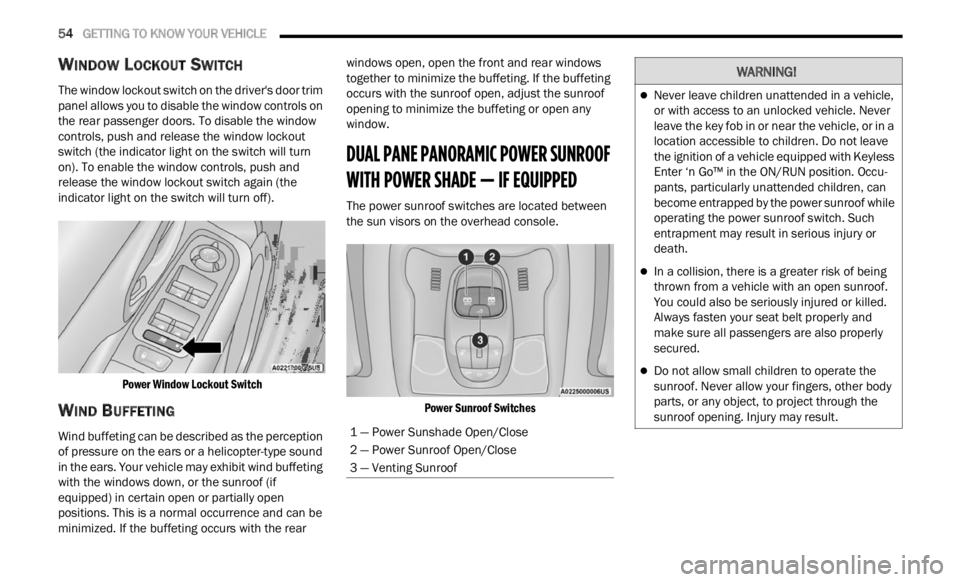
WINDOW LOCKOUT SWITCH
The window lockout switch on the driver's door trim
panel allows you to disable the window controls on
the rear passenger doors. To disable the window
controls, push and release the window lockout
switch (the indicator light on the switch will turn
on). To enable the window controls, push and
release the window lockout switch again (the
indicator light on the switch will turn off).
Power Window Lockout Switch
WIND BUFFETING
Wind buffeting can be described as the perception
of pressure on the ears or a helicopter-type sound
in the ears. Your vehicle may exhibit wind buffeting
with the windows down, or the sunroof (if
equipped) in certain open or partially open
positions. This is a normal occurrence and can be
minimized. If the buffeting occurs with the rear windows open, open the front and rear windows
together to minimize the buffeting. If the buffeting
occurs with the sunroof open, adjust the sunroof
opening to minimize the buffeting or open any
window.
DUAL PANE PANORAMIC POWER SUNROOF
WITH POWER SHADE — IF EQUIPPED
The power sunroof switches are located between
the sun visors on the overhead console.
Power Sunroof Switches
1 — Power Sunshade Open/Close
2 — Power Sunroof Open/Close
3 — Venting Sunroof
WARNING!
Never leave children unattended in a vehicle,
or with access to an unlocked vehicle. Never
leave the key fob in or near the vehicle, or in a
location accessible to children. Do not leave
the ignition of a vehicle equipped with Keyless
Enter ‘n Go™ in the ON/RUN position. Occu -
pants, particularly unattended children, can
b ecom e
entrapped by the power sunroof while
operating the power sunroof switch. Such
entrapment may result in serious injury or
death.
In a collision, there is a greater risk of being
thrown from a vehicle with an open sunroof.
You could also be seriously injured or killed.
Always fasten your seat belt properly and
make sure all passengers are also properly
secured.
Do not allow small children to operate the
sunroof. Never allow your fingers, other body
parts, or any object, to project through the
sunroof opening. Injury may result.
Page 57 of 364

GETTING TO KNOW YOUR VEHICLE 55
OPENING AND CLOSING THE SUNROOF
To retract the sunroof to the open position, push
the Open/Close switch and the sunroof will fully
open. The sunroof can be stopped in any position
by pushing/pulling the switch a second time while
opening.
To close the sunroof completely, pull the Open/
Close s
witch and the sunroof will fully close. The
sunroof can be stopped in any position by pushing/
pulling the switch a second time while it is closing.
VENTING SUNROOF
To vent the sunroof push the vent switch.
NOTE:
The vent switch has the automatic function only at
the op e
ning of the sunroof. During the closing of
the sunroof, the switch must be held until closed.
OPENING AND CLOSING THE POWER
S
UNSHADE
Express Open/Close
Push the shade switch for about one-half second
and t h
e shade will automatically open. During the
automatic open operation, any movement of the
shade switch will stop the shade. Pull the shade switch for about one-half second
and t
h
e shade will automatically close. During the
automatic close operation, any movement of the
shade switch will stop the shade.
Manual Open/Close
To open the shade part way, push the shade switch
brief l
y and release.
To close the shade part way, pull the shade switch
briefl
y and release.
NOTE:
The sunroof and the shade controls will operate
only when the ignition is in the ON/RUN posi -
tion.
If the Remote Start functionality is active, it is
not possible to move the sunroof.
PINCH PROTECT FEATURE
This feature will detect an obstruction in the
opening of the sunroof during Express Close
operation. If an obstruction in the path of the
sunroof is detected, the sunroof will automatically
retract. Remove the obstruction if this occurs.
WARNING!
Do not let children play with the sunroof.
Never leave children unattended in a vehicle,
or with access to an unlocked vehicle. Do not
leave the key fob in or near the vehicle, and do
not leave the ignition of a vehicle equipped
with Keyless Enter ‘n Go™ in the ACC or ON/
RUN position. Occupants, particularly unat -
tended children, can become entrapped by
the p ow
er sunroof while operating the power
sunroof switch. Such entrapment may result
in serious injury or death.
In a collision, there is a greater risk of being
thrown from a vehicle with an open sunroof.
You could also be severely injured or killed.
Always fasten your seat belt properly and
make sure all passengers are properly
secured.
Do not allow small children to operate the
sunroof. Never allow your fingers, other body
parts, or any object to project through the
sunroof opening. Injury may result.
2
Page 58 of 364
56 GETTING TO KNOW YOUR VEHICLE
SUNROOF MAINTENANCE
Use only a non-abrasive cleaner and a soft cloth to
clean the glass panel. Periodically check for and
clear out any debris that may have collected in the
tracks.
HOOD
TO OPEN THE HOOD
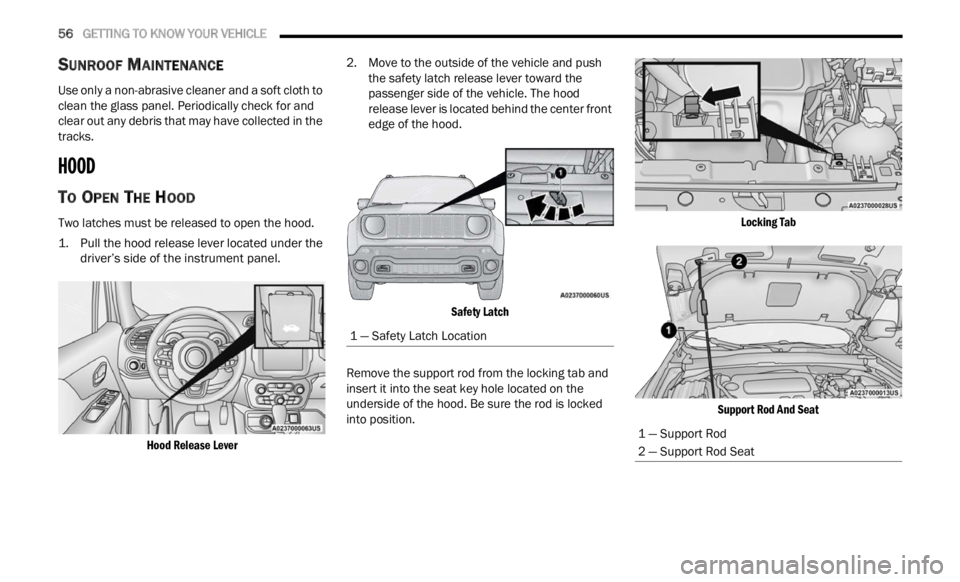
Two latches must be released to open the hood.
1. Pull the hood release lever located under the
driver’ s
side of the instrument panel.
Hood Release Lever
2. Move to the outside of the vehicle and push
the s
afety latch release lever toward the
passenger side of the vehicle. The hood
release lever is located behind the center front
edge of the hood.
Safety Latch
Remove the support rod from the locking tab and
inser t
it into the seat key hole located on the
underside of the hood. Be sure the rod is locked
into position.
Locking Tab
Support Rod And Seat
1 — Safety Latch Location
1 — Support Rod
2 — Support Rod Seat
Page 59 of 364
GETTING TO KNOW YOUR VEHICLE 57
TO CLOSE THE HOOD
LIFTGATE
UNLOCK/OPEN THE LIFTGATE
To unlock the liftgate, use the key fob or activate
the power door lock switches located on the driver
door handle.
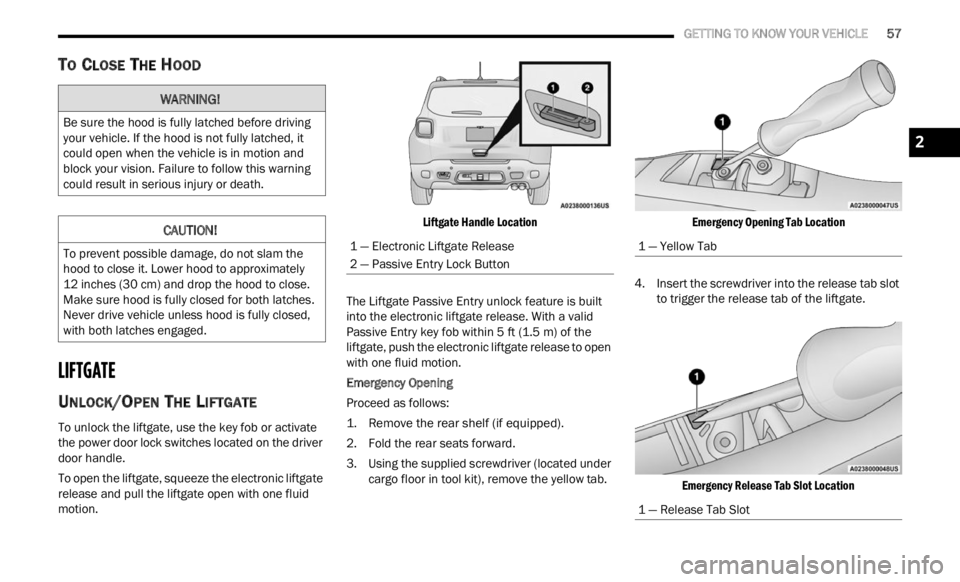
To open the liftgate, squeeze the electronic liftgate
relea s
e and pull the liftgate open with one fluid
motion.
Liftgate Handle Location
The Liftgate Passive Entry unlock feature is built
into t h
e electronic liftgate release. With a valid
Passive Entry key fob within 5 ft (1.5 m) of the
liftga
te, push the electronic liftgate release to open
with one fluid motion.
Emergency Opening
Proceed as follows:
1. R emove the rear shelf (if equipped).
2. Fol d
the rear seats forward.
3. Us i
ng the supplied screwdriver (located under
carg o
floor in tool kit), remove the yellow tab.
Emergency Opening Tab Location
4. Insert the screwdriver into the release tab slot to tri
gger the release tab of the liftgate.
Emergency Release Tab Slot Location
WARNING!
Be sure the hood is fully latched before driving
your vehicle. If the hood is not fully latched, it
could open when the vehicle is in motion and
block your vision. Failure to follow this warning
could result in serious injury or death.
CAUTION!
To prevent possible damage, do not slam the
hood to close it. Lower hood to approximately
12 inches (30 cm) and drop the hood to close.
Make s
ure hood is fully closed for both latches.
Never drive vehicle unless hood is fully closed,
with both latches engaged.
1 — Electronic Liftgate Release
2 — Passive Entry Lock Button
1 — Yellow Tab
1 — Release Tab Slot
2
Page 60 of 364
58 GETTING TO KNOW YOUR VEHICLE
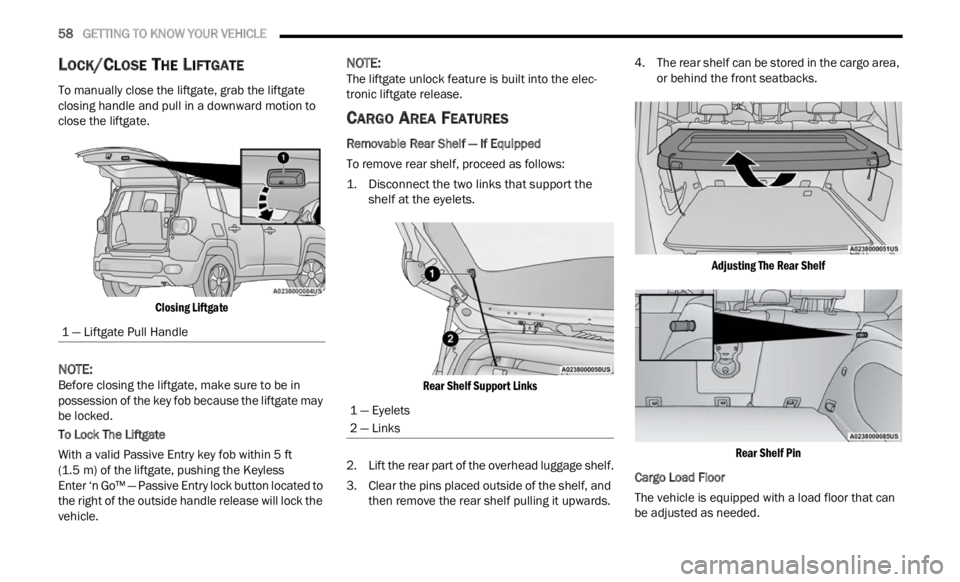
LOCK/CLOSE THE LIFTGATE
To manually close the liftgate, grab the liftgate
closing handle and pull in a downward motion to
close the liftgate.
Closing Liftgate
NOTE:
Before closing the liftgate, make sure to be in
posses s
ion of the key fob because the liftgate may
be locked.
To Lock The Liftgate
With a valid Passive Entry key fob within 5 ft
( 1.5 m)
of the liftgate, pushing the Keyless
Enter ‘n Go™ — Passive Entry lock button located to
t he ri
ght of the outside handle release will lock the
vehicle.
NOTE:
The liftgate unlock feature is built into the elec -
tronic liftgate release.
CARGO AREA FEATURES
Removable Rear Shelf — If Equipped
To remove rear shelf, proceed as follows:
1. D isconnect the two links that support the
shelf a
t the eyelets.
Rear Shelf Support Links
2. Li ft the rear part of the overhead luggage shelf.
3 . C
le
ar the pins placed outside of the shelf, and
then
remove the rear shelf pulling it upwards. 4. The rear shelf can be stored in the cargo area,
or be h
ind the front seatbacks.
Adjusting The Rear Shelf Rear Shelf Pin
Cargo Load Floor
The vehicle is equipped with a load floor that can
b e ad j
usted as needed.
1 — Liftgate Pull Handle
1 — Eyelets
2 — Links