clock reset JEEP RENEGADE 2023 Owners Manual
[x] Cancel search | Manufacturer: JEEP, Model Year: 2023, Model line: RENEGADE, Model: JEEP RENEGADE 2023Pages: 364, PDF Size: 18.65 MB
Page 69 of 364

GETTING TO KNOW YOUR INSTRUMENT PANEL 67
Audio
Push and release the up or down arrow
button until the Audio menu title is displayed in the
instr u
ment cluster display.
Stored Messages
Push and release the up or down arrow
button until the Messages Menu Icon is highlighted
in th e
instrument cluster display. This feature
shows the number of stored warning messages.
Pushing the left
or right arrow button will
all ow
you to scroll through the stored messages.
Screen Setup
This menu item allows you to change the position
of the information on the display.
Display Gears (Vehicles With Reconfigurable
Multi-
Functional Display And Automatic
Transmission)
By selecting this item, you can select the display
mode, t
he particulars relating to the automatic
transmission, and choose between the following
options:
“Single digit”
The right side of the display will show the letter
concer n
ing the automatic transmission gear
selector (P,R,N or D) position. After approxi -
mately two seconds, the letter will be displayed
in a c
entral position.
“Full PRND”
The letters PRND will display on the right side,
the p o
sition assumed by the gear selector will
be highlighted in the display. During the opera -
tion in sequential mode (“AutoStick”), in place
of the
letter D, the gear will be will be displayed.
In The Upper Left/Top Right
The information relating to the following can be
displ a
yed:
External temperature
Ignition Button — If Equipped
Compass — If Equipped
Date (Month/Day)
Time (Hours/Minutes)
In the central area of the display, you can view all
of t
h e
information listed above as well as the
following:
Compass — If Equipped
Speed Display — If Equipped
Date (Day/Month/Year)
Time
Compass — If Equipped
Ignition Button — If Equipped
External Temp — If equipped
Menu Item
Distance Traveled A (Trip A)
Distance Traveled B (Trip B)
Restore Default Settings
Selecting this item, and you can reset and restore
t he de
fault settings.
Settings
This menu item allows you to change the settings
for the following:
Display
Units
Clock and Date
Security
Safety and Assistance
Lights
Doors and Locks
NOTE:
Some items may be displayed and managed
throug h
the Uconnect system.
Vehicles Equipped With Multi-functional Display
Reconfi
gurable:
The following menu/submenu items are available
in the
cluster display.
3
Page 152 of 364

150 MULTIMEDIA
Safe Usage Of The Uconnect System
The Uconnect system is a sophisticated elec -
tronic device. Do not let young children use the
syste m
.
Permanent hearing loss may occur if you play
your music or sound system at loud volumes.
Exercise caution when setting the volume on the
system.
Keep drinks, rain and other sources of moisture
away from the system. Besides damage to the
system, moisture can cause electric shocks as
with any electronic device.
NOTE:
Many features of this system are speed
depen d
ent. For your own safety, it is not possible to
use some of the touchscreen features while the
vehicle is in motion.
Care And Maintenance
Do not press the touchscreen with any hard or
sharp objects (pen, USB stick, jewelry, etc.),
which could scratch the surface.
Do not spray any liquid or chemicals directly on
the screen! Use a clean and dry microfiber lens
cleaning cloth in order to clean the touchscreen.
If necessary, use a lint-free cloth dampened
with a cleaning solution, such as isopropyl
alcohol or an isopropyl alcohol and water solu -tion ratio of 50:50. Be sure to follow the solvent
manuf
a
cturer's precautions and directions
Ú page 349.
UCONNECT MODES
STEERING WHEEL AUDIO CONTROLS
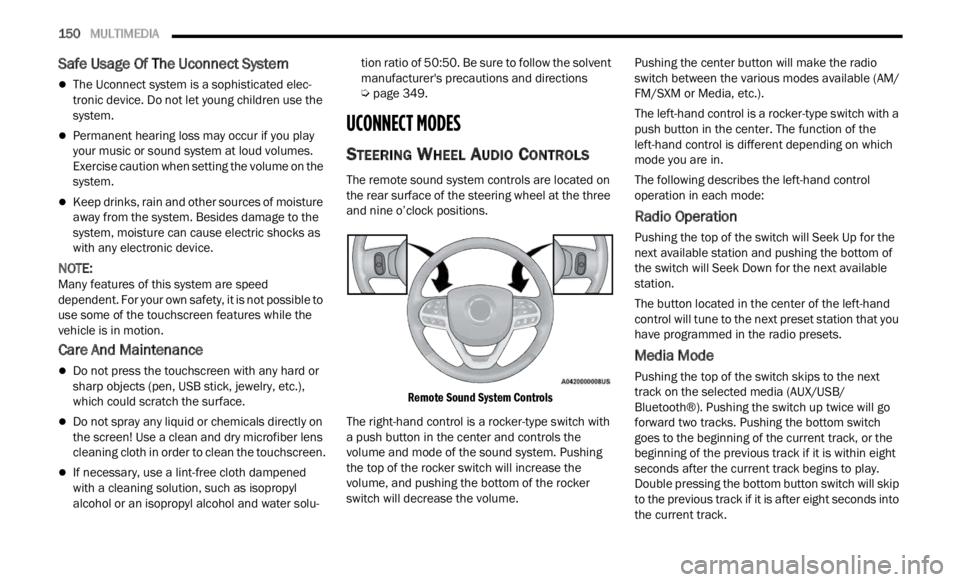
The remote sound system controls are located on
the rear surface of the steering wheel at the three
and nine o’clock positions.
Remote Sound System Controls
The right-hand control is a rocker-type switch with
a pus h
button in the center and controls the
volume and mode of the sound system. Pushing
the top of the rocker switch will increase the
volume, and pushing the bottom of the rocker
switch will decrease the volume. Pushing the center button will make the radio
switc
h
between the various modes available (AM/
FM/SXM or Media, etc.).
The left-hand control is a rocker-type switch with a
push b
utton in the center. The function of the
left-hand control is different depending on which
mode you are in.
The following describes the left-hand control
operati
on in each mode:
Radio Operation
Pushing the top of the switch will Seek Up for the
next available station and pushing the bottom of
the switch will Seek Down for the next available
station.
The button located in the center of the left-hand
control
will tune to the next preset station that you
have programmed in the radio presets.
Media Mode
Pushing the top of the switch skips to the next
track on the selected media (AUX/USB/
Bluetooth®). Pushing the switch up twice will go
forward two tracks. Pushing the bottom switch
goes to the beginning of the current track, or the
beginning of the previous track if it is within eight
seconds after the current track begins to play.
Double pressing the bottom button switch will skip
to the previous track if it is after eight seconds into
the current track.
Page 153 of 364

MULTIMEDIA 151
RADIO MODE
Radio Controls
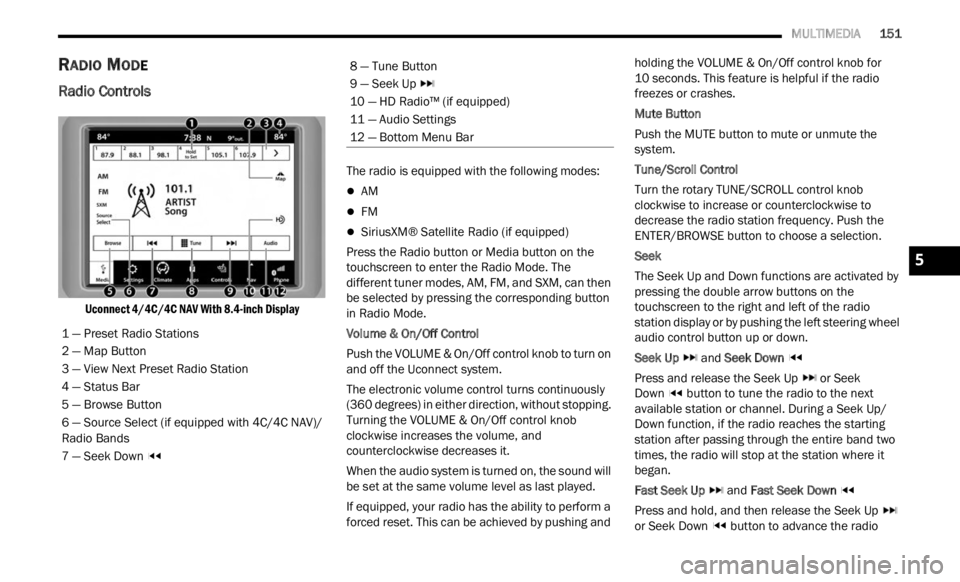
Uconnect 4/4C/4C NAV With 8.4-inch Display
The radio is equipped with the following modes:
AM
FM
SiriusXM® Satellite Radio (if equipped)
Press the Radio button or M
ed
i
a button on the
touchscreen to enter the Radio Mode. The
different tuner modes, AM, FM, and SXM, can then
be selected by pressing the corresponding button
in Radio Mode.
Volume & On/Off Control
Push the VOLUME & On/Off control knob to turn on
a nd of f
the Uconnect system.
The electronic volume control turns continuously
(360 d
egrees) in either direction, without stopping.
Turning the VOLUME & On/Off control knob
clockwise increases the volume, and
counterclockwise decreases it.
When the audio system is turned on, the sound will
be se t
at the same volume level as last played.
If equipped, your radio has the ability to perform a
forced
reset. This can be achieved by pushing and holding the VOLUME & On/Off control knob for
10 seconds. This feature is helpful if the radio
freez e
s or crashes.
Mute Button
Push the MUTE button to mute or unmute the
syste m
.
Tune/Scroll Control
Turn the rotary TUNE/SCROLL control knob
clock w
ise to increase or counterclockwise to
decrease the radio station frequency. Push the
ENTER/BROWSE button to choose a selection.
Seek
The Seek Up and Down functions are activated by
press i
ng the double arrow buttons on the
touchscreen to the right and left of the radio
station display or by pushing the left steering wheel
audio control button up or down.
Seek Up and Seek Down
Pres s
and release the Seek Up or Seek
Down button to tune the radio to the next
available station or channel. During a Seek Up/
D own f u
nction, if the radio reaches the starting
station after passing through the entire band two
times, the radio will stop at the station where it
began.
Fast Seek Up and Fast Seek Down
Pres s
and hold, and then release the Seek Up
or Seek Down button to advance the radio
1 — Preset Radio Stations
2 — Map Button
3 — View Next Preset Radio Station
4 — Status Bar
5 — Browse Button
6 — Source Select (if equipped with 4C/4C NAV)/
R
adio B
ands
7 — Seek Down
8 — Tune Button
9 — Seek Up
10 — HD Radio™ (if equipped)
11 — Audio Settings
12 — Bottom Menu Bar
5