display JEEP WAGONEER 2023 Owners Manual
[x] Cancel search | Manufacturer: JEEP, Model Year: 2023, Model line: WAGONEER, Model: JEEP WAGONEER 2023Pages: 396, PDF Size: 15.17 MB
Page 231 of 396
MULTIMEDIA229
ACCESSING REAR SEAT
E
NTERTAINMENT WITH FIRE TV BUILT-IN
FROM THE REAR SCREENS
You can also access your Rear Seat Entertainment with
Fire TV built-in by choosing one of the following options:
Option 1
The system will automatically turn on when the vehicle
is started. Pushing the power button on the Voice
Remote with Alexa will turn the system back on if it was
manually shut off. If the screen is inactive and goes to
a screen saver, the system can be woken up by either
tapping the screen or pushing any button on the Voice
Remote with Alexa.
Option 2
Swiping on either of the rear touchscreens.
NOTE:While accessing on the rear screens, the system will
launch with the integrated Fire TV.
ACCESSING REAR SEAT
E
NTERTAINMENT WITH FIRE TV BUILT-IN
FROM THE PASSENGER SCREEN —
I
F EQUIPPED
You can also access Rear Seat Entertainment with Fire TV
built-in content from the Passenger Screen.
Follow these steps:
1. Access the Home screen for the Passenger Screen.
2. Swipe right on the Home screen and select Fire TV
Rear Seat Entertainment Controls.
FIRST TIME STARTING UP
(U
SING THE REAR SCREENS)
Boot-up Screen
When turning on the system for the first time from the rear
screens, a boot-up screen will appear on the system
displaying the Fire TV logo.
During this boot-up sequence, language options will be
available for the system.
Voice Remote with Alexa Pairing
After the boot-up sequence is complete, the system will
then give the option to pair a Voice Remote with Alexa (two
are included with the system).
Follow the on-screen instructions for how to pair a Voice
Remote with Alexa to the system. Two Voice Remotes with
Alexa are included to be paired with each rear screen.
A Voice Remote with Alexa can be paired to each rear
screen. It will function with the rear screen it was paired
with. The pairing steps will need to be done for each rear
screen.
NOTE:If the Voice Remote with Alexa pairing fails, on-screen
instructions will appear for trying to pair again.
Connecting to a Network
During the start-up process, the system will need to be
connected to a network to function. Multiple network
sources can be options for the system. Some options for a network connection are:
Wi-Fi Hotspot using a capable smartphone (if activated,
it will show as a possible network for the system on the
screen).
Outside connection like a home Wi-Fi network.
In-vehicle Wi-Fi.
NOTE:When a network is connected to the system for the first
time, an over-the-air-software update will take place using
the Wi-Fi connection. It is recommended that an unlimited
Wi-Fi connection, if available, be used during this update.
After this first-time update, updates will only occur when
one is available.
Account Sign-in
The next step will be the option to sign in to your Amazon
account.
There are two options to sign into the system:
I already have an Amazon account: Sign in with an
already existing Amazon account
I am new to Amazon: Create a new Amazon Account
If “I am new to Amazon” is selected, follow the on-screen
steps to set up an Amazon account with the system.
Parental Controls
Another feature that will appear during this first time set
up is parental controls.
When the parental controls page appears, it will give the
options “Enable Parental Controls” and “No Parental
Controls”. If “Enable Parental Controls” is selected, follow
the on-screen steps to set up parental controls for the
system.
5
23_WS_OM_EN_USC_t.book Page 229
Page 234 of 396
232MULTIMEDIA
REAR SEAT ENTERTAINMENT WITH FIRE
TV B
UILT-IN STREAMING (USING THE
F
RONT RADIO AND REAR SCREENS)
Access Using Launch Source
To access Rear Seat Entertainment with Fire TV built-in
from the front radio, press the Media tab located on the
bottom menu bar. Then select the Rear Seat option
located on the top menu bar. Select “Launch Source”, and
then under “Inputs” select “Fire TV Home”.
Access Using Browse Media
Selecting “Browse Media” on the front radio screen will
give access to different media within Rear Seat
Entertainment with Fire TV built-in.
These options will be in the top menu of “Browse Media”
and include:
Fire TV — Selecting “Fire TV” will show streaming
options for categories and to select apps. This option
will be selectable on the left slider menu in “Browse
Media”. While in “Browse Media” under Fire TV, it will
display recent activity under “Recent”. This will display
recent videos viewed from Fire TV and recent down -
loads as well.
USB Video — Under “USB Videos”, videos will appear
that are options with a USB device connected to Rear
Seat Entertainment with Fire TV built-in.
USB Music — Under “USB Music”, music will appear
that are options with a USB device connected to Rear
Seat Entertainment with Fire TV built-in. Access Using the Voice Remote with Alexa and Rear
Screens
Rear passengers will be able to access some options for
streaming by pressing the “Prime Video”, “App 1”, or “App
2” button on the Voice Remote with Alexa. Selecting one
of those buttons on the Voice Remote with Alexa will take
you to the home page for that respective streaming
service. Turning on either of the rear screens will launch
Fire TV. By default, the rear screens will always launch in
Fire TV. More streaming options can be selected on the
Fire TV home page.
Fire TV
Fire TV is your source for online streaming with Rear Seat
Entertainment with Fire TV built-in.
NOTE:A data source needs to be connected to the system for
streaming to be accessible. This can be set up when Fire
TV is turned on for the first time on the rear screens. Some
options can be an in-vehicle 4G Wi-Fi hot spot, capable
Wi-Fi hot spot from a mobile device, or Wi-Fi from an
outside source like a home or a garage.
To access Fire TV on the front screen, select “Launch
Source” on the front radio, Rear Seat screen and then
“Fire TV Home” under “Inputs”.
Viewing from the front radio screen or passenger screen
mirrors or controls the Fire TV experience from one of the
rear Fire TV displays.
The menu bar for Fire TV will have the options for “Home”,
“Find”, “Library”, “Brand”, and “Live”.
Below the menu bar will be streaming options linked to
your Prime account like “Prime Video”. The front radio screen offers some options:
Power — This will turn Fire TV on or off.
Screen 1 and Screen 2 Toggle — This toggles between
the Rear Screens (for use with front radio screen only).
Collapse — While viewing on the front radio screen, this
will collapse the screen to dashboard view.
Source Drawer — This will open the “Source Drawer”
and the source logo will be displayed on the icon.
Browse Media — This will open the “Browse Media”
pop-up.
Back — This will let you go back the previous page.
Fire TV Home — This will take you back to the Fire TV
home page.
Menu — This will open the Fire TV menu.
Remote icon — This will display the on-screen remote.NOTE:Front radio screen mirroring and watching can only be
done when the vehicle is in PARK. The vehicle must be in
an active and usable cellular range and properly equipped
with a Uconnect 5 NAV system and Rear Seat Enter -
tainment with Fire TV package. For streaming, a Wi-Fi
connection and registered Amazon account are required
to run Fire TV in the vehicle. Streaming service subscrip -
tions are not included. Services and features are subject
to change or withdrawal at any time, may not be available
in all areas and languages, and may require separate
subscriptions.
23_WS_OM_EN_USC_t.book Page 232
Page 238 of 396
236MULTIMEDIA
OFF-ROAD PAGES — IF EQUIPPED
Your vehicle may be equipped with Off-Road Pages, which
provides the vehicle status information while operating on
off-road conditions. It supplies information relating to the
vehicle ride height, the status of the transfer case, the
pitch and roll of the vehicle, and the active Selec-Terrain
Mode.
To access Off-Road Pages, press the Off Road button on
the touchscreen from the Vehicle menu, and then press
“Launch Off-Road”.
Off-Road Pages has the following selectable pages:
Vehicle Dynamics
Accessory Gauges
Pitch & Roll
Selec-Terrain — If Equipped
Suspension — If Equipped
NOTE:With a Connected Services subscription, you can record
your Off-Road data and send it directly to the mobile app.
Press the Record button to begin.
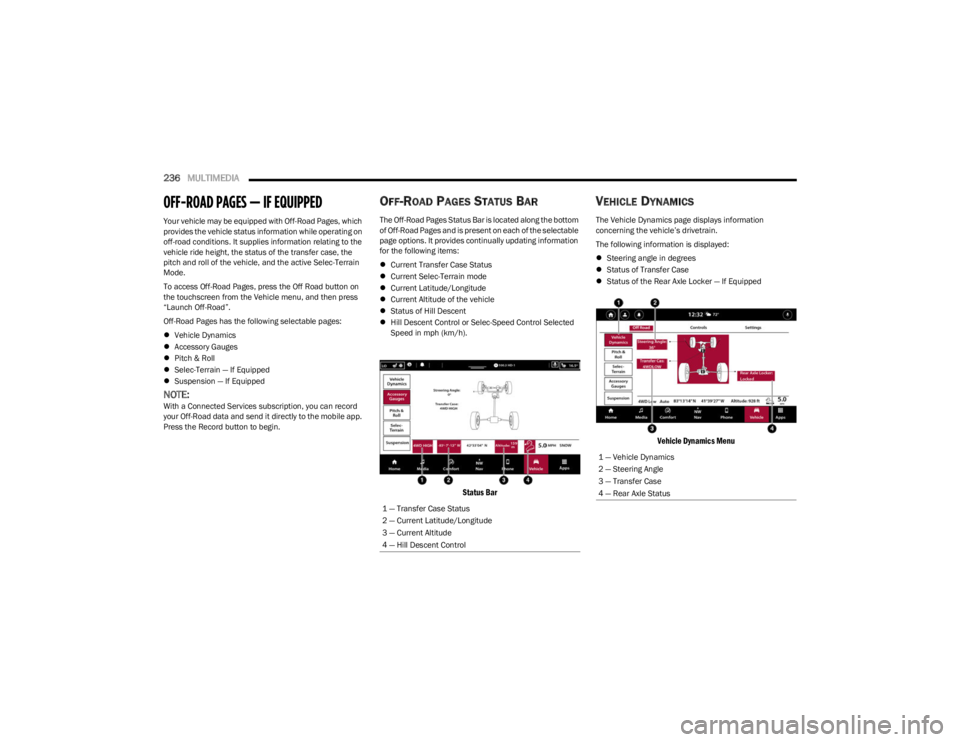
OFF-ROAD PAGES STATUS BAR
The Off-Road Pages Status Bar is located along the bottom
of Off-Road Pages and is present on each of the selectable
page options. It provides continually updating information
for the following items:
Current Transfer Case Status
Current Selec-Terrain mode
Current Latitude/Longitude
Current Altitude of the vehicle
Status of Hill Descent
Hill Descent Control or Selec-Speed Control Selected
Speed in mph (km/h).
Status Bar
VEHICLE DYNAMICS
The Vehicle Dynamics page displays information
concerning the vehicle’s drivetrain.
The following information is displayed:
Steering angle in degrees
Status of Transfer Case
Status of the Rear Axle Locker — If Equipped
Vehicle Dynamics Menu
1 — Transfer Case Status
2 — Current Latitude/Longitude
3 — Current Altitude
4 — Hill Descent Control
1 — Vehicle Dynamics
2 — Steering Angle
3 — Transfer Case
4 — Rear Axle Status
23_WS_OM_EN_USC_t.book Page 236
Page 239 of 396
MULTIMEDIA237
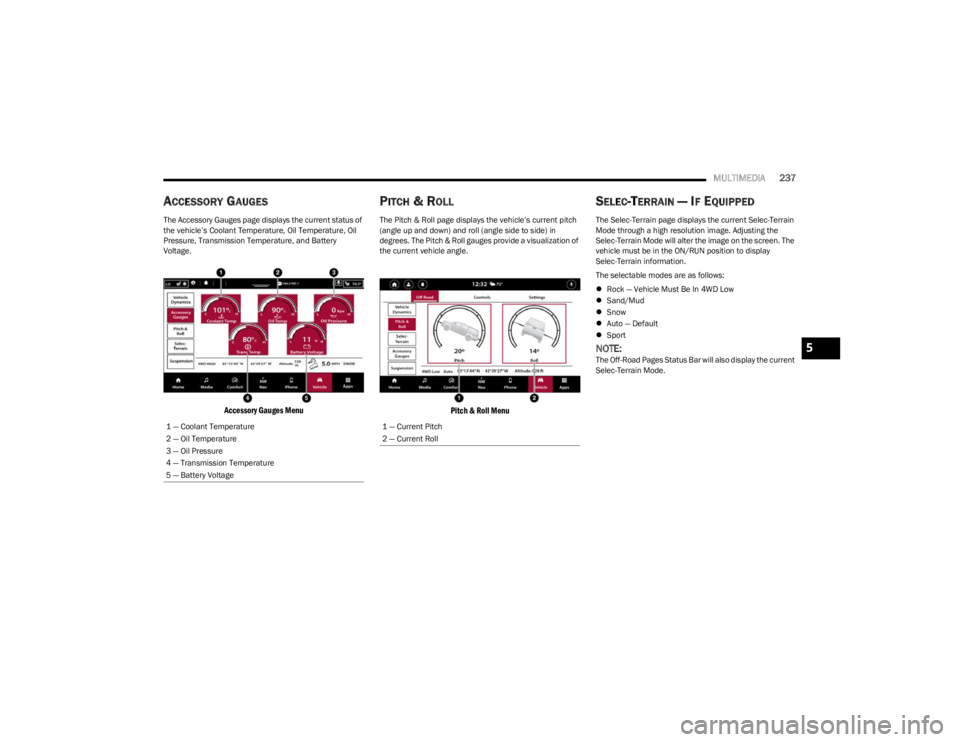
ACCESSORY GAUGES
The Accessory Gauges page displays the current status of
the vehicle’s Coolant Temperature, Oil Temperature, Oil
Pressure, Transmission Temperature, and Battery
Voltage.
Accessory Gauges Menu
PITCH & ROLL
The Pitch & Roll page displays the vehicle’s current pitch
(angle up and down) and roll (angle side to side) in
degrees. The Pitch & Roll gauges provide a visualization of
the current vehicle angle.
Pitch & Roll Menu
SELEC-TERRAIN — IF EQUIPPED
The Selec-Terrain page displays the current Selec-Terrain
Mode through a high resolution image. Adjusting the
Selec-Terrain Mode will alter the image on the screen. The
vehicle must be in the ON/RUN position to display
Selec-Terrain information.
The selectable modes are as follows:
Rock — Vehicle Must Be In 4WD Low
Sand/Mud
Snow
Auto — Default
Sport
NOTE:The Off-Road Pages Status Bar will also display the current
Selec-Terrain Mode.
1 — Coolant Temperature
2 — Oil Temperature
3 — Oil Pressure
4 — Transmission Temperature
5 — Battery Voltage
1 — Current Pitch
2 — Current Roll
5
23_WS_OM_EN_USC_t.book Page 237
Page 240 of 396
238MULTIMEDIA
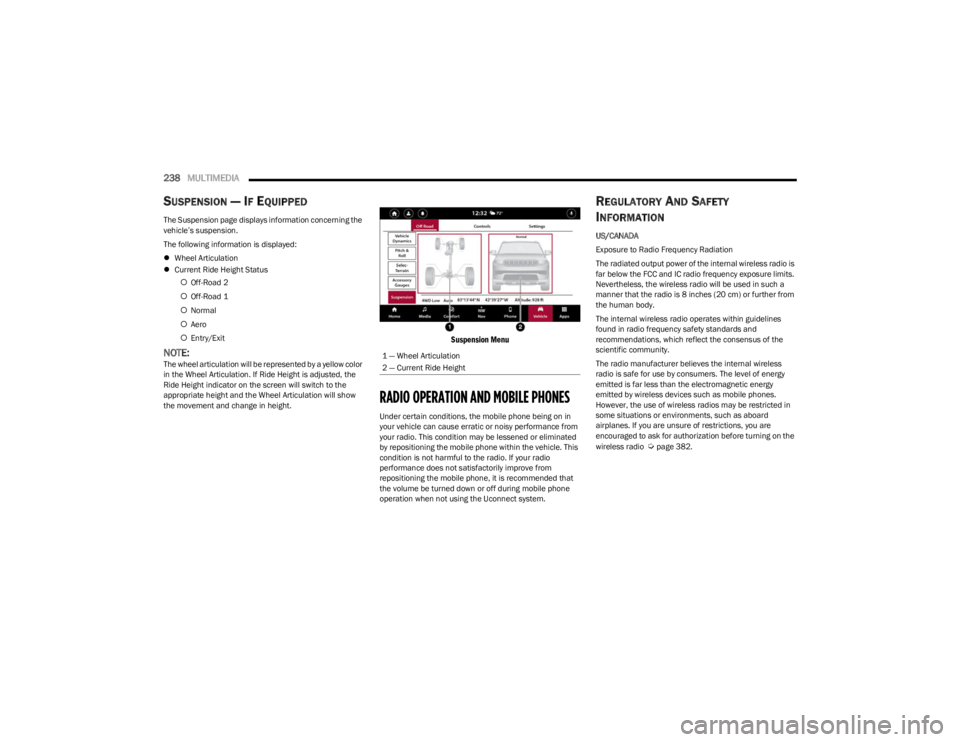
SUSPENSION — IF EQUIPPED
The Suspension page displays information concerning the
vehicle’s suspension.
The following information is displayed:
Wheel Articulation
Current Ride Height Status
Off-Road 2
Off-Road 1
Normal
Aero
Entry/Exit
NOTE:The wheel articulation will be represented by a yellow color
in the Wheel Articulation. If Ride Height is adjusted, the
Ride Height indicator on the screen will switch to the
appropriate height and the Wheel Articulation will show
the movement and change in height.
Suspension Menu
RADIO OPERATION AND MOBILE PHONES
Under certain conditions, the mobile phone being on in
your vehicle can cause erratic or noisy performance from
your radio. This condition may be lessened or eliminated
by repositioning the mobile phone within the vehicle. This
condition is not harmful to the radio. If your radio
performance does not satisfactorily improve from
repositioning the mobile phone, it is recommended that
the volume be turned down or off during mobile phone
operation when not using the Uconnect system.
REGULATORY AND SAFETY
I
NFORMATION
US/CANADA
Exposure to Radio Frequency Radiation
The radiated output power of the internal wireless radio is
far below the FCC and IC radio frequency exposure limits.
Nevertheless, the wireless radio will be used in such a
manner that the radio is 8 inches (20 cm) or further from
the human body.
The internal wireless radio operates within guidelines
found in radio frequency safety standards and
recommendations, which reflect the consensus of the
scientific community.
The radio manufacturer believes the internal wireless
radio is safe for use by consumers. The level of energy
emitted is far less than the electromagnetic energy
emitted by wireless devices such as mobile phones.
However, the use of wireless radios may be restricted in
some situations or environments, such as aboard
airplanes. If you are unsure of restrictions, you are
encouraged to ask for authorization before turning on the
wireless radio
Úpage 382.
1 — Wheel Articulation
2 — Current Ride Height
23_WS_OM_EN_USC_t.book Page 238
Page 242 of 396
240SAFETY
REAR SEAT REMINDER ALERT (RSRA)
RSRA alerts you of the possible presence of an object,
passenger, or pet in the rear seats through a visual and
auditory notification. The system will activate
automatically if a rear door was opened within 10 minutes
of the ignition being placed in the ON/RUN position. RSRA
does not directly detect objects, passengers, or pets in the
rear seats. When the previous conditions are met, RSRA
displays the message “Check Rear Seat” on the
instrument cluster display and sounds an auditory alert
upon the driver placing the ignition in the OFF position to
exit the vehicle.
To enable or disable RSRA, see
Úpage 197.
DROWSY DRIVER DETECTION (DDD) —
I
F EQUIPPED
DDD detects when the driver is feeling fatigued and warns
the driver to pull over and take a break.
To Activate/Deactivate
DDD can be activated and deactivated through the
Uconnect system by selecting the following in order:
1. “Safety & Driving Assistance”
2. “Drowsy Driver Detection”
System Intervention
Using feedback obtained from the driver’s steering
patterns, any buttons/switches that are pressed, and from
the front camera, the system implements two operating
logics:
The first operating logic takes the driving style into
account, observing the road and detecting to what
extent the driver can continue driving with few lane
crossing events.
The second operating logic measures the time spent
behind the wheel with the vehicle speed above 40 mph
(60 km/h) and below 100 mph (160 km/h).
If the driving style indicates that the driver is unable to
follow the road trajectory and respect the horizontal lane
markings while within the operating speed range of the
system, a pop up will display on the instrument cluster
display to suggest that the driver should stop for a break.
An audible signal will also sound.
If the driver accepts the suggestion provided by the
system by pushing the “OK” button on the left side of the
steering wheel, the message will disappear from the
display.
If the driver does not acknowledge the warning it will be
displayed for 60 seconds and then disappear.
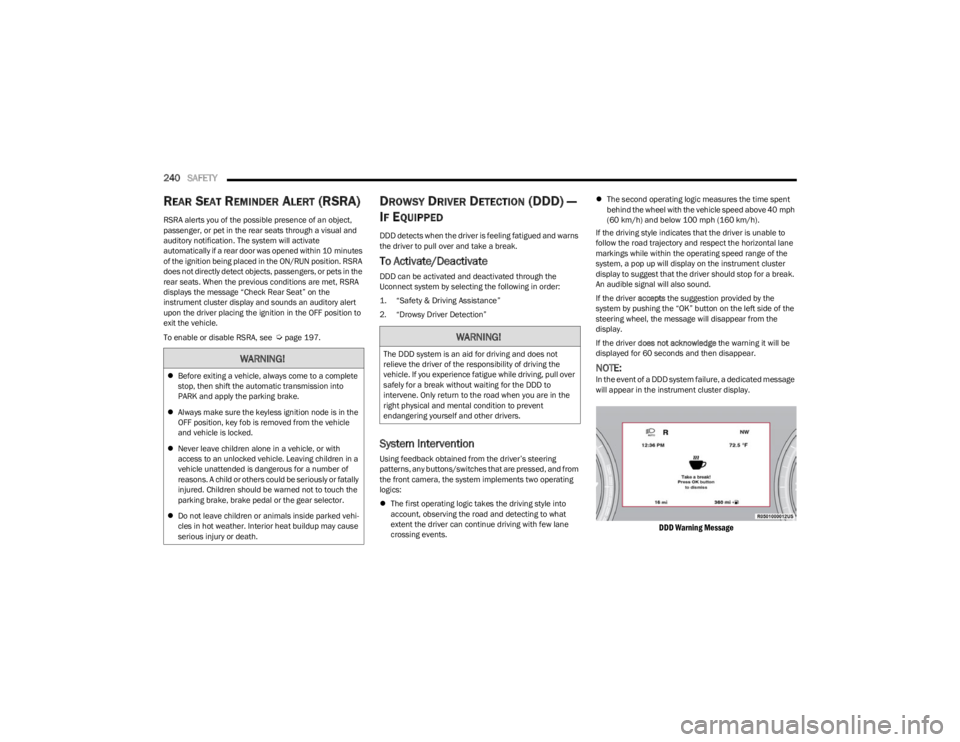
NOTE:In the event of a DDD system failure, a dedicated message
will appear in the instrument cluster display.
DDD Warning Message
WARNING!
Before exiting a vehicle, always come to a complete
stop, then shift the automatic transmission into
PARK and apply the parking brake.
Always make sure the keyless ignition node is in the
OFF position, key fob is removed from the vehicle
and vehicle is locked.
Never leave children alone in a vehicle, or with
access to an unlocked vehicle. Leaving children in a
vehicle unattended is dangerous for a number of
reasons. A child or others could be seriously or fatally
injured. Children should be warned not to touch the
parking brake, brake pedal or the gear selector.
Do not leave children or animals inside parked vehi -
cles in hot weather. Interior heat buildup may cause
serious injury or death.
WARNING!
The DDD system is an aid for driving and does not
relieve the driver of the responsibility of driving the
vehicle. If you experience fatigue while driving, pull over
safely for a break without waiting for the DDD to
intervene. Only return to the road when you are in the
right physical and mental condition to prevent
endangering yourself and other drivers.
23_WS_OM_EN_USC_t.book Page 240
Page 247 of 396
SAFETY245
Disabling And Enabling HSA
This feature can be turned on or turned off. To change the
current setting, proceed as follows:
If disabling HSA using your instrument cluster display,
see
Úpage 99 for further information.
If disabling HSA using Uconnect Settings, see
Úpage 197 for further information.
Towing With HSA
HSA will also provide assistance to mitigate roll back while
towing a trailer.
Rain Brake Support (RBS)
RBS may improve braking performance in wet conditions.
It will periodically apply a small amount of brake pressure
to remove any water buildup on the front brake rotors. It
functions when the windshield wipers are in LO or HI
speed. When RBS is active, there is no notification to the
driver and no driver interaction is required.
Ready Alert Braking (RAB)
RAB may reduce the time required to reach full braking
during emergency braking situations. It anticipates when
an emergency braking situation may occur by monitoring
how fast the throttle is released by the driver. The
Electronic Brake Controller (EBC) will prepare the brake
system for a panic stop.
Selec-Speed Control (SSC) — If Equipped
Selec-Speed Control (SSC) is intended for
off-road driving in 4WD Low only. SSC
maintains vehicle speed by actively controlling
engine torque and brakes.
SSC has three states:
1. Off (feature is not enabled and will not activate)
2. Enabled (feature is enabled and ready but activation conditions are not met, or driver is actively overriding
with brake or throttle application)
3. Active (feature is enabled and actively controlling vehicle speed)
Enabling SSC
SSC is enabled by pushing the SSC switch, but the
following conditions must also be met to enable SSC:
The driveline is in 4WD Low.
The vehicle speed is below 5 mph (8 km/h).
The parking brake is released.
The driver door is closed.
The driver is not applying throttle.
Activating SSC
Once SSC is enabled it will activate automatically once the
following conditions are met:
Driver releases throttle.
Driver releases brake.
Transmission is in any selection other than PARK.
Vehicle speed is below 20 mph (32 km/h).WARNING!
There may be situations where the Hill Start Assist
(HSA) will not activate and slight rolling may occur, such
as on minor hills or with a loaded vehicle, or while
pulling a trailer. HSA is not a substitute for active driving
involvement. It is always the driver’s responsibility to be
attentive to distance to other vehicles, people, and
objects, and most importantly brake operation to
ensure safe operation of the vehicle under all road
conditions. Your complete attention is always required
while driving to maintain safe control of your vehicle.
Failure to follow these warnings can result in a collision
or serious personal injury.
WARNING!
If you use a trailer brake controller with your trailer,
the trailer brakes may be activated and deactivated
with the brake switch. If so, there may not be enough
brake pressure to hold both the vehicle and the
trailer on a hill when the brake pedal is released. In
order to avoid rolling down an incline while resuming
acceleration, manually activate the trailer brake or
apply more vehicle brake pressure prior to releasing
the brake pedal.
HSA is not a parking brake. Always apply the parking
brake fully when exiting your vehicle. Also, be certain
to place the transmission in PARK.
Failure to follow these warnings can result in a colli -
sion or serious personal injury.
6
23_WS_OM_EN_USC_t.book Page 245
Page 249 of 396
SAFETY247
Trailer Sway Control (TSC)
TSC uses sensors in the vehicle to recognize an
excessively swaying trailer and will take the appropriate
actions to attempt to stop the sway. TSC will become
active automatically once an excessively swaying trailer is
recognized.
NOTE:TSC cannot stop all trailers from swaying. Always use
caution when towing a trailer and follow the trailer tongue
weight recommendations
Úpage 178.
When TSC is functioning, the ESC Activation/Malfunction
Indicator Light will flash, the engine power may be reduced
and you may feel the brakes being applied to individual
wheels to attempt to stop the trailer from swaying. TSC is
disabled when the ESC system is in the “Partial Off” mode.
AUXILIARY DRIVING SYSTEMS
BLIND SPOT MONITORING (BSM)
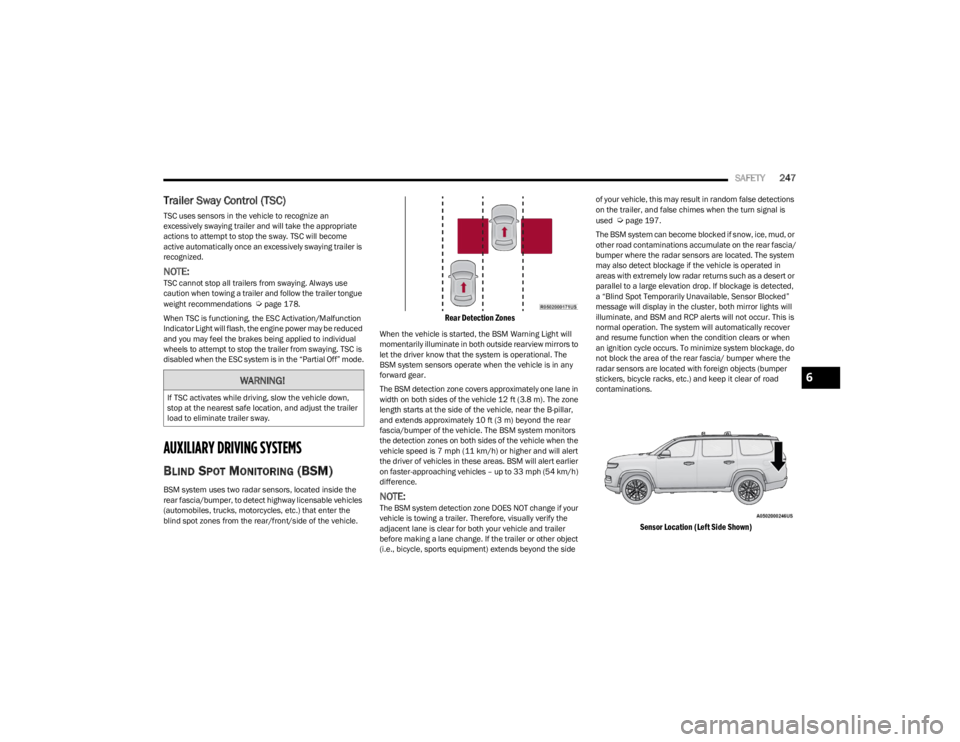
BSM system uses two radar sensors, located inside the
rear fascia/bumper, to detect highway licensable vehicles
(automobiles, trucks, motorcycles, etc.) that enter the
blind spot zones from the rear/front/side of the vehicle.
Rear Detection Zones
When the vehicle is started, the BSM Warning Light will
momentarily illuminate in both outside rearview mirrors to
let the driver know that the system is operational. The
BSM system sensors operate when the vehicle is in any
forward gear.
The BSM detection zone covers approximately one lane in
width on both sides of the vehicle 12 ft (3.8 m). The zone
length starts at the side of the vehicle, near the B-pillar,
and extends approximately 10 ft (3 m) beyond the rear
fascia/bumper of the vehicle. The BSM system monitors
the detection zones on both sides of the vehicle when the
vehicle speed is 7 mph (11 km/h) or higher and will alert
the driver of vehicles in these areas. BSM will alert earlier
on faster-approaching vehicles – up to 33 mph (54 km/h)
difference.
NOTE:The BSM system detection zone DOES NOT change if your
vehicle is towing a trailer. Therefore, visually verify the
adjacent lane is clear for both your vehicle and trailer
before making a lane change. If the trailer or other object
(i.e., bicycle, sports equipment) extends beyond the side of your vehicle, this may result in random false detections
on the trailer, and false chimes when the turn signal is
used
Úpage 197.
The BSM system can become blocked if snow, ice, mud, or
other road contaminations accumulate on the rear fascia/
bumper where the radar sensors are located. The system
may also detect blockage if the vehicle is operated in
areas with extremely low radar returns such as a desert or
parallel to a large elevation drop. If blockage is detected,
a “Blind Spot Temporarily Unavailable, Sensor Blocked”
message will display in the cluster, both mirror lights will
illuminate, and BSM and RCP alerts will not occur. This is
normal operation. The system will automatically recover
and resume function when the condition clears or when
an ignition cycle occurs. To minimize system blockage, do
not block the area of the rear fascia/ bumper where the
radar sensors are located with foreign objects (bumper
stickers, bicycle racks, etc.) and keep it clear of road
contaminations.
Sensor Location (Left Side Shown)
WARNING!
If TSC activates while driving, slow the vehicle down,
stop at the nearest safe location, and adjust the trailer
load to eliminate trailer sway.
6
23_WS_OM_EN_USC_t.book Page 247
Page 252 of 396
250SAFETY
Blind Spot Alert Lights/Chime
When operating in Blind Spot Alert Lights/Chime mode,
the BSM system will provide a visual alert in the
appropriate side view mirror based on a detected object.
If the turn signal is then activated, and it corresponds to
an alert present on that side of the vehicle, an audible
chime will also be sounded. Whenever a turn signal and
detected object are present on the same side at the same
time, both the visual and audible alerts will be issued. In
addition to the audible alert the radio (if on) will also be
muted.
NOTE:Whenever an audible alert is requested by the BSM
system, the radio is also muted.
When the system is in RCP, the system shall respond with
both visual and audible alerts when a detected object is
present. Whenever an audible alert is requested, the radio
is also muted. Turn/hazard signal status is ignored; the
RCP state always requests the chime.
Blind Spot Alert Off
When the BSM system is turned off, there will be no visual
or audible alerts from either the BSM or RCP systems.
NOTE:The BSM system will store the current operating mode
when the vehicle is shut off. Each time the vehicle is
started, the previously stored mode will be recalled and
used.
FORWARD COLLISION WARNING (FCW)
W
ITH MITIGATION
FCW with Mitigation system provides the driver with
audible warnings, visual warnings (within the instrument
cluster display), and may apply a brake jerk to warn the
driver when it detects a potential frontal collision. The
warnings and limited braking are intended to provide the
driver with enough time to react, avoid or mitigate the
potential collision.
NOTE:FCW monitors the information from the forward looking
sensors as well as the Electronic Brake Controller (EBC), to
calculate the probability of a forward collision. When the
system determines that a forward collision is probable, the
driver will be provided with audible and visual warnings
and may provide a brake jerk warning. If the driver does
not take action based upon these progressive warnings,
then the system will provide a limited level of active
braking to help slow the vehicle and mitigate the potential
forward collision. If the driver reacts to the warnings by
braking and the system determines that the driver intends
to avoid the collision by braking but has not applied suffi -
cient brake force, the system will compensate and provide
additional brake force as required.
If a Forward Collision Warning with Mitigation event begins
at a speed below 39 mph (62 km/h), the system may provide the maximum or partial braking to mitigate the
potential forward collision. If the Forward Collision
Warning with Mitigation event stops the vehicle
completely, the system will hold the vehicle at a standstill
for two seconds and then release the brakes.
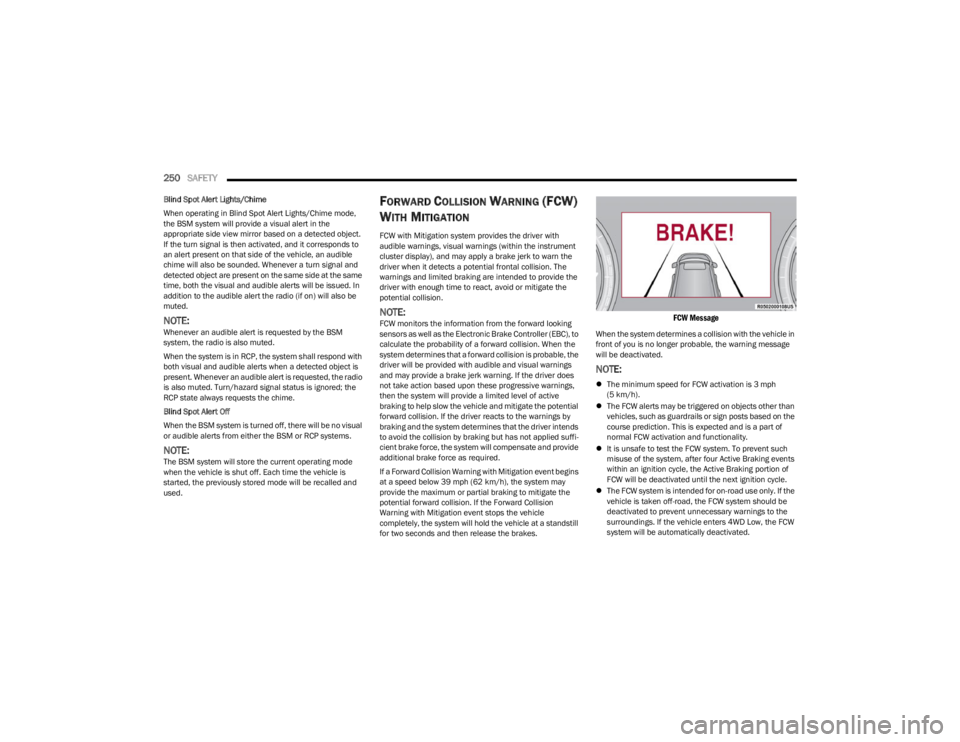
FCW Message
When the system determines a collision with the vehicle in
front of you is no longer probable, the warning message
will be deactivated.
NOTE:
The minimum speed for FCW activation is 3 mph
(5 km/h).
The FCW alerts may be triggered on objects other than
vehicles, such as guardrails or sign posts based on the
course prediction. This is expected and is a part of
normal FCW activation and functionality.
It is unsafe to test the FCW system. To prevent such
misuse of the system, after four Active Braking events
within an ignition cycle, the Active Braking portion of
FCW will be deactivated until the next ignition cycle.
The FCW system is intended for on-road use only. If the
vehicle is taken off-road, the FCW system should be
deactivated to prevent unnecessary warnings to the
surroundings. If the vehicle enters 4WD Low, the FCW
system will be automatically deactivated.
23_WS_OM_EN_USC_t.book Page 250
Page 253 of 396
SAFETY251
FCW Braking Status And Sensitivity
The FCW Sensitivity and Active Braking status are
programmable through the Uconnect system
Úpage 197.
The default sensitivity of FCW is the “Medium” setting and
the system status is “Warning & Braking”. This allows the
system to warn the driver of a possible collision with the
vehicle in front using audible/visual warnings and it
applies autonomous braking.
Changing the FCW status to the “Far” setting allows the
system to warn the driver of a possible collision with the
vehicle in front using an audible/visual warning when the
latter is at a farther distance than “Medium” setting. This
provides the most reaction time to avoid a possible
collision.
NOTE:The “Far” setting may result in a greater number of FCW
possible collision warnings experienced. Changing the FCW status to the “Near” setting allows the
system to warn the driver of a possible collision with the
vehicle in front when the distance between the vehicle in
the front is much closer. This setting provides less reaction
time than the “Far” and “Medium” settings, which allows
for a more dynamic driving experience.
NOTE:The “Near” setting may result in a lesser number of
FCW possible collision warnings experienced.
NOTE:
Changing the FCW status to “Only Warning” prevents
the system from providing limited active braking, or
additional brake support if the driver is not braking
adequately in the event of a potential frontal collision,
but maintains the audible and visual warnings.
Changing the FCW status to “Off” prevents the system
from providing autonomous braking, or additional
brake support if the driver is not braking adequately in
the event of a potential frontal collision.
The system will retain the last setting selected by the
driver after ignition shut down.
FCW may not react to irrelevant objects such as over -
head objects, ground reflections, objects not in the
path of the vehicle, stationary objects that are far away,
oncoming traffic, or leading vehicles with the same or
higher rate of speed.
FCW will be disabled like ACC, with the unavailable
screens.
FCW Limited Warning
If the instrument cluster displays “ACC/FCW Limited
Functionality” or “ACC/FCW Limited Functionality Clean
Front Windshield” momentarily, there may be a condition
that limits FCW functionality. Although the vehicle is still
drivable under normal conditions, the active braking may
not be fully available. Once the condition that limited the
system performance is no longer present, the system will
return to its full performance state. If the problem persists,
see an authorized dealer.
Service FCW Warning
If the system turns off, and the instrument cluster
displays:
ACC/FCW Unavailable Service Required
Cruise/FCW Unavailable Service Required
This indicates there is an internal system fault. Although
the vehicle is still drivable under normal conditions, have
the system checked by an authorized dealer.
WARNING!
Forward Collision Warning (FCW) is not intended to
avoid a collision on its own, nor can FCW detect every
type of potential collision. The driver has the
responsibility to avoid a collision by controlling the
vehicle via braking and steering. Failure to follow this
warning could lead to serious injury or death.
6
23_WS_OM_EN_USC_t.book Page 251