display JEEP WAGONEER 2023 Owners Manual
[x] Cancel search | Manufacturer: JEEP, Model Year: 2023, Model line: WAGONEER, Model: JEEP WAGONEER 2023Pages: 396, PDF Size: 15.17 MB
Page 254 of 396
252SAFETY
Pedestrian Emergency Braking (PEB)
PEB is a subsystem of the Forward Collision Warning
(FCW) system which provides the driver with audible
warnings and visual warnings, in the instrument cluster
display. It may apply limited automatic braking when it
detects a potential frontal collision with a pedestrian/
cyclist.
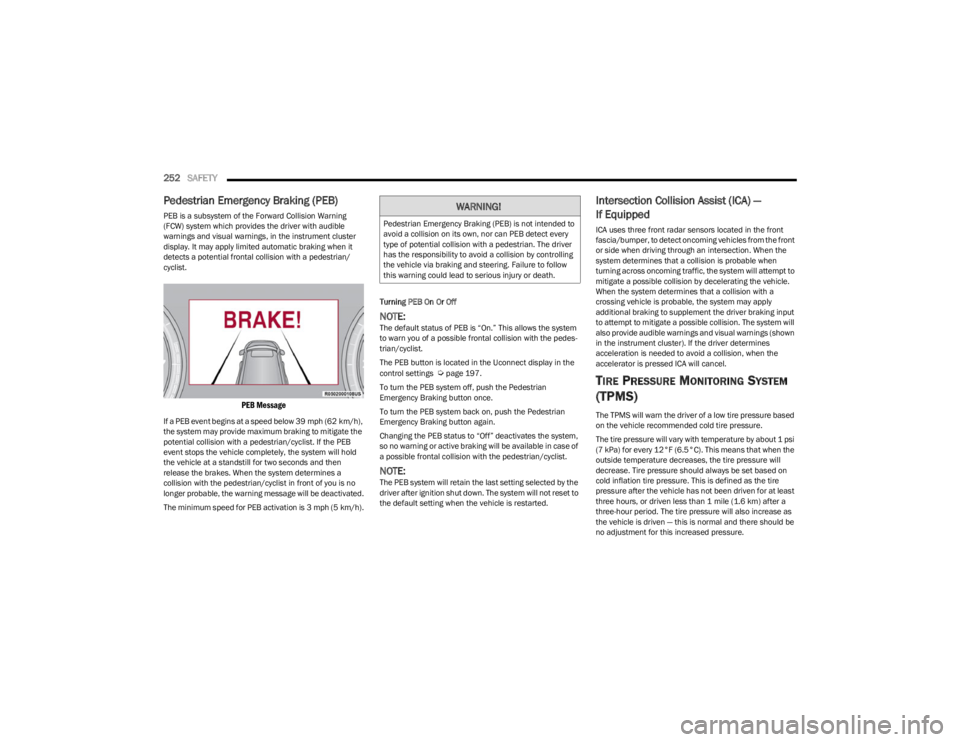
PEB Message
If a PEB event begins at a speed below 39 mph (62 km/h),
the system may provide maximum braking to mitigate the
potential collision with a pedestrian/cyclist. If the PEB
event stops the vehicle completely, the system will hold
the vehicle at a standstill for two seconds and then
release the brakes. When the system determines a
collision with the pedestrian/cyclist in front of you is no
longer probable, the warning message will be deactivated.
The minimum speed for PEB activation is 3 mph (5 km/h). Turning PEB On Or Off
NOTE:The default status of PEB is “On.” This allows the system
to warn you of a possible frontal collision with the pedes
-
trian/cyclist.
The PEB button is located in the Uconnect display in the
control settings
Úpage 197.
To turn the PEB system off, push the Pedestrian
Emergency Braking button once.
To turn the PEB system back on, push the Pedestrian
Emergency Braking button again.
Changing the PEB status to “Off” deactivates the system,
so no warning or active braking will be available in case of
a possible frontal collision with the pedestrian/cyclist.
NOTE:The PEB system will retain the last setting selected by the
driver after ignition shut down. The system will not reset to
the default setting when the vehicle is restarted.
Intersection Collision Assist (ICA) —
If Equipped
ICA uses three front radar sensors located in the front
fascia/bumper, to detect oncoming vehicles from the front
or side when driving through an intersection. When the
system determines that a collision is probable when
turning across oncoming traffic, the system will attempt to
mitigate a possible collision by decelerating the vehicle.
When the system determines that a collision with a
crossing vehicle is probable, the system may apply
additional braking to supplement the driver braking input
to attempt to mitigate a possible collision. The system will
also provide audible warnings and visual warnings (shown
in the instrument cluster). If the driver determines
acceleration is needed to avoid a collision, when the
accelerator is pressed ICA will cancel.
TIRE PRESSURE MONITORING SYSTEM
(TPMS)
The TPMS will warn the driver of a low tire pressure based
on the vehicle recommended cold tire pressure.
The tire pressure will vary with temperature by about 1 psi
(7 kPa) for every 12°F (6.5°C). This means that when the
outside temperature decreases, the tire pressure will
decrease. Tire pressure should always be set based on
cold inflation tire pressure. This is defined as the tire
pressure after the vehicle has not been driven for at least
three hours, or driven less than 1 mile (1.6 km) after a
three-hour period. The tire pressure will also increase as
the vehicle is driven — this is normal and there should be
no adjustment for this increased pressure.
WARNING!
Pedestrian Emergency Braking (PEB) is not intended to
avoid a collision on its own, nor can PEB detect every
type of potential collision with a pedestrian. The driver
has the responsibility to avoid a collision by controlling
the vehicle via braking and steering. Failure to follow
this warning could lead to serious injury or death.
23_WS_OM_EN_USC_t.book Page 252
Page 256 of 396
254SAFETY
The Tire Pressure Monitoring System (TPMS) uses wireless
technology with wheel rim-mounted electronic sensors to
monitor tire pressure levels. Sensors, mounted to each
wheel as part of the valve stem, transmit tire pressure
readings to the receiver module.
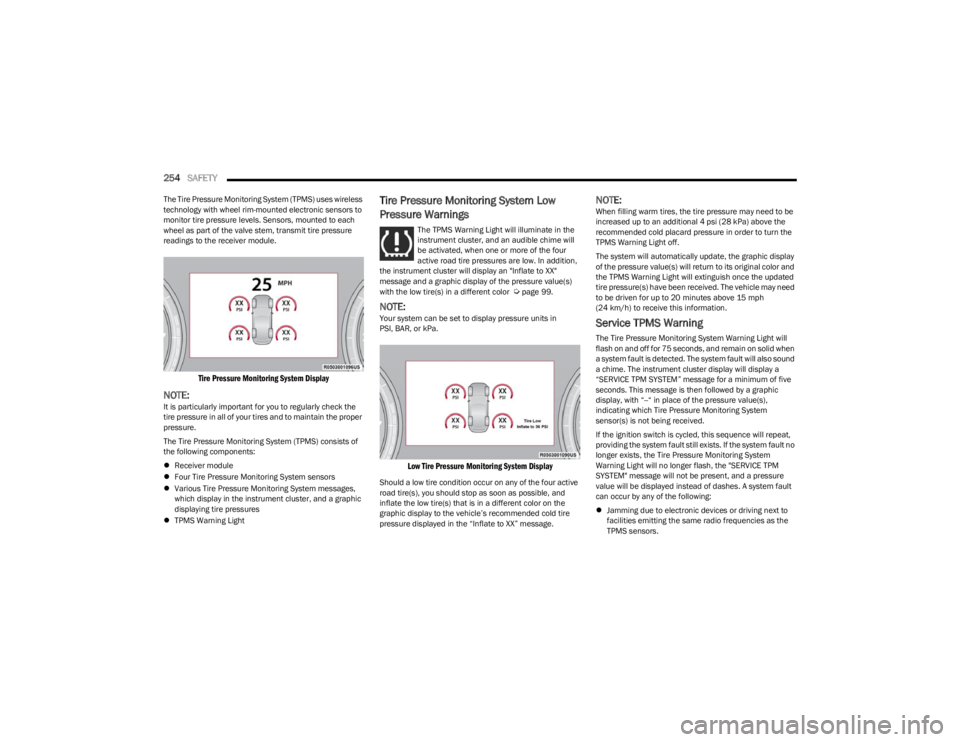
Tire Pressure Monitoring System Display
NOTE:It is particularly important for you to regularly check the
tire pressure in all of your tires and to maintain the proper
pressure.
The Tire Pressure Monitoring System (TPMS) consists of
the following components:
Receiver module
Four Tire Pressure Monitoring System sensors
Various Tire Pressure Monitoring System messages,
which display in the instrument cluster, and a graphic
displaying tire pressures
TPMS Warning Light
Tire Pressure Monitoring System Low
Pressure Warnings
The TPMS Warning Light will illuminate in the
instrument cluster, and an audible chime will
be activated, when one or more of the four
active road tire pressures are low. In addition,
the instrument cluster will display an "Inflate to XX"
message and a graphic display of the pressure value(s)
with the low tire(s) in a different color
Úpage 99.
NOTE:Your system can be set to display pressure units in
PSI, BAR, or kPa.
Low Tire Pressure Monitoring System Display
Should a low tire condition occur on any of the four active
road tire(s), you should stop as soon as possible, and
inflate the low tire(s) that is in a different color on the
graphic display to the vehicle’s recommended cold tire
pressure displayed in the “Inflate to XX” message.
NOTE:When filling warm tires, the tire pressure may need to be
increased up to an additional 4 psi (28 kPa) above the
recommended cold placard pressure in order to turn the
TPMS Warning Light off.
The system will automatically update, the graphic display
of the pressure value(s) will return to its original color and
the TPMS Warning Light will extinguish once the updated
tire pressure(s) have been received. The vehicle may need
to be driven for up to 20 minutes above 15 mph (24 km/h) to receive this information.
Service TPMS Warning
The Tire Pressure Monitoring System Warning Light will
flash on and off for 75 seconds, and remain on solid when
a system fault is detected. The system fault will also sound
a chime. The instrument cluster display will display a
“SERVICE TPM SYSTEM” message for a minimum of five
seconds. This message is then followed by a graphic
display, with “--“ in place of the pressure value(s),
indicating which Tire Pressure Monitoring System
sensor(s) is not being received.
If the ignition switch is cycled, this sequence will repeat,
providing the system fault still exists. If the system fault no
longer exists, the Tire Pressure Monitoring System
Warning Light will no longer flash, the "SERVICE TPM
SYSTEM" message will not be present, and a pressure
value will be displayed instead of dashes. A system fault
can occur by any of the following:
Jamming due to electronic devices or driving next to
facilities emitting the same radio frequencies as the
TPMS sensors.
23_WS_OM_EN_USC_t.book Page 254
Page 257 of 396

SAFETY255
Lots of snow or ice around the wheels or wheel
housings.
Using tire chains on the vehicle.
Using wheels/tires not equipped with TPMS sensors.
NOTE:There is no Tire Pressure Monitoring System sensor in the
spare tire. The TPMS will not be able to monitor the tire
pressure. If you install the spare tire in place of a road tire
that has a pressure below the low-pressure warning limit,
upon the next ignition switch cycle, the Tire Pressure Moni -
toring System Warning Light will remain on, a chime will
sound, and the instrument cluster display will still display
a pressure value in the different color graphic display and
an “Inflate to XX” message will be displayed. After driving
the vehicle for up to 20 minutes above 15 mph (24 km/h),
the Tire Pressure Monitoring System Warning Light will
flash on and off for 75 seconds and then remain on solid.
In addition, the instrument cluster display will display a
“SERVICE TPM SYSTEM" message for five seconds and
then display dashes (--) in place of the pressure value. For
each subsequent ignition switch cycle, a chime will sound,
the Tire Pressure Monitoring System Warning Light will
flash on and off for 75 seconds and then remain on solid,
and the instrument cluster display will display a "SERVICE
TPM SYSTEM" message for five seconds and then display
dashes (--) in place of the pressure value. Once you repair
or replace the original road tire, and reinstall it on the
vehicle in place of the spare tire, the TPMS will update
automatically.
In addition, the Tire Pressure Monitoring System Warning
Light will turn off and the graphic in the instrument cluster
display will display a new pressure value instead of
dashes (--), as long as no tire pressure is below the low-pressure warning limit in any of the four active road
tires. The vehicle may need to be driven for up to
20 minutes above 15 mph (24 km/h) in order for the
TPMS to receive this information.TPMS Deactivation — If Equipped
The Tire Pressure Monitoring System (TPMS) can be
deactivated if replacing all four wheel and tire assemblies
(road tires) with wheel and tire assemblies that do not
have TPMS sensors, such as when installing winter wheel
and tire assemblies on your vehicle.
To deactivate the TPMS, first, replace all four wheel and
tire assemblies (road tires) with tires not equipped with
Tire Pressure Monitoring System sensors. Then, drive the
vehicle for 20 minutes above 15 mph (24 km/h). The TPMS will chime, the TPMS Warning Light will flash on and
off for 75 seconds and then remain on. The instrument
cluster will display the “SERVICE TPM SYSTEM” message
and then display dashes (--) in place of the pressure
values.
Beginning with the next ignition cycle, the TPMS will no
longer chime or display the “SERVICE TPM SYSTEM”
message in the instrument cluster but dashes (--) will
remain in place of the pressure values.
To reactivate the TPMS, replace all four wheel and tire
assemblies (road tires) with tires equipped with TPMS
sensors. Then, drive the vehicle for up to 20 minutes
above 15 mph (24 km/h). The TPMS will chime, the TPMS
Warning Light will flash on and off for 75 seconds and then
turn off. The instrument cluster will display the “SERVICE
TPM SYSTEM” message and then display pressure values
in place of the dashes. On the next ignition cycle the
"SERVICE TPM SYSTEM" message will no longer be
displayed as long as no system fault exists.
Tire Fill Alert
This feature notifies the user when the placard tire
pressure is attained while inflating or deflating the tire.
The customer may choose to disable or enable the Tire Fill
Alert feature in the apps menu of the Uconnect system.
NOTE:
The Tire Fill Alert system will only support inflating or
deflating one tire at a time. The user is required to wait
until the hazard lights STOP flashing or 26-30 seconds
after the desired pressure is achieved in one wheel
before switching to another.
The Tire Fill Alert feature cannot be entered if an
existing TPMS fault is set to “active” or if the system is
in deactivation mode (if equipped).
The system will be activated when the system detects an
increase in tire pressure while filling the tire. The ignition
must be in the ON/RUN mode with the transmission in
PARK.
NOTE:It is not required to have the engine running to enter Tire
Fill Alert mode.
The hazard lights will come on to confirm the vehicle is in
Tire Fill Alert mode. If the hazard lights do not come on
while inflating the tire, the Tire Pressure Monitoring
System sensor may be in an inoperative position,
preventing the TPMS sensor signal from being received. In
this case, the vehicle may need to be moved slightly
forward or backward.
6
23_WS_OM_EN_USC_t.book Page 255
Page 258 of 396

256SAFETY
When Tire Fill Alert mode is entered, the tire pressure
display screen will be displayed in the instrument cluster.
Operation:
The horn will chirp once to let the user know when to
stop filling the tire, when it reaches recommended
pressure.
The horn will chirp three times if the tire is overfilled
and will continue to chirp every five seconds if the user
continues to inflate the tire.
The horn will chirp once again when enough air is let
out to reach proper inflation level.
The horn will also chirp three times if the tire is then
underinflated and will continue to chirp every five
seconds if the user continues to deflate the tire.
Selectable Tire Fill Alert (STFA) —
If Equipped
The Selectable Tire Fill Alert (STFA) system is an optional
feature that is included as part of the normal Tire Fill Alert
system. The system is designed to allow you to select a
pressure to inflate or deflate the vehicle's front and rear
axle tires to, and to provide feedback while inflating or
deflating the vehicle's tires.
In the Selectable Tire Fill Alert application, which is located
in the apps menu of the Uconnect system, you will be able
to select a pressure setting for both the front and rear axle
tire pressures by scrolling through a pressure range from
greater than or equal to 15 psi to XX psi in 1 psi
increments for each axle setting.
XX = the vehicle's cold placard pressure values for the
front and rear axles as shown on the vehicle placard
pressure label. You may also store pressure values chosen for each axle
in the Uconnect system application as preset pressure
values. Up to two sets of preset pressure values can be
stored in the Uconnect system for the front and rear axle.
Once you select the tire pressures for the front and rear
axles that you want to inflate or deflate to, you can begin
inflating or deflating one tire at a time.
NOTE:The STFA system will only support inflating or deflating one
tire at a time. The user is required to wait until the hazard
lights STOP flashing or 26-30 seconds after the desired
pressure is achieved in one wheel, before switching to
another.
The system will be activated when the TPMS receiver
module detects a change in tire pressure. The ignition
must be in the ON/RUN mode, with the transmission in
PARK. The hazard lights will come on to confirm the
vehicle is in Tire Fill Alert mode.
When Tire Fill Alert mode is entered, the tire pressure
screen will be displayed in the instrument cluster. If the
hazard lights do not come on while inflating or deflating
the tire, the Tire Pressure Monitoring System sensor may
be in an inoperative position, preventing the TPMS sensor
signal from being received. In this case, the vehicle may
need to be moved slightly forward or backward.
Horn chirps will indicate STFA status as tires are inflated/
deflated. The horn will chirp under the following STFA
states:
1. The horn will chirp once when the selected pressure
is reached to let you know when to stop inflating or
deflating the tire.
2. The horn will chirp three times if the tire is overin -
flated or over-deflated.
3. The horn will chirp once again when enough air is added or removed to reach proper selected pressure
level.
OCCUPANT RESTRAINT SYSTEMS
Some of the most important safety features in your vehicle
are the restraint systems:
OCCUPANT RESTRAINT SYSTEMS
F
EATURES
Seat Belt Systems
Supplemental Restraint Systems (SRS) Air Bags
Child Restraints
Some of the safety features described in this section may
be standard equipment on some models, or may be
optional equipment on others. If you are not sure, ask an
authorized dealer.
IMPORTANT SAFETY PRECAUTIONS
Please pay close attention to the information in this
section. It tells you how to use your restraint system
properly, to keep you and your passengers as safe as
possible.
23_WS_OM_EN_USC_t.book Page 256
Page 294 of 396
292IN CASE OF EMERGENCY
SOS Call System Limitations
Vehicles sold in Mexico DO NOT have SOS Call system
capabilities.
SOS or other emergency line operators in Mexico may not
answer or respond to SOS system calls.
If the SOS Call system detects a malfunction, any of the
following may occur at the time the malfunction is
detected, and at the beginning of each ignition cycle:
The overhead console lights located within the ASSIST
and SOS buttons will continuously illuminate red.
The Device Screen will display the following message
“Vehicle device requires service. Please contact an
authorized dealer.”
An In-Vehicle Audio message will state “Vehicle device
requires service. Please contact an authorized dealer.”
Even if the SOS Call system is fully functional, factors
beyond FCA US LLC’s control may prevent or stop the SOS
Call system operation. These include, but are not limited
to, the following factors:
The ignition is in the OFF position
The vehicle’s electrical systems are not intact
The SOS Call system software and/or hardware are
damaged during a crash
The vehicle battery loses power or becomes discon -
nected during a vehicle crash
LTE (voice/data) or 4G (data) network and/or Global
Positioning Satellite signals are unavailable or
obstructed
Equipment malfunction at the SOS operator facility
Operator error by the SOS operator
LTE (voice/data) or 4G (data) network congestion
Weather
Buildings, structures, geographic terrain, or tunnels
NOTE:
Your vehicle may be transmitting data as authorized by
the subscriber.
Never place anything on or near the vehicle’s LTE
(voice/data) or 4G (data) and GPS antennas. You could
prevent LTE (voice/data) or 4G (data) and GPS signal
reception, which can prevent your vehicle from placing
an emergency call. An operable LTE (voice/data) or 4G
(data) network connection and a GPS signal is required
for the SOS Call system to function properly.
NOTE:Changes or modifications not expressly approved by the
party responsible for compliance could void the user's
authority to operate the equipment.
The SOS Call system is embedded into the vehicle’s
electrical system. Do not add aftermarket electrical
equipment to the vehicle’s electrical system. This
may prevent your vehicle from sending a signal to
initiate an emergency call. To avoid interference that
can cause the SOS Call system to fail, never add
aftermarket equipment (e.g., two-way mobile radio,
CB radio, data recorder, etc.) to your vehicle’s elec -
trical system or modify the antennas on your vehicle.
IF YOUR VEHICLE LOSES BATTERY POWER FOR ANY
REASON (INCLUDING DURING OR AFTER AN ACCI -
DENT), THE UCONNECT FEATURES, APPS AND
SERVICES, AMONG OTHERS, WILL NOT OPERATE.
Modifications to any part of the SOS Call system
could cause the air bag system to fail when you need
it. You could be injured if the air bag system is not
there to help protect you.
WARNING!
WARNING!
Ignoring the overhead console light could mean you
will not have SOS Call services. If the overhead
console light is illuminated, have an authorized
dealer service the SOS Call system immediately.
The Occupant Restraint Control module turns on the
air bag Warning Light on the instrument panel if a
malfunction in any part of the system is detected. If
the Air Bag Warning Light is illuminated, have an
authorized dealer service the Occupant Restraint
Control system immediately.
WARNING!
ALWAYS obey traffic laws and pay attention to the road.
ALWAYS drive safely with your hands on the steering
wheel. You have full responsibility and assume all risks
related to the use of the features and applications in
this vehicle. Only use the features and applications
when it is safe to do so. Failure to do so may result in an
accident involving serious injury or death.
23_WS_OM_EN_USC_t.book Page 292
Page 311 of 396
309
SERVICING AND MAINTENANCE
SCHEDULED SERVICING
Your vehicle is equipped with an automatic oil change
indicator system. The oil change indicator system will
remind you that it is time to take your vehicle in for
scheduled maintenance.
Based on engine operation conditions, the oil change
indicator message will illuminate. This means that service
is required for your vehicle. Operating conditions such as
frequent short-trips, trailer tow, extremely hot or cold
ambient temperatures, and extended idling will influence
when the “Oil Change Required” message is displayed.
Have your vehicle serviced as soon as possible, within the
next 500 miles (805 km).An authorized dealer will reset the oil change indicator
message after completing the scheduled oil change or for
engine oil life reset procedure Úpage 101.
NOTE:3.0L & 5.7L Engines:
Under no circumstances should oil
change intervals exceed 10,000 miles (16,000 km), or
12 months, whichever comes first. The engine controller
also monitors the number of hours of engine run time, and
will illuminate the oil change indicator after 350 hours
(which is not likely to be exceeded except for certain fleet
customers with extended engine idling periods).
6.4L Engines: Under no circumstances should oil change
intervals exceed 6,000 miles (10,000 km), or 6 months,
whichever comes first. The engine controller also monitors
the number of hours of engine run time, and will illuminate
the oil change indicator after 350 hours (which is not likely
to be exceeded except for certain fleet customers with
extended engine idling periods). Once A Month Or Before A Long Trip:
Check engine oil level
Check windshield washer fluid level
Check the tire inflation pressures and look for unusual
wear or damage
Check the fluid levels of the coolant reservoir, brake
master cylinder and fill as needed.
Check function of all interior and exterior lights
8
23_WS_OM_EN_USC_t.book Page 309
Page 318 of 396
316SERVICING AND MAINTENANCE
CHECKING OIL LEVEL — 3.0L ENGINES
The 3.0L engine does not have a traditional “dipstick” and
there is no need to manually check the oil level. If it is
desired to check engine oil level, it can be seen on the
instrument cluster display by navigating to the appropriate
screen under “Vehicle Information”. Use the up or
down arrow buttons within the steering wheel controls
to find the “Vehicle Information” menu. Then use the
right or left arrow buttons until you reach the “Oil
Level” sub-menu.
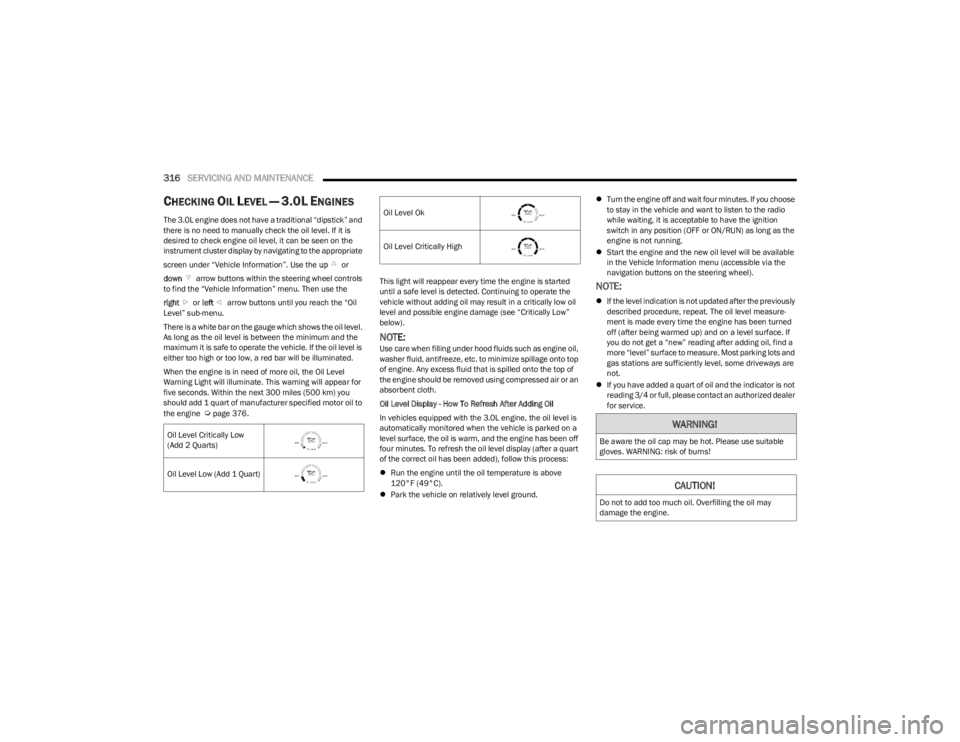
There is a white bar on the gauge which shows the oil level.
As long as the oil level is between the minimum and the
maximum it is safe to operate the vehicle. If the oil level is
either too high or too low, a red bar will be illuminated.
When the engine is in need of more oil, the Oil Level
Warning Light will illuminate. This warning will appear for
five seconds. Within the next 300 miles (500 km) you
should add 1 quart of manufacturer specified motor oil to
the engine
Úpage 376. This light will reappear every time the engine is started
until a safe level is detected. Continuing to operate the
vehicle without adding oil may result in a critically low oil
level and possible engine damage (see “Critically Low”
below).
NOTE:Use care when filling under hood fluids such as engine oil,
washer fluid, antifreeze, etc. to minimize spillage onto top
of engine. Any excess fluid that is spilled onto the top of
the engine should be removed using compressed air or an
absorbent cloth.
Oil Level Display - How To Refresh After Adding Oil
In vehicles equipped with the 3.0L engine, the oil level is
automatically monitored when the vehicle is parked on a
level surface, the oil is warm, and the engine has been off
four minutes. To refresh the oil level display (after a quart
of the correct oil has been added), follow this process:
Run the engine until the oil temperature is above
120°F (49°C).
Park the vehicle on relatively level ground.
Turn the engine off and wait four minutes. If you choose
to stay in the vehicle and want to listen to the radio
while waiting, it is acceptable to have the ignition
switch in any position (OFF or ON/RUN) as long as the
engine is not running.
Start the engine and the new oil level will be available
in the Vehicle Information menu (accessible via the
navigation buttons on the steering wheel).
NOTE:
If the level indication is not updated after the previously
described procedure, repeat. The oil level measure -
ment is made every time the engine has been turned
off (after being warmed up) and on a level surface. If
you do not get a “new” reading after adding oil, find a
more “level” surface to measure. Most parking lots and
gas stations are sufficiently level, some driveways are
not.
If you have added a quart of oil and the indicator is not
reading 3/4 or full, please contact an authorized dealer
for service.
Oil Level Critically Low
(Add 2 Quarts)
Oil Level Low (Add 1 Quart)
Oil Level Ok
Oil Level Critically High
WARNING!
Be aware the oil cap may be hot. Please use suitable
gloves. WARNING: risk of burns!
CAUTION!
Do not to add too much oil. Overfilling the oil may
damage the engine.
23_WS_OM_EN_USC_t.book Page 316
Page 319 of 396
SERVICING AND MAINTENANCE317
NOTE:
After adding oil to the engine, always reinstall the oil
cap securely by rotating clockwise until it stops. Never
run the engine without the oil fill cap as this could
cause an oil leak.
Because the oil level is automatically detected only
when the engine has been off and restarted (after four
minutes), the system cannot immediately detect a
sudden drop in oil level while driving (for example, if the
oil pan starts to leak due to damage during an off-road
event).
CHECKING OIL LEVEL — 5.7L & 6.4L
E
NGINES
To ensure proper engine lubrication, the engine oil must
be maintained at the correct level. Check the oil level at
regular intervals, such as every fuel stop. The best time to
check the engine oil level is about five minutes after a fully
warmed up engine is shut off.
Checking the oil while the vehicle is on level ground will
improve the accuracy of the oil level readings.
There are four possible dipstick types:
Crosshatched zone.
Crosshatched zone marked SAFE.
Crosshatched zone marked with MIN at the low end of
the range and MAX at the high end of the range.
Crosshatched zone marked with dimples at the MIN
and the MAX ends of the range.
NOTE:Always maintain the oil level within the crosshatch
markings on the dipstick.
Adding 1 qt (1 L) of oil when the reading is at the low end
of the dipstick range will raise the oil level to the high end
of the range marking.
ADDING WASHER FLUID
The instrument cluster display will indicate when the
washer fluid level is low. When the sensor detects a low
fluid level, the Low Washer Fluid Warning Light will turn on
and the "Washer Fluid Low" message will be displayed.
The fluid reservoir for the windshield washers and the rear
window washer is shared. The fluid reservoir is located in
the engine compartment, be sure to check the fluid level
at regular intervals. Fill the reservoir with windshield
washer solvent only (not radiator antifreeze). When
refilling the washer fluid reservoir, take some washer fluid
and apply it to a cloth or towel and wipe clean the wiper
blades, this will help blade performance. To prevent
freeze-up of your windshield washer system in cold
weather, select a solution or mixture that meets or
exceeds the temperature range of your climate. This rating
information can be found on most washer fluid containers.
NOTE:Use care when filling under hood fluids such as engine oil,
washer fluid, antifreeze, etc. to minimize spillage onto top
of engine. Any excess fluid that is spilled onto the top of
the engine should be removed using compressed air or an
absorbent cloth.
CAUTION!
If the “Critically Low or Critically High” Oil Level Warning
Light is illuminated, the following steps should be
taken:
Critically Low: add two quarts of manufacturer speci -
fied oil as soon as possible
Úpage 376. Continuing
to operate the vehicle with “Critically Low” oil level
may damage the engine.
Critically High: contact an authorized dealer for
service. Continuing to operate the vehicle with “Criti -
cally High” oil level may damage the engine.
Do not use any oils that are not manufacturer specified
and API approved.
Used engine oil and oil filters contain substances which
are harmful to the environment. When oil and filters are
changed contact an authorized dealer and dispose of in
a safe and responsible manner.
WARNING!
Commercially available windshield washer solvents are
flammable. They could ignite and burn you. Care must
be exercised when filling or working around the washer
solution.
8
23_WS_OM_EN_USC_t.book Page 317
Page 342 of 396
340SERVICING AND MAINTENANCE
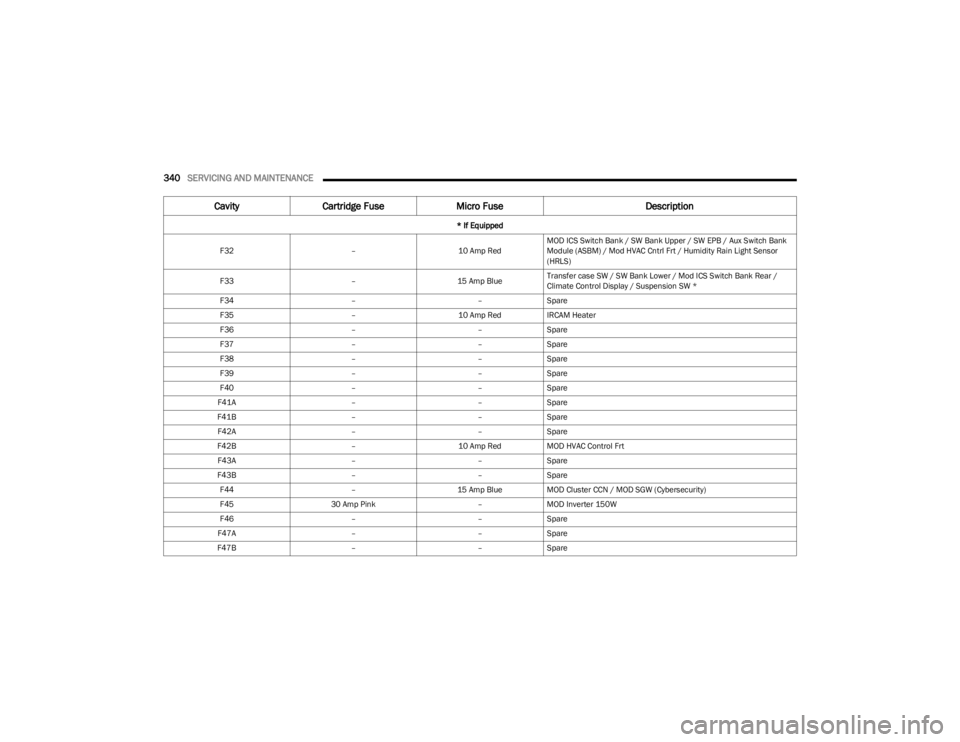
F32 –10 Amp RedMOD ICS Switch Bank / SW Bank Upper / SW EPB / Aux Switch Bank
Module (ASBM) / Mod HVAC Cntrl Frt / Humidity Rain Light Sensor
(HRLS)
F33 –15 Amp BlueTransfer case SW / SW Bank Lower / Mod ICS Switch Bank Rear /
Climate Control Display / Suspension SW *
F34 ––Spare
F35 –10 Amp RedIRCAM Heater
F36 ––Spare
F37 ––Spare
F38 ––Spare
F39 ––Spare
F40 ––Spare
F41A ––Spare
F41B ––Spare
F42A ––Spare
F42B –10 Amp RedMOD HVAC Control Frt
F43A ––Spare
F43B ––Spare
F44 –15 Amp BlueMOD Cluster CCN / MOD SGW (Cybersecurity)
F45 30 Amp Pink –MOD Inverter 150W
F46 ––Spare
F47A ––Spare
F47B ––Spare
Cavity Cartridge Fuse Micro Fuse Description
* If Equipped
23_WS_OM_EN_USC_t.book Page 340
Page 368 of 396
366SERVICING AND MAINTENANCE
TIRE ROTATION RECOMMENDATIONS
The tires on the front and rear of your vehicle operate at
different loads and perform different steering, handling,
and braking functions. For these reasons, they wear at
unequal rates.
These effects can be reduced by timely rotation of tires.
The benefits of rotation are especially worthwhile with
aggressive tread designs such as those on On/Off-Road
type tires. Rotation will increase tread life, help to
maintain mud, snow, and wet traction levels, and
contribute to a smooth, quiet ride.
For the proper maintenance intervals
Úpage 310. More
frequent rotation is permissible if desired. The reasons for
any rapid or unusual wear should be corrected prior to
rotation being performed.
NOTE:The premium Tire Pressure Monitoring System will auto -
matically locate the pressure values displayed in the
correct vehicle position following a tire rotation.
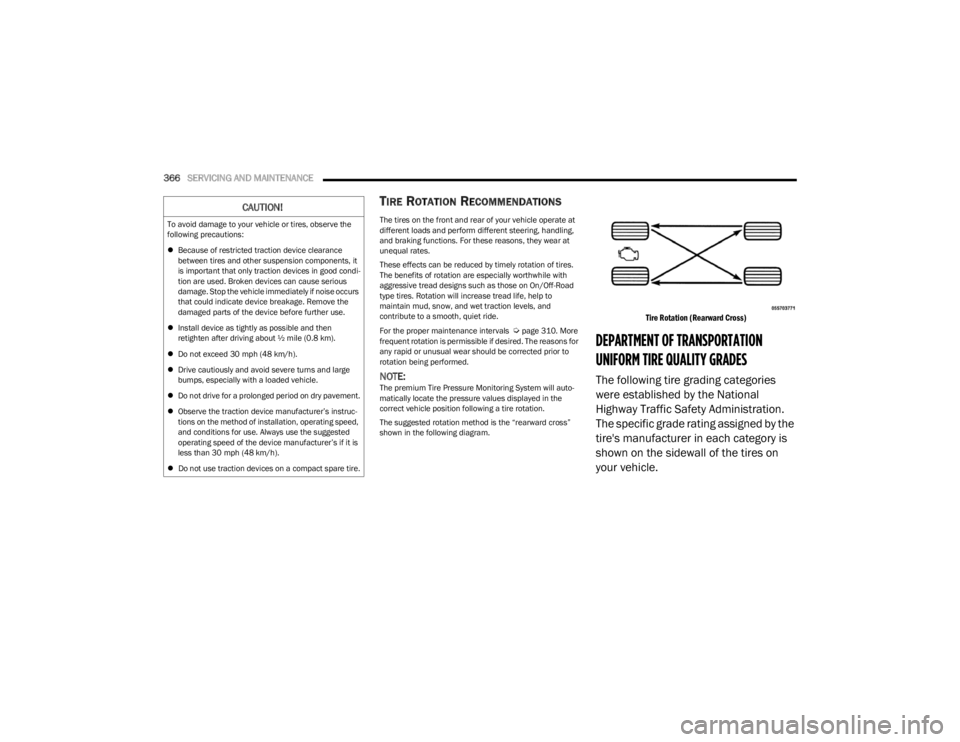
The suggested rotation method is the “rearward cross”
shown in the following diagram.
Tire Rotation (Rearward Cross)
DEPARTMENT OF TRANSPORTATION
UNIFORM TIRE QUALITY GRADES
The following tire grading categories
were established by the National
Highway Traffic Safety Administration.
The specific grade rating assigned by the
tire's manufacturer in each category is
shown on the sidewall of the tires on
your vehicle.
CAUTION!
To avoid damage to your vehicle or tires, observe the
following precautions:
Because of restricted traction device clearance
between tires and other suspension components, it
is important that only traction devices in good condi -
tion are used. Broken devices can cause serious
damage. Stop the vehicle immediately if noise occurs
that could indicate device breakage. Remove the
damaged parts of the device before further use.
Install device as tightly as possible and then
retighten after driving about ½ mile (0.8 km).
Do not exceed 30 mph (48 km/h).
Drive cautiously and avoid severe turns and large
bumps, especially with a loaded vehicle.
Do not drive for a prolonged period on dry pavement.
Observe the traction device manufacturer’s instruc -
tions on the method of installation, operating speed,
and conditions for use. Always use the suggested
operating speed of the device manufacturer’s if it is
less than 30 mph (48 km/h).
Do not use traction devices on a compact spare tire.
23_WS_OM_EN_USC_t.book Page 366