bluetooth JEEP WAGONEER 2023 Owners Manual
[x] Cancel search | Manufacturer: JEEP, Model Year: 2023, Model line: WAGONEER, Model: JEEP WAGONEER 2023Pages: 396, PDF Size: 15.17 MB
Page 208 of 396
206MULTIMEDIA
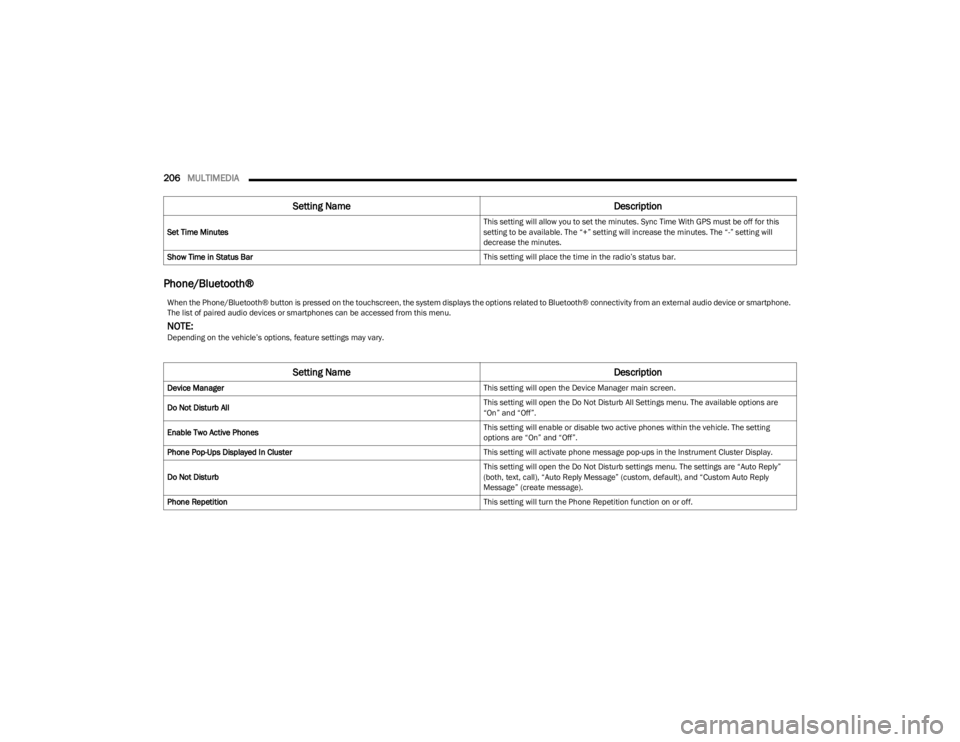
Phone/Bluetooth®
Set Time Minutes This setting will allow you to set the minutes. Sync Time With GPS must be off for this
setting to be available. The “+” setting will increase the minutes. The “-” setting will
decrease the minutes.
Show Time in Status Bar This setting will place the time in the radio’s status bar.
Setting NameDescription
When the Phone/Bluetooth® button is pressed on the touchscreen, the system displays the options related to Bluetooth® connectivity from an external audio device or smartphone.
The list of paired audio devices or smartphones can be accessed from this menu.
NOTE:Depending on the vehicle’s options, feature settings may vary.
Setting NameDescription
Device Manager This setting will open the Device Manager main screen.
Do Not Disturb All This setting will open the Do Not Disturb All Settings menu. The available options are
“On” and “Off”.
Enable Two Active Phones This setting will enable or disable two active phones within the vehicle. The setting
options are “On” and “Off”.
Phone Pop-Ups Displayed In Cluster This setting will activate phone message pop-ups in the Instrument Cluster Display.
Do Not Disturb This setting will open the Do Not Disturb settings menu. The settings are “Auto Reply”
(both, text, call), “Auto Reply Message” (custom, default), and “Custom Auto Reply
Message” (create message).
Phone Repetition This setting will turn the Phone Repetition function on or off.
23_WS_OM_EN_USC_t.book Page 206
Page 222 of 396
220MULTIMEDIA
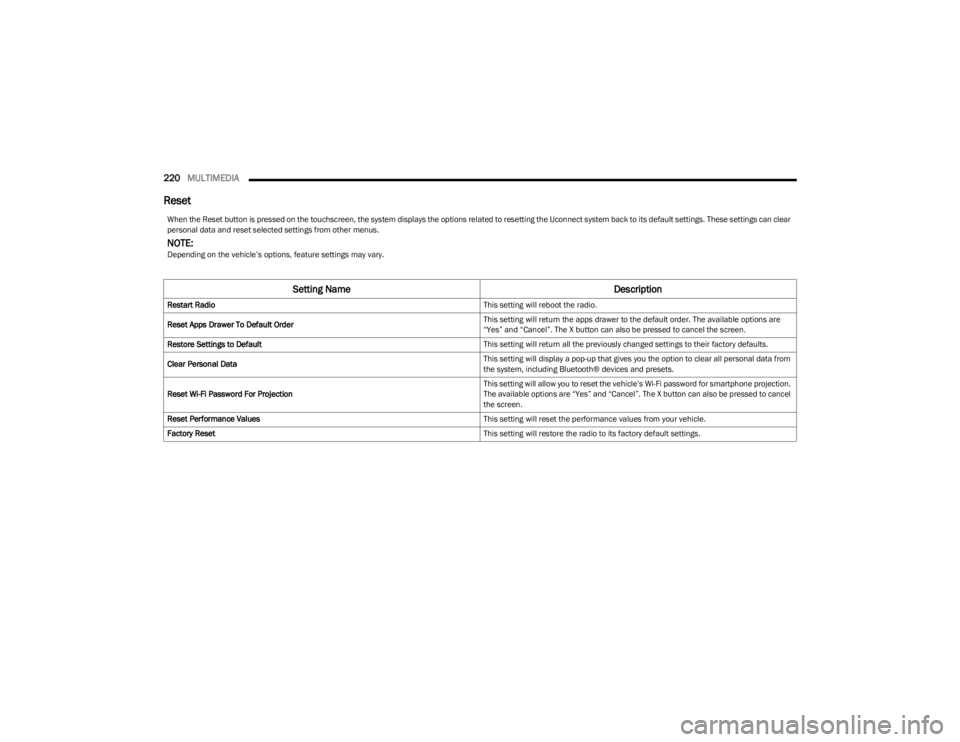
Reset
When the Reset button is pressed on the touchscreen, the system displays the options related to resetting the Uconnect system back to its default settings. These settings can clear
personal data and reset selected settings from other menus.
NOTE:Depending on the vehicle’s options, feature settings may vary.
Setting Name Description
Restart Radio This setting will reboot the radio.
Reset Apps Drawer To Default Order This setting will return the apps drawer to the default order. The available options are
“Yes” and “Cancel”. The X button can also be pressed to cancel the screen.
Restore Settings to Default This setting will return all the previously changed settings to their factory defaults.
Clear Personal Data This setting will display a pop-up that gives you the option to clear all personal data from
the system, including Bluetooth® devices and presets.
Reset Wi-Fi Password For Projection This setting will allow you to reset the vehicle’s Wi-Fi password for smartphone projection.
The available options are “Yes” and “Cancel”. The X button can also be pressed to cancel
the screen.
Reset Performance Values This setting will reset the performance values from your vehicle.
Factory Reset This setting will restore the radio to its factory default settings.
23_WS_OM_EN_USC_t.book Page 220
Page 223 of 396
MULTIMEDIA221
STEERING WHEEL AUDIO CONTROLS
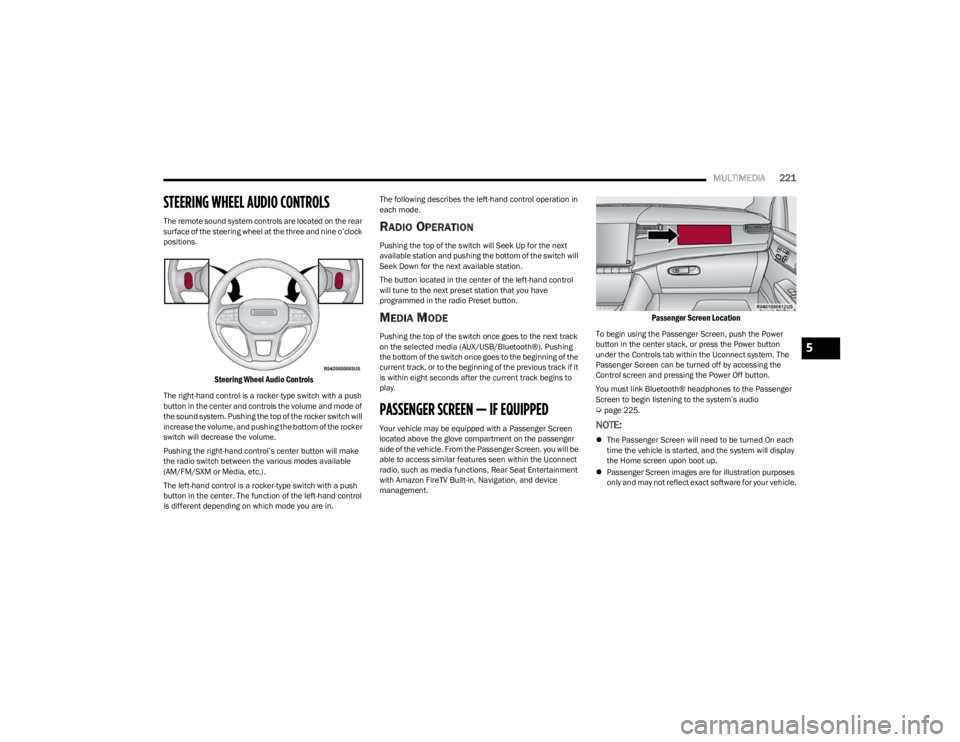
The remote sound system controls are located on the rear
surface of the steering wheel at the three and nine o’clock
positions.
Steering Wheel Audio Controls
The right-hand control is a rocker-type switch with a push
button in the center and controls the volume and mode of
the sound system. Pushing the top of the rocker switch will
increase the volume, and pushing the bottom of the rocker
switch will decrease the volume.
Pushing the right-hand control’s center button will make
the radio switch between the various modes available
(AM/FM/SXM or Media, etc.).
The left-hand control is a rocker-type switch with a push
button in the center. The function of the left-hand control
is different depending on which mode you are in. The following describes the left-hand control operation in
each mode.
RADIO OPERATION
Pushing the top of the switch will Seek Up for the next
available station and pushing the bottom of the switch will
Seek Down for the next available station.
The button located in the center of the left-hand control
will tune to the next preset station that you have
programmed in the radio Preset button.
MEDIA MODE
Pushing the top of the switch once goes to the next track
on the selected media (AUX/USB/Bluetooth®). Pushing
the bottom of the switch once goes to the beginning of the
current track, or to the beginning of the previous track if it
is within eight seconds after the current track begins to
play.
PASSENGER SCREEN — IF EQUIPPED
Your vehicle may be equipped with a Passenger Screen
located above the glove compartment on the passenger
side of the vehicle. From the Passenger Screen, you will be
able to access similar features seen within the Uconnect
radio, such as media functions, Rear Seat Entertainment
with Amazon FireTV Built-in, Navigation, and device
management.
Passenger Screen Location
To begin using the Passenger Screen, push the Power
button in the center stack, or press the Power button
under the Controls tab within the Uconnect system. The
Passenger Screen can be turned off by accessing the
Control screen and pressing the Power Off button.
You must link Bluetooth® headphones to the Passenger
Screen to begin listening to the system’s audio
Úpage 225.
NOTE:
The Passenger Screen will need to be turned On each
time the vehicle is started, and the system will display
the Home screen upon boot up.
Passenger Screen images are for illustration purposes
only and may not reflect exact software for your vehicle.
5
23_WS_OM_EN_USC_t.book Page 221
Page 226 of 396
224MULTIMEDIA
To change the media source, press the Source button and
then press on the desired source. The available sources
are:
Live Radio (FM, AM, SXM)
Bluetooth®
USB 1
USB 2
AUX
AV 1 — If Equipped
AV 2 — If Equipped
Rear Screen 1 Listen In — If Equipped
Rear Screen 2 Listen In — If Equipped
NOTE:
Audio devices connected via Bluetooth® must be done
through the Device Manager in the radio. For more
information on pairing a device, refer to your Uconnect
Radio Instruction Manual.
If the driver is listening to “Live Radio”, the option will
not be available in the Passenger Screen. Select “Now
Playing On Radio” to listen to the currently playing
station. If the driver selects a radio station while the
Passenger Screen is playing live radio content, the feed
will end on the Passenger Screen and control will be
given to the Uconnect system.
On the Preset menu, you will be able to listen to saved
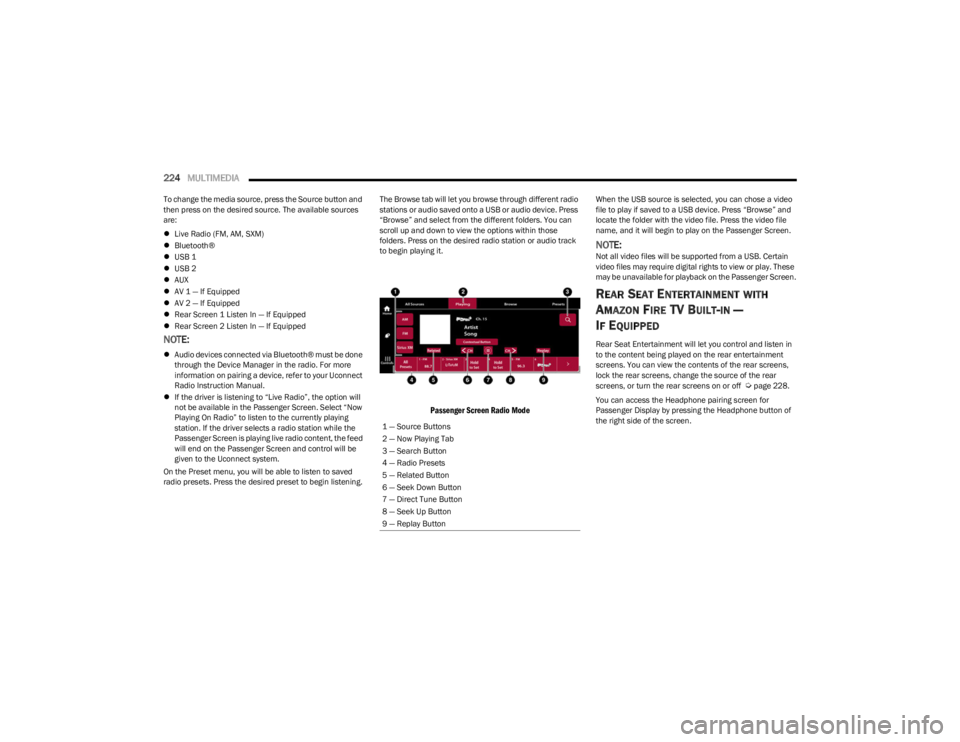
radio presets. Press the desired preset to begin listening. The Browse tab will let you browse through different radio
stations or audio saved onto a USB or audio device. Press
“Browse” and select from the different folders. You can
scroll up and down to view the options within those
folders. Press on the desired radio station or audio track
to begin playing it.
Passenger Screen Radio Mode
When the USB source is selected, you can chose a video
file to play if saved to a USB device. Press “Browse” and
locate the folder with the video file. Press the video file
name, and it will begin to play on the Passenger Screen.
NOTE:Not all video files will be supported from a USB. Certain
video files may require digital rights to view or play. These
may be unavailable for playback on the Passenger Screen.
REAR SEAT ENTERTAINMENT WITH
A
MAZON FIRE TV BUILT-IN —
I
F EQUIPPED
Rear Seat Entertainment will let you control and listen in
to the content being played on the rear entertainment
screens. You can view the contents of the rear screens,
lock the rear screens, change the source of the rear
screens, or turn the rear screens on or off
Úpage 228.
You can access the Headphone pairing screen for
Passenger Display by pressing the Headphone button of
the right side of the screen.
1 — Source Buttons
2 — Now Playing Tab
3 — Search Button
4 — Radio Presets
5 — Related Button
6 — Seek Down Button
7 — Direct Tune Button
8 — Seek Up Button
9 — Replay Button
23_WS_OM_EN_USC_t.book Page 224
Page 227 of 396
MULTIMEDIA225
HDMI PROJECTING
HDMI lets you connect a device to the provided HDMI port,
using an HDMI cable, and project the device directly to the
Passenger Screen. To begin, plug a a device into the HDMI
port. Then, press the HDMI button on the touchscreen.
HDMI will continue to show the menu bar and Headphone
Paring button.
NOTE:
The HDMI Card will not automatically launch when a
new device is connected. The HDMI Card will show a
device connected, and the Card will need to be
pressed.
If the user disconnects a device from the HDMI port
while the HDMI Card is in full screen, the system will
close HDMI and reload the Home screen.
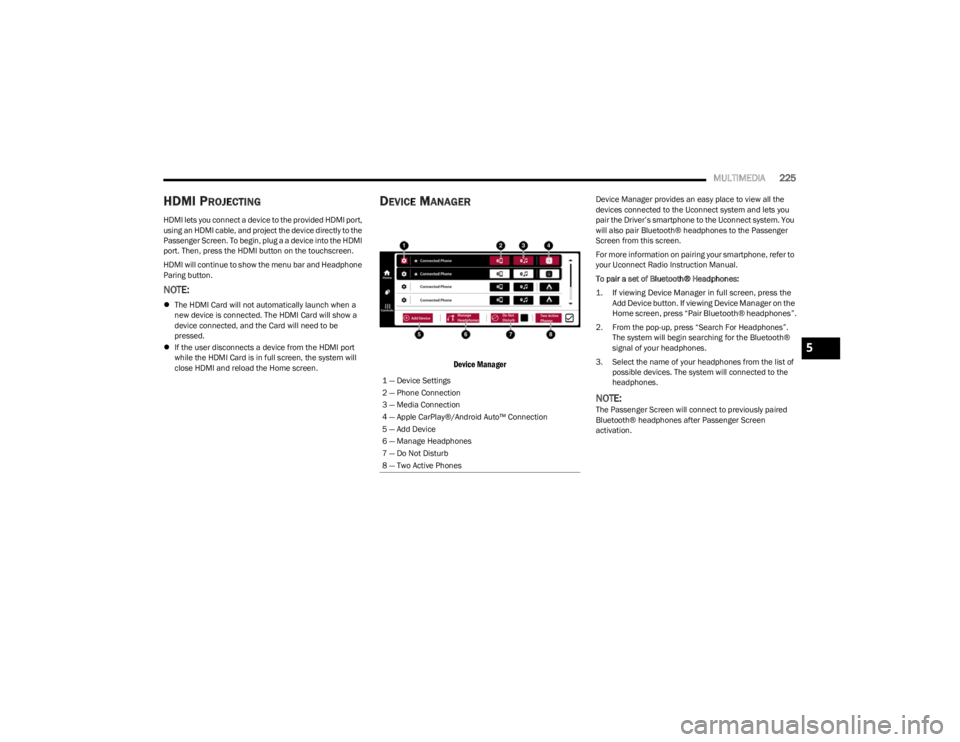
DEVICE MANAGER
Device Manager
Device Manager provides an easy place to view all the
devices connected to the Uconnect system and lets you
pair the Driver’s smartphone to the Uconnect system. You
will also pair Bluetooth® headphones to the Passenger
Screen from this screen.
For more information on pairing your smartphone, refer to
your Uconnect Radio Instruction Manual.
To pair a set of Bluetooth® Headphones:
1. If viewing Device Manager in full screen, press the
Add Device button. If viewing Device Manager on the
Home screen, press “Pair Bluetooth® headphones”.
2. From the pop-up, press “Search For Headphones”. The system will begin searching for the Bluetooth®
signal of your headphones.
3. Select the name of your headphones from the list of possible devices. The system will connected to the
headphones.
NOTE:The Passenger Screen will connect to previously paired
Bluetooth® headphones after Passenger Screen
activation.
1 — Device Settings
2 — Phone Connection
3 — Media Connection
4 — Apple CarPlay®/Android Auto™ Connection
5 — Add Device
6 — Manage Headphones
7 — Do Not Disturb
8 — Two Active Phones
5
23_WS_OM_EN_USC_t.book Page 225
Page 228 of 396
226MULTIMEDIA
Removing Bluetooth® Headphones
1. From the Controls screen, press the Manage
Headphones button.
2. Press the Settings button (gear icon) next to the set of headphones you wish to remove.
3. Press “Delete Device”; the Bluetooth® headphones will be removed from the system.
NAVIGATION
Navigation allows you to assist the driver in searching for
destinations using Uconnect’s built-in Navigation system.
For information on the full functionality of Navigation, refer
to your Uconnect Radio Instruction Manual.
When a new route is selected from the Passenger Screen,
a confirmation will be sent to the driver. The driver will be
able to confirm or deny the route.
NOTE:Using Navigation on the Passenger Screen will not affect
the Navigation screen in the Uconnect system. The Driver
can continue to use Navigation while the Passenger
Screen can “suggest” new routes or stops.
CAMERA
Camera will display the equipped vehicle camera feed.
When selected, press the desired Camera button. The
feed from that camera will display in the center of the
touchscreen. Press the X button or Back Arrow button to
return to the Home screen.
NOTE:The Passenger Screen will lose access to a camera if the
driver chooses to view it on the Uconnect system or if a
condition would activate the camera on the Uconnect
system (the rearview camera being activated when the
vehicle is shifted into REVERSE).
3RD PARTY APPS — IF EQUIPPED
If equipped, your vehicle may contain some 3rd party
apps, which will further enhance your Uconnect system.
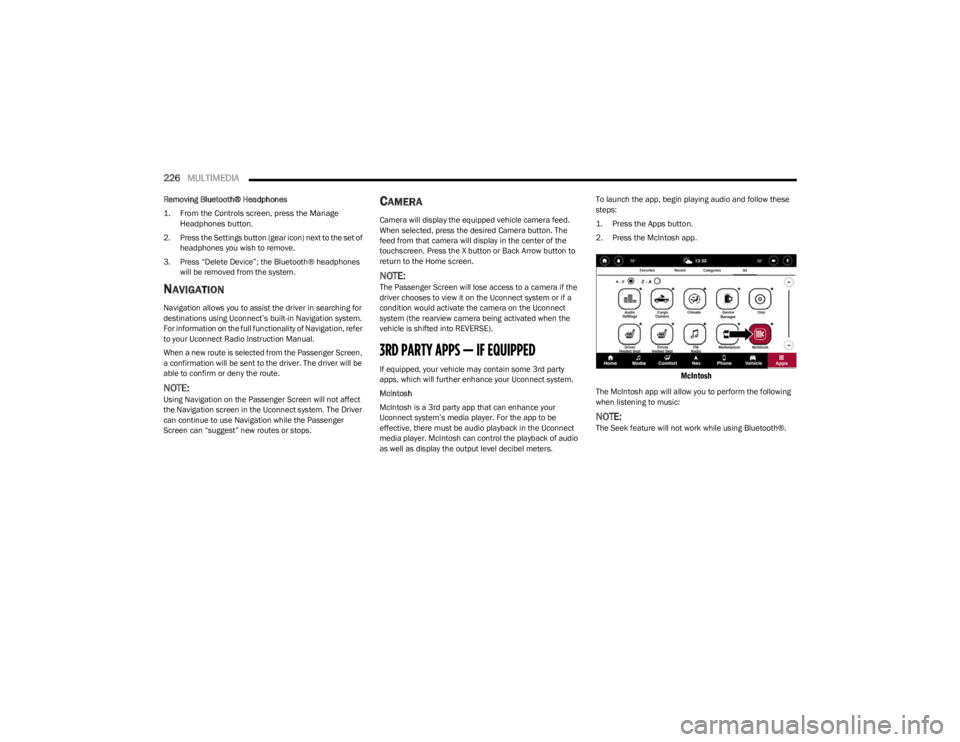
McIntosh
McIntosh is a 3rd party app that can enhance your
Uconnect system’s media player. For the app to be
effective, there must be audio playback in the Uconnect
media player. McIntosh can control the playback of audio
as well as display the output level decibel meters. To launch the app, begin playing audio and follow these
steps:
1. Press the Apps button.
2. Press the McIntosh app.
McIntosh
The McIntosh app will allow you to perform the following
when listening to music:
NOTE:The Seek feature will not work while using Bluetooth®.
23_WS_OM_EN_USC_t.book Page 226
Page 232 of 396
230MULTIMEDIA
ALEXA VOICE CONTROL
A feature with Rear Seat Entertainment with Fire TV
built-in that enhances your experience is Alexa. It is simple
to get started using this feature. Push the Microphone
button at the top of the Voice Remote with Alexa to
activate Alexa and get started.
LISTEN VIA VEHICLE SPEAKERS
A feature within Rear Seat Entertainment with Fire TV
built-in is the front radio Listen feature. On the front radio
Home screen for Fire TV, select the Listen button in the top
right corner on either card for Screen 1 or 2. This will allow
you to have either rear screen play audio through all the
speakers in the vehicle.
QUICK MENU
Accessing the quick menu will give you more options for
Fire TV.
To access the quick menu, tap the screen and it will
appear. The quick menu is also accessible by pushing the
Gear/Settings button on the Voice Remote with Alexa.
Some options of the quick menu are:
Power — This will power the screen off.
On-Screen Remote — This will bring up the on-screen
remote to use with the system.
Back — This will let you go back a page.
Home — This will take you to the Home screen.
Gear/Settings — This will let you access certain settings
in the system. For more setting options, select
“Settings” within the on-screen Gear/Settings menu.
Vehicle — This will bring up the Vehicle menu. From
here you can adjust rear climate controls and the Are
We There Yet? app.
PARENTAL CONTROLS (USING THE REAR
S
CREENS)
If parental controls were not set during the first time start
up of the system, they can be set by following these steps:
1. Push the Gear/Settings button on the Voice Remote
with Alexa or tap the screen to access Settings in the
“quick menu”.
2. Select the Gear/Settings icon on the screen.
3. Select “Settings” on the screen.
4. While in Settings, select “Preferences”.
5. Select “Parental Controls”; from here you can turn Parental Controls on or off and set up a PIN for the
controls using the Voice Remote with Alexa.
VOICE REMOTE WITH ALEXA PAIRING
(U
SING THE REAR SCREENS)
If the Voice Remote with Alexa needs to be paired again or
a new remote is being paired, follow these procedures:
1. Install batteries into the remote.
2. Tap the screen and Select the Gear/Settings icon on
the screen.
3. Select “Settings” on the screen. 4. In Settings, select “Controllers & Bluetooth®
Devices”.
5. From this menu, select “Add New Remote”.
6. Follow the on-screen steps for Voice Remote with Alexa pairing.
A long press on the Home button can also re-pair a Voice
Remote with Alexa that has become disconnected.
NOTE:Your vehicle is included with two Voice Remotes with
Alexa. A Voice Remote with Alexa can be paired to each
rear screen. It will function with the rear screen it was
paired with. The pairing steps will need to be done for each
rear screen.
MEDIA SOURCES INPUT (USING THE
F
RONT RADIO AND REAR SCREENS)
Front Radio Screen
Users can select inputs for each rear screen from the front
radio touchscreen by selecting the Rear Seat tab and
choosing the desired content by selecting “Launch
Source” on the Screen 1 or Screen 2 tab.
Inputs available within Launch Source under “Inputs” are
“Fire TV”, “HDMI”, and “USB”.
Rear Screens
To select inputs on the rear screen, scroll down on the Fire
TV Home screen and select your desired input under
“Input”.
Inputs can also be selected from the Brand tab in the top
menu. While in this tab, scroll down to “Inputs” for
selection options.
23_WS_OM_EN_USC_t.book Page 230
Page 235 of 396
MULTIMEDIA233
FIRE TV APPS/GAMES
(U
SING THE REAR SCREENS)
Apps and games can be accessed using Rear Seat
Entertainment with Fire TV built-in.
To access Apps on the rear screen, turn on the system and
select “Find” in the top menu. On the Find page, select
“Appstore”. Within the Appstore® you can purchase apps
and games. From here you can also select from all the
apps and games that have been purchased.
ARE WE THERE YET?
When a navigation route has been set from the Uconnect
system, the second-row passengers can use “Are We
There Yet?” for an animated screen showing distance and
time remaining on navigation routes, as well as the
estimated time of arrival with pop-up notifications.
Some screen information includes:
Decrease Timing Between Notifications Button
Notifications ON/OFF Button
Increase Timing Between Notifications Button
Arrival Time
Time Remaining Until Destination Is Reached
Distance Remaining
To access “Are We There Yet?” from the rear screens,
follow these steps:
1. Tap one of the rear screens and select the Vehicle icon or push the Vehicle button on the Voice Remote
with Alexa.
2. Select “Are We There Yet?” near the bottom of the menu on the first page of options.
USING THE VIDEO USB PORT
Plug in a USB drive or mass storage device and play your
favorite music or movies.
NOTE:To view USB media on the rear screens, insert a USB drive
into the port. The USB drive port is located under the radio
controls in the instrument panel.
On the rear screen you can browse the content of the USB
device by going to the USB source in the inputs. Use the
search feature to find your media faster.
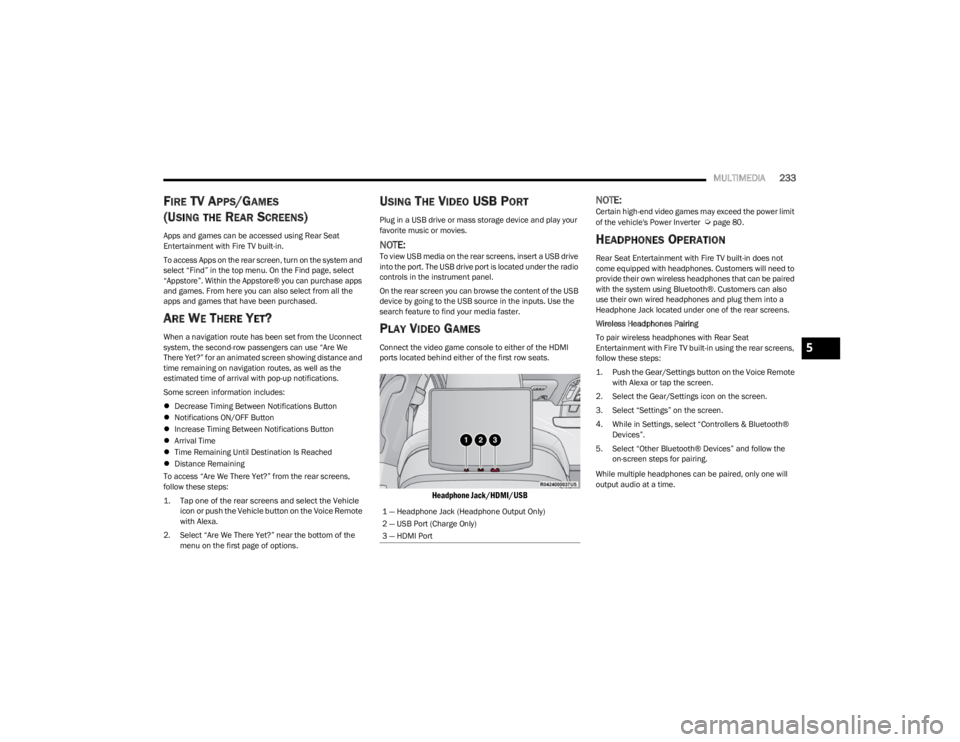
PLAY VIDEO GAMES
Connect the video game console to either of the HDMI
ports located behind either of the first row seats.
Headphone Jack/HDMI/USB
NOTE:Certain high-end video games may exceed the power limit
of the vehicle's Power Inverter Úpage 80.
HEADPHONES OPERATION
Rear Seat Entertainment with Fire TV built-in does not
come equipped with headphones. Customers will need to
provide their own wireless headphones that can be paired
with the system using Bluetooth®. Customers can also
use their own wired headphones and plug them into a
Headphone Jack located under one of the rear screens.
Wireless Headphones Pairing
To pair wireless headphones with Rear Seat
Entertainment with Fire TV built-in using the rear screens,
follow these steps:
1. Push the Gear/Settings button on the Voice Remote with Alexa or tap the screen.
2. Select the Gear/Settings icon on the screen.
3. Select “Settings” on the screen.
4. While in Settings, select “Controllers & Bluetooth® Devices”.
5. Select “Other Bluetooth® Devices” and follow the on-screen steps for pairing.
While multiple headphones can be paired, only one will
output audio at a time.
1 — Headphone Jack (Headphone Output Only)
2 — USB Port (Charge Only)
3 — HDMI Port
5
23_WS_OM_EN_USC_t.book Page 233