ECO mode JEEP WRANGLER 2015 JK / 3.G User Guide
[x] Cancel search | Manufacturer: JEEP, Model Year: 2015, Model line: WRANGLER, Model: JEEP WRANGLER 2015 JK / 3.GPages: 695, PDF Size: 20.64 MB
Page 170 of 695
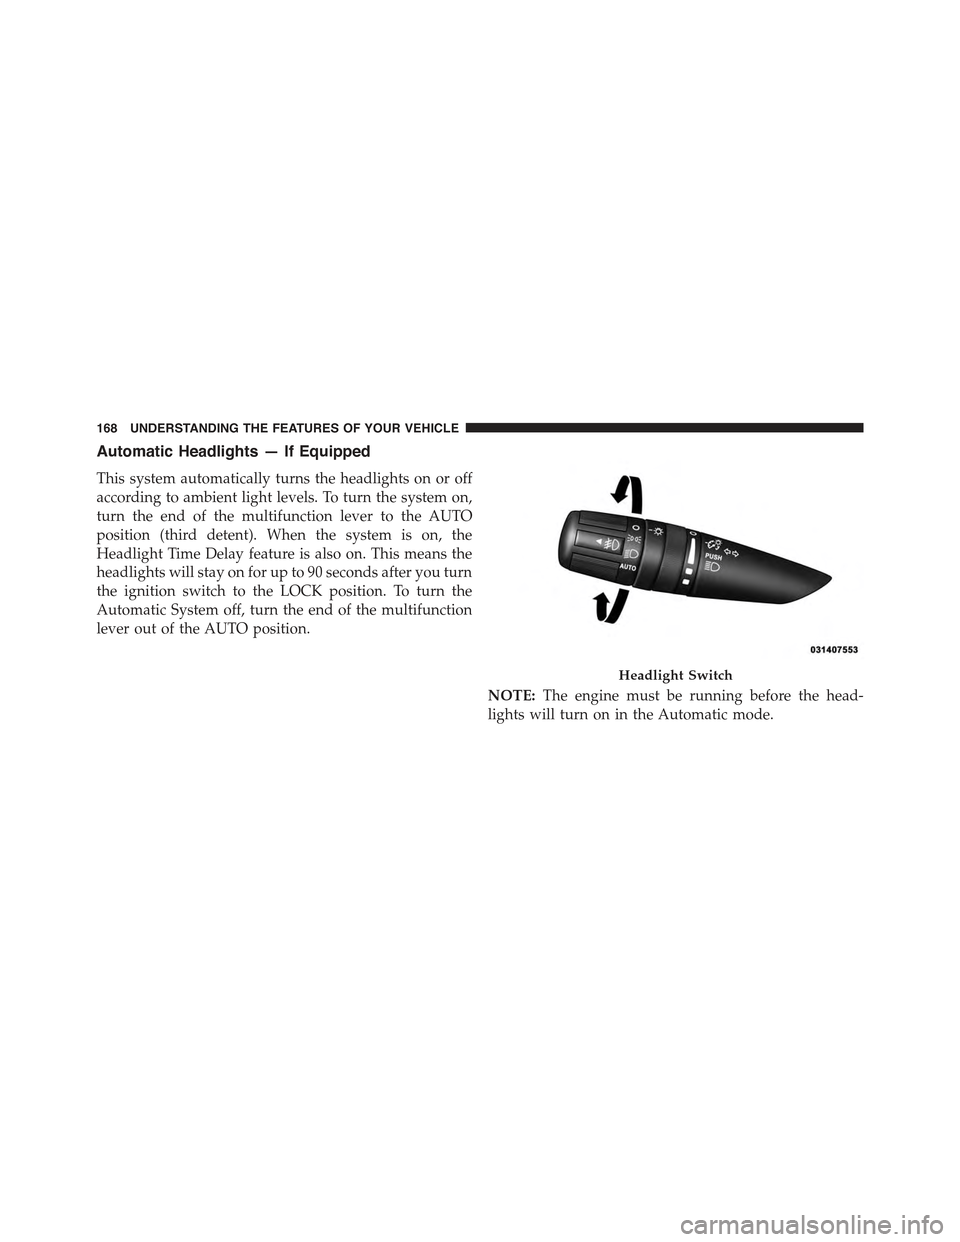
Automatic Headlights — If Equipped
This system automatically turns the headlights on or off
according to ambient light levels. To turn the system on,
turn the end of the multifunction lever to the AUTO
position (third detent). When the system is on, the
Headlight Time Delay feature is also on. This means the
headlights will stay on for up to 90 seconds after you turn
the ignition switch to the LOCK position. To turn the
Automatic System off, turn the end of the multifunction
lever out of the AUTO position.
NOTE:The engine must be running before the head-
lights will turn on in the Automatic mode.
Headlight Switch
168 UNDERSTANDING THE FEATURES OF YOUR VEHICLE
Page 175 of 695
Cargo Lamp
The courtesy and dome lights will turn on when the front
doors are opened, by rotating the control for the dimmer
switch on the multifunction lever fully upward, or if
equipped, when the UNLOCK button is pressed on the
Remote Keyless Entry (RKE) transmitter.
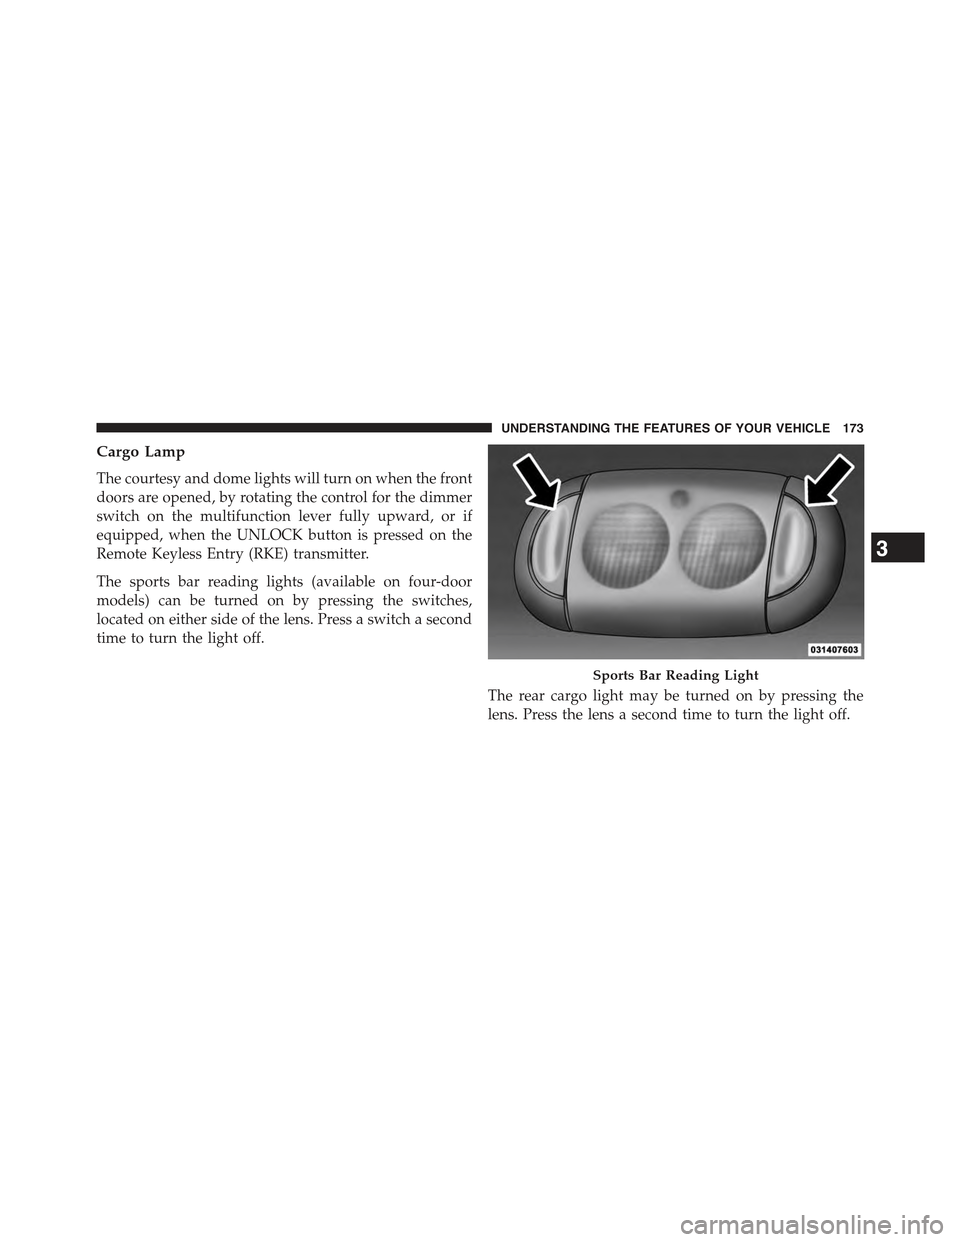
The sports bar reading lights (available on four-door
models) can be turned on by pressing the switches,
located on either side of the lens. Press a switch a second
time to turn the light off.
The rear cargo light may be turned on by pressing the
lens. Press the lens a second time to turn the light off.
Sports Bar Reading Light
3
UNDERSTANDING THE FEATURES OF YOUR VEHICLE 173
Page 226 of 695
CAUTION!(Continued)
•Refer to “Appearance Care For Fabric Top Models”
in “Maintaining Your Vehicle” for further informa-
tion. It contains important information on cleaning
and caring for your vehicle’s fabric top.
•Do not use any tools (screwdrivers, etc.) to pry or
force any of the clamps, clips, or retainers securing
the soft top. Do not force or pry the soft top
framework when opening or closing. Damage to
the top may result.
WARNING!
•Do not drive the vehicle with the rear window
curtain up unless the side curtains are also re-
moved. Dangerous exhaust gases could enter the
vehicle causing harm to the driver and passengers.
(Continued)
WARNING!(Continued)
•The fabric upper doors and fabric top are designed
only for protection against the elements. Do not
rely on them to contain occupants within the ve-
hicle or to protect against injury during an acci-
dent. Remember, always wear seat belts.
CAUTION!
Failure to follow these cautions may cause interior
water damage, stains or mildew on the top material:
•It is recommended that the top be free of water
prior to opening it. Operating the top, opening a
door or lowering a window while the top is wet
may allow water to drip into the vehicle’s interior.
(Continued)
224 UNDERSTANDING THE FEATURES OF YOUR VEHICLE
Page 254 of 695
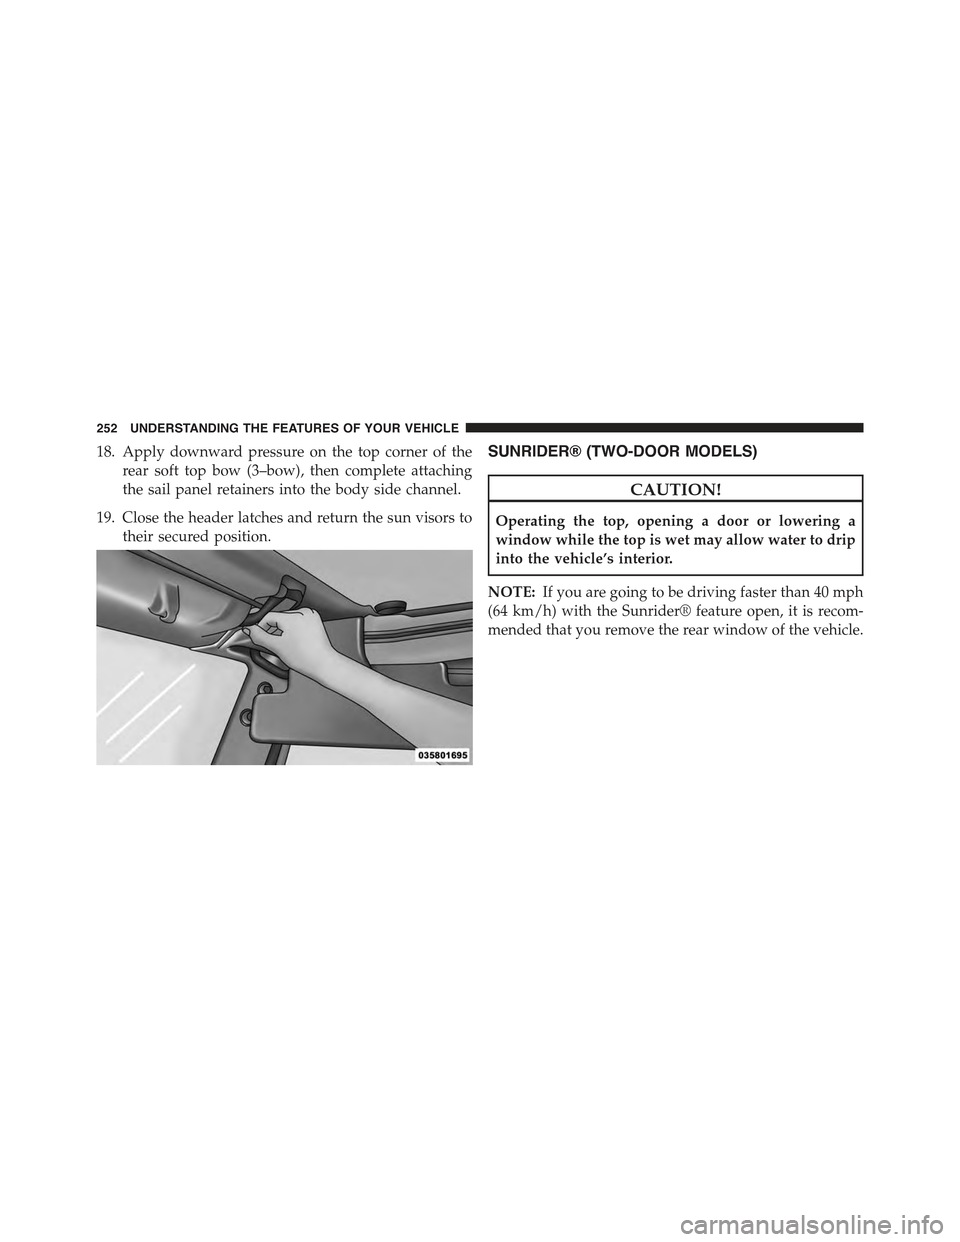
18. Apply downward pressure on the top corner of the
rear soft top bow (3–bow), then complete attaching
the sail panel retainers into the body side channel.
19. Close the header latches and return the sun visors to
their secured position.
SUNRIDER® (TWO-DOOR MODELS)
CAUTION!
Operating the top, opening a door or lowering a
window while the top is wet may allow water to drip
into the vehicle’s interior.
NOTE:If you are going to be driving faster than 40 mph
(64 km/h) with the Sunrider® feature open, it is recom-
mended that you remove the rear window of the vehicle.
252 UNDERSTANDING THE FEATURES OF YOUR VEHICLE
Page 290 of 695
SUNRIDER® (FOUR-DOOR MODELS)
CAUTION!
Operating the top, opening a door or lowering a
window while the top is wet may allow water to drip
into the vehicle’s interior.
NOTE:If you are going to be driving faster than 40 mph
(64 km/h) with the Sunrider® feature open, it is recom-
mended that you remove the rear window of the vehicle.
Opening The Sunrider®
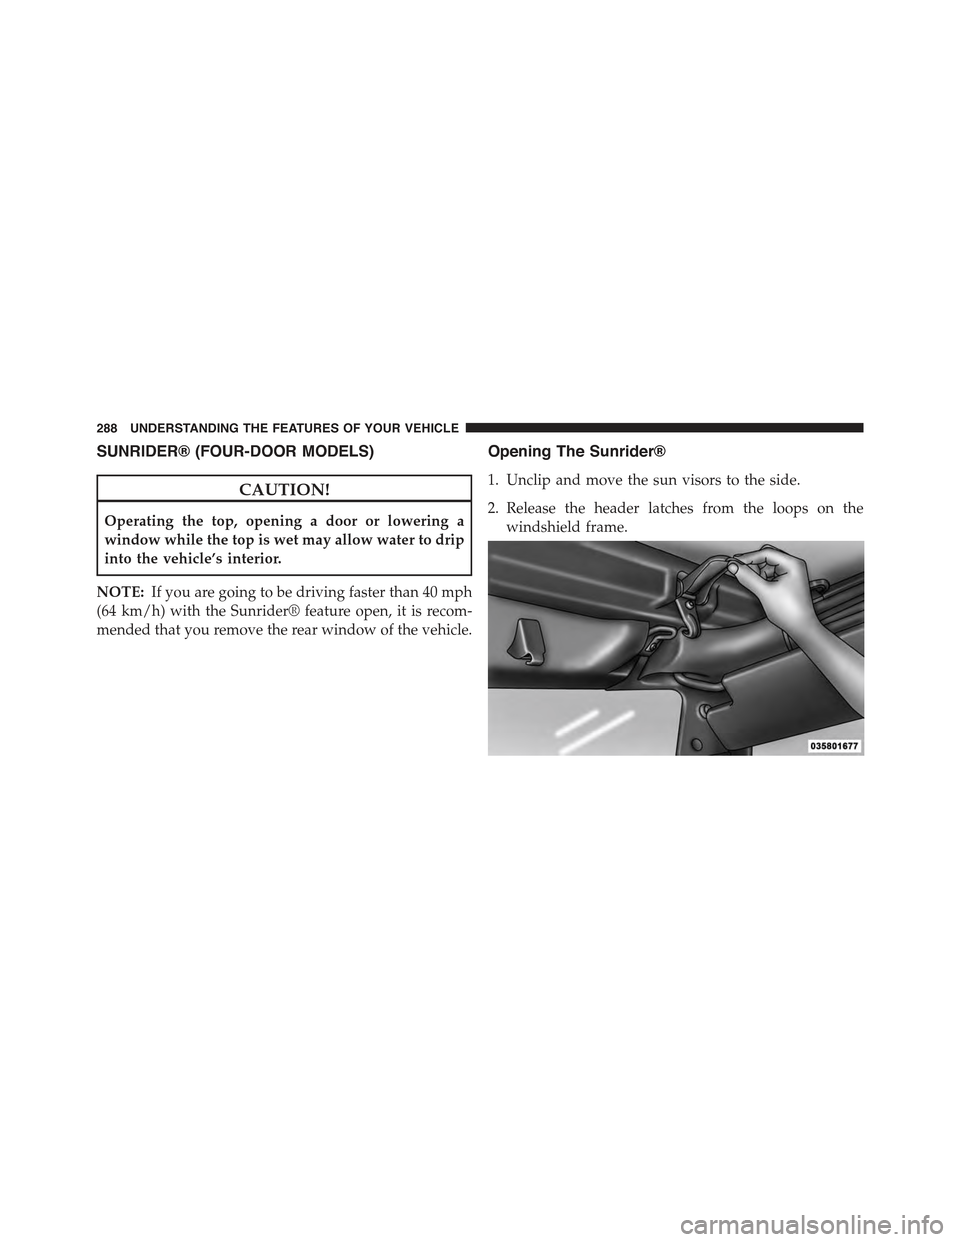
1. Unclip and move the sun visors to the side.
2. Release the header latches from the loops on the
windshield frame.
288 UNDERSTANDING THE FEATURES OF YOUR VEHICLE
Page 300 of 695
Rotate the switch upward to the first detent
position for rear wiper operation.
Rotate the switch upward past the first detent
to activate the rear washer. The washer pump
and the wiper will continue to operate as long
as the switch is held. Upon release, the wiper
will cycle two to three times before returning to the set
position.
If the rear wiper is operating when the ignition is turned
to the LOCK position, the wiper will automatically return
to the “Park” position. When the vehicle is restarted, the
wiper will resume function at whichever position the
switch is set at.
Rear Window Defroster — If Equipped
The rear window defroster button is located on
the climate controls mode control knob. Push the
button to turn on the rear window defroster. An indicator
in the button will illuminate when the rear window
defroster is on. The rear window defroster automatically
turns off after approximately 10 minutes. For an addi-
tional five minutes of operation, push the button a
second time.
NOTE:To prevent excessive battery drain, use the rear
window defroster only when the engine is operating.
298 UNDERSTANDING THE FEATURES OF YOUR VEHICLE
Page 303 of 695
UNDERSTANDING YOUR INSTRUMENT PANEL
CONTENTS
!INSTRUMENT PANEL FEATURES..........304
!INSTRUMENT CLUSTER.................305
!INSTRUMENT CLUSTER DESCRIPTIONS.....306
!COMPASS AND TRIP COMPUTER — IF
EQUIPPED...........................322
▫Control Buttons.......................323
▫Compass/Temperature Display............324
▫Trip Conditions.......................326
!ELECTRONIC VEHICLE INFORMATION CENTER
(EVIC) — IF EQUIPPED..................327
▫Electronic Vehicle Information Center (EVIC)
Displays............................330
▫Oil Change Required..................331
▫EVIC Main Menu.....................332
▫Compass, Outside Temperature Display / ECO
(Fuel Saver Mode) — If Equipped.........333
▫Average Fuel Economy..................336
▫Distance To Empty (DTE)................336
▫Elapsed Time........................336
▫EVIC Units Selection (UNITS IN Display) . . . .337
4
Page 314 of 695
NOTE:As the coolant temperature gauge approaches
#H,#this indicator will illuminate and a single chime will
sound. Further overheating will cause the temperature
gauge to pass#H.#In this case, a continuous chime will
sound, until the engine is allowed to cool or the 4 minutes
duration is expired, whichever come first.
18. Front Fog Light Indicator — If Equipped
This indicator will illuminate when the front fog
lights are on.
19. 4WD Indicator Light — If Equipped
This light alerts the driver that the vehicle is in
the four-wheel drive mode, and the front and
rear driveshafts are mechanically locked to-
gether forcing the front and rear wheels to
rotate at the same speed.
20. Vehicle Security Light — If Equipped
This light will flash at a fast rate for approxi-
mately 15 seconds, when the vehicle security
alarm is arming, and then will flash slowly
until the vehicle is disarmed.
21. Temperature Gauge
The temperature gauge shows engine coolant tempera-
ture. Any reading within the normal range indicates that
the engine cooling system is operating satisfactorily.
The gauge pointer will likely indicate a higher tempera-
ture when driving in hot weather, up mountain grades,
or when towing a trailer. It should not be allowed to
exceed the upper limits of the normal operating range.
312 UNDERSTANDING YOUR INSTRUMENT PANEL
Page 315 of 695
CAUTION!
Driving with a hot engine cooling system could
damage your vehicle. If the temperature gauge reads
“H” pull over and stop the vehicle. Idle the vehicle
with the air conditioner turned off until the pointer
drops back into the normal range. If the pointer
remains on the “H” and you hear continuous chimes,
turn the engine off immediately and call an autho-
rized dealer for service.
WARNING!
A hot engine cooling system is dangerous. You or
others could be badly burned by steam or boiling
coolant. You may want to call an authorized dealer
for service if your vehicle overheats. If you decide to
look under the hood yourself, see “Maintaining Your
(Continued)
WARNING!(Continued)
Vehicle”. Follow the warnings under the Cooling
System Pressure Cap paragraph.
22. Odometer / Trip Odometer / ECO (Fuel Saver Indi-
cator) Button
Press this button to change the display from odometer to
either of the two trip odometer settings or the “ECO”
display. Trip A or Trip B will appear when in the trip
odometer mode. Press and hold the button for two
seconds to reset the trip odometer to 0 miles or kilome-
ters. The odometer must be in trip mode to reset.
23. Shift Lever Indicator
The Shift Lever Indicator is self-contained within the
instrument cluster. It displays the gear position of the
automatic transmission.
4
UNDERSTANDING YOUR INSTRUMENT PANEL 313
Page 335 of 695
After three seconds without pushing SELECT, RESET
ALL will return to RESET and only the selected feature
will have been reset.
Compass, Outside Temperature Display / ECO
(Fuel Saver Mode) — If Equipped
The compass readings indicate the direction the vehicle is
facing. Push and release the COMPASS button to display
one of eight compass headings, the outside temperature/
ECO if the EVIC display is not already displaying this
screen.
NOTE:The system will display the last known outside
temperature when starting the vehicle and may need to
be driven several minutes before the updated tempera-
ture is displayed. Engine temperature can also affect the
displayed temperature; therefore, temperature readings
are not updated when the vehicle is not moving.
ECO (Fuel Saver Mode) — If Equipped
The ECO message will display below the outside tem-
perature in the EVIC display (if the audio system is on
the ECO indicator will override the audio information
display line if the#Display Fuel Saver#personal setting is
ON — see#Personal Settings#section). This message will
appear whenever you are driving in a fuel efficient
manner.
This feature allows you to monitor when you are driving
in a fuel efficient manner, and it can be used to modify
driving habits in order to increase fuel economy.
Automatic Compass Calibration
This compass is self-calibrating, which eliminates the
need to set the compass manually. When the vehicle is
new, the compass may appear erratic and the EVIC will
display “CAL” until the compass is calibrated. You may
also calibrate the compass by completing one or more
360–degree turns (in an area free from large metal or
4
UNDERSTANDING YOUR INSTRUMENT PANEL 333