engine JEEP WRANGLER 2021 Owner handbook (in English)
[x] Cancel search | Manufacturer: JEEP, Model Year: 2021, Model line: WRANGLER, Model: JEEP WRANGLER 2021Pages: 276, PDF Size: 4.47 MB
Page 185 of 276
by gently spraying water from a garden hose
vertically down the face of the A/C condenser
(if equipped) or the back of the radiator core.
Check the engine cooling system hoses for
brittle rubber, cracking, tears, cuts, and
tightness of the connection at the coolant
recovery bottle and radiator. Inspect the en-
tire system for leaks. DO NOT REMOVE THE
COOLANT PRESSURE CAP WHEN THE
COOLING SYSTEM IS HOT.
Adding Washer Fluid
The fluid reservoir for the windshield washers
and the rear window washer (if equipped) is
shared. The fluid reservoir is located in the
engine compartment. Be sure to check the
fluid level at regular intervals. Fill the reservoir
with windshield washer solvent only (not radia-
tor antifreeze). When refilling the washer fluid
reservoir, take some washer fluid and apply it to
a cloth or towel and wipe clean the wiper
blades; this will help blade performance.
To prevent freeze-up of your windshield
washer system in cold weather, select a solu-
tion or mixture that meets or exceeds the
temperature range of your climate. This rat-
ing information can be found on most washer
fluid containers.
WARNING!
Commercial windshield washer solvents
are flammable. They could ignite and burn
you. Care must be exercised when filling or
working around the washer solution.
Brake System
In order to assure brake system performance,
all brake system components should be in-
spected periodically. Refer to the “Mainte-
nance Plan” in this section for the proper
maintenance intervals.
WARNING!
Riding the brakes can lead to brake failure
and possibly a collision. Driving with your
foot resting or riding on the brake pedal
WARNING!
can result in abnormally high brake tem-
peratures, excessive lining wear, and pos-
sible brake damage. You would not have
your full braking capacity in an emergency.
Fluid Level Check — Brake Master Cylinder
The fluid level of the master cylinder should
be checked whenever the vehicle is serviced,
or immediately if the brake system warning
light is on. If necessary, add fluid to bring
level within the designated marks on the side
of the reservoir of the brake master cylinder.
Be sure to clean the top of the master cylin-
der area before removing cap. With disc
brakes, fluid level can be expected to fall as
the brake pads wear. Brake fluid level should
be checked when pads are replaced. If the
brake fluid is abnormally low, check the sys-
tem for leaks.
Refer to “Fluids And Lubricants” in “Techni-
cal Specifications” for further information.
183
Page 186 of 276
WARNING!
• Use only manufacturer's recommended
brake fluid. Refer to “Fluids And Lubri-
cants” in “Technical Specifications” for
further information. Using the wrong
type of brake fluid can severely damage
your brake system and/or impair its per-
formance. The proper type of brake fluid
for your vehicle is also identified on the
original factory installed hydraulic mas-
ter cylinder reservoir.
• To avoid contamination from foreign
matter or moisture, use only new brake
fluid or fluid that has been in a tightly
closed container. Keep the master cylin-
der reservoir cap secured at all times.
Brake fluid in a open container absorbs
moisture from the air resulting in a lower
boiling point. This may cause it to boil
unexpectedly during hard or prolonged
braking, resulting in sudden brake fail-
ure. This could result in a collision.
• Overfilling the brake fluid reservoir can
result in spilling brake fluid on hot en-
gine parts, causing the brake fluid to
WARNING!
catch fire. Brake fluid can also damage
painted and vinyl surfaces, care should
be taken to avoid its contact with these
surfaces.
• Do not allow petroleum based fluid to
contaminate the brake fluid. Brake seal
components could be damaged, causing
partial or complete brake failure. This
could result in a collision.
Manual Transmission
Fluid Level Check
Check the fluid level by removing the fill
plug. The fluid level should be between the
bottom of the fill hole and a point not more
than 3/16 of an inch (4.76 mm) below the
bottom of the hole.
Add fluid, if necessary, to maintain the
proper level.
Automatic Transmission
Fluid Level Check — Gasoline Engine
It is best to check the fluid level when the
transmission is at normal operating tempera-
ture (approximately 180°F/82°C). This oc-
curs after at least 15 miles (25 km) of driv-
ing. At normal operating temperature, the
fluid cannot be held comfortably between the
fingertips.
Use the following procedure to check the
transmission fluid level properly:
1. Park the vehicle on level ground.
2. Remove the engine cover by pulling it up
off the mounting studs (two in the front
and two in the rear).
3. Run the engine at normal idle speed for at
least 60 seconds, and leave the engine
running for the rest of this procedure.
4. Fully apply the parking brake, and press
the brake pedal.
SERVICING AND MAINTENANCE
184
Page 187 of 276
5. Place the gear selector momentarily into
each gear position (allowing time for the
transmission to fully engage in each posi-
tion), ending with the transmission in
PARK.
6. Remove the dipstick, wipe it clean and
reinsert it until seated.
7. Remove the dipstick again and note the
fluid level on both sides. The fluid level
reading is only valid if there is a solid
coating of oil on both sides of the dipstick.
Note that the holes in the dipstick will be
full of fluid if the actual level is at or above
the hole. The fluid level should be be-
tween the HOT (upper) reference holes on
the dipstick at normal operating tempera-
ture. If the fluid level is low, add fluid
through the dipstick tube to bring it to the
proper level.Do not overfill.Use ONLY the
specified fluid (refer to "Fluids And Lubri-
cants" under “Technical Specifications”
for fluid specifications). After adding any
quantity of oil through the dipstick tube,
wait a minimum of two minutes for the oil
to fully drain into the transmission before
rechecking the fluid level.NOTE:
• The holes in the dipstick will be full of
fluid if the actual level is at or above the
hole.
• If it is necessary to check the transmis-
sion below the operating temperature,
the fluid level should be between the
two COLD (lower) holes on the dipstick
with the fluid at approximately 80°F
(27°C). If the fluid level is correctly
established at 80° F (27°C), it should
be between the HOT (upper) reference
holes when the transmission reaches
180° F (82°C). Remember it is best to
check the level at the normal operating
temperature.
CAUTION!
If the fluid temperature is below 50°F
(10°C) it may not register on the dipstick.
Do not add fluid until the temperature is
elevated enough to produce an accurate
reading. Run the engine at idle, in PARK,
to warm the fluid.8. Reinstall the engine cover and snap it
down securely onto the four mounting
studs.
9. Check for leaks. Release the parking
brake.
NOTE:
To prevent dirt and water from entering the
transmission after checking or replenishing
fluid, make sure that the dipstick cap is
properly reseated. It is normal for the dipstick
cap to spring back slightly from its fully
seated position, as long as its seal remains
engaged in the dipstick tube.
Fluid Level Check — 2.8L Turbo Diesel
Engine
The fluid level is preset at the factory and
does not require adjustment under normal
operating conditions. Routine fluid level
checks are not required, therefore the trans-
mission filler tube is capped and no dipstick
is provided. An authorized dealer can check
your transmission fluid level using a special
service dipstick.
185
Page 191 of 276
CAUTION!
The cabin air filter is identified with an
arrow to indicate airflow direction through
the filter. Failure to properly install the
filter will result in the need to replace it
more often.
8. Close A/C Air Filter access doors and se-
cure retaining tabs.
9. Rotate the glove compartment door back
into position.
Refer to the “Maintenance Plan” for the
proper maintenance intervals.
DEALER SERVICE
An authorized dealer has the qualified service
personnel, special tools, and equipment to
perform all service operations in an expert
manner. Service Manuals are available which
include detailed service information for your
vehicle. Refer to these Service Manuals be-
fore attempting any procedure yourself.NOTE:
Intentional tampering with emissions control
systems may void your warranty and could
result in civil penalties being assessed
against you.
WARNING!
You can be badly injured working on or
around a motor vehicle. Only do service
work for which you have the knowledge
and the proper equipment. If you have any
doubt about your ability to perform a ser-
vice job, take your vehicle to a competent
mechanic.
Windshield Wiper Blades
Clean the rubber edges of the wiper blades
and the windshield periodically with a sponge
or soft cloth and a mild nonabrasive cleaner.
This will remove accumulations of salt or road
film.Operation of the wipers on dry glass for long
periods may cause deterioration of the wiper
blades. Always use washer fluid when using
the wipers to remove salt or dirt from a dry
windshield.
Avoid using the wiper blades to remove frost
or ice from the windshield. Keep the blade
rubber out of contact with petroleum prod-
ucts such as engine oil, gasoline, etc.
NOTE:
Life expectancy of wiper blades varies de-
pending on geographical area and frequency
of use. Poor performance of blades may be
present with chattering, marks, water lines or
wet spots. If any of these conditions are
present, clean the wiper blades or replace as
necessary.
The wiper blades and wiper arms should be
inspected periodically, not just when wiper
performance problems are experienced. This
inspection should include the following
points:
• Wear Or Uneven Edges
• Foreign Material
189
Page 209 of 276
TECHNICAL SPECIFICATIONS
VEHICLE IDENTIFICATION
NUMBER.................208
WHEEL AND TIRE TORQUE
SPECIFICATIONS...........208
Torque Specifications............208
FUEL REQUIREMENTS — GASOLINE
ENGINES.................209
Ethanol....................209
FUEL REQUIREMENTS — DIESEL
ENGINES.................209
FLUID CAPACITIES..........210
FLUIDS AND LUBRICANTS.....210
Engine.....................210
Chassis....................211
MOPAR ACCESSORIES........212
Authentic Accessories And Jeep
Performance Parts By Mopar.......212
TECHNICAL SPECIFICATIONS
207
Page 210 of 276
VEHICLE IDENTIFICATION
NUMBER
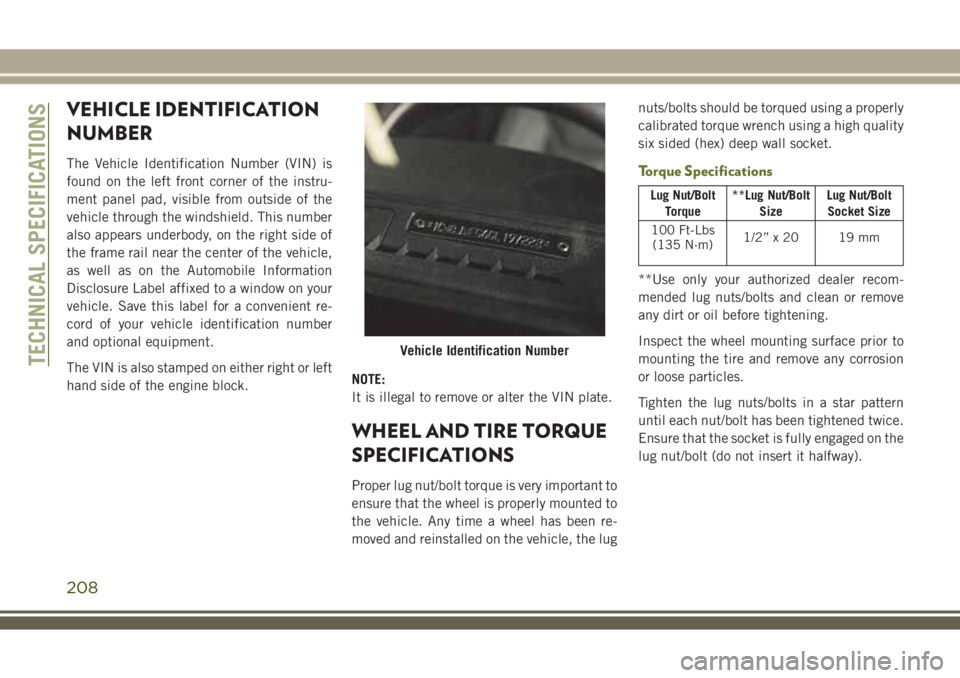
The Vehicle Identification Number (VIN) is
found on the left front corner of the instru-
ment panel pad, visible from outside of the
vehicle through the windshield. This number
also appears underbody, on the right side of
the frame rail near the center of the vehicle,
as well as on the Automobile Information
Disclosure Label affixed to a window on your
vehicle. Save this label for a convenient re-
cord of your vehicle identification number
and optional equipment.
The VIN is also stamped on either right or left
hand side of the engine block.NOTE:
It is illegal to remove or alter the VIN plate.
WHEEL AND TIRE TORQUE
SPECIFICATIONS
Proper lug nut/bolt torque is very important to
ensure that the wheel is properly mounted to
the vehicle. Any time a wheel has been re-
moved and reinstalled on the vehicle, the lugnuts/bolts should be torqued using a properly
calibrated torque wrench using a high quality
six sided (hex) deep wall socket.
Torque Specifications
Lug Nut/Bolt
Torque**Lug Nut/Bolt
SizeLug Nut/Bolt
Socket Size
100 Ft-Lbs
(135 N·m)1/2” x 20 19 mm
**Use only your authorized dealer recom-
mended lug nuts/bolts and clean or remove
any dirt or oil before tightening.
Inspect the wheel mounting surface prior to
mounting the tire and remove any corrosion
or loose particles.
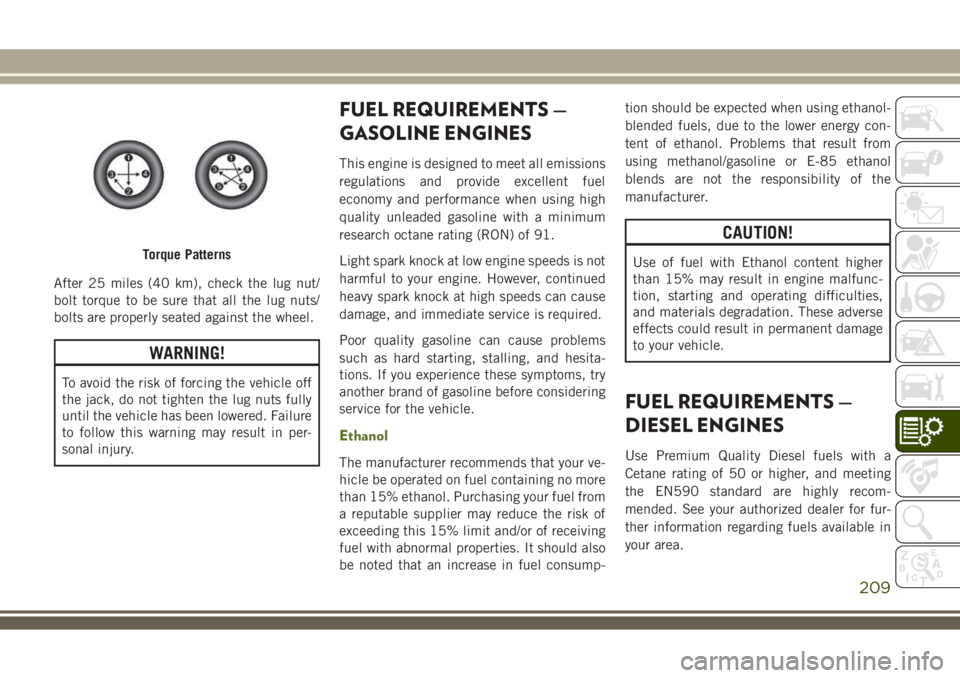
Tighten the lug nuts/bolts in a star pattern
until each nut/bolt has been tightened twice.
Ensure that the socket is fully engaged on the
lug nut/bolt (do not insert it halfway).
Vehicle Identification NumberTECHNICAL SPECIFICATIONS
208
Page 211 of 276
After 25 miles (40 km), check the lug nut/
bolt torque to be sure that all the lug nuts/
bolts are properly seated against the wheel.
WARNING!
To avoid the risk of forcing the vehicle off
the jack, do not tighten the lug nuts fully
until the vehicle has been lowered. Failure
to follow this warning may result in per-
sonal injury.
FUEL REQUIREMENTS —
GASOLINE ENGINES
This engine is designed to meet all emissions
regulations and provide excellent fuel
economy and performance when using high
quality unleaded gasoline with a minimum
research octane rating (RON) of 91.
Light spark knock at low engine speeds is not
harmful to your engine. However, continued
heavy spark knock at high speeds can cause
damage, and immediate service is required.
Poor quality gasoline can cause problems
such as hard starting, stalling, and hesita-
tions. If you experience these symptoms, try
another brand of gasoline before considering
service for the vehicle.
Ethanol
The manufacturer recommends that your ve-
hicle be operated on fuel containing no more
than 15% ethanol. Purchasing your fuel from
a reputable supplier may reduce the risk of
exceeding this 15% limit and/or of receiving
fuel with abnormal properties. It should also
be noted that an increase in fuel consump-tion should be expected when using ethanol-
blended fuels, due to the lower energy con-
tent of ethanol. Problems that result from
using methanol/gasoline or E-85 ethanol
blends are not the responsibility of the
manufacturer.
CAUTION!
Use of fuel with Ethanol content higher
than 15% may result in engine malfunc-
tion, starting and operating difficulties,
and materials degradation. These adverse
effects could result in permanent damage
to your vehicle.
FUEL REQUIREMENTS —
DIESEL ENGINES
Use Premium Quality Diesel fuels with a
Cetane rating of 50 or higher, and meeting
the EN590 standard are highly recom-
mended. See your authorized dealer for fur-
ther information regarding fuels available in
your area.
Torque Patterns
209
Page 212 of 276
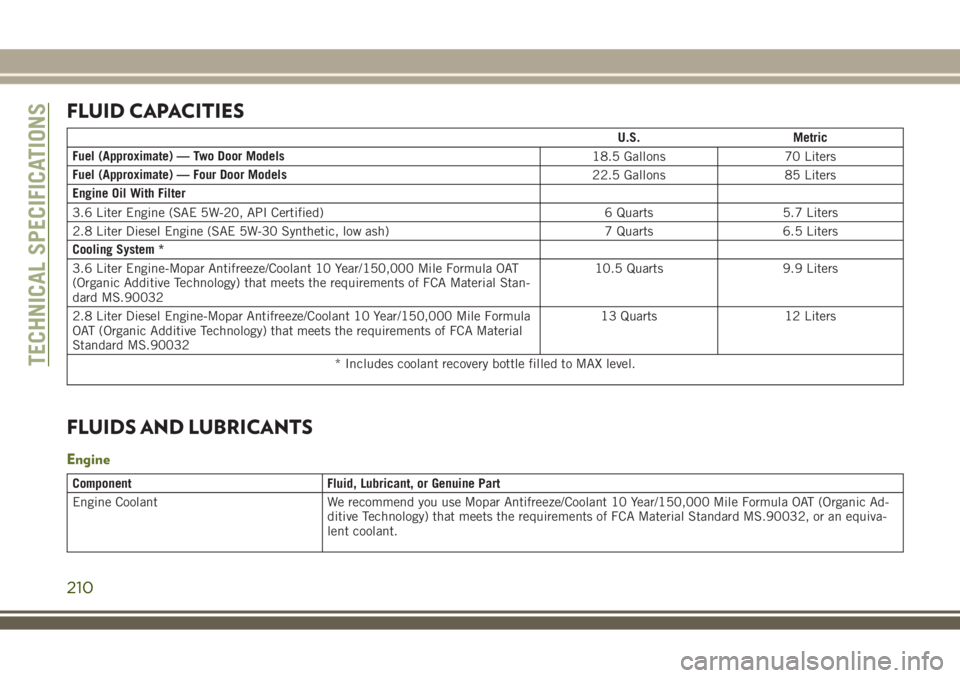
FLUID CAPACITIES
U.S. Metric
Fuel (Approximate) — Two Door Models
18.5 Gallons 70 Liters
Fuel (Approximate) — Four Door Models
22.5 Gallons 85 Liters
Engine Oil With Filter
3.6 Liter Engine (SAE 5W-20, API Certified) 6 Quarts 5.7 Liters
2.8 Liter Diesel Engine (SAE 5W-30 Synthetic, low ash) 7 Quarts 6.5 Liters
Cooling System *
3.6 Liter Engine-Mopar Antifreeze/Coolant 10 Year/150,000 Mile Formula OAT
(Organic Additive Technology) that meets the requirements of FCA Material Stan-
dard MS.9003210.5 Quarts 9.9 Liters
2.8 Liter Diesel Engine-Mopar Antifreeze/Coolant 10 Year/150,000 Mile Formula
OAT (Organic Additive Technology) that meets the requirements of FCA Material
Standard MS.9003213 Quarts 12 Liters
* Includes coolant recovery bottle filled to MAX level.
FLUIDS AND LUBRICANTS
Engine
Component Fluid, Lubricant, or Genuine Part
Engine Coolant We recommend you use Mopar Antifreeze/Coolant 10 Year/150,000 Mile Formula OAT (Organic Ad-
ditive Technology) that meets the requirements of FCA Material Standard MS.90032, or an equiva-
lent coolant.
TECHNICAL SPECIFICATIONS
210
Page 213 of 276
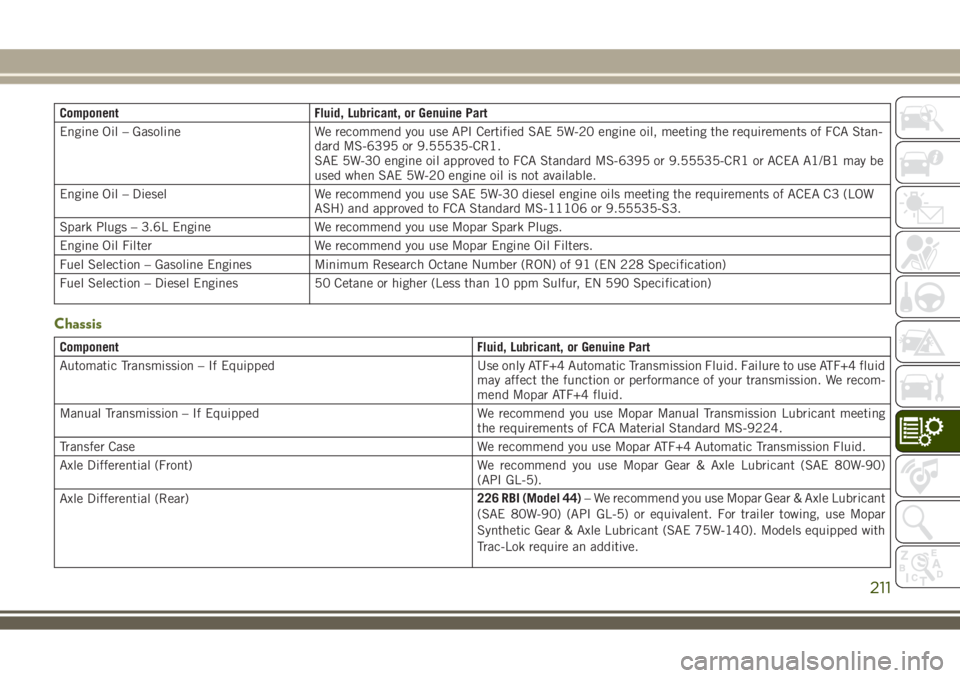
Component Fluid, Lubricant, or Genuine Part
Engine Oil – Gasoline We recommend you use API Certified SAE 5W-20 engine oil, meeting the requirements of FCA Stan-
dard MS-6395 or 9.55535-CR1.
SAE 5W-30 engine oil approved to FCA Standard MS-6395 or 9.55535-CR1 or ACEA A1/B1 may be
used when SAE 5W-20 engine oil is not available.
Engine Oil – Diesel We recommend you use SAE 5W-30 diesel engine oils meeting the requirements of ACEA C3 (LOW
ASH) and approved to FCA Standard MS-11106 or 9.55535-S3.
Spark Plugs – 3.6L Engine We recommend you use Mopar Spark Plugs.
Engine Oil Filter We recommend you use Mopar Engine Oil Filters.
Fuel Selection – Gasoline Engines Minimum Research Octane Number (RON) of 91 (EN 228 Specification)
Fuel Selection – Diesel Engines 50 Cetane or higher (Less than 10 ppm Sulfur, EN 590 Specification)
Chassis
Component Fluid, Lubricant, or Genuine Part
Automatic Transmission – If Equipped Use only ATF+4 Automatic Transmission Fluid. Failure to use ATF+4 fluid
may affect the function or performance of your transmission. We recom-
mend Mopar ATF+4 fluid.
Manual Transmission – If Equipped We recommend you use Mopar Manual Transmission Lubricant meeting
the requirements of FCA Material Standard MS-9224.
Transfer Case We recommend you use Mopar ATF+4 Automatic Transmission Fluid.
Axle Differential (Front) We recommend you use Mopar Gear & Axle Lubricant (SAE 80W-90)
(API GL-5).
Axle Differential (Rear)226 RBI (Model 44)– We recommend you use Mopar Gear & Axle Lubricant
(SAE 80W-90) (API GL-5) or equivalent. For trailer towing, use Mopar
Synthetic Gear & Axle Lubricant (SAE 75W-140). Models equipped with
Trac-Lok require an additive.
211
Page 261 of 276
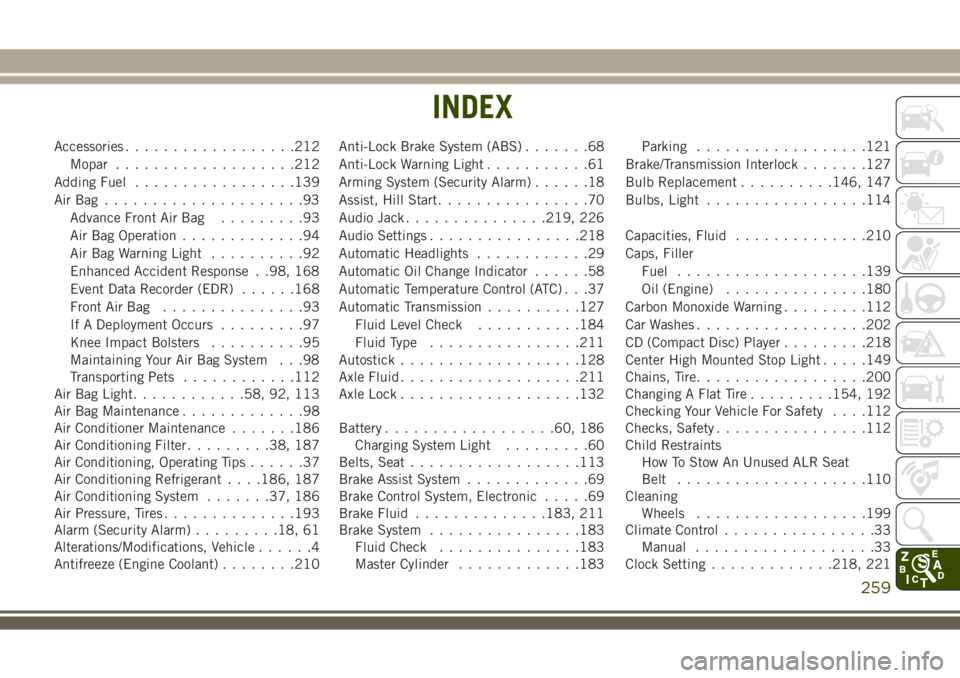
Accessories..................212
Mopar...................212
Adding Fuel.................139
AirBag .....................93
Advance Front Air Bag.........93
Air Bag Operation.............94
Air Bag Warning Light..........92
Enhanced Accident Response . .98, 168
Event Data Recorder (EDR)......168
Front Air Bag...............93
If A Deployment Occurs.........97
Knee Impact Bolsters..........95
Maintaining Your Air Bag System . . .98
Transporting Pets............112
Air Bag Light............58, 92, 113
Air Bag Maintenance.............98
Air Conditioner Maintenance.......186
Air Conditioning Filter.........38, 187
Air Conditioning, Operating Tips......37
Air Conditioning Refrigerant. . . .186, 187
Air Conditioning System.......37, 186
Air Pressure, Tires..............193
Alarm (Security Alarm).........18, 61
Alterations/Modifications, Vehicle......4
Antifreeze (Engine Coolant)........210Anti-Lock Brake System (ABS).......68
Anti-Lock Warning Light...........61
Arming System (Security Alarm)......18
Assist, Hill Start................70
Audio Jack...............219, 226
Audio Settings................218
Automatic Headlights............29
Automatic Oil Change Indicator......58
Automatic Temperature Control (ATC) . . .37
Automatic Transmission..........127
Fluid Level Check...........184
Fluid Type................211
Autostick...................128
Axle Fluid...................211
Axle Lock...................132
Battery..................60, 186
Charging System Light.........60
Belts, Seat
.................
.113
Brake Assist System.............69
Brake Control System, Electronic.....69
Brake Fluid..............183, 211
Brake System................183
Fluid Check...............183
Master Cylinder.............183Parking..................121
Brake/Transmission Interlock.......127
Bulb Replacement..........146, 147
Bulbs, Light.................114
Capacities, Fluid..............210
Caps, Filler
Fuel....................139
Oil (Engine)...............180
Carbon Monoxide Warning.........112
Car Washes..................202
CD (Compact Disc) Player.........218
Center High Mounted Stop Light.....149
Chains, Tire..................200
Changing A Flat Tire.........154, 192
Checking Your Vehicle For Safety. . . .112
Checks, Safety................112
Child Restraints
How To Stow An Unused ALR Seat
Belt....................110
Cleaning
Wheels..................199
Climate Control................33
Manual...................33
Clock Setting.............218, 221
INDEX
259