JEEP YJ 1995 Service And Repair Manual
Manufacturer: JEEP, Model Year: 1995, Model line: YJ, Model: JEEP YJ 1995Pages: 2158, PDF Size: 81.9 MB
Page 371 of 2158
ignition switch to ON. Lamp should light. If OK, go
to next step. If not OK, replace bulb.
(3) Turn ignition switch to OFF. Disconnect battery
negative cable. Unplug cluster connector B. Check for
continuity between cavity 2 (cavity 15 - RHD) of clus-
ter connector B and a good ground. There should be
no continuity. If OK, go to next step. If not OK, re-
pair short circuit to PCM as required.
(4) Check continuity between cavity 2 (cavity 15 -
RHD) of cluster connector B and cavity 32 of PCM
connector. There should be continuity. If not OK, re-
pair open circuit to PCM as required.
SEAT BELT REMINDER LAMP
(1) Refer to Group 8U - Chime/Buzzer Warning
Systems to check chime/buzzer module operation. If
OK, go to next step. If not OK, replace chime/buzzer
module.
(2) Disconnect battery negative cable. Remove in-
strument cluster bezel and cluster assembly. Unplug
cluster (tell-tale) connector B. Check for continuity
between cavity 16 (cavity 1 - RHD) of cluster connec-
tor B and a good ground. There should be continuity.
If OK, plug cluster connector B back into cluster and
go to next step. If not OK, repair open circuit to
ground as required.
(3) Connect battery negative cable. Install a
jumper wire between a 12-volt battery feed and cav-
ity 15 (cavity 2 - RHD) of cluster connector B. Lamp
should light. If OK, go to next step. If not OK, re-
place bulb.
(4) Disconnect battery negative cable. Unplug
chime/buzzer module from fuseblock module (connec-
tor near fuseblock module - RHD). Unplug cluster
connector B. Check for continuity between cavity 15
(cavity 2 - RHD) of cluster connector B and a good
ground. There should be no continuity. If OK, go to
next step. If not OK, repair short circuit to chime/
buzzer module as required.
(5) Check continuity between cavity 15 (cavity 2 -
RHD) of cluster connector B and cavity for terminal
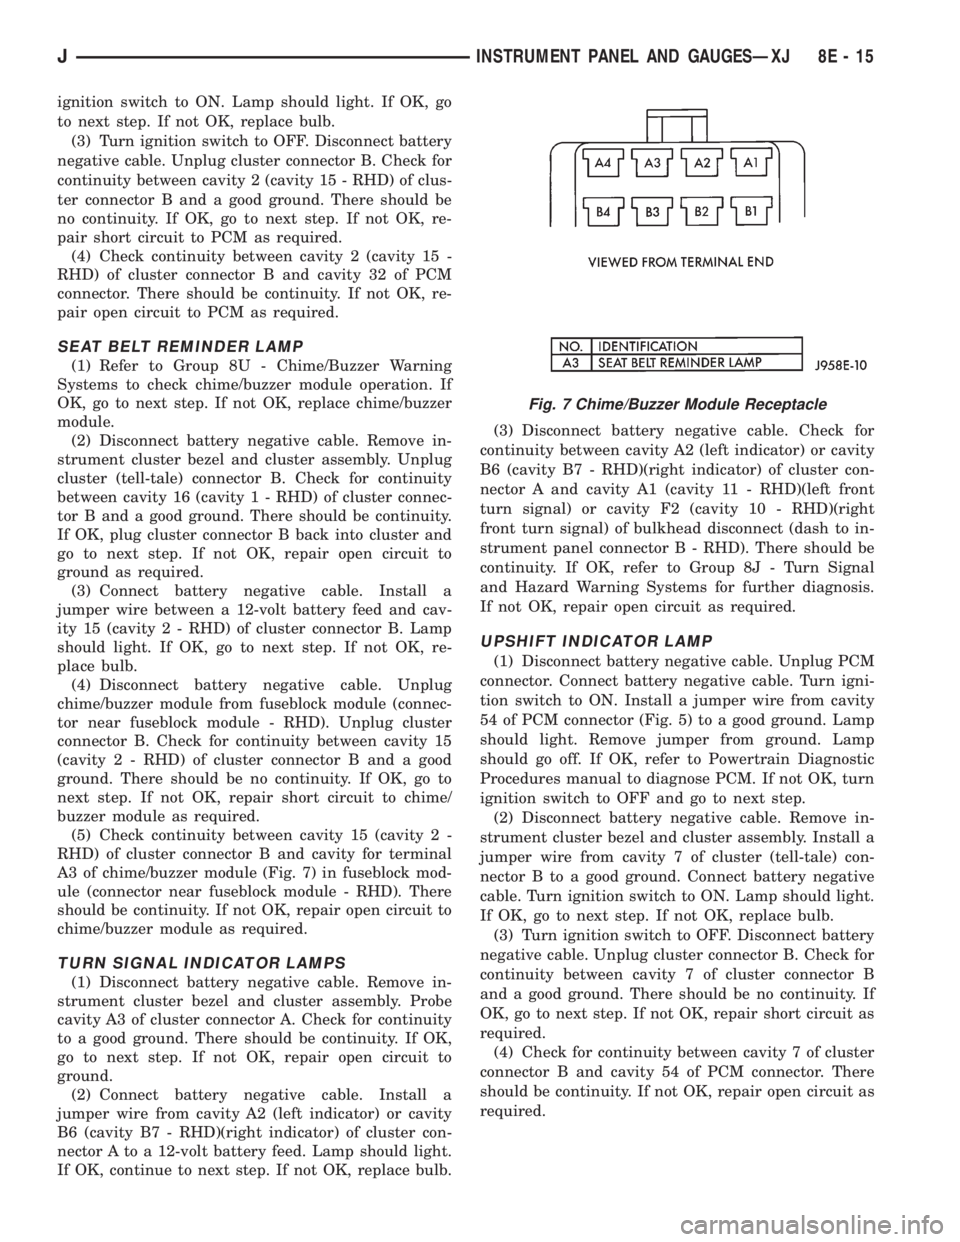
A3 of chime/buzzer module (Fig. 7) in fuseblock mod-
ule (connector near fuseblock module - RHD). There
should be continuity. If not OK, repair open circuit to
chime/buzzer module as required.
TURN SIGNAL INDICATOR LAMPS
(1) Disconnect battery negative cable. Remove in-
strument cluster bezel and cluster assembly. Probe
cavity A3 of cluster connector A. Check for continuity
to a good ground. There should be continuity. If OK,
go to next step. If not OK, repair open circuit to
ground.
(2) Connect battery negative cable. Install a
jumper wire from cavity A2 (left indicator) or cavity
B6 (cavity B7 - RHD)(right indicator) of cluster con-
nector A to a 12-volt battery feed. Lamp should light.
If OK, continue to next step. If not OK, replace bulb.(3) Disconnect battery negative cable. Check for
continuity between cavity A2 (left indicator) or cavity
B6 (cavity B7 - RHD)(right indicator) of cluster con-
nector A and cavity A1 (cavity 11 - RHD)(left front
turn signal) or cavity F2 (cavity 10 - RHD)(right
front turn signal) of bulkhead disconnect (dash to in-
strument panel connector B - RHD). There should be
continuity. If OK, refer to Group 8J - Turn Signal
and Hazard Warning Systems for further diagnosis.
If not OK, repair open circuit as required.
UPSHIFT INDICATOR LAMP
(1) Disconnect battery negative cable. Unplug PCM
connector. Connect battery negative cable. Turn igni-
tion switch to ON. Install a jumper wire from cavity
54 of PCM connector (Fig. 5) to a good ground. Lamp
should light. Remove jumper from ground. Lamp
should go off. If OK, refer to Powertrain Diagnostic
Procedures manual to diagnose PCM. If not OK, turn
ignition switch to OFF and go to next step.
(2) Disconnect battery negative cable. Remove in-
strument cluster bezel and cluster assembly. Install a
jumper wire from cavity 7 of cluster (tell-tale) con-
nector B to a good ground. Connect battery negative
cable. Turn ignition switch to ON. Lamp should light.
If OK, go to next step. If not OK, replace bulb.
(3) Turn ignition switch to OFF. Disconnect battery
negative cable. Unplug cluster connector B. Check for
continuity between cavity 7 of cluster connector B
and a good ground. There should be no continuity. If
OK, go to next step. If not OK, repair short circuit as
required.
(4) Check for continuity between cavity 7 of cluster
connector B and cavity 54 of PCM connector. There
should be continuity. If not OK, repair open circuit as
required.
Fig. 7 Chime/Buzzer Module Receptacle
JINSTRUMENT PANEL AND GAUGESÐXJ 8E - 15
Page 372 of 2158
CLUSTER ILLUMINATION LAMPS
(1) Check fuse 19 (fuse 25 - RHD) in fuseblock
module. If OK, go to next step. If not OK, replace
fuse.
(2) Turn park lamps on at headlamp switch. Rotate
headlamp switch knob counterclockwise to just before
interior lamps detent. Check for battery voltage at
fuse 19 (fuse 25 - RHD) in fuseblock module. Rotate
headlamp switch clockwise while observing test volt-
meter. Reading should go from battery voltage to zero
volts. If OK, go to next step. If not OK, repair open
circuit to headlamp switch or refer to Group 8L -
Lamps to diagnose headlamp switch.
(3) Disconnect battery negative cable. Remove in-
strument cluster bezel and cluster assembly. Unplug
cluster connector A. Connect battery negative cable.Turn park lamps on at headlamp switch. Rotate
headlamp switch knob counterclockwise to just before
interior lamps detent. Check for battery voltage at
cavity A7 (cavity A6 - RHD) of cluster connector A. If
OK, go to next step. If not OK, repair open circuit to
fuse as required.
(4) Turn park lamps off. Disconnect battery nega-
tive cable. Remove fuse 19 (fuse 25 - RHD) from fuse-
block module. Probe cavity A7 (cavity A6 - RHD) of
cluster connector A. Check for continuity to a good
ground. There should be no continuity. If OK, go to
next step. If not OK, repair short circuit as required.
(5) Probe cavity A3 of cluster connector A. Check
for continuity to ground. There should be continuity.
If not OK, repair open circuit as required.
8E - 16 INSTRUMENT PANEL AND GAUGESÐXJJ
Page 373 of 2158
SERVICE PROCEDURES
CLUSTER ASSEMBLY REMOVE/INSTALL
(1) Disconnect battery negative cable.
(2) Remove upper and lower steering column
shrouds and steering column to instrument panel be-
zel gap hider. If equipped with tilt steering, apply
tape to tilt mechanism on top of steering column to
protect instrument panel bezel from damage during
removal.
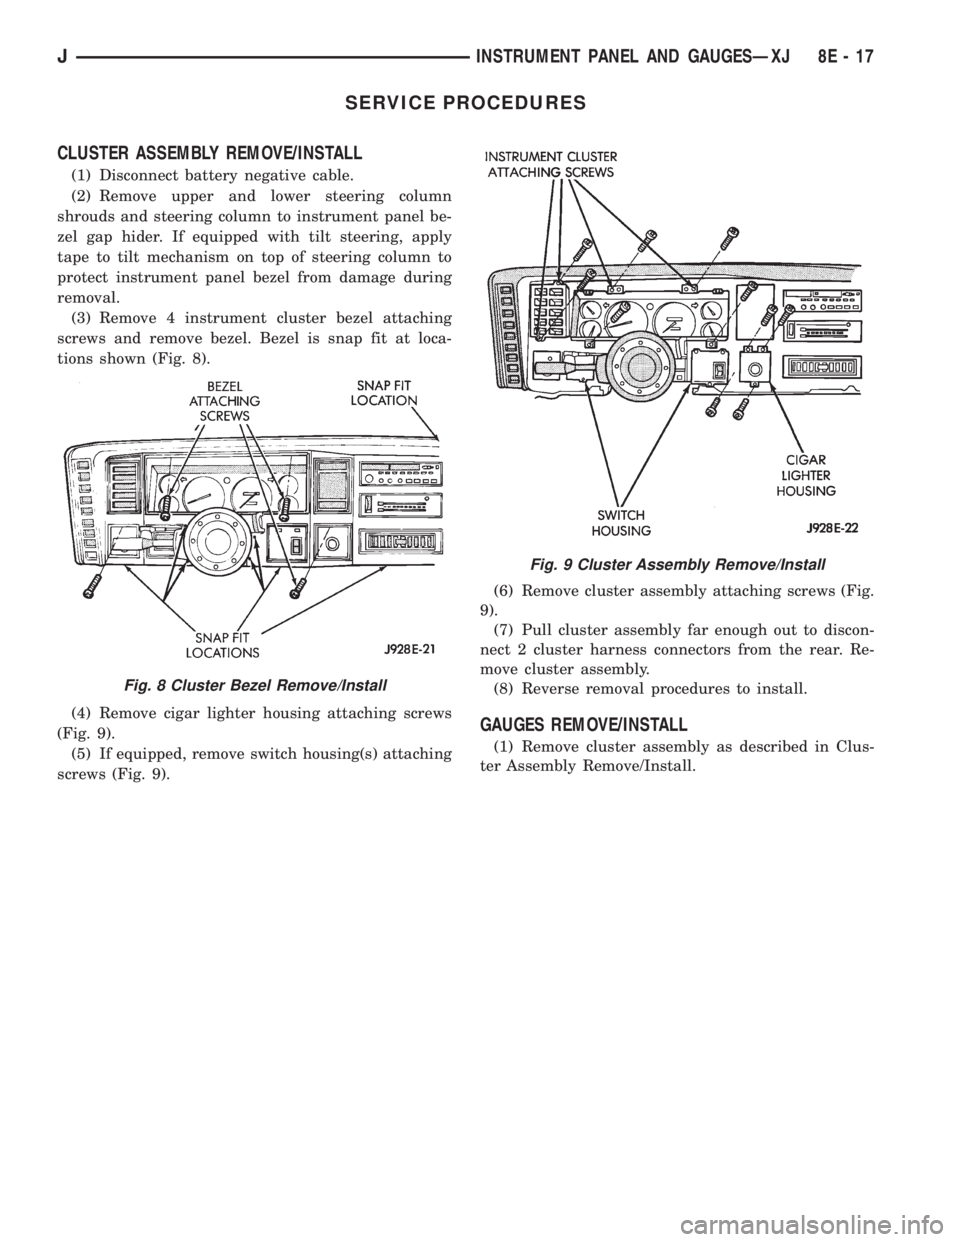
(3) Remove 4 instrument cluster bezel attaching
screws and remove bezel. Bezel is snap fit at loca-
tions shown (Fig. 8).
(4) Remove cigar lighter housing attaching screws
(Fig. 9).
(5) If equipped, remove switch housing(s) attaching
screws (Fig. 9).(6) Remove cluster assembly attaching screws (Fig.
9).
(7) Pull cluster assembly far enough out to discon-
nect 2 cluster harness connectors from the rear. Re-
move cluster assembly.
(8) Reverse removal procedures to install.
GAUGES REMOVE/INSTALL
(1) Remove cluster assembly as described in Clus-
ter Assembly Remove/Install.
Fig. 8 Cluster Bezel Remove/Install
Fig. 9 Cluster Assembly Remove/Install
JINSTRUMENT PANEL AND GAUGESÐXJ 8E - 17
Page 374 of 2158
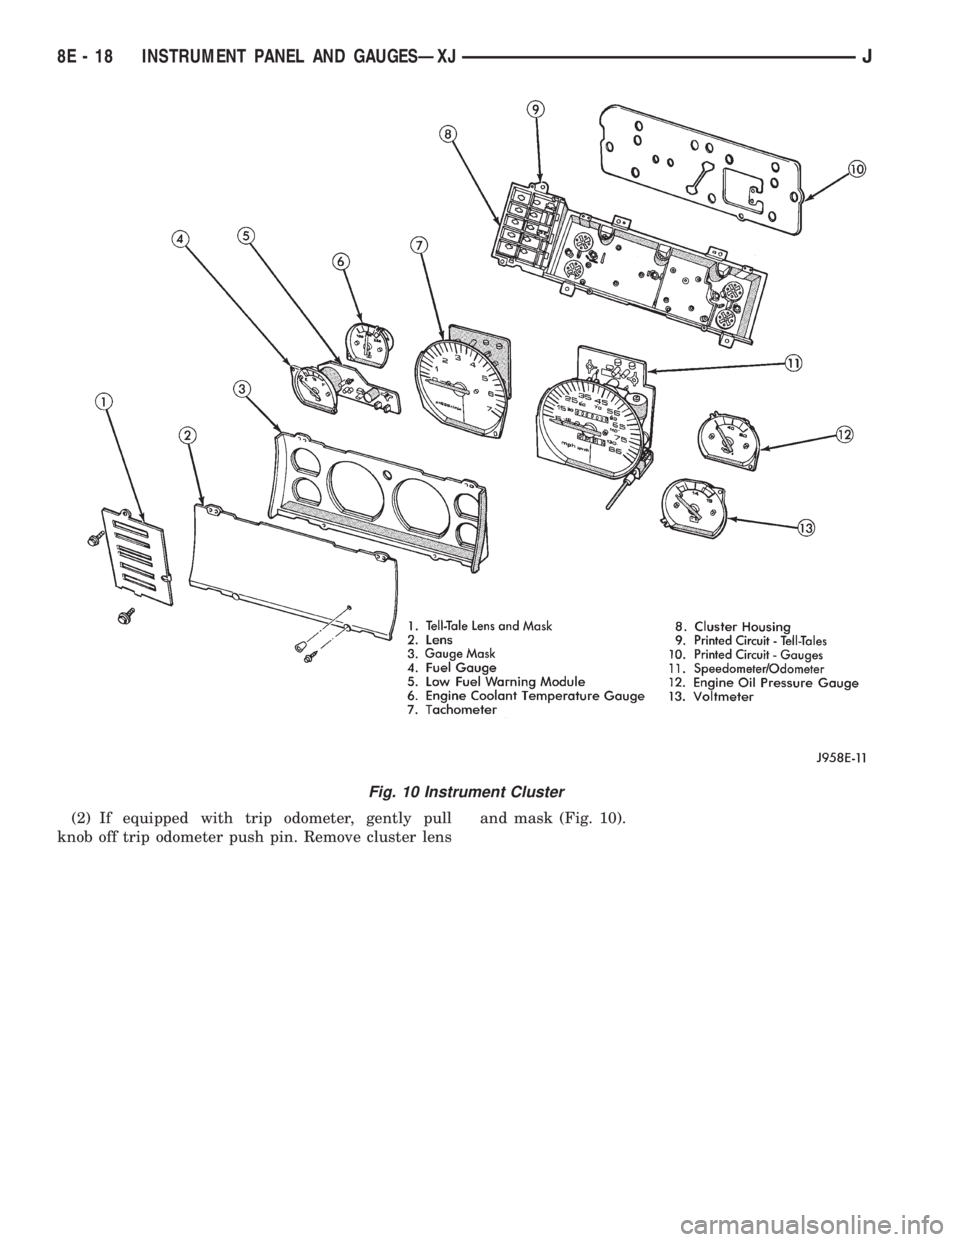
(2) If equipped with trip odometer, gently pull
knob off trip odometer push pin. Remove cluster lensand mask (Fig. 10).
Fig. 10 Instrument Cluster
8E - 18 INSTRUMENT PANEL AND GAUGESÐXJJ
Page 375 of 2158
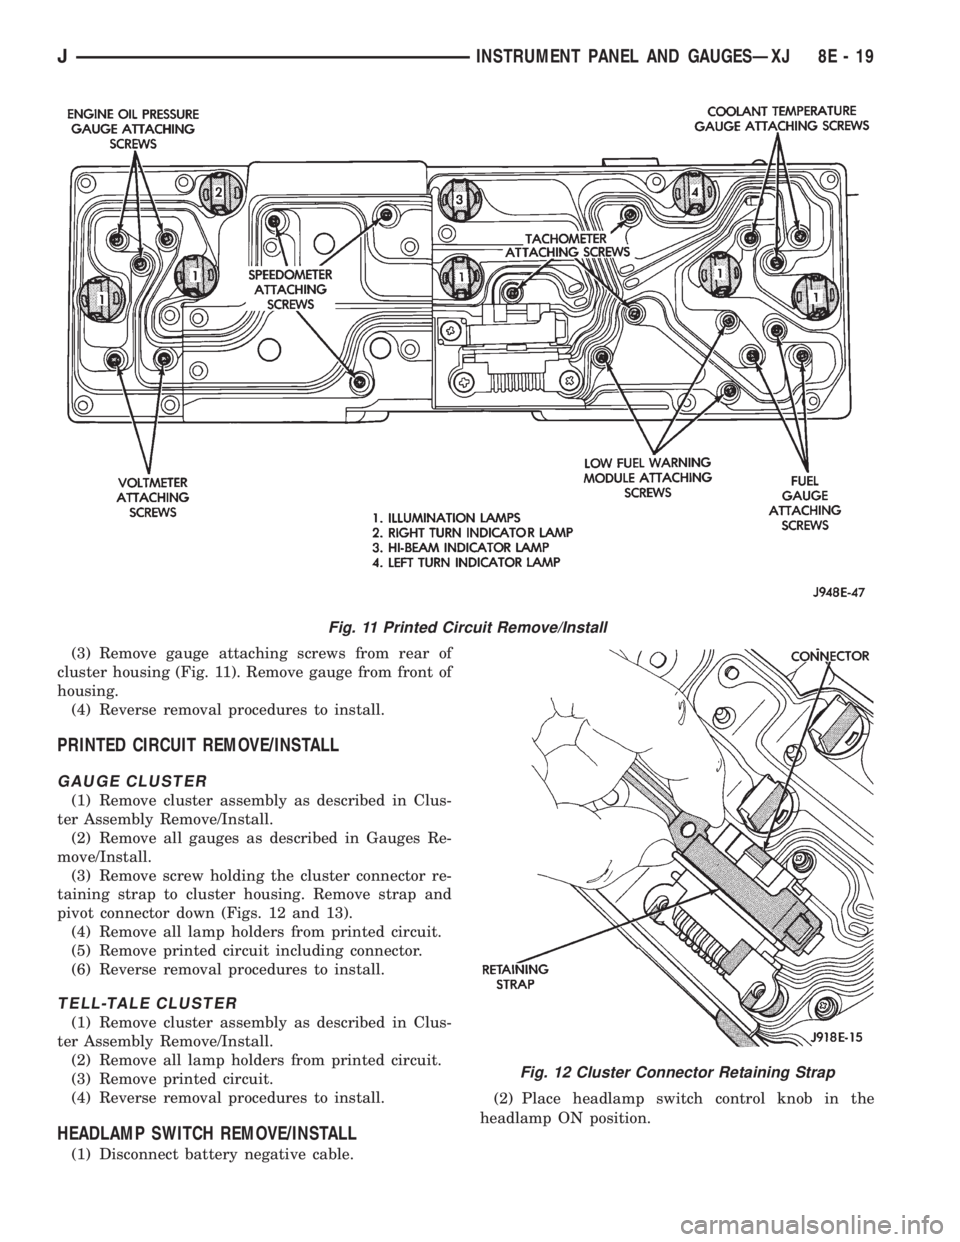
(3) Remove gauge attaching screws from rear of
cluster housing (Fig. 11). Remove gauge from front of
housing.
(4) Reverse removal procedures to install.
PRINTED CIRCUIT REMOVE/INSTALL
GAUGE CLUSTER
(1) Remove cluster assembly as described in Clus-
ter Assembly Remove/Install.
(2) Remove all gauges as described in Gauges Re-
move/Install.
(3) Remove screw holding the cluster connector re-
taining strap to cluster housing. Remove strap and
pivot connector down (Figs. 12 and 13).
(4) Remove all lamp holders from printed circuit.
(5) Remove printed circuit including connector.
(6) Reverse removal procedures to install.
TELL-TALE CLUSTER
(1) Remove cluster assembly as described in Clus-
ter Assembly Remove/Install.
(2) Remove all lamp holders from printed circuit.
(3) Remove printed circuit.
(4) Reverse removal procedures to install.
HEADLAMP SWITCH REMOVE/INSTALL
(1) Disconnect battery negative cable.(2) Place headlamp switch control knob in the
headlamp ON position.
Fig. 11 Printed Circuit Remove/Install
Fig. 12 Cluster Connector Retaining Strap
JINSTRUMENT PANEL AND GAUGESÐXJ 8E - 19
Page 376 of 2158
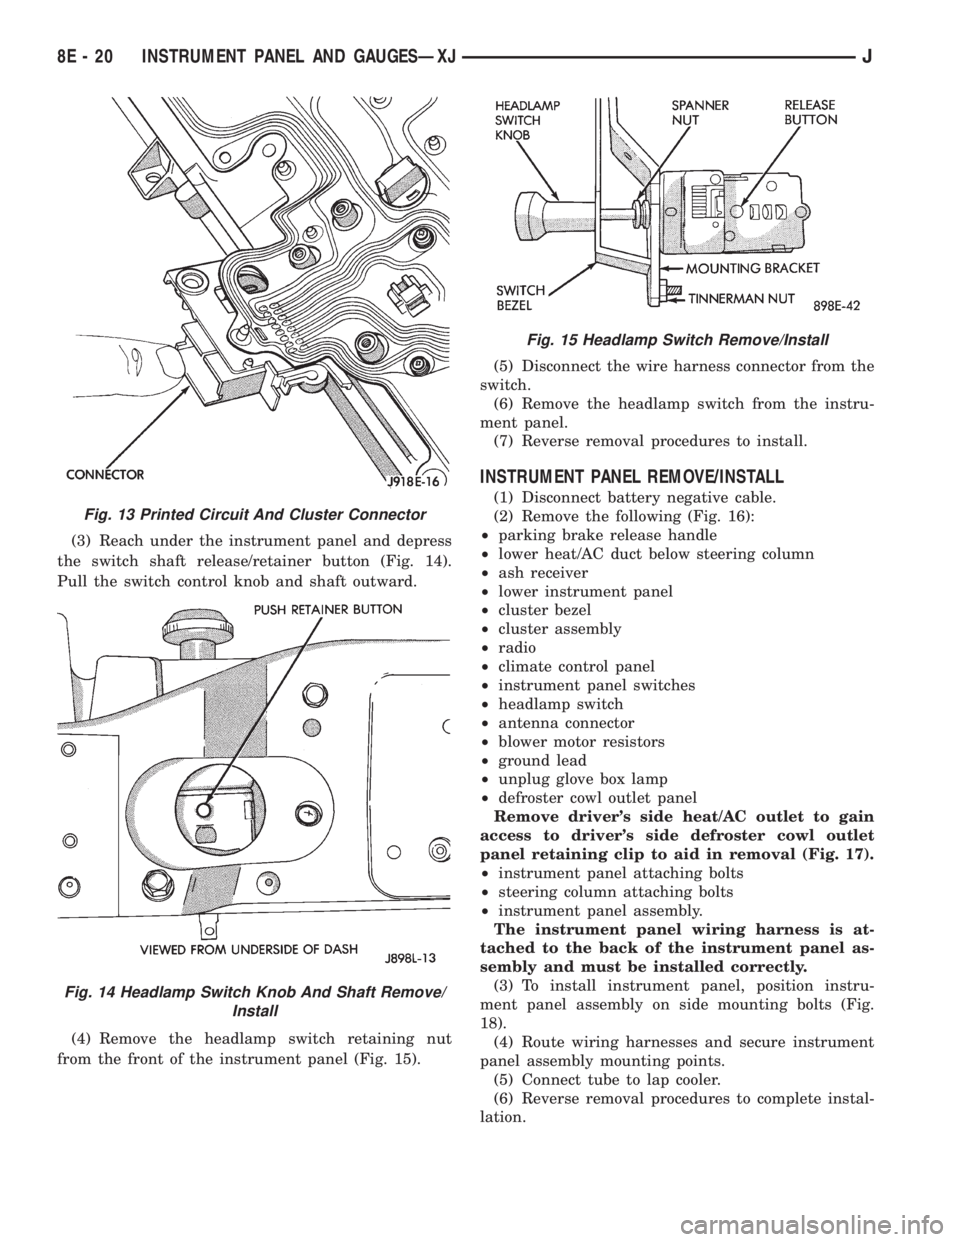
(3) Reach under the instrument panel and depress
the switch shaft release/retainer button (Fig. 14).
Pull the switch control knob and shaft outward.
(4) Remove the headlamp switch retaining nut
from the front of the instrument panel (Fig. 15).(5) Disconnect the wire harness connector from the
switch.
(6) Remove the headlamp switch from the instru-
ment panel.
(7) Reverse removal procedures to install.
INSTRUMENT PANEL REMOVE/INSTALL
(1) Disconnect battery negative cable.
(2) Remove the following (Fig. 16):
²parking brake release handle
²lower heat/AC duct below steering column
²ash receiver
²lower instrument panel
²cluster bezel
²cluster assembly
²radio
²climate control panel
²instrument panel switches
²headlamp switch
²antenna connector
²blower motor resistors
²ground lead
²unplug glove box lamp
²defroster cowl outlet panel
Remove driver's side heat/AC outlet to gain
access to driver's side defroster cowl outlet
panel retaining clip to aid in removal (Fig. 17).
²instrument panel attaching bolts
²steering column attaching bolts
²instrument panel assembly.
The instrument panel wiring harness is at-
tached to the back of the instrument panel as-
sembly and must be installed correctly.
(3) To install instrument panel, position instru-
ment panel assembly on side mounting bolts (Fig.
18).
(4) Route wiring harnesses and secure instrument
panel assembly mounting points.
(5) Connect tube to lap cooler.
(6) Reverse removal procedures to complete instal-
lation.
Fig. 13 Printed Circuit And Cluster Connector
Fig. 14 Headlamp Switch Knob And Shaft Remove/
Install
Fig. 15 Headlamp Switch Remove/Install
8E - 20 INSTRUMENT PANEL AND GAUGESÐXJJ
Page 377 of 2158
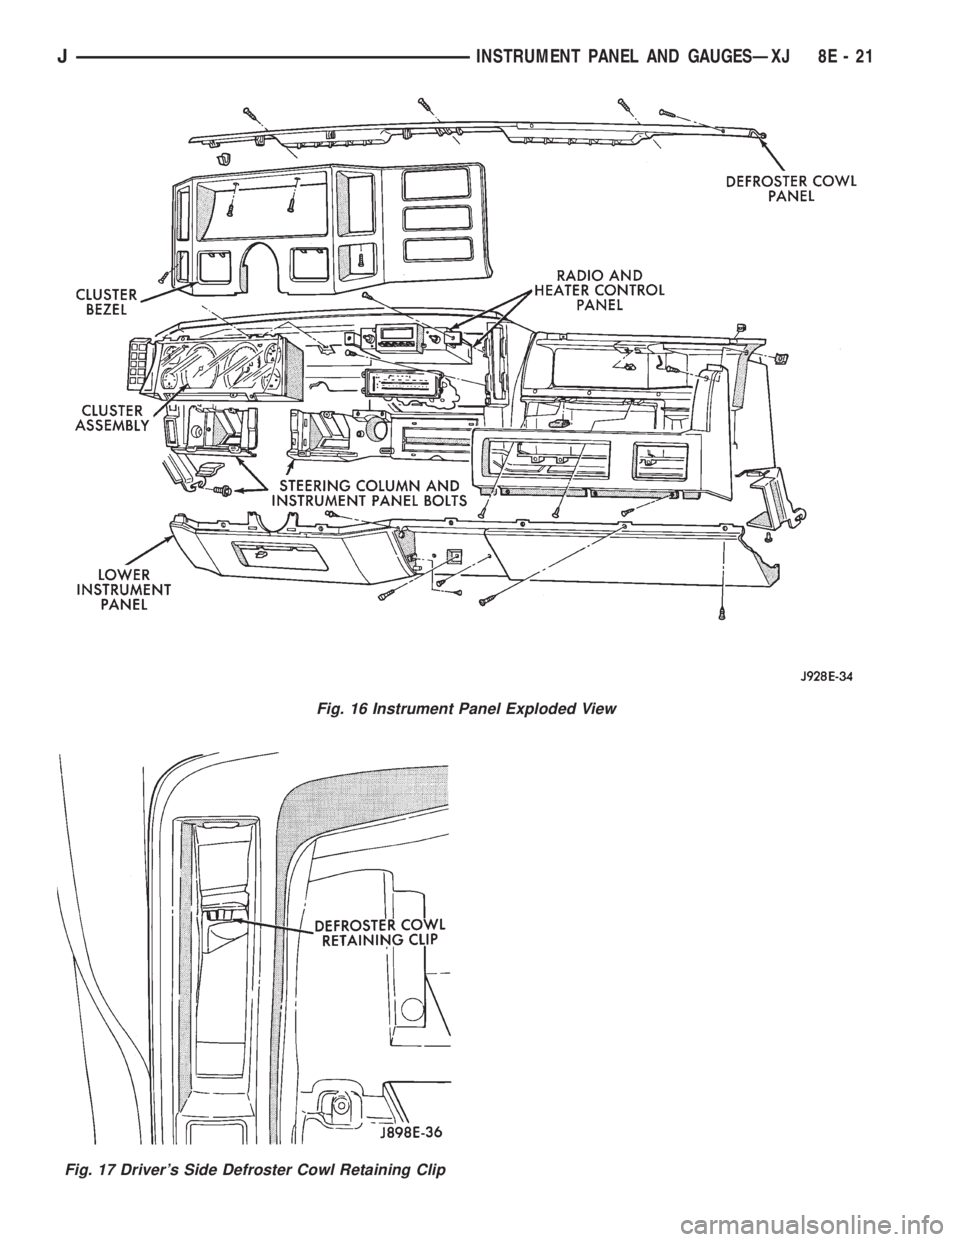
Fig. 16 Instrument Panel Exploded View
Fig. 17 Driver's Side Defroster Cowl Retaining Clip
JINSTRUMENT PANEL AND GAUGESÐXJ 8E - 21
Page 378 of 2158
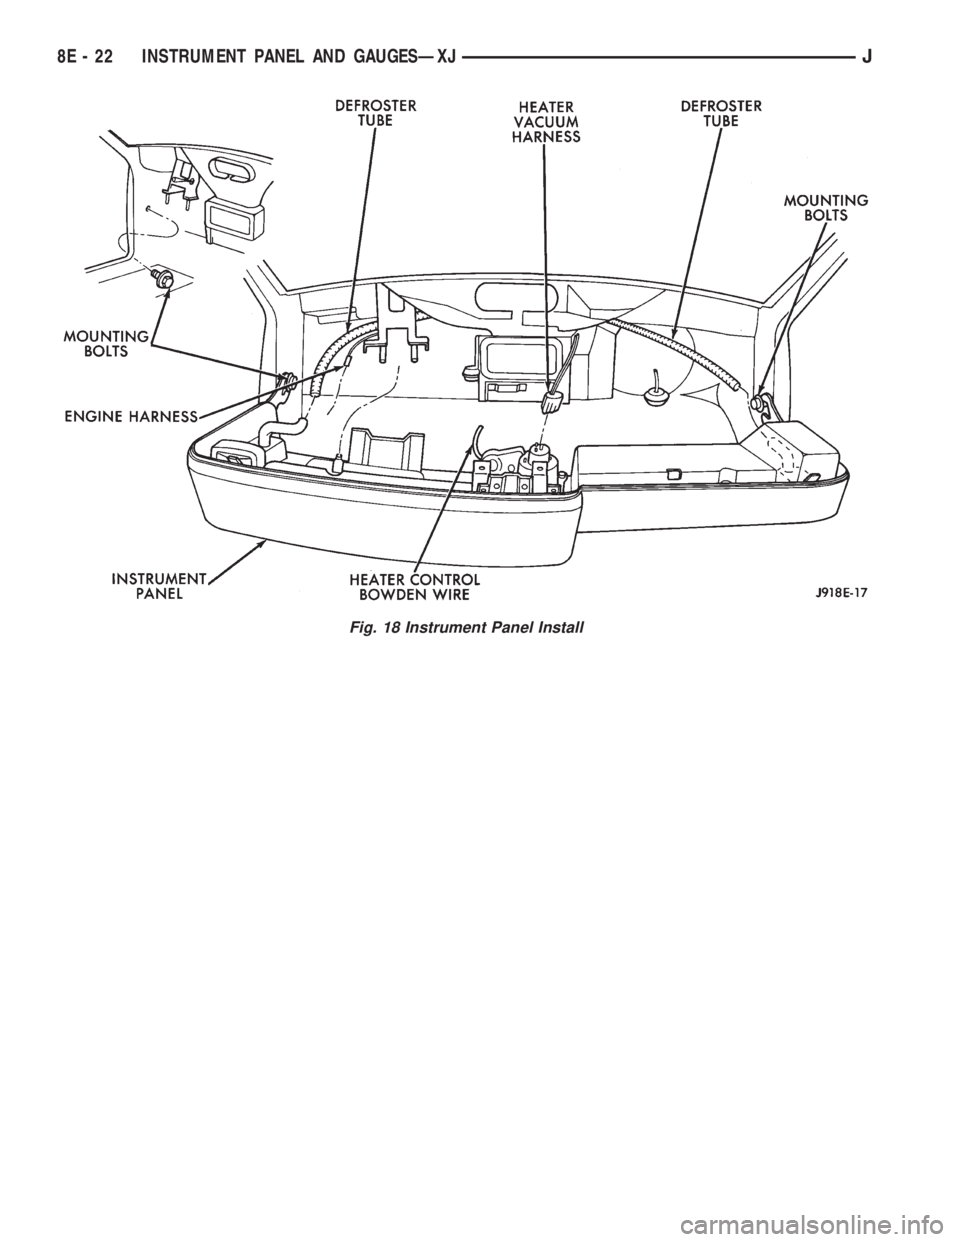
Fig. 18 Instrument Panel Install
8E - 22 INSTRUMENT PANEL AND GAUGESÐXJJ
Page 379 of 2158
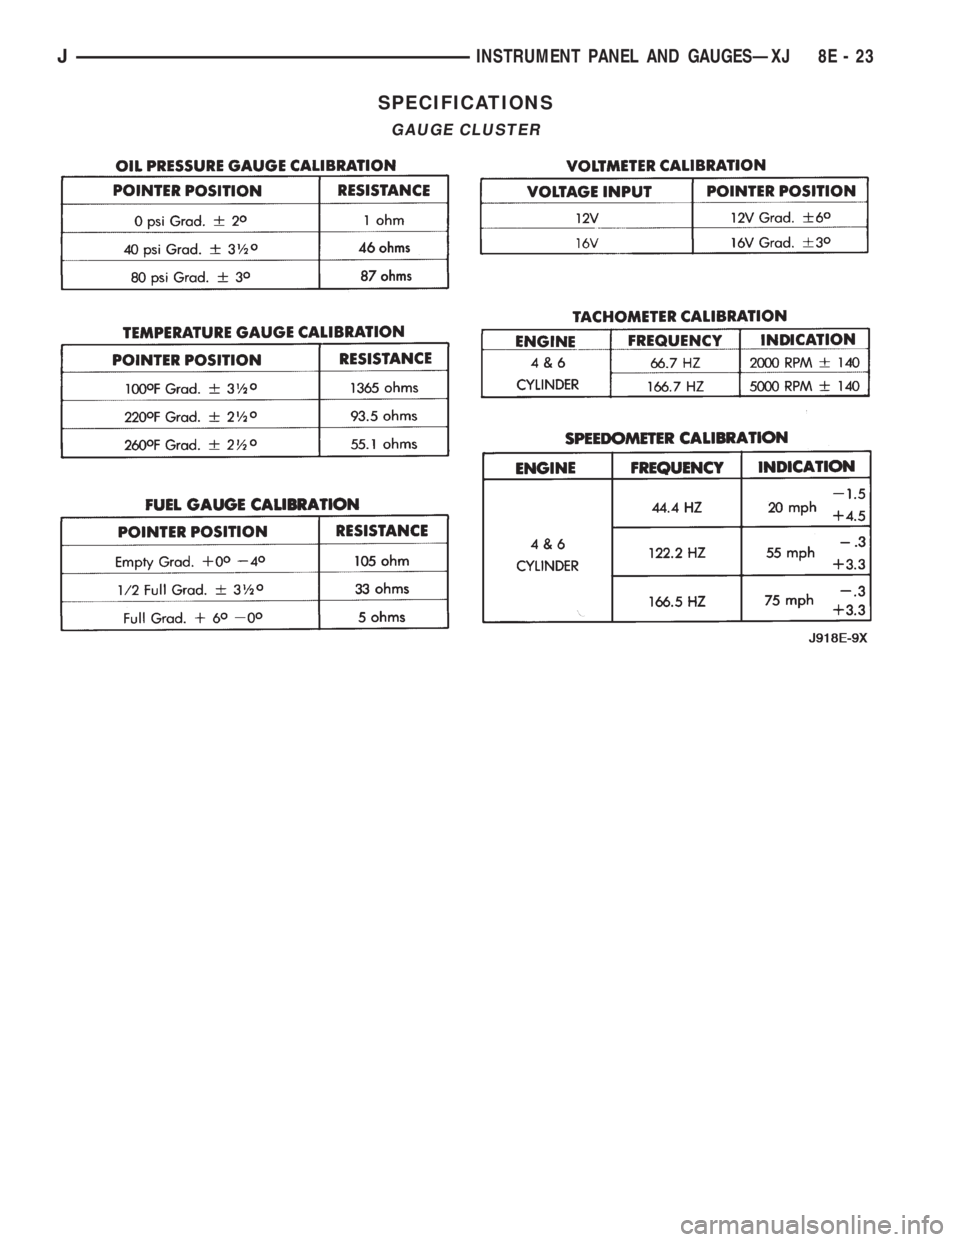
SPECIFICATIONS
GAUGE CLUSTER
JINSTRUMENT PANEL AND GAUGESÐXJ 8E - 23
Page 380 of 2158
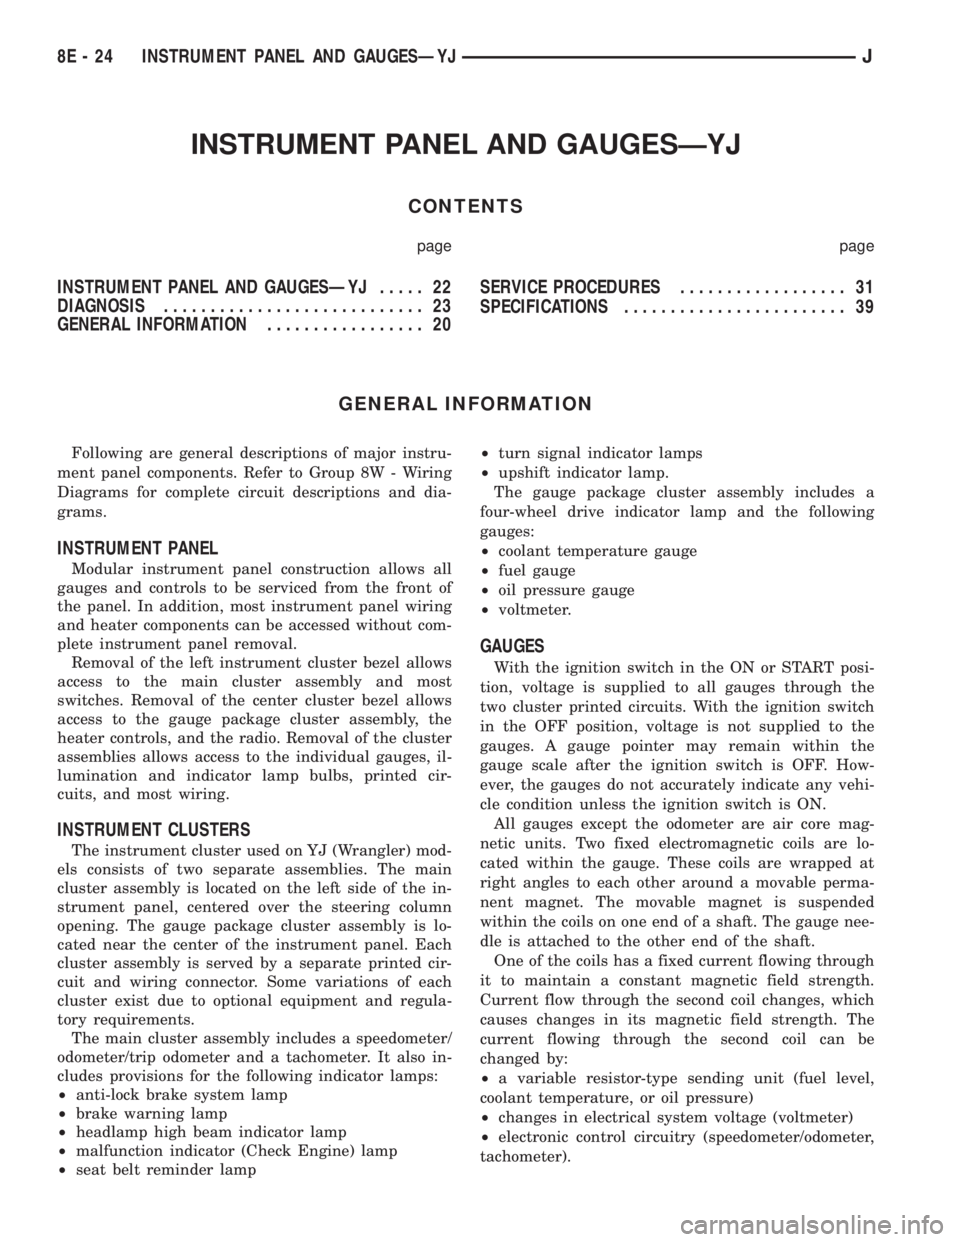
INSTRUMENT PANEL AND GAUGESÐYJ
CONTENTS
page page
INSTRUMENT PANEL AND GAUGESÐYJ..... 22
DIAGNOSIS............................ 23
GENERAL INFORMATION................. 20SERVICE PROCEDURES.................. 31
SPECIFICATIONS........................ 39
GENERAL INFORMATION
Following are general descriptions of major instru-
ment panel components. Refer to Group 8W - Wiring
Diagrams for complete circuit descriptions and dia-
grams.
INSTRUMENT PANEL
Modular instrument panel construction allows all
gauges and controls to be serviced from the front of
the panel. In addition, most instrument panel wiring
and heater components can be accessed without com-
plete instrument panel removal.
Removal of the left instrument cluster bezel allows
access to the main cluster assembly and most
switches. Removal of the center cluster bezel allows
access to the gauge package cluster assembly, the
heater controls, and the radio. Removal of the cluster
assemblies allows access to the individual gauges, il-
lumination and indicator lamp bulbs, printed cir-
cuits, and most wiring.
INSTRUMENT CLUSTERS
The instrument cluster used on YJ (Wrangler) mod-
els consists of two separate assemblies. The main
cluster assembly is located on the left side of the in-
strument panel, centered over the steering column
opening. The gauge package cluster assembly is lo-
cated near the center of the instrument panel. Each
cluster assembly is served by a separate printed cir-
cuit and wiring connector. Some variations of each
cluster exist due to optional equipment and regula-
tory requirements.
The main cluster assembly includes a speedometer/
odometer/trip odometer and a tachometer. It also in-
cludes provisions for the following indicator lamps:
²anti-lock brake system lamp
²brake warning lamp
²headlamp high beam indicator lamp
²malfunction indicator (Check Engine) lamp
²seat belt reminder lamp²turn signal indicator lamps
²upshift indicator lamp.
The gauge package cluster assembly includes a
four-wheel drive indicator lamp and the following
gauges:
²coolant temperature gauge
²fuel gauge
²oil pressure gauge
²voltmeter.
GAUGES
With the ignition switch in the ON or START posi-
tion, voltage is supplied to all gauges through the
two cluster printed circuits. With the ignition switch
in the OFF position, voltage is not supplied to the
gauges. A gauge pointer may remain within the
gauge scale after the ignition switch is OFF. How-
ever, the gauges do not accurately indicate any vehi-
cle condition unless the ignition switch is ON.
All gauges except the odometer are air core mag-
netic units. Two fixed electromagnetic coils are lo-
cated within the gauge. These coils are wrapped at
right angles to each other around a movable perma-
nent magnet. The movable magnet is suspended
within the coils on one end of a shaft. The gauge nee-
dle is attached to the other end of the shaft.
One of the coils has a fixed current flowing through
it to maintain a constant magnetic field strength.
Current flow through the second coil changes, which
causes changes in its magnetic field strength. The
current flowing through the second coil can be
changed by:
²a variable resistor-type sending unit (fuel level,
coolant temperature, or oil pressure)
²changes in electrical system voltage (voltmeter)
²electronic control circuitry (speedometer/odometer,
tachometer).
8E - 24 INSTRUMENT PANEL AND GAUGESÐYJJ