sensor JEEP YJ 1995 Service And Repair Manual
[x] Cancel search | Manufacturer: JEEP, Model Year: 1995, Model line: YJ, Model: JEEP YJ 1995Pages: 2158, PDF Size: 81.9 MB
Page 20 of 2158
LUBRICATION AND MAINTENANCE
CONTENTS
page page
CHASSIS AND BODY COMPONENTS........ 28
DRIVETRAIN........................... 22
ENGINE MAINTENANCE................... 15GENERAL INFORMATION.................. 1
JUMP STARTING, TOWING AND HOISTING.... 9
MAINTENANCE SCHEDULES................ 4
GENERAL INFORMATION
INDEX
page page
Classification of Lubricants................... 2
Components Requiring No Lubrication........... 2
Fluid Capacities........................... 3
Fuel Requirements......................... 1International Symbols....................... 1
Introduction.............................. 1
Lubrication and Replacement Parts
Recommendation......................... 2
INTRODUCTION
Lubrication and maintenance is divided into re-
quired and recommended service tasks. The required
service tasks must be completed to verify the emis-
sion controls function correctly. The recommended
service tasks should be completed to maintain safety
and durability.
This information will assist the service personnel
in providing maximum protection for each owner's
vehicle.
Conditions can vary with individual driving habits.
It is necessary to schedule maintenance as a time in-
terval as well as a distance interval.
It is the owner's responsibility to determine the ap-
plicable driving condition. Also to have the vehicle
serviced according to the maintenance schedule, and
to pay for the necessary parts and labor.
Additional maintenance and lubrication informa-
tion is listed in the Owner's Manual.
INTERNATIONAL SYMBOLS
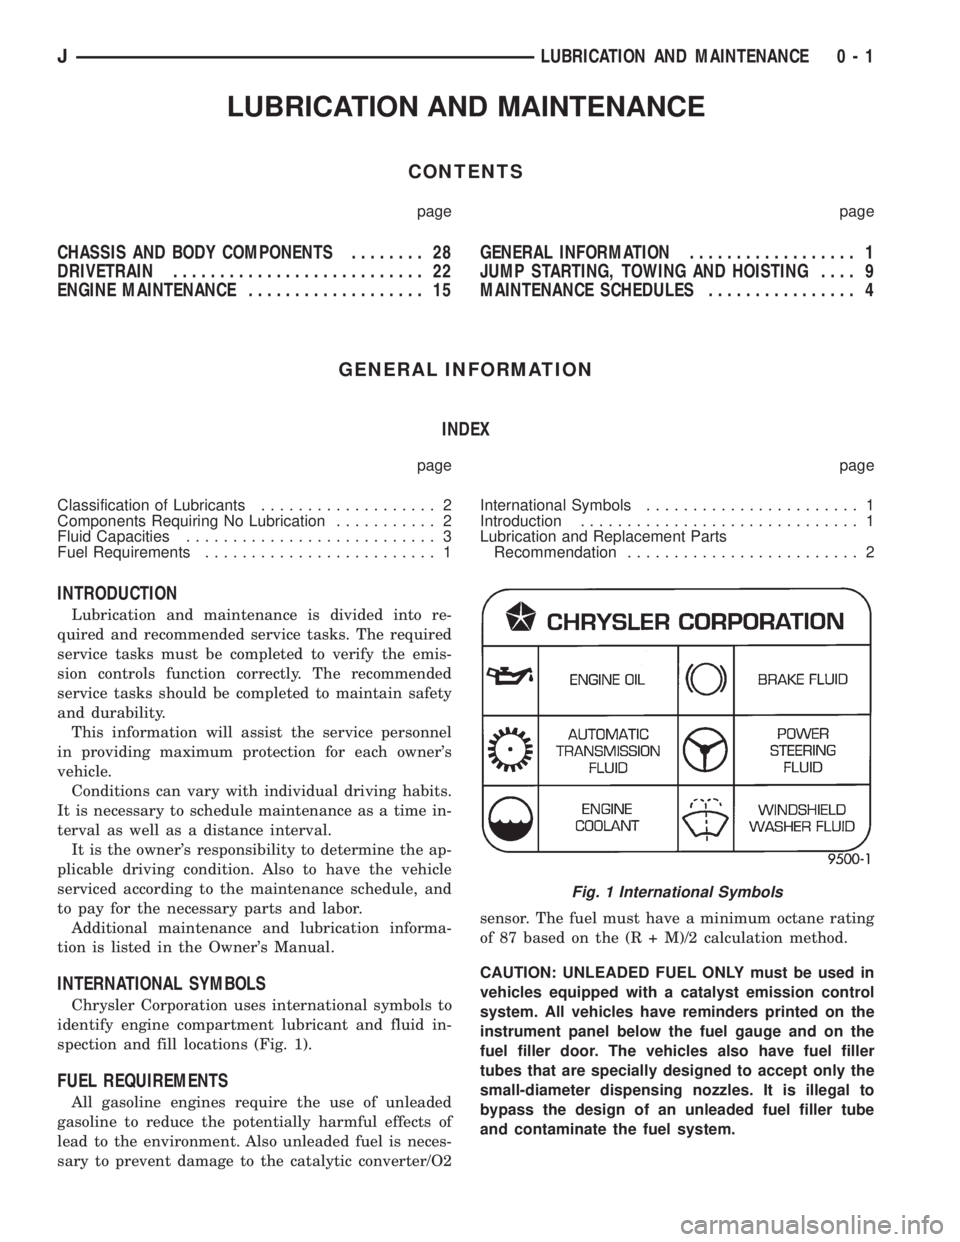
Chrysler Corporation uses international symbols to
identify engine compartment lubricant and fluid in-
spection and fill locations (Fig. 1).
FUEL REQUIREMENTS
All gasoline engines require the use of unleaded
gasoline to reduce the potentially harmful effects of
lead to the environment. Also unleaded fuel is neces-
sary to prevent damage to the catalytic converter/O2sensor. The fuel must have a minimum octane rating
of 87 based on the (R + M)/2 calculation method.
CAUTION: UNLEADED FUEL ONLY must be used in
vehicles equipped with a catalyst emission control
system. All vehicles have reminders printed on the
instrument panel below the fuel gauge and on the
fuel filler door. The vehicles also have fuel filler
tubes that are specially designed to accept only the
small-diameter dispensing nozzles. It is illegal to
bypass the design of an unleaded fuel filler tube
and contaminate the fuel system.
Fig. 1 International Symbols
JLUBRICATION AND MAINTENANCE 0 - 1
Page 74 of 2158
MODEL 30 AXLE AND TUBE AXLE (2WD)
INDEX
page page
Axle Bushing Replacement.................. 34
Axle ShaftÐCardan U-Joint.................. 26
Backlash and Contact Pattern Analysis......... 45
Cleaning/Inspection........................ 37
Differential and Pinion Measurement........... 40
Differential Assembly....................... 38
Differential Disassembly.................... 35
Differential Installation...................... 44
Differential Removal....................... 34
Differential Shim Pack Measurement and
Adjustment............................ 43
Drive Axle Assembly ReplacementÐXJ Vehicles . . 23
Drive Axle Assembly ReplacementÐYJ Vehicles . . 24Final Assembly........................... 46
Hub Bearing and Axle Shaft................. 25
Information.............................. 22
Inner Axle Shaft Oil Seal Replacement......... 35
Lubricant Change......................... 23
Lubricant Specifications..................... 22
Pinion Gear Assembly/Installation............. 42
Pinion Gear Depth Information............... 39
Pinion Removal/Disassembly................. 36
Pinion Seal Replacement................... 25
Steering Knuckle and Ball Studs.............. 32
Vacuum Disconnect AxleÐYJ Vehicles......... 27
INFORMATION
The Model 30 front axles consists of a cast iron dif-
ferential housing with axle shaft tubes extending
from either side. The tubes are pressed into the dif-
ferential housing and welded.
The integral type housing, hypoid gear design has
the centerline of the pinion set above the centerline
of the ring gear.
The axle has a fitting for a vent hose used to re-
lieve internal pressure caused by lubricant vaporiza-
tion and internal expansion.
The axles are equipped with semi-floating axle
shafts, meaning that loads are supported by the hub
bearings. The axle shafts are retained by nuts at the
hub bearings. The hub bearings are bolted to the
steering knuckle at the outboard end of the axle tube
yoke. The hub bearings are serviced as an assembly.
The axles are equipped with ABS brake sensors.
The sensors are attached to the knuckle assemblies
and tone rings are pressed on the axle shaft.Use
care when removing axle shafts as NOT to dam-
age the tone wheel or the sensor.
The stamped steel cover provides a means for in-
spection and servicing the differential.
The Model 30 axle has the assembly part number
and gear ratio listed on a tag. The tag is attached to
the housing cover. Build date identification codes are
stamped on the axle shaft tube cover side.
The differential case is a one-piece design. The dif-
ferential pinion mate shaft is retained with a roll
pin. Differential bearing preload and ring gear back-
lash is adjusted by the use of shims (select thick-
ness). The shims are located between the differential
bearing cones and case. Pinion bearing preload is set
and maintained by the use of collapsible spacer.
COMMAND-TRACÐYJ VEHICLES
The Command-Trac system is a vacuum disconnect
axle. The system has a two-piece axle shaft coupled
together by a shift collar. For two-wheel drive opera-
tion, the vacuum motor and shift fork disengages the
axle shaft splines. For four-wheel drive operation, the
vacuum motor and shift fork engages the axle
splines.
SELEC-TRACÐXJ VEHICLES
The Selec-Trac system is a non-disconnect axle.
Shifting from two-wheel to four-wheel drive is done
at the transfer case.
For XJ vehicles equipped withSelec-Tracand
ABS brake system, refer to Group 5ÐBrakes for ad-
ditional service information.
LUBRICANT SPECIFICATIONS
Multi-purpose, hypoid gear lubricant should be
used for Model 30 axles. The lubricant should have
MIL-L-2105C and API GL 5 quality specifications.
MOPARtHypoid Gear Lubricant conforms to both of
these specifications.
²The factory fill for the Model 30 axle is SAE Ther-
mally Stable 80W-90 gear lubricant.Do not use
heavier weight lubricant, this will cause axle
engagement difficulties.
²The factory installed lubricant quantity for the
NON-DISCONNECT TYPE AXLE is 1.48 L (3.13
pts.).
²The factory installed lubricant quantity for the
VACUUM-DISCONNECT TYPE AXLE is 1.65 L (3.76
pts.).
Refer to Group 0, Lubrication and Maintenance for
additional information regarding temperature range,
viscosity and fluid level.
2 - 22 FRONT SUSPENSION AND AXLEJ
Page 75 of 2158
CAUTION: If axle is submerged in water, lubricant
must be replaced immediately to avoid possible
premature axle failure.
LUBRICANT CHANGE
The gear lubricant will drain quicker if the vehicle
has been recently driven.
(1) Raise and support the vehicle.
(2) Remove the lubricant fill hole plug from the dif-
ferential housing cover.
(3) Remove the differential housing cover and
drain the lubricant from the housing.
(4) Clean the housing cavity with a flushing oil,
light engine oil or lint free cloth.Do not use water,
steam, kerosene or gasoline for cleaning.
(5) Remove the sealant from the housing and cover
surfaces. Use solvent to clean the mating surfaces.
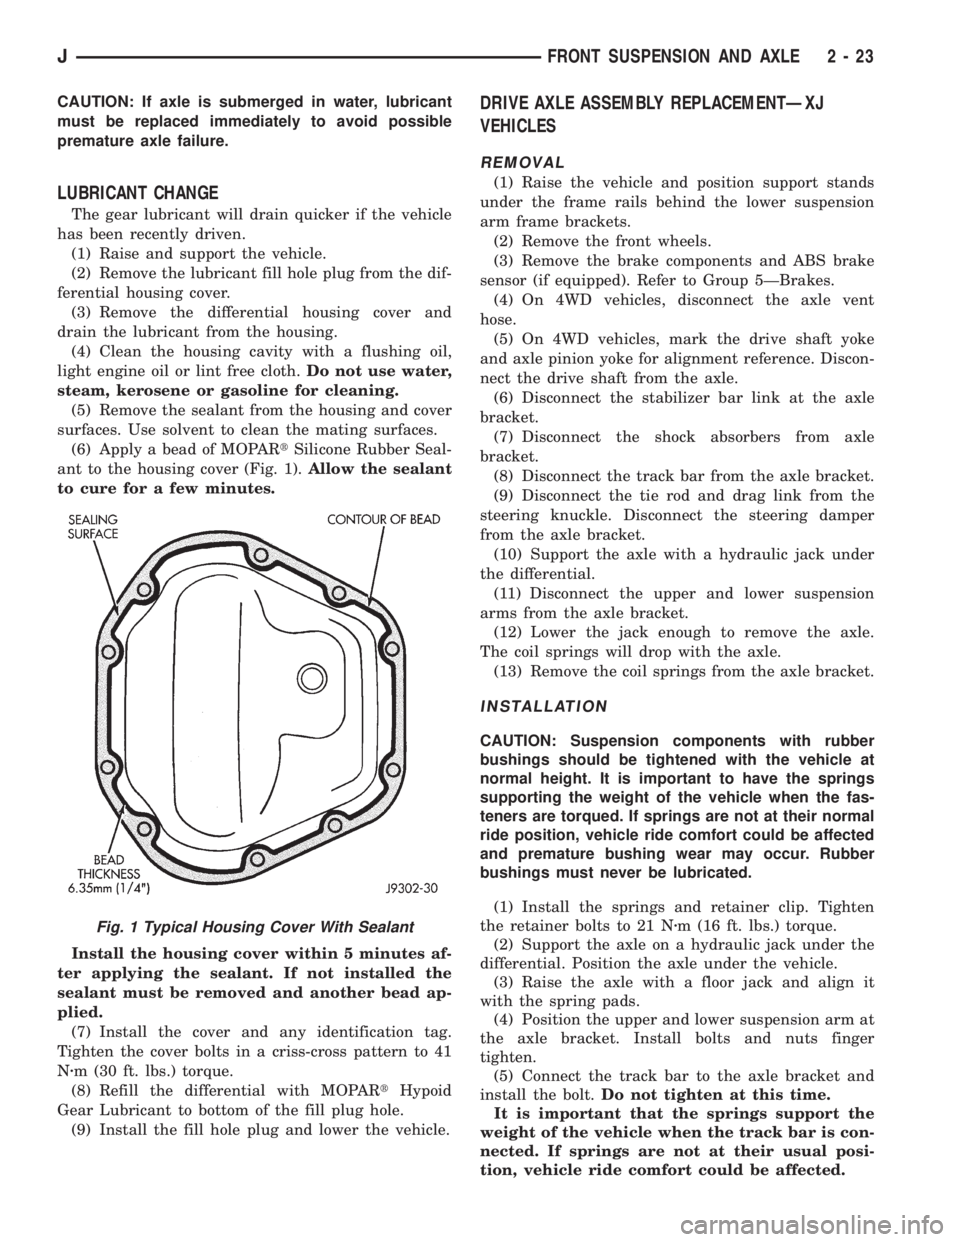
(6) Apply a bead of MOPARtSilicone Rubber Seal-
ant to the housing cover (Fig. 1).Allow the sealant
to cure for a few minutes.
Install the housing cover within 5 minutes af-
ter applying the sealant. If not installed the
sealant must be removed and another bead ap-
plied.
(7) Install the cover and any identification tag.
Tighten the cover bolts in a criss-cross pattern to 41
Nzm (30 ft. lbs.) torque.
(8) Refill the differential with MOPARtHypoid
Gear Lubricant to bottom of the fill plug hole.
(9) Install the fill hole plug and lower the vehicle.
DRIVE AXLE ASSEMBLY REPLACEMENTÐXJ
VEHICLES
REMOVAL
(1) Raise the vehicle and position support stands
under the frame rails behind the lower suspension
arm frame brackets.
(2) Remove the front wheels.
(3) Remove the brake components and ABS brake
sensor (if equipped). Refer to Group 5ÐBrakes.
(4) On 4WD vehicles, disconnect the axle vent
hose.
(5) On 4WD vehicles, mark the drive shaft yoke
and axle pinion yoke for alignment reference. Discon-
nect the drive shaft from the axle.
(6) Disconnect the stabilizer bar link at the axle
bracket.
(7) Disconnect the shock absorbers from axle
bracket.
(8) Disconnect the track bar from the axle bracket.
(9) Disconnect the tie rod and drag link from the
steering knuckle. Disconnect the steering damper
from the axle bracket.
(10) Support the axle with a hydraulic jack under
the differential.
(11) Disconnect the upper and lower suspension
arms from the axle bracket.
(12) Lower the jack enough to remove the axle.
The coil springs will drop with the axle.
(13) Remove the coil springs from the axle bracket.
INSTALLATION
CAUTION: Suspension components with rubber
bushings should be tightened with the vehicle at
normal height. It is important to have the springs
supporting the weight of the vehicle when the fas-
teners are torqued. If springs are not at their normal
ride position, vehicle ride comfort could be affected
and premature bushing wear may occur. Rubber
bushings must never be lubricated.
(1) Install the springs and retainer clip. Tighten
the retainer bolts to 21 Nzm (16 ft. lbs.) torque.
(2) Support the axle on a hydraulic jack under the
differential. Position the axle under the vehicle.
(3) Raise the axle with a floor jack and align it
with the spring pads.
(4) Position the upper and lower suspension arm at
the axle bracket. Install bolts and nuts finger
tighten.
(5) Connect the track bar to the axle bracket and
install the bolt.Do not tighten at this time.
It is important that the springs support the
weight of the vehicle when the track bar is con-
nected. If springs are not at their usual posi-
tion, vehicle ride comfort could be affected.
Fig. 1 Typical Housing Cover With Sealant
JFRONT SUSPENSION AND AXLE 2 - 23
Page 76 of 2158
(6) Install the shock absorber and tighten the bolt
to 23 Nzm (17 ft. lbs.) torque.
(7) Install the stabilizer bar link to the axle
bracket. Tighten the nut to 95 Nzm (70 ft. lbs.)
torque.
(8) Install the drag link and tie rod to the steering
knuckles and tighten the nuts to 47 Nzm (35 ft. lbs.)
torque. Install the steering damper to the axle
bracket and tighten the nut to 75 Nzm (55 ft. lbs.)
torque.
(9) Install the brake components and ABS brake
sensor (if equipped). Refer to Group 5ÐBrakes.
(10) On 4WD vehicles, connect the vent hose to the
tube fitting.
(11) On 4WD vehicles, align the reference marks
and connect the drive shaft to the axle yoke. Tighten
the U-joint clamp bolts to 19 Nzm (14 ft. lbs.) torque.
(12) Check differential lubricant and add if neces-
sary.
(13) Install the wheel and tire assemblies.
(14) Remove the supports and lower the vehicle.
(15) Tighten the upper suspension arm nuts to 75
Nzm (55 ft. lbs.) torque. Tighten the lower suspension
arm nuts to 115 Nzm (85 ft. lbs.) torque.
(16) Tighten the track bar bolt at the axle bracket
to 100 Nzm (74 ft. lbs.) torque.
(17) Check the front wheel alignment.
DRIVE AXLE ASSEMBLY REPLACEMENTÐYJ
VEHICLES
REMOVAL
(1) Raise the vehicle and position support stands
under the frame rails behind the spring frame brack-
ets.
(2) Remove the front wheels.
(3) Remove the brake components and ABS brake
sensor (if equipped). Refer to Group 5ÐBrakes.
(4) Disconnect the axle vent hose and axle shift
motor vacuum harness.
(5) Mark the drive shaft yoke and axle pinion yoke
for alignment reference. Disconnect the drive shaft
from the axle.
(6) Disconnect the stabilizer bar link at the axle
bracket.
(7) Disconnect the shock absorbers from axle
bracket.
(8) Disconnect the track bar from the axle bracket.
(9) Disconnect the tie rod from the steering
knuckle. Disconnect the steering damper from the
axle bracket.
(10) Support the axle with a hydraulic jack under
the differential. Raise the axle just enough to relieve
the axle weight from the springs.
(11) Remove the spring U-bolts from the plate
brackets.(12) Loosen BUT DO NOT REMOVE the bolts that
attach the spring rear pivot at the frame rail brack-
ets. This will allow the springs to pivot without bind-
ing on the bushings.
(13) Disconnect shackle from the springs and lower
the springs to the surface.
(14) Lower the jack enough to remove the axle.
INSTALLATION
CAUTION: Suspension components with rubber
bushings should be tightened with the vehicle at
normal height. It is important to have the springs
supporting the weight of the vehicle when the fas-
teners are torqued. If springs are not at their normal
ride position, vehicle ride comfort could be affected
and premature bushing wear may occur. Rubber
bushings must never be lubricated.
(1) Support the axle on a hydraulic jack under the
differential. Position the axle under the vehicle.
(2) Raise the springs and install the spring shackle
bolts.Do not tighten at this time.
(3) Lower the axle and align the spring center
bolts with the locating holes in the axle pads and
plate brackets.
(4) Install the spring U-bolts through the plate
brackets and tighten to 122 Nzm (90 ft. lbs.) torque.
(5) Connect the track bar to the axle bracket and
install the bolt.Do not tighten at this time.
It is important that the springs support the
weight of the vehicle when the track bar is con-
nected. If springs are not at their usual posi-
tion, the vehicle ride comfort could be affected.
(6) Install the shock absorber and tighten the nut
to 61 Nzm (45 ft. lbs.) torque.
(7) Install the stabilizer bar link to the axle
bracket. Tighten the nut to 61 Nzm (45 ft. lbs.)
torque.
(8) Install the tie rod to the steering knuckles and
tighten the nuts to 47 Nzm (35 ft. lbs.) torque. Install
the steering damper to the axle bracket and tighten
the bolt to 75 Nzm (55 ft. lbs.) torque.
(9) Install the brake components and ABS brake
sensor (if equipped). Refer to Group 5ÐBrakes.
(10) Connect the vent hose to the tube fitting and
axle shift motor vacuum harness.
(11) Align the reference marks and connect the
drive shaft to the axle yoke. Tighten the U-joint
clamp bolts to 19 Nzm (14 ft. lbs.) torque.
(12) Check differential lubricant and add if neces-
sary.
(13) Install the wheel and tire assemblies.
(15) Remove the supports and lower the vehicle.
(16) Tighten the spring rear pivot bolt/nut to 142
Nzm (105 ft. lbs.) torque. Tighten the spring shackle
bolt/nut to 135 Nzm (100 ft. lbs.) torque.
2 - 24 FRONT SUSPENSION AND AXLEJ
Page 85 of 2158
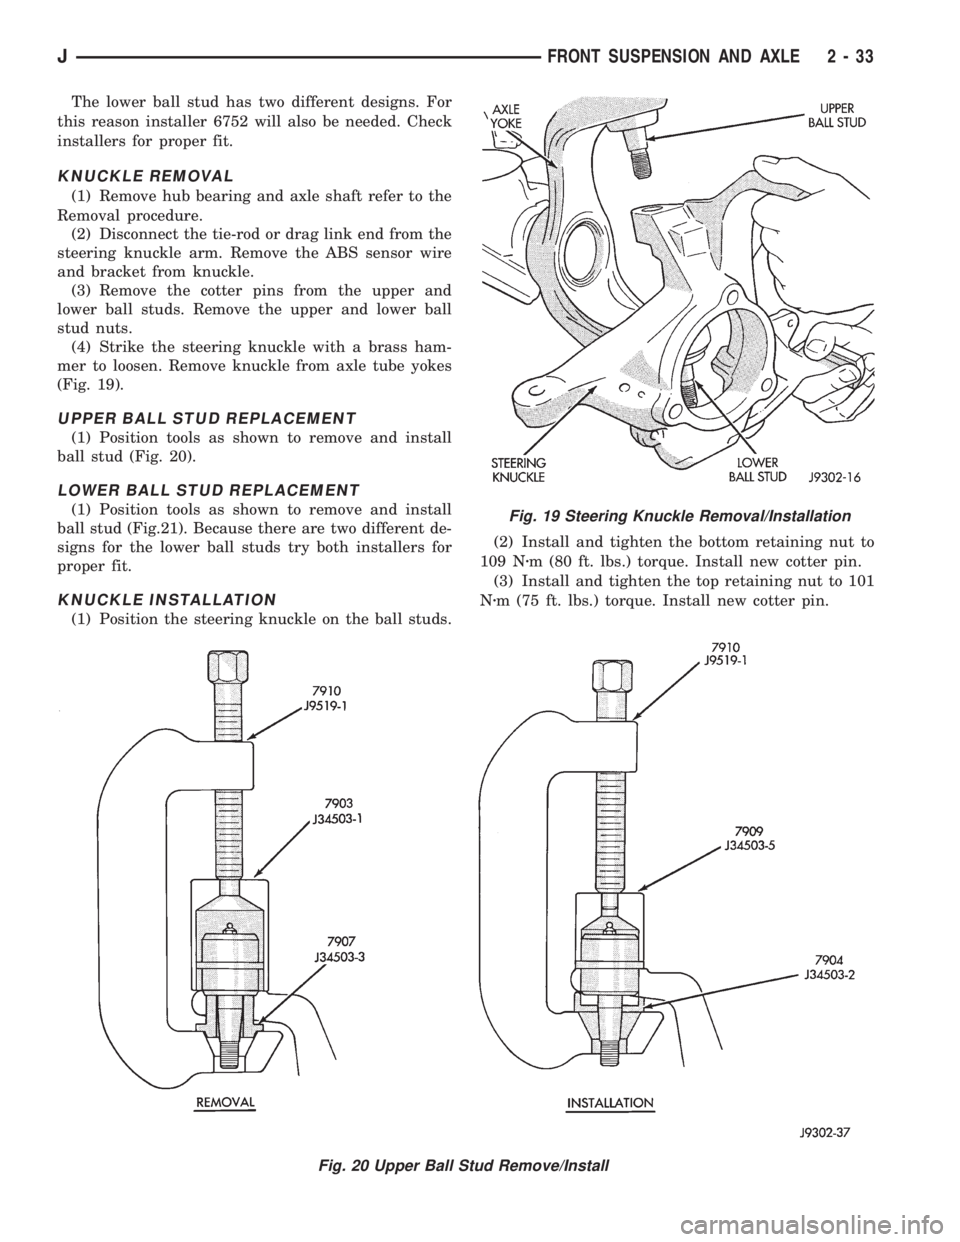
The lower ball stud has two different designs. For
this reason installer 6752 will also be needed. Check
installers for proper fit.
KNUCKLE REMOVAL
(1) Remove hub bearing and axle shaft refer to the
Removal procedure.
(2) Disconnect the tie-rod or drag link end from the
steering knuckle arm. Remove the ABS sensor wire
and bracket from knuckle.
(3) Remove the cotter pins from the upper and
lower ball studs. Remove the upper and lower ball
stud nuts.
(4) Strike the steering knuckle with a brass ham-
mer to loosen. Remove knuckle from axle tube yokes
(Fig. 19).
UPPER BALL STUD REPLACEMENT
(1) Position tools as shown to remove and install
ball stud (Fig. 20).
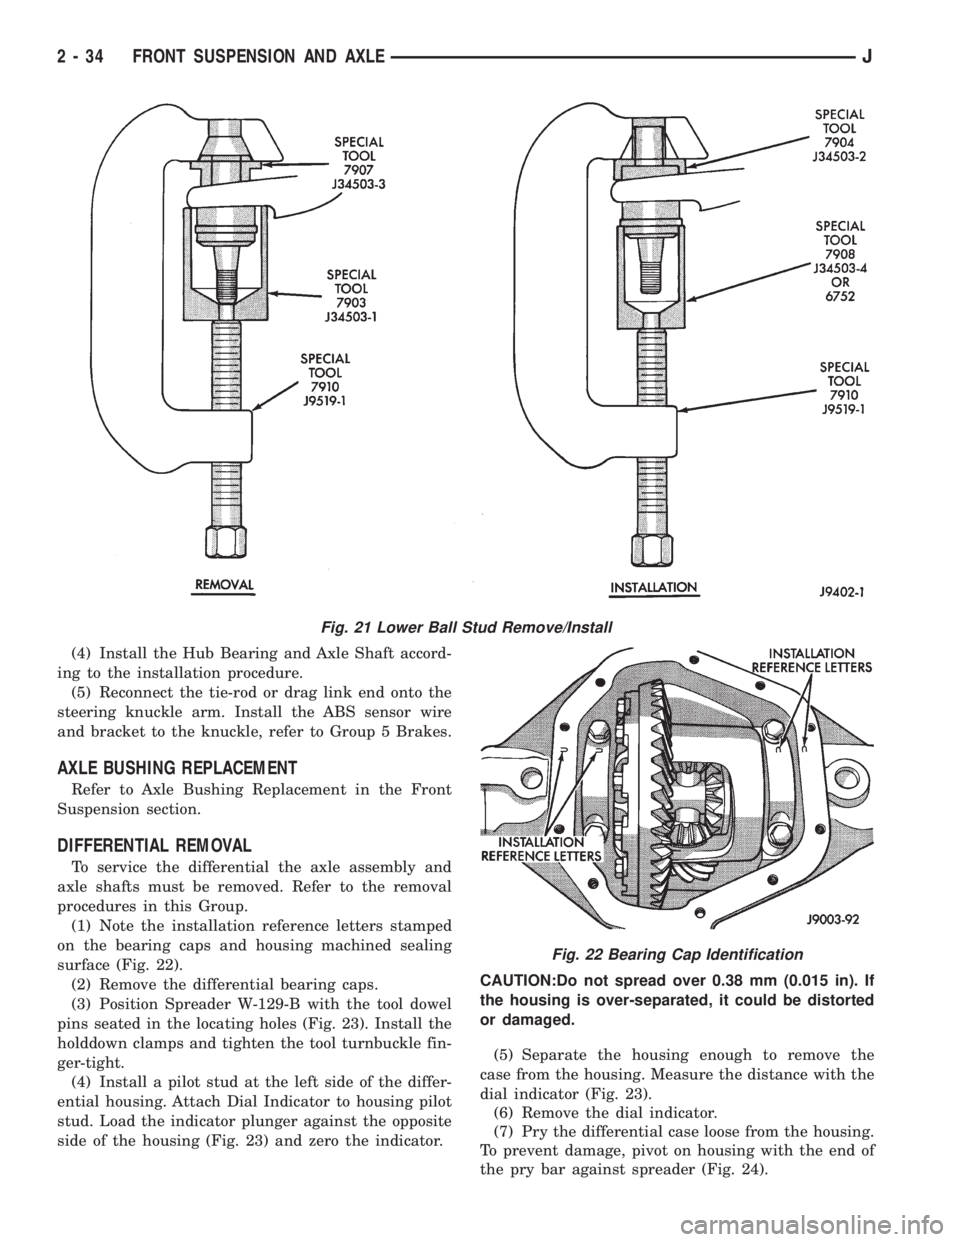
LOWER BALL STUD REPLACEMENT
(1) Position tools as shown to remove and install
ball stud (Fig.21). Because there are two different de-
signs for the lower ball studs try both installers for
proper fit.
KNUCKLE INSTALLATION
(1) Position the steering knuckle on the ball studs.(2) Install and tighten the bottom retaining nut to
109 Nzm (80 ft. lbs.) torque. Install new cotter pin.
(3) Install and tighten the top retaining nut to 101
Nzm (75 ft. lbs.) torque. Install new cotter pin.
Fig. 19 Steering Knuckle Removal/Installation
Fig. 20 Upper Ball Stud Remove/Install
JFRONT SUSPENSION AND AXLE 2 - 33
Page 86 of 2158
(4) Install the Hub Bearing and Axle Shaft accord-
ing to the installation procedure.
(5) Reconnect the tie-rod or drag link end onto the
steering knuckle arm. Install the ABS sensor wire
and bracket to the knuckle, refer to Group 5 Brakes.
AXLE BUSHING REPLACEMENT
Refer to Axle Bushing Replacement in the Front
Suspension section.
DIFFERENTIAL REMOVAL
To service the differential the axle assembly and
axle shafts must be removed. Refer to the removal
procedures in this Group.
(1) Note the installation reference letters stamped
on the bearing caps and housing machined sealing
surface (Fig. 22).
(2) Remove the differential bearing caps.
(3) Position Spreader W-129-B with the tool dowel
pins seated in the locating holes (Fig. 23). Install the
holddown clamps and tighten the tool turnbuckle fin-
ger-tight.
(4) Install a pilot stud at the left side of the differ-
ential housing. Attach Dial Indicator to housing pilot
stud. Load the indicator plunger against the opposite
side of the housing (Fig. 23) and zero the indicator.CAUTION:Do not spread over 0.38 mm (0.015 in). If
the housing is over-separated, it could be distorted
or damaged.
(5) Separate the housing enough to remove the
case from the housing. Measure the distance with the
dial indicator (Fig. 23).
(6) Remove the dial indicator.
(7) Pry the differential case loose from the housing.
To prevent damage, pivot on housing with the end of
the pry bar against spreader (Fig. 24).
Fig. 21 Lower Ball Stud Remove/Install
Fig. 22 Bearing Cap Identification
2 - 34 FRONT SUSPENSION AND AXLEJ
Page 101 of 2158
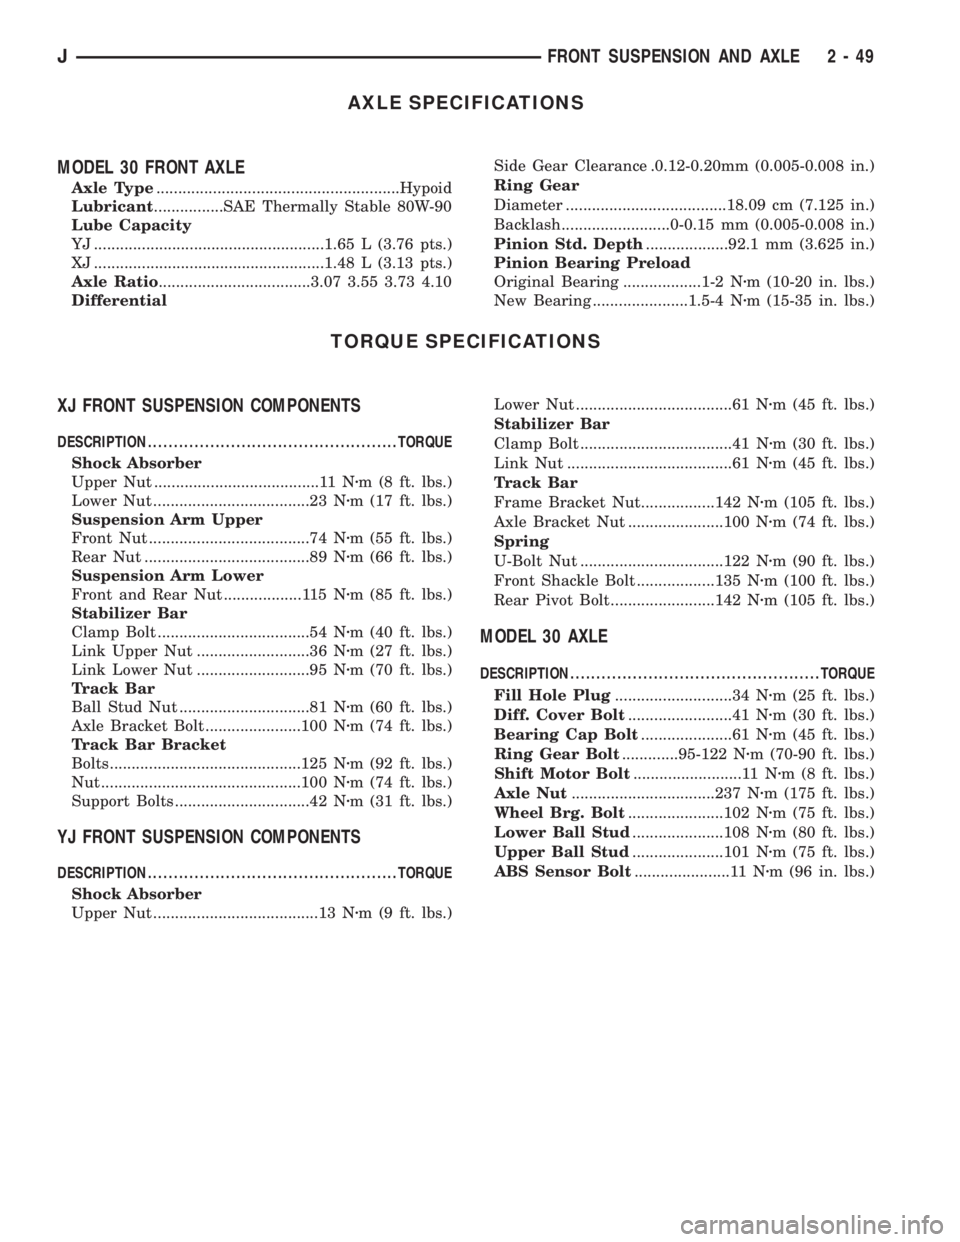
AXLE SPECIFICATIONS
MODEL 30 FRONT AXLE
Axle Type........................................................Hypoid
Lubricant................SAE Thermally Stable 80W-90
Lube Capacity
YJ .....................................................1.65 L (3.76 pts.)
XJ .....................................................1.48 L (3.13 pts.)
Axle Ratio...................................3.07 3.55 3.73 4.10
DifferentialSide Gear Clearance .0.12-0.20mm (0.005-0.008 in.)
Ring Gear
Diameter .....................................18.09 cm (7.125 in.)
Backlash.........................0-0.15 mm (0.005-0.008 in.)
Pinion Std. Depth...................92.1 mm (3.625 in.)
Pinion Bearing Preload
Original Bearing ..................1-2 Nzm (10-20 in. lbs.)
New Bearing ......................1.5-4 Nzm (15-35 in. lbs.)
TORQUE SPECIFICATIONS
XJ FRONT SUSPENSION COMPONENTS
DESCRIPTION ................................................TORQUE
Shock Absorber
Upper Nut ......................................11 Nzm (8 ft. lbs.)
Lower Nut ....................................23 Nzm (17 ft. lbs.)
Suspension Arm Upper
Front Nut .....................................74 Nzm (55 ft. lbs.)
Rear Nut ......................................89 Nzm (66 ft. lbs.)
Suspension Arm Lower
Front and Rear Nut ..................115 Nzm (85 ft. lbs.)
Stabilizer Bar
Clamp Bolt ...................................54 Nzm (40 ft. lbs.)
Link Upper Nut ..........................36 Nzm (27 ft. lbs.)
Link Lower Nut ..........................95 Nzm (70 ft. lbs.)
Track Bar
Ball Stud Nut ..............................81 Nzm (60 ft. lbs.)
Axle Bracket Bolt ......................100 Nzm (74 ft. lbs.)
Track Bar Bracket
Bolts............................................125 Nzm (92 ft. lbs.)
Nut ..............................................100 Nzm (74 ft. lbs.)
Support Bolts ...............................42 Nzm (31 ft. lbs.)
YJ FRONT SUSPENSION COMPONENTS
DESCRIPTION ................................................TORQUE
Shock Absorber
Upper Nut ......................................13 Nzm (9 ft. lbs.)Lower Nut ....................................61 Nzm (45 ft. lbs.)
Stabilizer Bar
Clamp Bolt ...................................41 Nzm (30 ft. lbs.)
Link Nut ......................................61 Nzm (45 ft. lbs.)
Track Bar
Frame Bracket Nut.................142 Nzm (105 ft. lbs.)
Axle Bracket Nut ......................100 Nzm (74 ft. lbs.)
Spring
U-Bolt Nut .................................122 Nzm (90 ft. lbs.)
Front Shackle Bolt ..................135 Nzm (100 ft. lbs.)
Rear Pivot Bolt........................142 Nzm (105 ft. lbs.)
MODEL 30 AXLE
DESCRIPTION ................................................TORQUE
Fill Hole Plug...........................34 Nzm (25 ft. lbs.)
Diff. Cover Bolt........................41 Nzm (30 ft. lbs.)
Bearing Cap Bolt.....................61 Nzm (45 ft. lbs.)
Ring Gear Bolt.............95-122 Nzm (70-90 ft. lbs.)
Shift Motor Bolt.........................11 Nzm (8 ft. lbs.)
Axle Nut.................................237 Nzm (175 ft. lbs.)
Wheel Brg. Bolt......................102 Nzm (75 ft. lbs.)
Lower Ball Stud.....................108 Nzm (80 ft. lbs.)
Upper Ball Stud.....................101 Nzm (75 ft. lbs.)
ABS Sensor Bolt......................11 Nzm (96 in. lbs.)
JFRONT SUSPENSION AND AXLE 2 - 49
Page 114 of 2158
MODEL 35 AXLE
INDEX
page page
Axle Shaft............................... 16
Axle Shaft Seal and Bearing................. 17
Backlash and Contact Pattern Analysis......... 27
Cleaning/Inspection........................ 20
Differential Assembly....................... 21
Differential Disassembly.................... 18
Differential Measurement and Installation........ 25
Differential Removal....................... 18
Drive Axle Assembly ReplacementÐXJ Vehicles . . 14Drive Axle Assembly ReplacementÐYJ Vehicles . . 14
Final Assembly........................... 29
General Information....................... 13
Lubricant Change......................... 13
Lubricant Specifications..................... 13
Pinion Gear Depth Information............... 21
Pinion Measurement and Assembly............ 22
Pinion Removal/Disassembly................. 19
Pinion Shaft Seal Replacement............... 15
GENERAL INFORMATION
The Model 35 housing has an iron center casting
(differential housing) with axle shaft tubes extending
from either side. The tubes are pressed into and
welded to the differential housing to form a one-piece
axle housing.
The integral type housing, hypoid gear design has
the centerline of the pinion set below the centerline
of the ring gear.
The axle has a vent hose to relieve internal pres-
sure caused by lubricant vaporization and internal
expansion.
The axles are equipped with semi-floating axle
shafts, meaning that loads are supported by the axle
shaft and bearings. The axle shafts are retained by
C-clips in the differential side gears.
The cover provides a means for servicing the differ-
ential without removing the axle.
Axles may be equipped with drum or disc brakes.
The axles that are equipped with ABS brake have a
tone ring pressed on the axle shaft. Use care when
removing axle shafts as NOT to damage the tone
wheel or the sensor.
The Model 35 axle has the assembly part number
and gear ratio listed on a tag. The tag is attached to
the housing cover. Build date identification codes are
stamped on the axle shaft tube cover side.
The differential case is a one-piece design. The dif-
ferential pinion mate shaft is retained with a
threaded roll pin. Differential bearing preload and
ring gear backlash is adjusted by the use of spacer
shims. Pinion bearing preload is set and maintained
by the use of a collapsible spacer.
For complete drive axle assembly removal
and installation refer to Drive Axle Assembly
Replacement in this Group.
LUBRICANT SPECIFICATIONS
Multi-purpose, hypoid gear lubricant should be
used for Model 35 axle. The lubricant should haveMIL-L-2105C and API GL 5 quality specifications.
MOPAR Hypoid Gear Lubricant conforms to both of
these specifications.
²Lubricant for Model 35 axle is a thermally stable
SAE 80W-90 gear lubricant.
²Lubricant for Model 35 axle with Trailer Tow is
SAE 75W-140 SYNTHETIC gear lubricant.
²Trac-Lok differentials add 4 oz. of friction modifier.
²Lubricant quantity is 1.66 L (3.50 pts.).
Refer to Group 0, Lubrication and Maintenance for
additional information.
CAUTION: If axle is submerged in water, lubricant
must be replaced immediately to avoid possible
premature axle failure.
LUBRICANT CHANGE
The gear lubricant will drain quicker if the vehicle
has been recently driven.
(1) Raise and support the vehicle.
(2) Remove the lubricant fill hole plug from the dif-
ferential housing cover.
(3) Remove the differential housing cover and
drain the lubricant from the housing.
(4) Clean the housing cavity with a flushing oil,
light engine oil or lint free cloth.Do not use water,
steam, kerosene or gasoline for cleaning.
(5) Remove the sealant from the housing and cover
surfaces.
(6) Apply a bead of MOPARtSilicone Rubber Seal-
ant to the housing cover (Fig. 1).Allow the sealant
to cure for a few minutes.
Install the housing cover within 5 minutes af-
ter applying the sealant. If not installed the
sealant must be removed and another bead ap-
plied.
(7) Install the cover and any identification tag.
Tighten the cover bolts to 41 Nzm (30 ft. lbs.) torque.
(8) Refill differential with Mopar Hypoid Gear Lu-
bricant to bottom of the fill plug hole.
JREAR SUSPENSION AND AXLES 3 - 13
Page 152 of 2158
AXLE SPECIFICATIONS
MODEL 35 AXLE
Axle Type...............................Semi-Floating Hypoid
Lubricant................SAE Thermally Stable 80W-90
Lubricant Trailer Tow.............Synthetic 75W-140
Lube Capacity..............................1.66 L (3.50 pts.)
Axle Ratio................................3.07, 3.55, 3.73, 4.10
Differential
Bearing Preload ............................0.1 mm (0.004 in.)
Side Gear Clearance ............0-0.15 mm (0-0.006 in.)
Ring Gear
Diameter .......................................19.2 cm (7.562 in.)
Backlash.........................0-0.15 mm (0.005-0.008 in.)
Pinion Std. Depth...................96.8 mm (3.813 in.)
Pinion Bearing Preload
Original Bearing ....................1-2Nzm (10-20 in. lbs.)
New Bearing .......................1.5-4Nzm (15-35 in. lbs.)
8 1/4 AXLE
Axle Type................................Semi-floating, hypoid
Lubricant...............................................SAE 75W-90
Lube Capacity................................2.08 L (4.4 pts.)
Axle Ratios.........................................3.07 3.55 4.10
Differential
Side Gear Clearance ..................0.12 mm (0.005 in.)
Case Flange Runout ..................0.07 mm (0.003 in.)
Bearing Preload ...........................95 Nzm (70 ft. lbs.)
Ring Gear
Diameter .......................................20.95 cm (8.25 in.)
Backlash....................0.12-0.20 mm (0.005-0.008 in.)
Runout .......................................0.127 mm (0.005 in.)
Pinion Bearing
Preload ....................................1-2 Nzm (10-20 in.lbs.)
TORQUE SPECIFICATIONS
XJ REAR SUSPENSION COMPONENTS
DESCRIPTION ................................................TORQUE
Shock Absorber
Upper Bolt ...................................23 Nzm (17 ft. lbs.)
Lower Nut ....................................62 Nzm (46 ft. lbs.)
Stabilizer Bar
Clamp Bolt ...................................54 Nzm (40 ft. lbs.)
Link Upper Bolt ............................12 Nzm (9 ft. lbs.)
Link Lower Nut ..........................74 Nzm (55 ft. lbs.)
Spring
U-Bolt Nut ...................................70 Nzm (52 ft. lbs.)
Front Pivot Bolt ......................148 Nzm (109 ft. lbs.)
Upper Shackle Bolt .................148 Nzm (109 ft. lbs.)
Lower Shackle Bolt ...................108 Nzm (80 ft. lbs.)
YJ REAR SUSPENSION COMPONENTS
DESCRIPTION ................................................TORQUE
Shock Absorber
Upper Nut ....................................61 Nzm (45 ft. lbs.)
Lower Nut ....................................61 Nzm (45 ft. lbs.)
Track Bar
Frame Bracket Nut.................142 Nzm (105 ft. lbs.)
Axle Bracket Nut ....................142 Nzm (105 ft. lbs.)Spring
U-Bolt Nut .................................122 Nzm (90 ft. lbs.)
Rear Shackle Bolts..................136 Nzm (100 ft. lbs.)
Front Pivot Bolt ......................142 Nzm (105 ft. lbs.)
MODEL 35 AXLE
DESCRIPTION ................................................TORQUE
Fill Hole Plug...........................34 Nzm (25 ft. lbs.)
Diff. Cover Bolt........................41 Nzm (30 ft. lbs.)
Bearing Cap Bolt.....................77 Nzm (57 ft. lbs.)
Pinion Nut...............292-427 Nzm (215-315 ft. lbs.)
Ring Gear Bolt.............95-122 Nzm (70-90 ft. lbs.)
RWAL/ABS Sensor Bolt.........24 Nzm (18. ft. lbs.)
8 1/4 AXLE
DESCRIPTION ................................................TORQUE
Diff. Cover Bolt........................47 Nzm (35 ft. lbs.)
Bearing Cap Bolt.....................95 Nzm (70 ft. lbs.)
Pinion Nut.............................285 Nzm (210 ft. lbs.)
Ring Gear Bolt.........................95 Nzm (70 ft. lbs.)
RWAL/ABS Sensor Bolt.........24 Nzm (18. ft. lbs.)
JREAR SUSPENSION AND AXLES 3 - 51
Page 154 of 2158
ABS SYSTEM CHANGES
A different master cylinder, power brake booster,
and HCU are used in the 1995 Jeep ABS system.
The master cylinder reservoir has a single filler cap
and is no longer interconnected with the HCU. The
new HCU has built-in accumulators. The pedal travel
sensor has been eliminated and a new dual dia-
phragm power brake booster is used.
BRAKE FLUID/LUBRICANTS/CLEANING SOLVENTS
Recommended fluid for all Jeep vehicles is Mopar
DOT 3 brake fluid, or an equivalent meeting SAE
J1703 and DOT 3 standards.
Use Mopar Multi Mileage grease to lubricate drum
brake pivot pins and rear brakeshoe contact points
on the support plates. Use GE 661, or Dow 111 sili-
cone grease on caliper bushings and mounting bolts.
Use fresh brake fluid or Mopar brake cleaner to
clean or flush brake system components. These are
the only cleaning materials recommended.
CAUTION: Never use gasoline, kerosene, methyl or
isopropyl alcohol, paint thinner, or any fluid con-
taining mineral oil to clean brake parts. These fluids
damage rubber cups and seals. If system contami-
nation is suspected, check the fluid for dirt, discol-
oration, or separation into distinct layers. Drain and
flush the system with new brake fluid if contamina-
tion is suspected.
JEEP BODY CODE LETTERS
The body/model identification code letters for Jeep
vehicles are as follows:²Code letters XJ: Cherokee
²Code letters YJ: Wrangler/YJ
The code letters are used throughout this group to
simplify model identification and component applica-
tion.
BRAKE SAFETY PRECAUTIONS
WARNING: ALTHOUGH FACTORY INSTALLED
BRAKELINING ON JEEP VEHICLES IS MADE FROM
ASBESTOS FREE MATERIALS, SOME AFTER MAR-
KET BRAKELINING MAY CONTAIN ASBESTOS. THIS
SHOULD BE TAKEN INTO ACCOUNT WHEN RE-
PAIRING A VEHICLE WITH PRIOR BRAKE SERVICE.
WEAR A RESPIRATOR WHEN CLEANING BRAKE
COMPONENTS AS ASBESTOS FIBERS CAN BE A
HEALTH HAZARD. NEVER CLEAN WHEEL BRAKE
COMPONENTS WITH COMPRESSED AIR. USE A
VACUUM CLEANER SPECIFICALLY DESIGNED FOR
REMOVING BRAKE DUST. IF A VACUUM CLEANER
IS NOT AVAILABLE, CLEAN THE PARTS WITH WA-
TER DAMPENED SHOP RAGS. DO NOT CREATE
DUST BY SANDING BRAKELINING. DISPOSE OF
ALL DUST AND DIRT SUSPECTED OF CONTAINING
ASBESTOS FIBERS IN SEALED BAGS OR CON-
TAINERS. FOLLOW ALL SAFETY PRACTICES REC-
OMMENDED BY THE OCCUPATIONAL SAFETY AND
HEALTH ADMINISTRATION (OSHA) AND THE ENVI-
RONMENTAL PROTECTION AGENCY (EPA), FOR
HANDLING AND DISPOSAL OF ASBESTOS.
5 - 2 BRAKESJ