display KIA CADENZA 2016 Navigation System Quick Reference Guide
[x] Cancel search | Manufacturer: KIA, Model Year: 2016, Model line: CADENZA, Model: KIA CADENZA 2016Pages: 76, PDF Size: 6.73 MB
Page 36 of 76
33
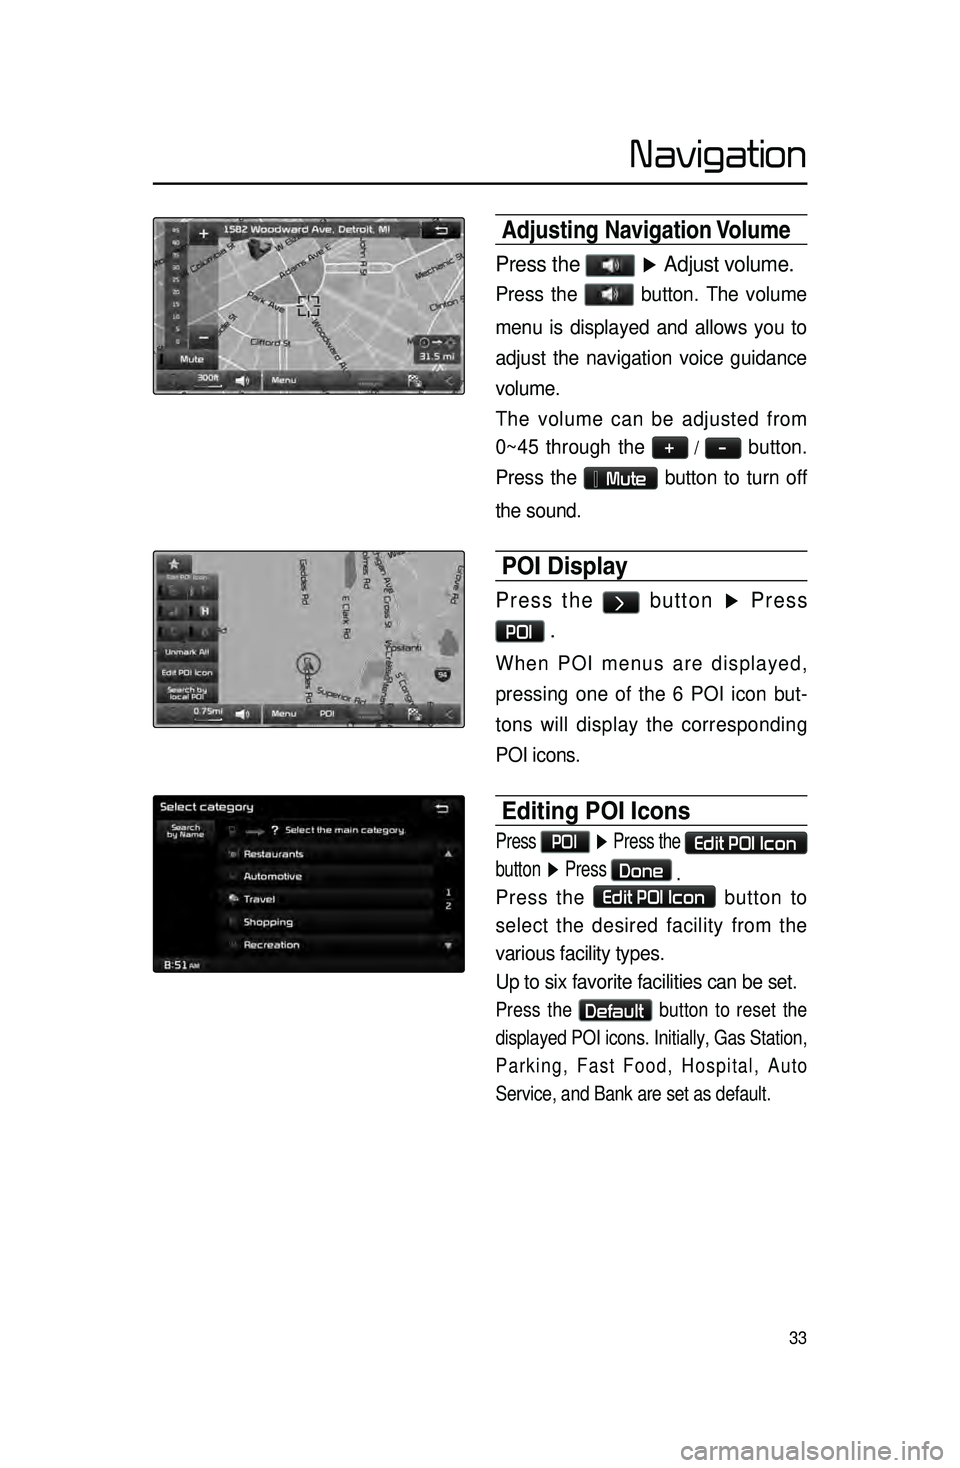
Adjusting Navigation Volume
Press the ▶ Adjust volume.
Press the button. The volume
menu is displayed and allows you to
adjust the navigation voice guidance
volume.
The volume can be adjusted from
0~45 through the
+ / - button.
Press the
Mute button to turn off
the sound.
POI Display
Press the > button ▶ Press
POI .
When POI menus are displayed,
pressing one of the 6 POI icon but -
tons will display the corresponding
POI icons.
Editing POI Icons
Press POI ▶ Press the Edit POI Icon
button ▶ Press
Done
.
Press the Edit POI Icon button to
select the desired facility from the
various facility types.
Up to six favorite facilities can be set.
Press the Default button to reset the
displayed POI icons. Initially, Gas Station,
Parking, Fast Food, Hospital, Auto
Service, and Bank are set as default.
Navigation
Page 37 of 76
34
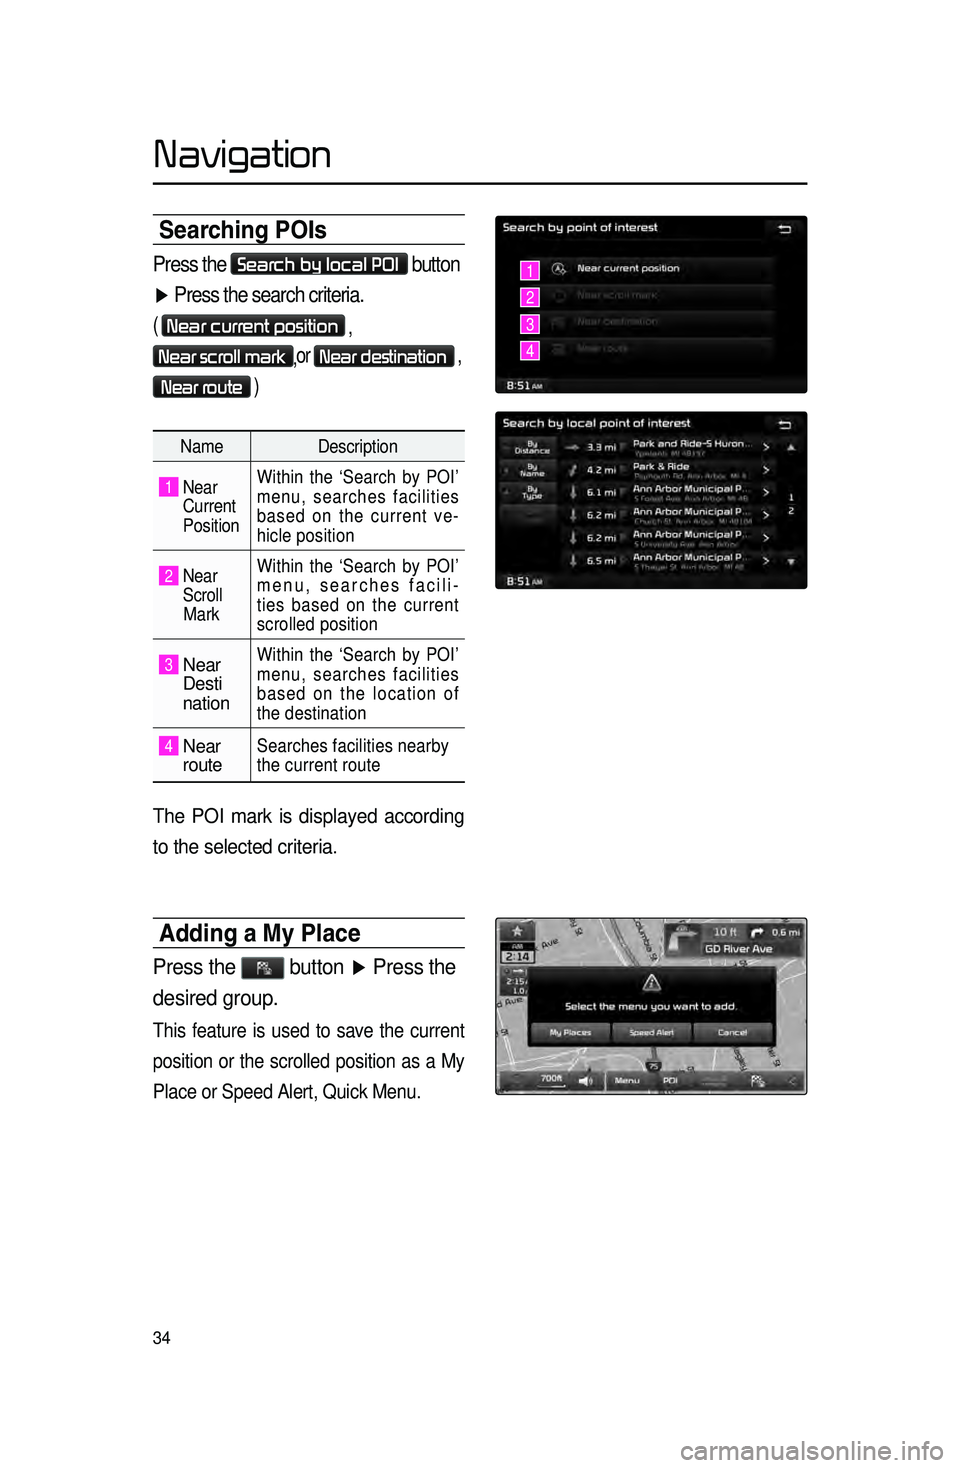
Searching POIs
Press the Search by local POI button
▶ Press the search criteria.
( Near current position
,
Near scroll mark,or Near destination ,
Near route )
Name
Description
1 Near
Current
Position Within the ‘Search by POI’
menu, searches facilities
based on the current ve
-
hicle position
2 Near
Scroll
Mark Within the ‘Search by POI’
menu, searches facili
-
ties based on the current
scrolled position
3 Near
Desti
nation
Within the ‘Search by POI’
menu, searches facilities
based on the location of
the destination
4 Near
routeSearches facilities nearby
the current route
The POI mark is displayed according
to the selected criteria.
Adding a \by Place
Press the button ▶ Press the
desired group.
This feature is used to save the current
position or the scrolled position as a My
Place or Speed Alert, Quick Menu.
1
2
3
4
Navigation
Page 38 of 76
35
Destination Search
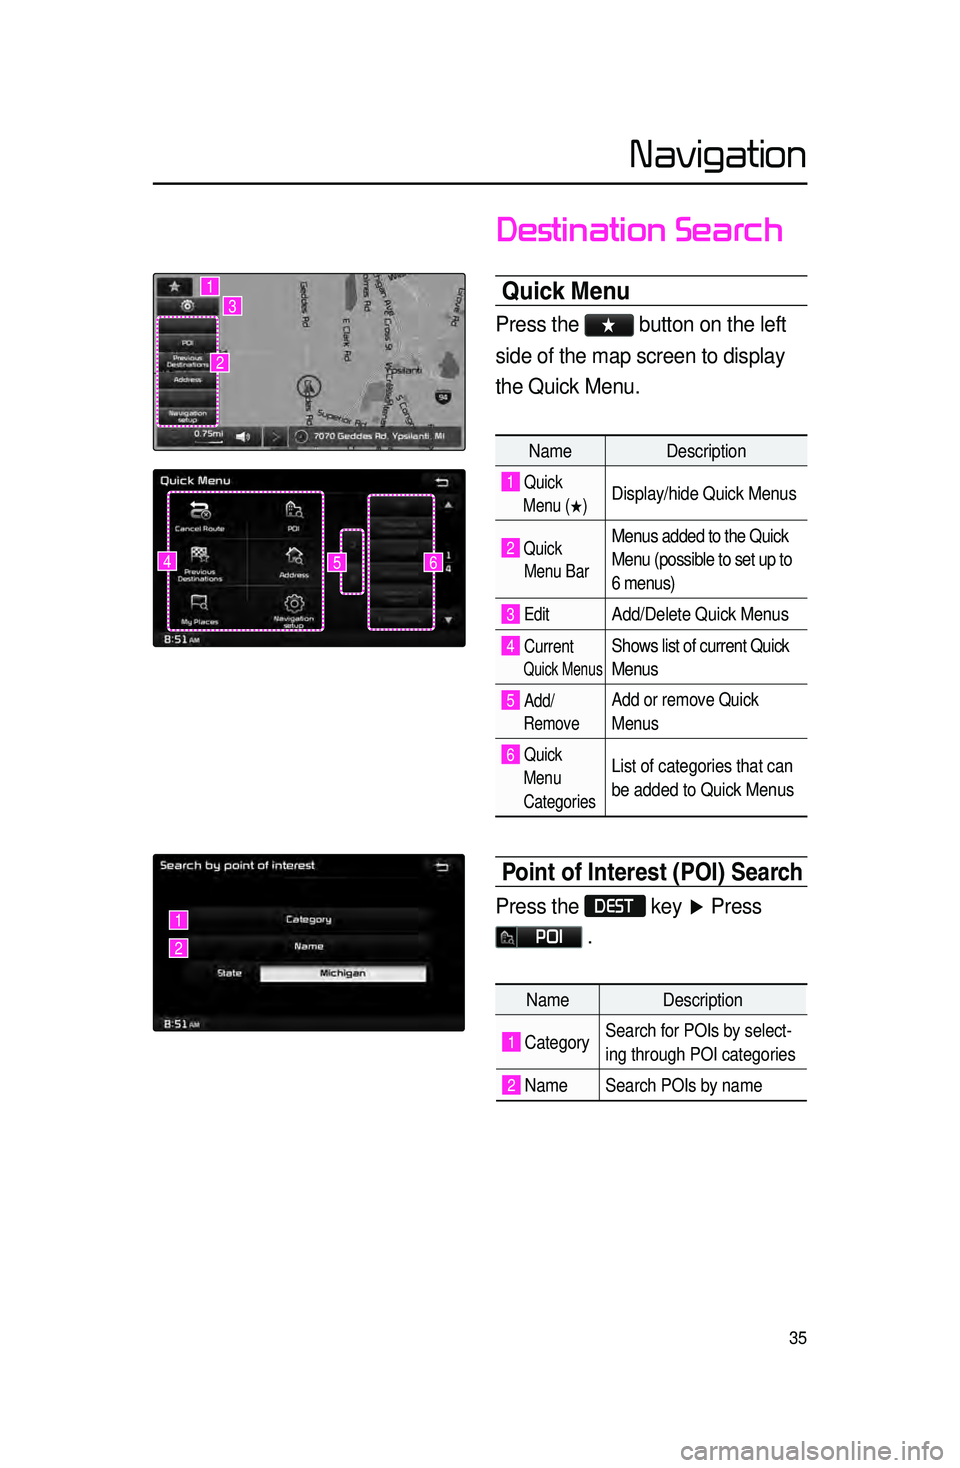
Quick \benu
Press the ★ button on the left
side of the map screen to display
the Quick Menu.
Name Description
1 Quick
Menu (
0530) Display/hide Quick Menus
2 Quick
Menu Bar Menus added to the Quick
Menu (possible to set up to
6 menus)
3 EditAdd/Delete Quick Menus
4 Current
Quick Menus
Shows list of current Quick
Menus
5 Add/
RemoveAdd or remove Quick
Menus
6 Quick
Menu
Categories List of categories that can
be added to Quick Menus
Point of Interest (P\cOI) Search
Press the DEST key ▶ Press
POI .
645
1
2
3
1
2
Name Description
1 CategorySearch for POIs by select
-
ing through POI categories
2 Name Search POIs by name
Navigation
Page 43 of 76

40
Setting a Destinati\con
Press the DEST key ▶ Search
for the Destination ▶ Press
Set as Destination
.
• To conduct a destination search
through the desired search method,
select the desired destination from
the list. (For more information on
destination search methods, refer to
the ‘Destination Search’ section.)
• After verifying the location of the
searched destination, press the
Set as Destination button to calcu-
late the route. The Route Overview
or Alternative Route screen will be
the displayed.
• Within the Route Overview
or Alternative Route screen, press
the
MAP
VOICE key or the
Start Guidance button to start
route guidance.
One Touch Scroll Setting
The destination can be set to the cur -
rent map display.
• While in the map screen, touching
a position on the map will move the
map to the center of the selected
position and display the scroll mark.
• Press the Menu button to set the
selected position as a waypoint or des -
tination.
(Alternative Route)
(Route Overview)
Navigation
Page 45 of 76

42
Route Recalculation\c
Once.a.route.has.been.set\f.the.
Recalculate.button.is.displayed.at.the.
top
.
of
.
the
.
menus.
Pressing.the .Recalculate.button.
will
.
displa
y
.
a
.
pop\bup
.
that
.
allo
ws .
y
ou .
to.
change
.
route
.
options
.
.Once
.
the
.
settings
.
are
.
changed\f
.
the
.
route
.
is
.
recalculated.
b
y
.
reflecting
.
the
.
changes.
Cancel Route
In.the.Map.menu.screen\f.press.the..
Cancel Route.button.
Navigation
Page 46 of 76

43
Route Guidance
Preliminary guidance, highway mode,
turn list guidance, and other guidance
screens are displayed according to
the current road condition.
Within the guidance map screen, if
the current position is on route, then
intersection guidance will be provided
once you are nearby an intersection.
Also, the intersection zoom screen is
displayed when nearby an intersec-
tion.
Preliminary Guidance \bode
At the top right side of the screen, the
next/ after next turn info, remaining
distance, direction, and other informa -
tion are displayed.
Intersection Zoom \bode
This mode provides detailed guidance
nearby intersections before the next
turn.
This mode is displayed starting from
300m before the intersection.
Navigation
Page 48 of 76

45
Route Menu
Press the ROUTE key to use, edit,
or optimize various route options.
Cancel Route
Press the ROUTE key ▶ Press
Cancel Route .
Route Overview
Press the ROUTE
key ▶ Press
Route Overview .
Within the Route Overview screen,
press the
Alternative Route button
to display other potential routes to the
set destination.
From the alternative route options,
select the desired route.
Route Info
Press the ROUTE key ▶ Press
Route Info
.
The turn points and distance informa-
tion
by key roads within the set route
are played.
Press the MAP button
next to each road name to display the
map position for the corresponding
location.
Navigation
Page 49 of 76

46
Route Option
Press the ROUTE
key ▶ Press
Route Option
▶ Set and press
Done
. Route.Options.refer.to.condi\b
tions
.used.to.calculate.the.route.to.the.
destination..The
. route . is . automatically . re\b
calculated
.if.the.route.options.and.detailed.
route
. settings . are . changed.
Detour
Press the ROUTE key ▶ Press
Detour
.
The Detour menu is used to redefine
the route by setting a detour to a cer -
tain distance from the current position.
Avoid Streets
Press the ROUTE key ▶ Press
Avoid Streets ▶ Select the
streets you want to avoid and press
Done .
This feature is used to select specific
streets to avoid within the current route.
Select
Avoid to avoid the particular
streets in the route overview that are
desired to be avoided.
Edit Route
Press the ROUTE key ▶ Press
Edit Route ▶ Set and press
Done
.
The Edit Route menu displays the
start point, waypoints, and the desti -
nation in list format and is used to edit
corresponding posit
ions or the order
of destinations within the route.
Navigation
Page 51 of 76
48
Using Bluetooth® Handsfree
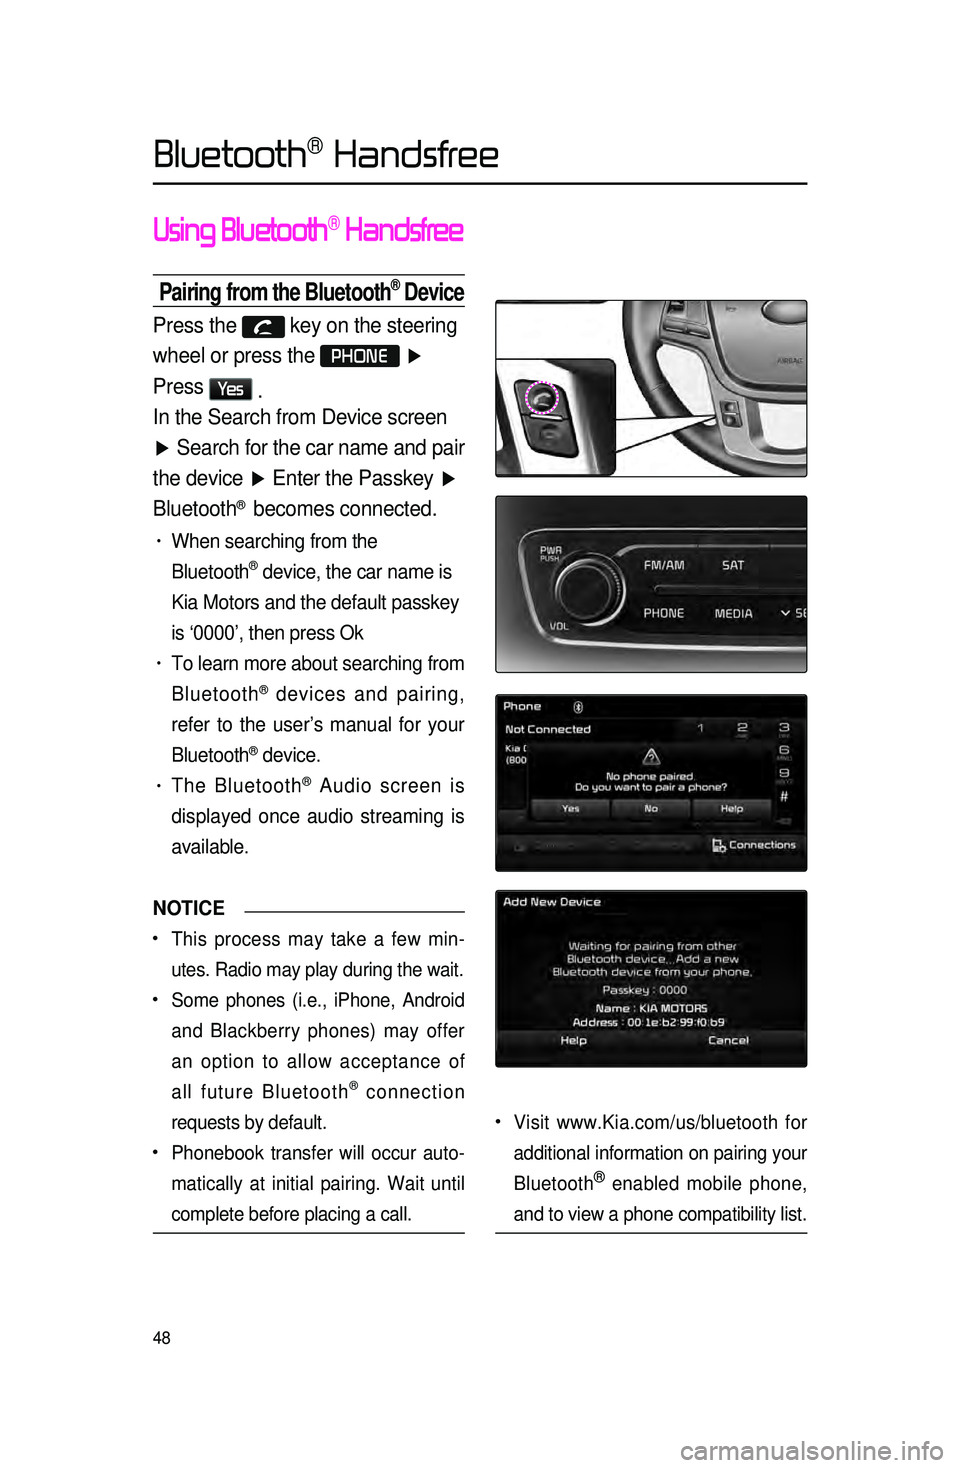
Pairing from the Bluetooth® Device
Press the key on the steering
wheel or press the
PHONE ▶
Press
Ye s .
In the Search from Device screen
▶ Search for the car name and pair
the device ▶ Enter the Passkey ▶
Bluetooth
® becomes connected.
• When searching from the
Bluetooth
® device, the car name is
Kia Motors and the default passkey
is ‘0000’, then press Ok
• To learn more about searching from
Bluetooth
® devices and pairing,
refer to the user’s manual for your
Bluetooth
® device.
• The Bluetooth® Audio screen is
displayed once audio streaming is
available.
NOTICE
•.This process may take a few min -
utes. Radio may play during the wait.
•.Some phones (i.e., iPhone, Android
and Blackberry phones) may offer
an option to allow acceptance of
all future Bluetooth
® connection
requests by default.
•.Phonebook transfer will occur auto -
matically at initial pairing. Wait until
complete before placing a call.
•.Visit www.Kia.com/us/bluetooth for
additional information on pairing your
Bluetooth
® enabled mobile phone,
and to view a phone compatibility list.
Bluetooth® Handsfree
Page 52 of 76
49
Making/Answering
Calls
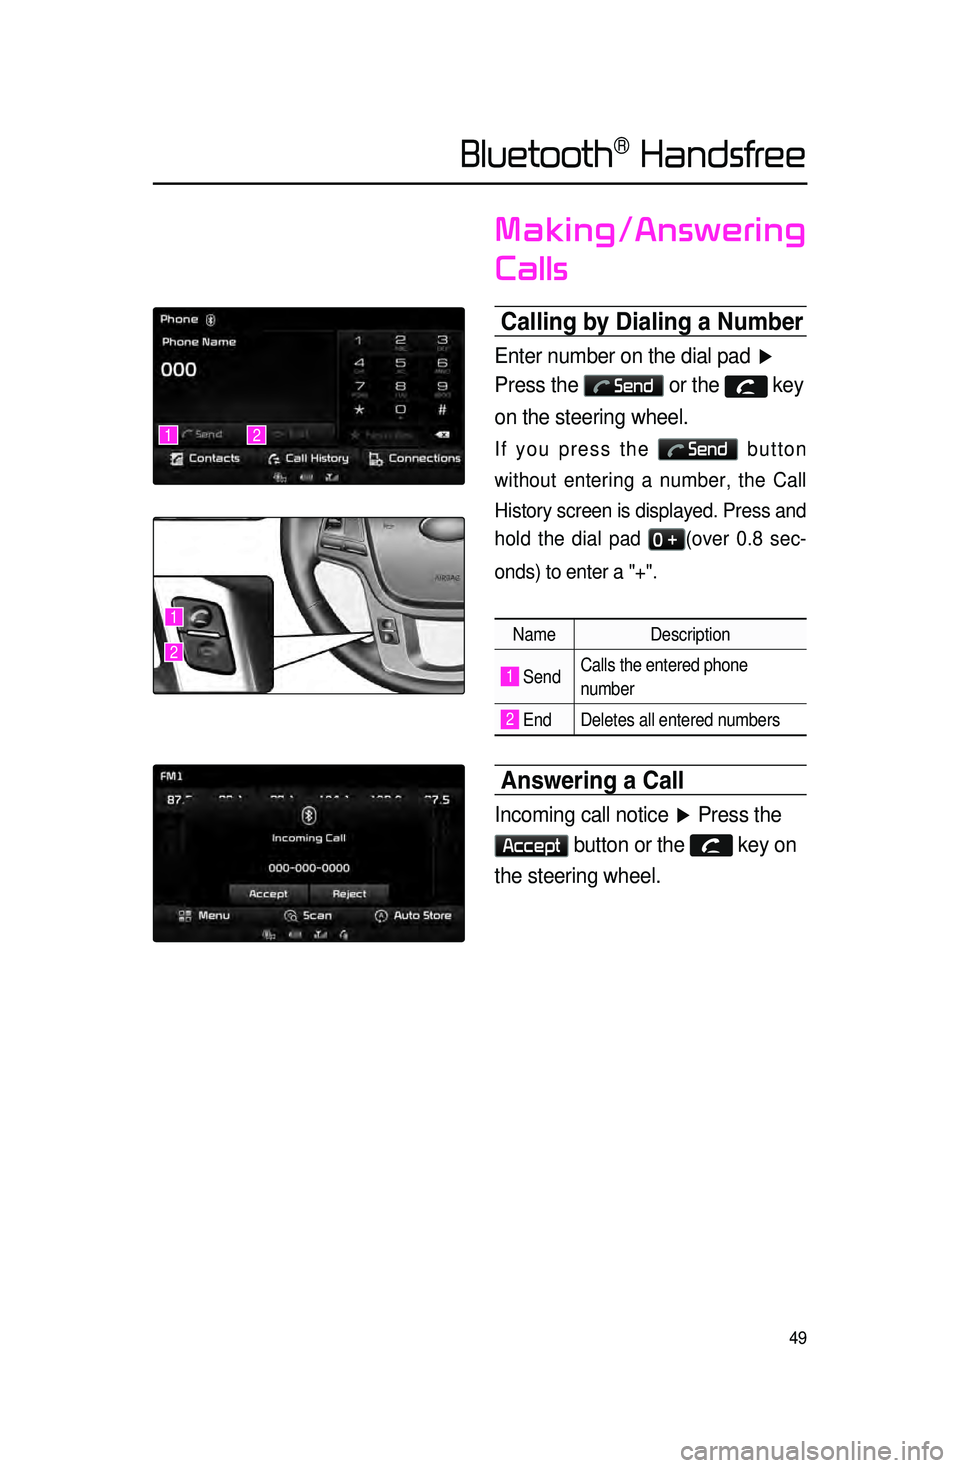
Calling by Dialing a Number\c
Enter number on the dial pad ▶
Press the
Send or the key
on the steering wheel.
If you press the Send button
without entering a number, the Call
History screen is displayed. Press and
hold the dial pad
0 +(over 0.8 sec -
onds) to enter a "+".
Name Description
1 SendCalls the entered phone
number
2 End Deletes all entered numbers
Answering a Call
Incoming call notice ▶ Press the
Accept button or the key on
the steering wheel.
12
1
2
Bluetooth® Handsfree