Open door KIA CADENZA 2017 Owner's Manual
[x] Cancel search | Manufacturer: KIA, Model Year: 2017, Model line: CADENZA, Model: KIA CADENZA 2017Pages: 500, PDF Size: 10.37 MB
Page 111 of 500
Features of your vehicle
30
4
✽
✽
NOTICE
• If you press the door unlock but-
ton (2), the Smart Trunk function
will be deactivated temporarily.
But, if you do not open any door
for 30 seconds, the smart trunk
function will be activated again.
• If you press the trunk open button (3) for more than 1 second, the
trunk opens.
• If you press the door lock button (1) or trunk open button (3) when
the Smart Trunk function is not in
the Detect and Alert stage, the
smart trunk function will not be
deactivated.
• In case you have deactivated the Smart Trunk function by pressing
the smart key button and opened a
door, the smart trunk function can
be activated again by closing and
locking all doors.
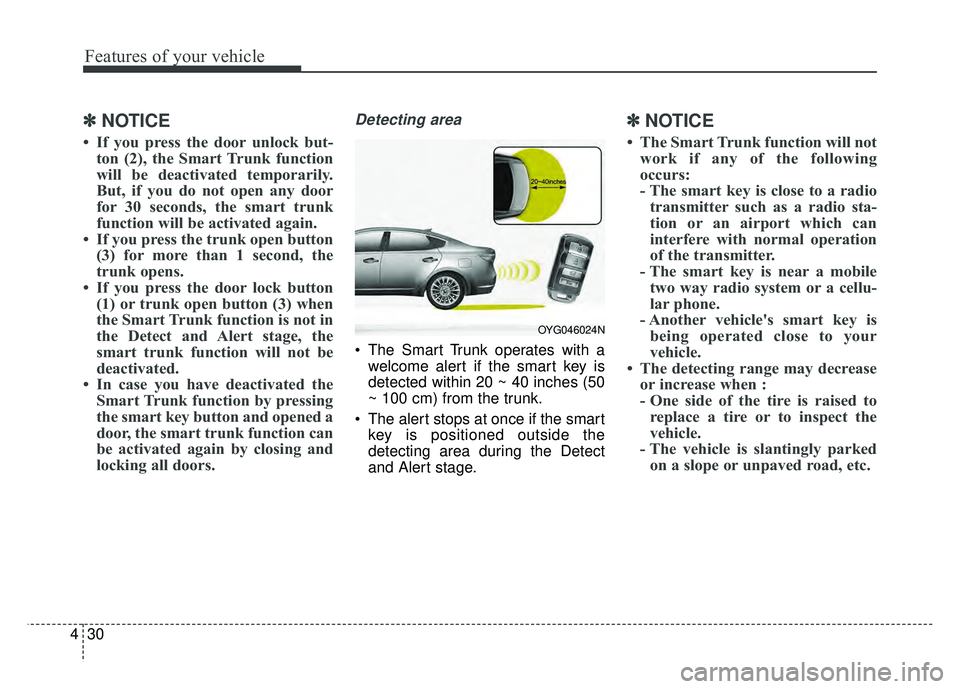
Detecting area
The Smart Trunk operates with a
welcome alert if the smart key is
detected within 20 ~ 40 inches (50
~ 100 cm) from the trunk.
The alert stops at once if the smart key is positioned outside the
detecting area during the Detect
and Alert stage.
✽ ✽ NOTICE
• The Smart Trunk function will not
work if any of the following
occurs:
- The smart key is close to a radiotransmitter such as a radio sta-
tion or an airport which can
interfere with normal operation
of the transmitter.
- The smart key is near a mobile two way radio system or a cellu-
lar phone.
- Another vehicle's smart key is being operated close to your
vehicle.
• The detecting range may decrease or increase when :
- One side of the tire is raised toreplace a tire or to inspect the
vehicle.
- The vehicle is slantingly parked on a slope or unpaved road, etc.
OYG046024N
Page 112 of 500
431
Features of your vehicle
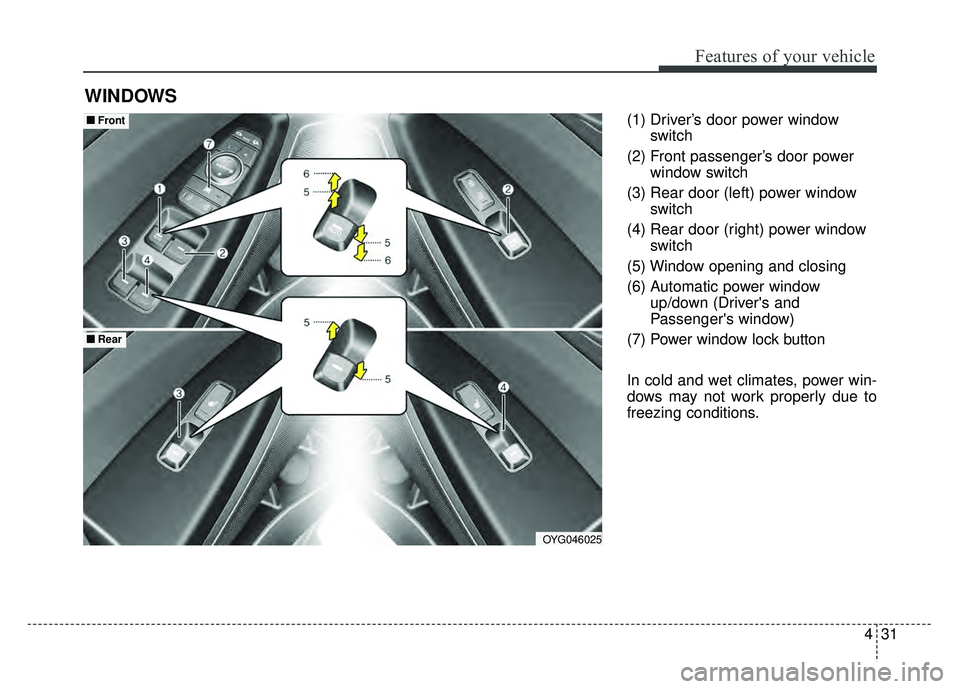
(1) Driver’s door power windowswitch
(2) Front passenger’s door power window switch
(3) Rear door (left) power window switch
(4) Rear door (right) power window switch
(5) Window opening and closing
(6) Automatic power window up/down (Driver's and
Passenger's window)
(7) Power window lock button
In cold and wet climates, power win-
dows may not work properly due to
freezing conditions.
WINDOWS
OYG046025
■
■ Front
■
■Rear
Page 113 of 500
Features of your vehicle
32
4
Power windows
The Engine Start/Stop button must be
in the ON position for power windows
to operate. Each door has a power
window switch that controls the door’s
window. The driver has a power win-
dow lock switch which can block the
operation of rear passenger windows.
The power windows can be operated
for approximately 30 seconds after
engine is turned off. However, if the
front doors are opened, the power
windows cannot be operated even
within the 30 second period.
✽ ✽
NOTICE
While driving with the rear windows
down or with the sunroof (if
equipped) in an open (or partially
open) position, your vehicle may
demonstrate a wind buffeting or
pulsation noise. This noise is a nor-
mal occurrence and can be reduced
or eliminated by taking the follow-
ing actions. If the noise occurs with
one or both of the rear windows
down, partially lower both front
windows approximately one inch. If
you experience the noise with the
sunroof open, slightly reduce the
size of the sunroof opening.
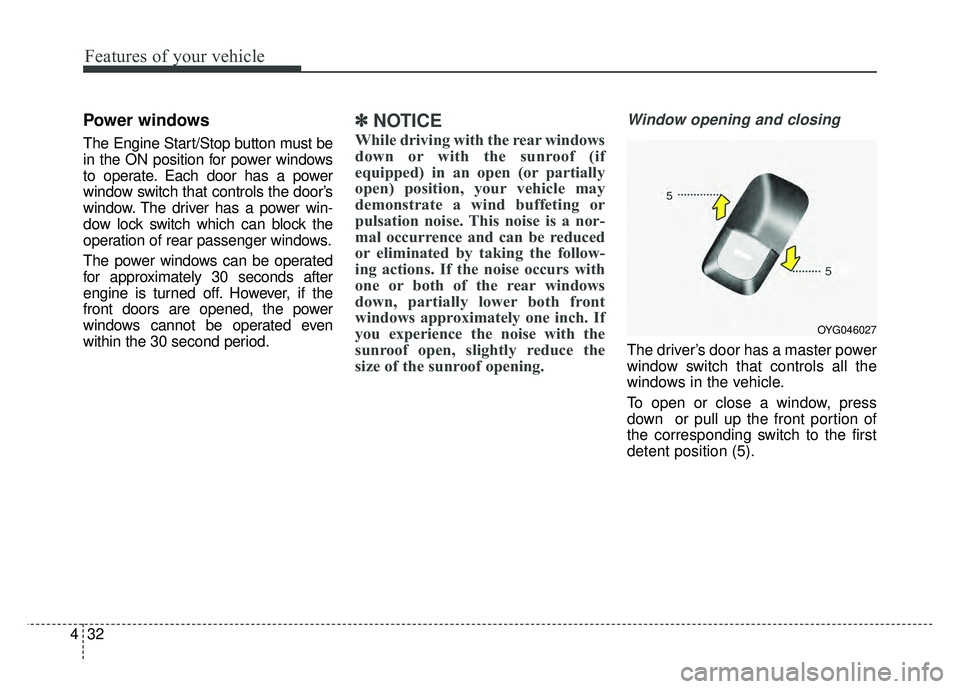
Window opening and closing
The driver’s door has a master power
window switch that controls all the
windows in the vehicle.
To open or close a window, press
down or pull up the front portion of
the corresponding switch to the first
detent position (5).
OYG046027
Page 115 of 500
Features of your vehicle
34
4
If the power window switch is pulled
up continuously again within 5 sec-
onds after the window is lowered by
the automatic window reversal fea-
ture, the automatic window reversal
will not operate.
The automatic reverse feature for the
driver’s window is only active when
the “auto up” feature is used by fully
pulling up the switch. The automatic
reverse feature will not operate if the
window is raised using the halfway
position on the power window switch.Power window lock button
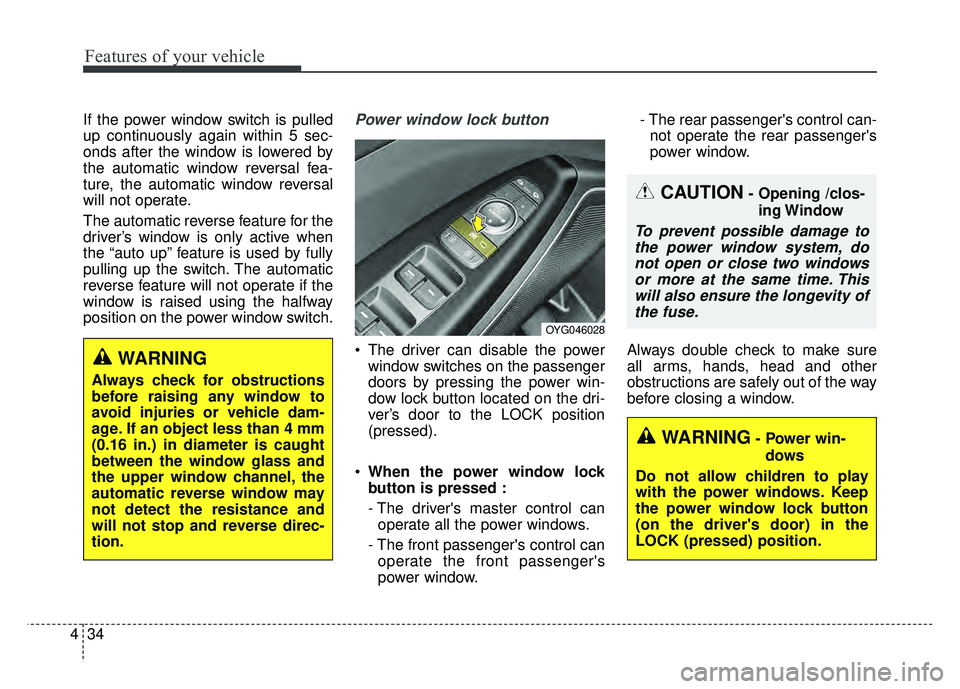
The driver can disable the power
window switches on the passenger
doors by pressing the power win-
dow lock button located on the dri-
ver’s door to the LOCK position
(pressed).
When the power window lock
button is pressed :
- The driver's master control can
operate all the power windows.
- The front passenger's control can operate the front passenger's
power window. - The rear passenger's control can-
not operate the rear passenger's
power window.
Always double check to make sure
all arms, hands, head and other
obstructions are safely out of the way
before closing a window.
CAUTION- Opening /clos- ing Window
To prevent possible damage tothe power window system, donot open or close two windowsor more at the same time. Thiswill also ensure the longevity ofthe fuse.
WARNING- Power win-
dows
Do not allow children to play
with the power windows. Keep
the power window lock button
(on the driver's door) in the
LOCK (pressed) position.
OYG046028
WARNING
Always check for obstructions
before raising any window to
avoid injuries or vehicle dam-
age. If an object less than 4 mm
(0.16 in.) in diameter is caught
between the window glass and
the upper window channel, the
automatic reverse window may
not detect the resistance and
will not stop and reverse direc-
tion.
Page 122 of 500
441
Features of your vehicle
If your vehicle is equipped with a
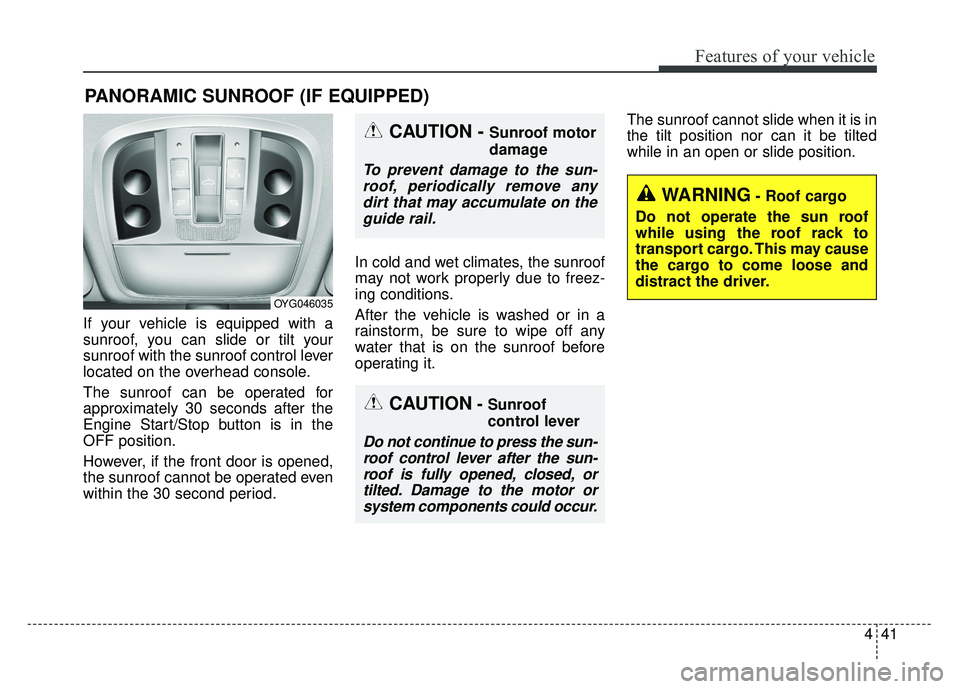
sunroof, you can slide or tilt your
sunroof with the sunroof control lever
located on the overhead console.
The sunroof can be operated for
approximately 30 seconds after the
Engine Start/Stop button is in the
OFF position.
However, if the front door is opened,
the sunroof cannot be operated even
within the 30 second period.In cold and wet climates, the sunroof
may not work properly due to freez-
ing conditions.
After the vehicle is washed or in a
rainstorm, be sure to wipe off any
water that is on the sunroof before
operating it.The sunroof cannot slide when it is in
the tilt position nor can it be tilted
while in an open or slide position.
PANORAMIC SUNROOF (IF EQUIPPED)
CAUTION- Sunroof
control lever
Do not continue to press the sun-
roof control lever after the sun-roof is fully opened, closed, ortilted. Damage to the motor orsystem components could occur.
CAUTION - Sunroof motor
damage
To prevent damage to the sun-roof, periodically remove anydirt that may accumulate on theguide rail.
WARNING- Roof cargo
Do not operate the sun roof
while using the roof rack to
transport cargo. This may cause
the cargo to come loose and
distract the driver.
OYG046035
Page 134 of 500
453
Features of your vehicle
Electric chromic mirror (ECM)with HomeLink®system and com-
pass (if equipped)
Your vehicle may be equipped with a
Gentex Automatic-Dimming Mirror
with a Z-Nav
®Electronic Compass
Display and an Integrated
HomeLink
®Wireless Control
System.
During nighttime driving, this feature
will automatically detect and reduce
rearview mirror glare while the com-
pass indicates the direction the vehi-
cle is pointed. The HomeLink
®
Universal Transceiver allows you to
activate your garage door(s), electric
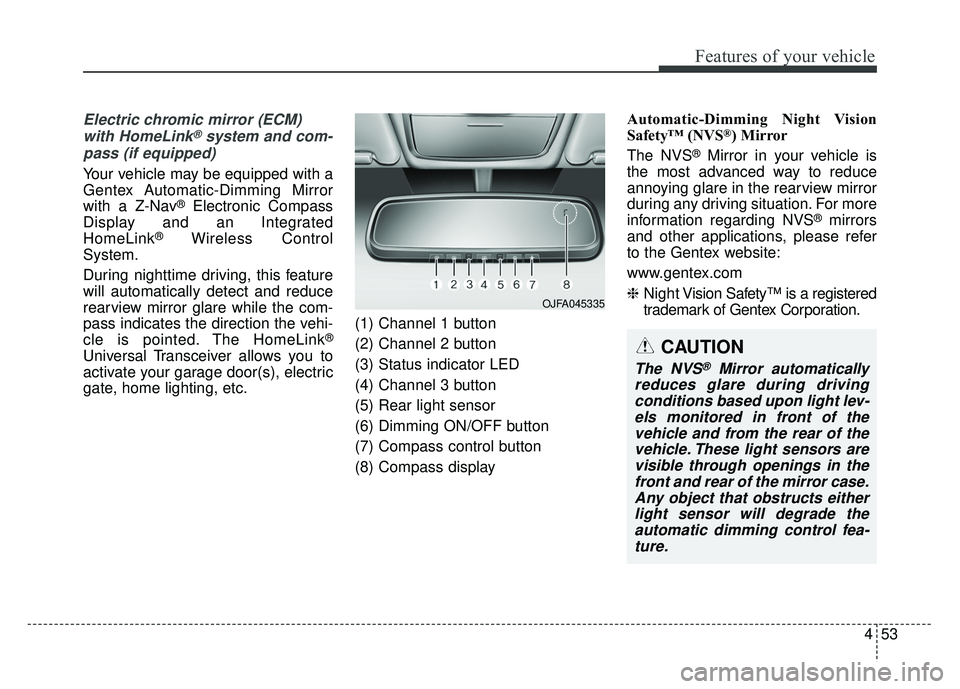
gate, home lighting, etc. (1) Channel 1 button
(2) Channel 2 button
(3) Status indicator LED
(4) Channel 3 button
(5) Rear light sensor
(6) Dimming ON/OFF button
(7) Compass control button
(8) Compass display Automatic-Dimming Night Vision
Safety™ (NVS
®) Mirror
The NVS
®Mirror in your vehicle is
the most advanced way to reduce
annoying glare in the rearview mirror
during any driving situation. For more
information regarding NVS
®mirrors
and other applications, please refer
to the Gentex website:
www.gentex.com
❈ Night Vision Safety™ is a registered
trademark of Gentex Corporation.
OJFA045335
CAUTION
The NVS®Mirror automatically
reduces glare during driving conditions based upon light lev-els monitored in front of thevehicle and from the rear of thevehicle. These light sensors arevisible through openings in thefront and rear of the mirror case.Any object that obstructs eitherlight sensor will degrade theautomatic dimming control fea-ture.
Page 137 of 500
Features of your vehicle
56
4
To adjust the Zone setting:
1. Determine the desired Zone
Number based upon your current
location on the Zone Map.
2. Press and hold the button for more than 3, but less than 6 sec-
onds, the current Zone Number
will appear on the display.
3. Pressing and holding the button again will cause the numbers to
increment (Note: they will repeat
…13, 14, 15, 1, 2, …). Releasing
the button when the desired Zone
Number appears on the display
will set the new Zone.
4. Within about 5 seconds, the com- pass will start displaying a com-
pass heading again. There are some conditions that can
cause changes to the vehicle mag-
nets, such as installing a ski rack or
a CB antenna. Body repair work on
the vehicle can also cause changes
to the vehicle's magnetic field. In
these situations, the compass will
need to be re-calibrated to quickly
correct for these changes. To re-cali-
brate the compass:
1. Press and hold the button for
more than 6 seconds. When the
compass memory is cleared, a "C"
will appear in the display.
2. To calibrate the compass, drive the vehicle in 2 complete circles at
less than 8 km/h (5 mph). Integrated HomeLink®Wireless
Control System
The HomeLink
®Wireless Control
System provides a convenient way to
replace up to three hand-held radio-
frequency (RF) transmitters with a
single built-in device. This innovative
feature will learn the radio frequency
codes of most current transmitters to
operate devices such as gate opera-
tors, garage door openers, entry
door locks, security systems, even
home lighting. Both standard and
rolling code-equipped transmitters
can be programmed by following the
outlined procedures. Additional
HomeLink
®information can be found
at: www.homelink.com or by calling
1-800-355-3515.
❈ HomeLink
®is a registered trade-
mark of Johnson Controls, Inc.
Page 138 of 500
457
Features of your vehicle
Retain the original transmitter of the
RF device you are programming for
use in other vehicles as well as for
future HomeLink
®programming. It is
also suggested that upon the sale of
the vehicle, the programmed
HomeLink
®buttons be erased for
security purposes.
Programming HomeLink®
✽ ✽ NOTICE
• When programming a garage
door opener, it is advised to park
the vehicle outside of the garage.
• It is recommended that a new bat- tery be placed in the hand-held
transmitter of the device being pro-
grammed to HomeLink
®for quick-
er training and accurate transaxle of
the radio-frequency signal.
• Some vehicles may require the igni- tion switch to be turned to the sec-
ond position for programming
and/or operation of HomeLink
®.
• In the event that there are still pro- gramming difficulties or questions
after following the programming
steps listed below, contact
HomeLink
®at: www.homelink.com
or 1-800-355-3515.
Standard programming
To train most devices, follow these
instructions:
1. For first-time programming, press
and hold the two outside buttons,
HomeLink
®Channel 1 and
Channel 3 Buttons, until the indi-
cator light begins to flash (after 20
seconds). Release both buttons.
Do not hold the buttons for longer
than 30 seconds.
2. Position the end of your hand-held transmitter 1-3 inches (2-8 cm)
away from the HomeLink
®buttons
while keeping the indicator light in
view.
3. Simultaneously press and hold both the HomeLink
®and hand-
held transmitter button. DO NOT
release the buttons until step 4
has been completed.
4. While continuing to hold the but- tons the red Indicator Status LED
will flash slowly and then rapidly
after HomeLink
®successfully
trains to the frequency signal from
the hand-held transmitter. Release
both buttons.
Page 139 of 500
Features of your vehicle
58
4
5. Press and hold the just-trained
HomeLink®button and observe
the red Status Indicator LED. If the
indicator light stays on constantly,
programming is complete and
your device should activate when
the HomeLink
® button is pressed
and released.
6. To program the remaining two HomeLink
® buttons, follow steps 2
through 5.
Rolling code programming
Rolling code devices which are
“code-protected” and manufactured
after 1996 may be determined by the
following:
Reference the device owner's manual for verification.
The handheld transmitter appears to program the HomeLink
®
Universal Transceiver but does not
activate the device.
Press and hold the trained HomeLink
®button. The device has
the rolling code feature if the indi-
cator light flashes rapidly and then
turns solid after 2 seconds. To train rolling code devices, follow
these instructions:
1.At the garage door opener receiver
(motor-head unit) in the garage,
locate the “learn” or “smart” button.
This can usually be found where
the hanging antenna wire is
attached to the motor-head unit.
Exact location and color of the but-
ton may vary by garage door open-
er brand.
If there is difficulty locating the
training button, reference the
device owner's manual or please
visit our web site at www.home-
link.com.
2.Firmly press and release the “learn” or “smart” button (which
activates the “training light”).
✽ ✽ NOTICE
There are 30 seconds in which to ini-
tiate step 3.
Page 140 of 500
459
Features of your vehicle
3.Return to the vehicle, firmly pressand hold for two seconds the
desired HomeLink
®button then
release. Repeat the
“press/hold/release” sequence a
second time to complete the pro-
gramming. (Some devices may
require you to repeat this sequence
a third time to complete the pro-
gramming.)
4.Press and hold the just-trained HomeLink
®button and observe the
red Status Indicator LED. If the indi-
cator light stays on constantly, pro-
gramming is complete and your
device should activate.
5.To program the remaining two HomeLink
®buttons, follow either
steps 1 through 4 above for other
Rolling Code devices or steps 2
through 5 in Standard Programming
for standard devices.
Gate operator & Canadian pro-
gramming
During programming, your handheld
transmitter may automatically stop
transmitting. Continue to press the
Integrated HomeLink
®Wireless
Control System button (note steps 2
through 4 in the Standard
Programming portion of this docu-
ment) while you press and re-press
(“cycle”) your handheld transmitter
every two seconds until the frequen-
cy signal has been learned. The indi-
cator light will flash slowly and then
rapidly after several seconds upon
successful training.
Operating HomeLink®
To operate, simply press and release
the programmed HomeLink®button.
Activation will now occur for the
trained device (i.e. garage door
opener, gate operator, security sys-
tem, entry door lock, home/office
lighting, etc.). For convenience, the
hand-held transmitter of the device
may also be used at any time.