fuse box KIA CADENZA 2020 Owners Manual
[x] Cancel search | Manufacturer: KIA, Model Year: 2020, Model line: CADENZA, Model: KIA CADENZA 2020Pages: 560, PDF Size: 11.37 MB
Page 16 of 560
Your vehicle at a glance
6 2
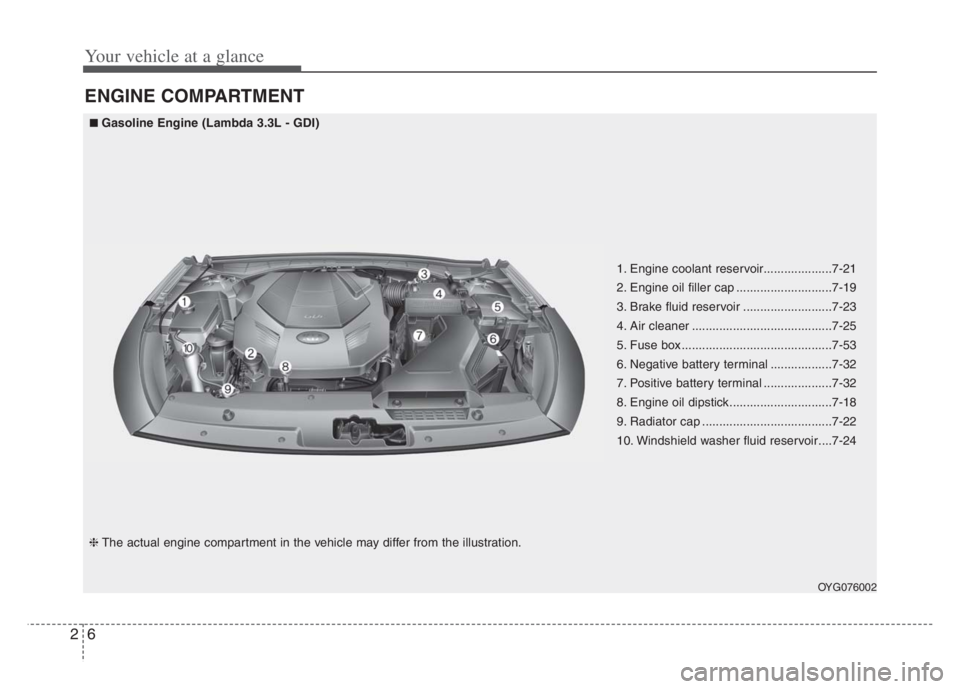
ENGINE COMPARTMENT
OYG076002
1. Engine coolant reservoir....................7-21
2. Engine oil filler cap ............................7-19
3. Brake fluid reservoir ..........................7-23
4. Air cleaner .........................................7-25
5. Fuse box ............................................7-53
6. Negative battery terminal ..................7-32
7. Positive battery terminal ....................7-32
8. Engine oil dipstick..............................7-18
9. Radiator cap ......................................7-22
10. Windshield washer fluid reservoir....7-24
■ ■Gasoline Engine (Lambda 3.3L - GDI)
❈The actual engine compartment in the vehicle may differ from the illustration.
Page 447 of 560
Fuses . . . . . . . . . . . . . . . . . . . . . . . . . . . . . . . . . . . . 7-50
• Inner panel fuse replacement . . . . . . . . . . . . . . . . . . . 7-51
• Engine compartment fuse replacement. . . . . . . . . . . 7-53
• Fuse/relay panel description. . . . . . . . . . . . . . . . . . . . 7-56
Light bulbs . . . . . . . . . . . . . . . . . . . . . . . . . . . . . . . 7-67
• Bulb replacement precaution . . . . . . . . . . . . . . . . . . . 7-67
• Light bulb position (Front). . . . . . . . . . . . . . . . . . . . . 7-69
• Light bulb position (Rear) . . . . . . . . . . . . . . . . . . . . . 7-69
• Light bulb position (Side) . . . . . . . . . . . . . . . . . . . . . . 7-70
• Headlamp (Low/High beam) (LED type) bulb
replacement . . . . . . . . . . . . . . . . . . . . . . . . . . . . . . . . 7-70
• Position lamp (LED type) bulb replacement . . . . . . 7-71
• Front side marker (LED type) bulb replacement . . 7-71
• Front turn signal lamp (Bulb type) bulb
replacement . . . . . . . . . . . . . . . . . . . . . . . . . . . . . . . . 7-71
• Tail lamp (LED type) bulb replacement . . . . . . . . . . 7-72
• Stop and tail lamp (LED type) bulb replacement . . 7-72
• Back-up lamp (Bulb type) bulb replacement . . . . . . 7-72
• Rear turn signal lamp (Bulb type) bulb
replacement . . . . . . . . . . . . . . . . . . . . . . . . . . . . . . . . 7-73
• Rear side marker (LED type) bulb replacement . . . 7-74
• High mounted stop lamp (LED type) bulb
replacement . . . . . . . . . . . . . . . . . . . . . . . . . . . . . . . . 7-74
• License plate lamp (Bulb type) bulb replacement . . 7-75
• Map lamp (LED type) bulb replacement . . . . . . . . . 7-75• Vanity mirror lamp (LED type) bulb replacement . . 7-76
• Room lamp (LED type) bulb replacement . . . . . . . . 7-76
• Personal lamp (LED type) bulb replacement . . . . . . 7-77
• Glove box lamp (Bulb type) bulb replacement . . . . 7-77
• Trunk room lamp (LED type) bulb replacement . . . 7-78Appearance care . . . . . . . . . . . . . . . . . . . . . . . . . . . 7-79
• Exterior care . . . . . . . . . . . . . . . . . . . . . . . . . . . . . . . . 7-79
• Interior care . . . . . . . . . . . . . . . . . . . . . . . . . . . . . . . . . 7-84
Emission control system . . . . . . . . . . . . . . . . . . . . 7-87
• Crankcase emission control system . . . . . . . . . . . . . . 7-87
• Evaporative emission control (including ORVR:
Onboard Refueling Vapor Recovery) system . . . . . 7-87
• Exhaust emission control system . . . . . . . . . . . . . . . . 7-88
7
Page 448 of 560
73
Maintenance
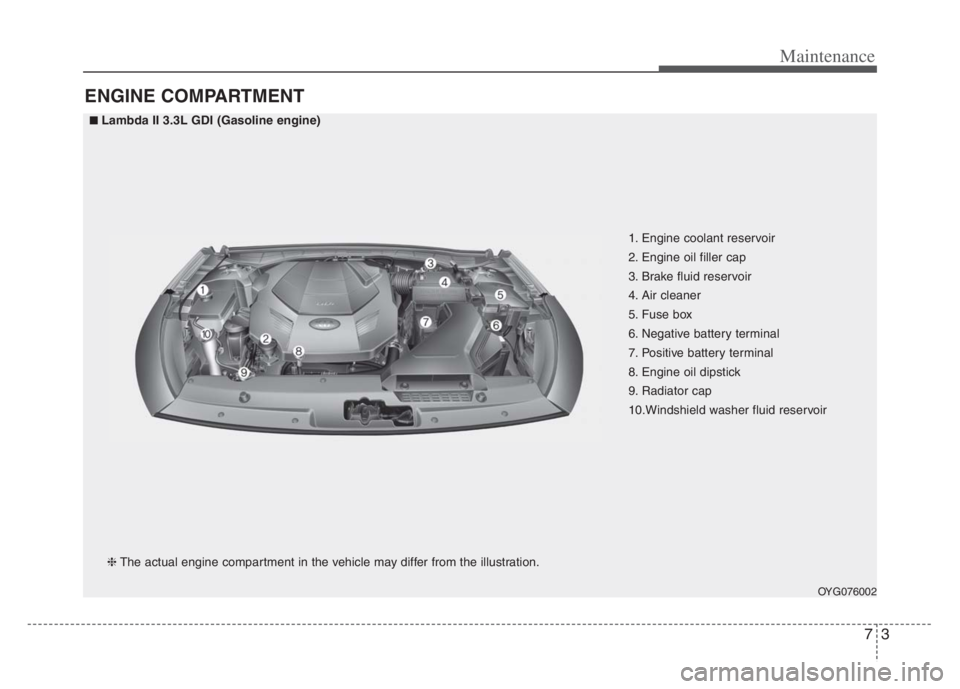
ENGINE COMPARTMENT
OYG076002
■ ■Lambda II 3.3L GDI (Gasoline engine)
❈The actual engine compartment in the vehicle may differ from the illustration.1. Engine coolant reservoir
2. Engine oil filler cap
3. Brake fluid reservoir
4. Air cleaner
5. Fuse box
6. Negative battery terminal
7. Positive battery terminal
8. Engine oil dipstick
9. Radiator cap
10.Windshield washer fluid reservoir
Page 498 of 560
753
Maintenance
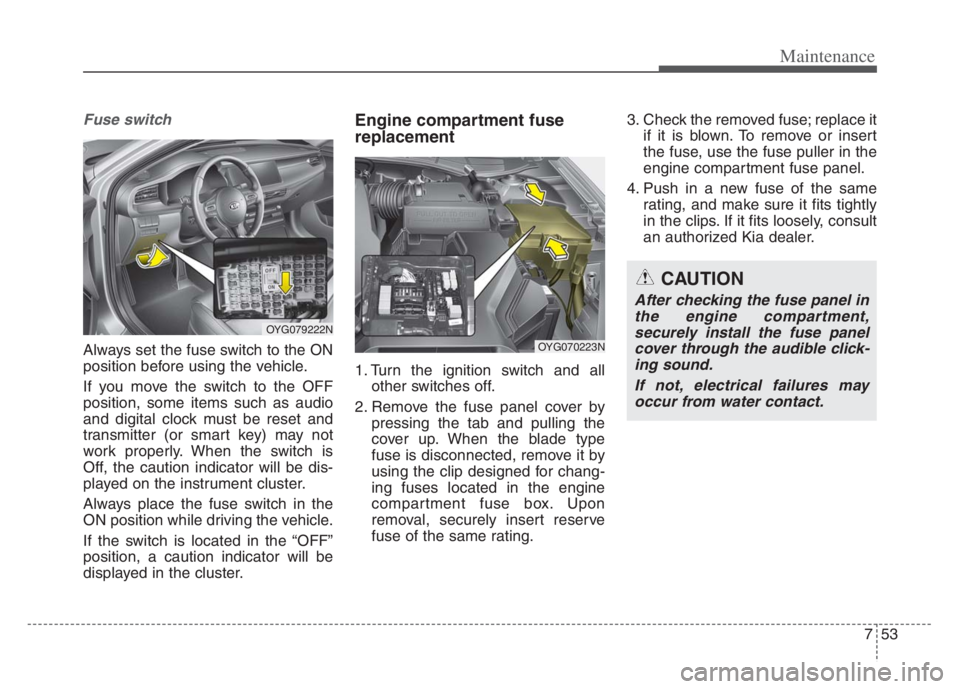
Fuse switch
Always set the fuse switch to the ON
position before using the vehicle.
If you move the switch to the OFF
position, some items such as audio
and digital clock must be reset and
transmitter (or smart key) may not
work properly. When the switch is
Off, the caution indicator will be dis-
played on the instrument cluster.
Always place the fuse switch in the
ON position while driving the vehicle.
If the switch is located in the “OFF”
position, a caution indicator will be
displayed in the cluster.
Engine compartment fuse
replacement
1. Turn the ignition switch and all
other switches off.
2. Remove the fuse panel cover by
pressing the tab and pulling the
cover up. When the blade type
fuse is disconnected, remove it by
using the clip designed for chang-
ing fuses located in the engine
compartment fuse box. Upon
removal, securely insert reserve
fuse of the same rating.3. Check the removed fuse; replace it
if it is blown. To remove or insert
the fuse, use the fuse puller in the
engine compartment fuse panel.
4. Push in a new fuse of the same
rating, and make sure it fits tightly
in the clips. If it fits loosely, consult
an authorized Kia dealer.
CAUTION
After checking the fuse panel in
the engine compartment,
securely install the fuse panel
cover through the audible click-
ing sound.
If not, electrical failures may
occur from water contact.
OYG079222N
OYG070223N
Page 500 of 560

755
Maintenance
✽ ✽
NOTICE
The electronic system may not func-
tion correctly even when the engine
compartment and internal fuse
box’s individual fuses are not dis-
connected. In such case the cause of
the problem may be disconnection
of the main fuse (BFT type), which is
located inside the positive battery
terminal (+) cap.
Since the main fuse is designed more
intricately than other parts, have the
vehicle checked by an authorized
Kia dealer.CAUTION
Visually inspect the battery cap
to ensure it is securely closed.
If the battery cap is not securely
closed, moisture may enter the
system and damage the electri-
cal components.
Page 503 of 560
Maintenance
58 7
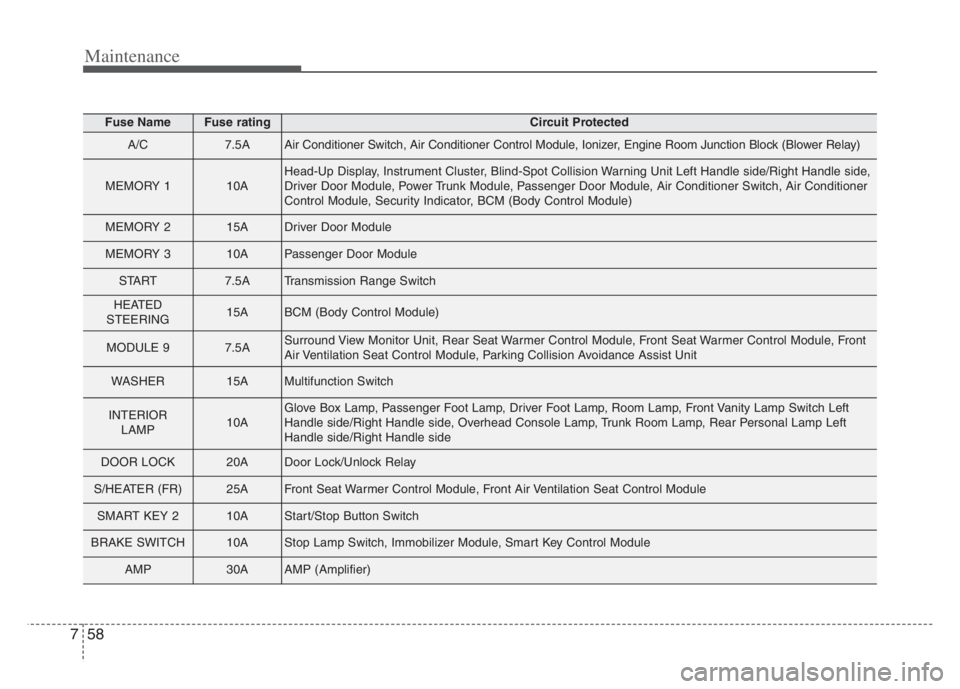
Fuse NameFuse ratingCircuit Protected
A/C7.5AAir Conditioner Switch, Air Conditioner Control Module, Ionizer, Engine Room Junction Block (Blower Relay)
MEMORY 110AHead-Up Display, Instrument Cluster, Blind-Spot Collision Warning Unit Left Handle side/Right Handle side,
Driver Door Module, Power Trunk Module, Passenger Door Module, Air Conditioner Switch, Air Conditioner
Control Module, Security Indicator, BCM (Body Control Module)
MEMORY 215ADriver Door Module
MEMORY 310APassenger Door Module
START7.5ATransmission Range Switch
HEATED
STEERING15ABCM (Body Control Module)
MODULE 97.5ASurround View Monitor Unit, Rear Seat Warmer Control Module, Front Seat Warmer Control Module, Front
Air Ventilation Seat Control Module, Parking Collision Avoidance Assist Unit
WASHER15AMultifunction Switch
INTERIOR
LAMP10AGlove Box Lamp, Passenger Foot Lamp, Driver Foot Lamp, Room Lamp, Front Vanity Lamp Switch Left
Handle side/Right Handle side, Overhead Console Lamp, Trunk Room Lamp, Rear Personal Lamp Left
Handle side/Right Handle side
DOOR LOCK20ADoor Lock/Unlock Relay
S/HEATER (FR)25AFront Seat Warmer Control Module, Front Air Ventilation Seat Control Module
SMART KEY 210AStart/Stop Button Switch
BRAKE SWITCH10AStop Lamp Switch, Immobilizer Module, Smart Key Control Module
AMP30AAMP (Amplifier)
Page 513 of 560
Maintenance
68 7
✽
✽
NOTICE
• If the light bulb or lamp connector
is removed while the lamp is still
on, the fuse box's electronic sys-
tem may log it as a malfunction.
Therefore, a lamp malfunction
incident may be recorded as a
Diagnostic Trouble Code (DTC) in
the fuse box.
• It is normal for an operating lamp
to flicker momentarily. This is due
to a stabilization function of the
vehicle’s electronic control device.
If the lamp lights up normally
after momentarily blinking, then
it is functioning as normal.
However, if the lamp continues to
flicker several times or turns off
completely, there may be an error
in the vehicle’s electronic control
device. Please have the vehicle
checked by an authorized Kia
dealer immediately.
✽ ✽
NOTICE
We recommend that the headlight
aiming be adjusted after an accident
or after the headlight assembly is rein-
stalled at an authorized Kia dealer.
✽ ✽
NOTICE
You can find moisture inside the lens
of lamps after a car wash or driving
in the rain. It is a natural event
caused by the temperature differ-
ence between the inside and the out-
side of the lamp and does not mean a
problem with its functions. The
moisture inside the lamp would dis-
appear if you drive the vehicle with
the headlamp turned on, however,
the level at which the moisture is
removed may differ depending on
the size/location/condition of the
lamp. If the moisture continues to
stay inside the lamp, we recommend
that you have the vehicle checked by
an authorized Kia dealer.
Page 514 of 560
769
Maintenance
If you don’t have the necessary tools,
the correct bulbs and the expertise,
consult an authorized Kia dealer. In
many cases, it is difficult to replace
vehicle light bulbs because other
parts of the vehicle must be removed
before you can get to the bulb. This is
especially true if you have to remove
the headlamp assembly to get to the
bulb(s).
Removing/installing the headlamp
assembly can result in damage to
the vehicle.
If non-genuine parts or substandard
bulbs are used, it may lead to blow-
ing a fuse or other wiring damages.
Do not install extra lamps or LEDs to
the vehicle. If additional lights are
installed, it may lead to lamp mal-
functions and flickering. Additionally,
the fuse box and other writing may
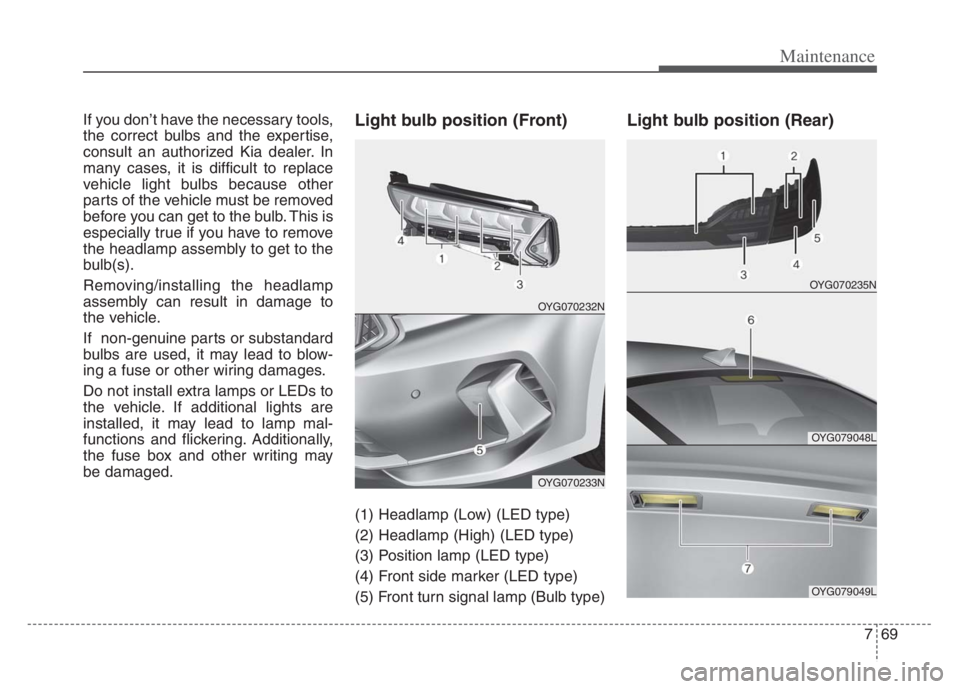
be damaged.Light bulb position (Front)
(1) Headlamp (Low) (LED type)
(2) Headlamp (High) (LED type)
(3) Position lamp (LED type)
(4) Front side marker (LED type)
(5) Front turn signal lamp (Bulb type)
Light bulb position (Rear)
OYG070232N
OYG070233N
OYG070235N
OYG079048L
OYG079049L