tailgate KIA CARNIVAL 2007 Workshop Manual
[x] Cancel search | Manufacturer: KIA, Model Year: 2007, Model line: CARNIVAL, Model: KIA CARNIVAL 2007Pages: 1575, PDF Size: 44.86 MB
Page 3 of 1575

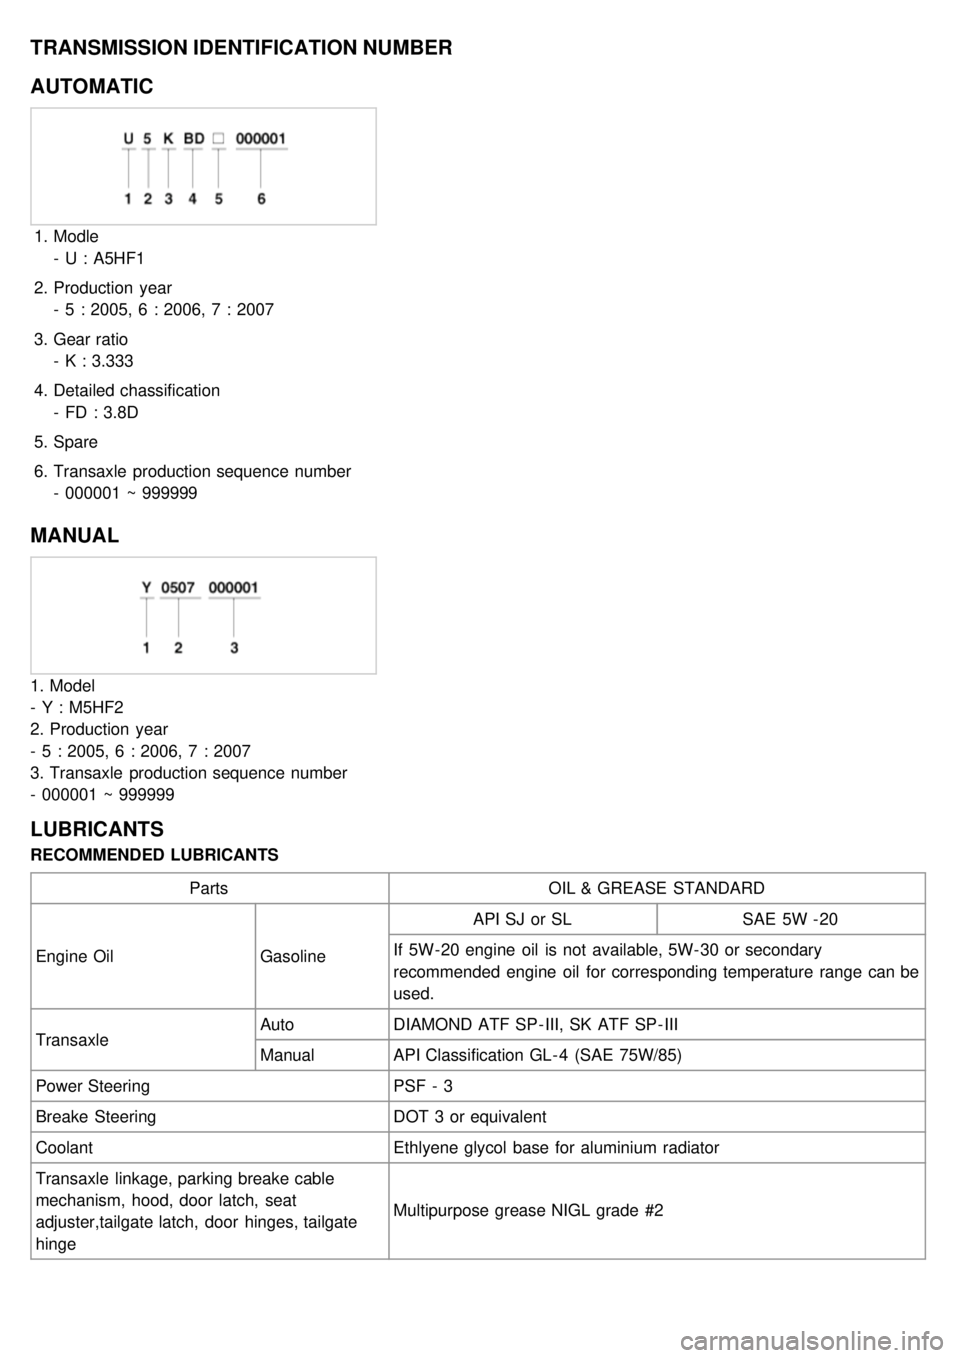
TRANSMISSION IDENTIFICATION NUMBER
AUTOMATIC
1.Modle
- U : A5HF1
2. Production year
- 5 : 2005, 6 : 2006, 7 : 2007
3. Gear ratio
- K : 3.333
4. Detailed chassification
- FD : 3.8D
5. Spare
6. Transaxle production sequence number
- 000001 ~ 999999
MANUAL
1. Model
- Y : M5HF2
2. Production year
- 5 : 2005, 6 : 2006, 7 : 2007
3. Transaxle production sequence number
- 000001 ~ 999999
LUBRICANTS
RECOMMENDED LUBRICANTS
Parts OIL & GREASE STANDARD
Engine Oil GasolineAPI SJ or SL
SAE 5W - 20
If 5W- 20 engine oil is not available, 5W- 30 or secondary
recommended engine oil for corresponding temperature range can be
used.
Transaxle Auto
DIAMOND ATF SP - III, SK ATF SP - III
Manual API Classification GL - 4 (SAE 75W/85)
Power Steering PSF - 3
Breake Steering DOT 3 or equivalent
Coolant Ethlyene glycol base for aluminium radiator
Transaxle linkage, parking breake cable
mechanism, hood, door latch, seat
adjuster,tailgate latch, door hinges, tailgate
hinge Multipurpose grease NIGL grade #2
Page 994 of 1575

2007 > 2.7L V6 GASOLINE >
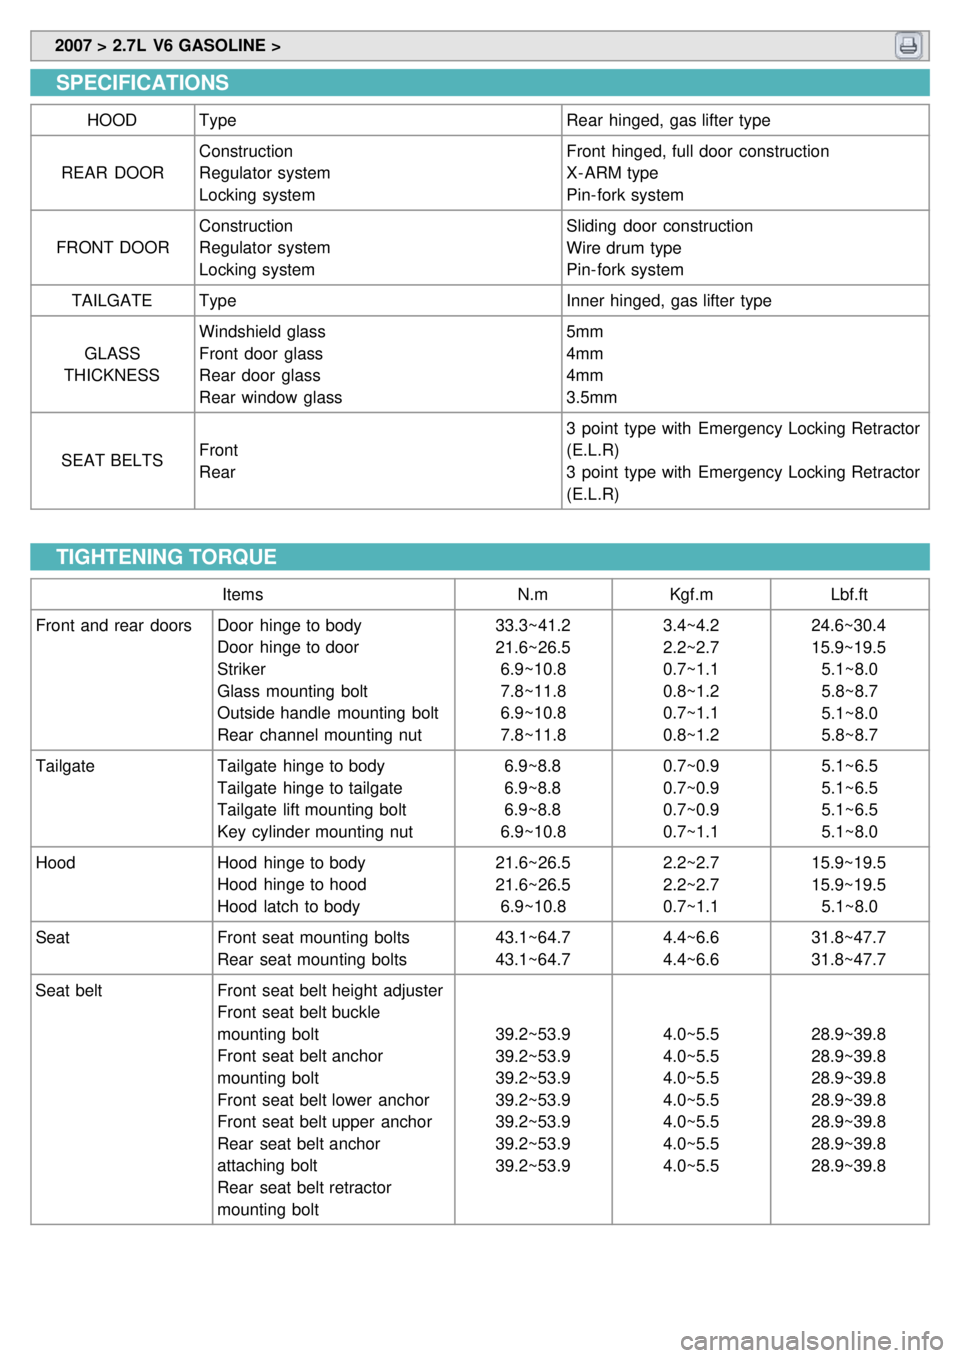
SPECIFICATIONS
HOOD Type Rear hinged, gas lifter type
REAR DOOR Construction
Regulator system
Locking system Front hinged, full door construction
X- ARM type
Pin- fork system
FRONT DOOR Construction
Regulator system
Locking system Sliding door construction
Wire drum type
Pin- fork system
TAILGATE Type Inner hinged, gas lifter type
GLASS
THICKNESS Windshield glass
Front door glass
Rear door glass
Rear window glass 5mm
4mm
4mm
3.5mm
SEAT BELTS Front
Rear 3 point type with Emergency Locking Retractor
(E.L.R)
3 point type with Emergency Locking Retractor
(E.L.R)
TIGHTENING TORQUE
Items
N.mKgf.m Lbf.ft
Front and rear doors Door hinge to body
Door hinge to door
Striker
Glass mounting bolt
Outside handle mounting bolt
Rear channel mounting nut 33.3~41.2
21.6~26.5
6.9~10.8
7.8~11.8
6.9~10.8
7.8~11.8 3.4~4.2
2.2~2.7
0.7~1.1
0.8~1.2
0.7~1.1
0.8~1.224.6~30.4
15.9~19.5
5.1~8.0
5.8~8.7
5.1~8.0
5.8~8.7
Tailgate Tailgate hinge to body
Tailgate hinge to tailgate
Tailgate lift mounting bolt
Key cylinder mounting nut 6.9~8.8
6.9~8.8
6.9~8.8
6.9~10.8 0.7~0.9
0.7~0.9
0.7~0.9
0.7~1.15.1~6.5
5.1~6.5
5.1~6.5
5.1~8.0
Hood Hood hinge to body
Hood hinge to hood
Hood latch to body 21.6~26.5
21.6~26.5
6.9~10.8 2.2~2.7
2.2~2.7
0.7~1.115.9~19.5
15.9~19.5
5.1~8.0
Seat Front seat mounting bolts
Rear seat mounting bolts 43.1~64.7
43.1~64.74.4~6.6
4.4~6.631.8~47.7
31.8~47.7
Seat belt Front seat belt height adjuster
Front seat belt buckle
mounting bolt
Front seat belt anchor
mounting bolt
Front seat belt lower anchor
Front seat belt upper anchor
Rear seat belt anchor
attaching bolt
Rear seat belt retractor
mounting bolt 39.2~53.9
39.2~53.9
39.2~53.9
39.2~53.9
39.2~53.9
39.2~53.9
39.2~53.9
4.0~5.5
4.0~5.5
4.0~5.5
4.0~5.5
4.0~5.5
4.0~5.5
4.0~5.528.9~39.8
28.9~39.8
28.9~39.8
28.9~39.8
28.9~39.8
28.9~39.8
28.9~39.8
Page 1008 of 1575

2007 > 2.7L V6 GASOLINE >
REPLACEMENT
INSIDE HANDLE REPLACEMENT
1. After loosening the mounting screws, remove the inside handle (A).
2.Installation is the reverse of removal.
ROOM LAMP REPLACEMENT
1.Remove the room ramp.
a. Remove the lens (A).
b. Remove the screw.
c. Pull out the room lamp (B).
d. Disconnect the connector (C).
2.Installation is the reverse of removal.
TAILGATE TRIM REPLACEMENT
a.When prying with a flat- tipper screwdriver, wrap it with protective tape, and apply protective tape around the
related parts, to prevent damage.
b. Put on gloves to protect your hands.
1. Remove the following items.
a. Room lamp
Page 1009 of 1575

b.Inside handle
2. Disconnect the clip (A), remove the tailgate lifter (B).
3.Using a screwdriver, remove the tailgate switch (A).
4. Disconnect the connector (B).
5.Using a screwdriver, remove the tailgate upper trim (A).
6.Loosen the screw, then remove tailgate side trim (A).
Page 1010 of 1575

7.Loosen the screws and clips to the lower tailgate trim (A).
8.Installation is the reverse of removal.
a.Replace and damaged clips.
TAILGATE WEATHERSTRIP REPLACEMENT
1.Remove the tailgate weather strip (A).
Page 1011 of 1575

2.Installation is the reverse of removal.
LATCH ASSEMBLY REPLACEMENT
1.Remove the tailgate trim.
2. Disconnect the outside handle rod (A), connector (B).
3.After loosening the mounting screws, then remove the latch assembly (A).
4.Installation is the reverse of removal.
a. Make sure the connector is connected properly and the connecting rod is connected properly.
b. Make sure the tailgate opens properly and locks securely.
ACTUATOR ASSEMBLY REPLACEMENT
1.Remove the tailgate trim.
2. Disconnect the outside handle rod (A), actuator rod (B), key cylinder rod (C) and connector.
3. After loosening the mounting bolt and nuts, then remove the actuator assembly (D).
Page 1012 of 1575

4.Installation is the reverse of removal.
a.Make sure the connector is connected properly and the connecting rod is connected properly.
b. Make sure the tailgate opens properly and locks securely.
OUTSIDE HANDLE REPLACEMENT
1.Remove the tailgate trim.
2. After loosening the mounting bolt and nuts, then remove the tailgate garnish (A).
3.Disconnect the outside handle rod (A).
4. Loosen the outside handle (B) mounting bolts.
Page 1013 of 1575

5.Installation is the reverse of removal.
a.Make sure the tailgate opens properly and locks securely.
LIFTER REPLACEMENT
1.Using a screwdriver (A), lift up slightly the socket clips (B) of both ends on the lifter (D), and then remove the lifter
from the bracket (C).
Page 1014 of 1575

2.Push the socket of the lifter into the bracket for installation.
KEY HOLDER REPLACEMENT
1.Remove the tailgate trim.
2. Remove the tailgate garnish.
3. Disconnect the key rod (B) and connector (A).
4.Remove the key holder (A).
Page 1015 of 1575

5.Installation is the reverse of removal.
a.Make sure the tailgate opens properly and locks securely.
POWER TAILGATE MOTER ASSEMBLY REPLACEMENT
1.Remove the rear seat assembly.
2. Remove the luggage trim.
3. Disconnect the clip (A), remove the tailgate lifter (B).
4.Disconnect the connector.
5. After loosening the mounting bolts, then remove the tailgate motor assembly (A).
6.Installation is the reverse of removal.