ESP KIA CEED 2015 Repair Manual
[x] Cancel search | Manufacturer: KIA, Model Year: 2015, Model line: CEED, Model: KIA CEED 2015Pages: 1210, PDF Size: 35.92 MB
Page 445 of 1210
619
What to do in an emergency
IF YOU HAVE A FLAT TIRE (WITH TIREMOBILITYKIT, IF EQUIPPED)
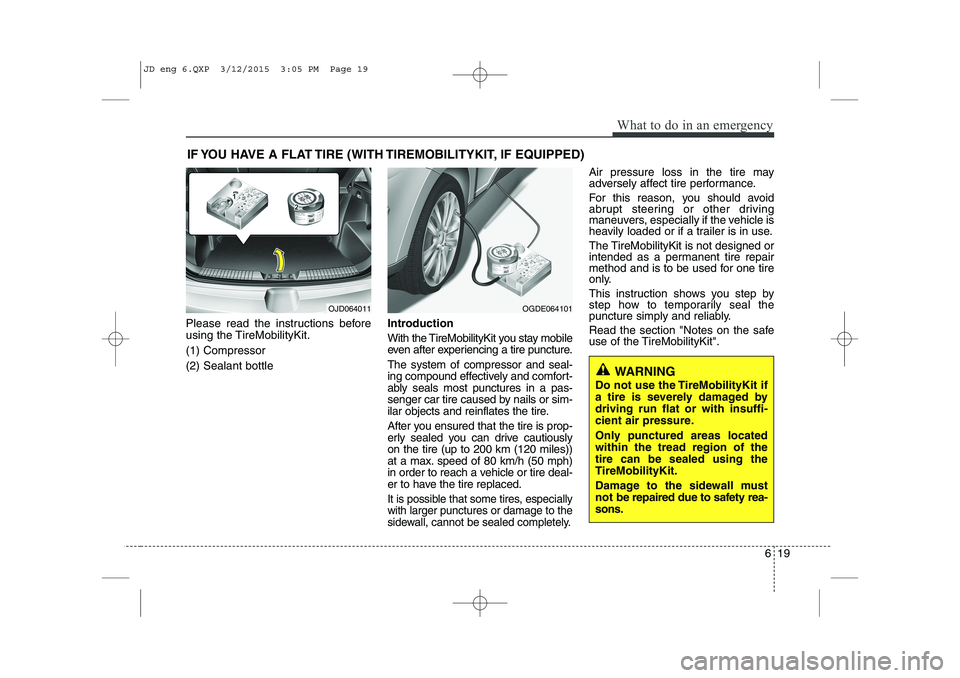
Please read the instructions before
using the TireMobilityKit. (1) Compressor(2) Sealant bottle Introduction
With the TireMobilityKit you stay mobile
even after experiencing a tire puncture. The system of compressor and seal-
ing compound effectively and comfort-
ably seals most punctures in a pas-
senger car tire caused by nails or sim-
ilar objects and reinflates the tire.
After you ensured that the tire is prop-
erly sealed you can drive cautiouslyon the tire (up to 200 km (120 miles))
at a max. speed of 80 km/h (50 mph)
in order to reach a vehicle or tire deal-
er to have the tire replaced.
It is possible that some tires, especiallywith larger punctures or damage to the
sidewall, cannot be sealed completely.
Air pressure loss in the tire may
adversely affect tire performance.
For this reason, you should avoid
abrupt steering or other driving
maneuvers, especially if the vehicle is
heavily loaded or if a trailer is in use.
The TireMobilityKit is not designed or
intended as a permanent tire repair
method and is to be used for one tire
only.
This instruction shows you step by
step how to temporarily seal the
puncture simply and reliably.
Read the section "Notes on the safe
use of the TireMobilityKit".
OGDE064101
WARNING
Do not use the TireMobilityKit if
a tire is severely damaged bydriving run flat or with insuffi-
cient air pressure.
Only punctured areas located within the tread region of thetire can be sealed using theTireMobilityKit.
Damage to the sidewall must
not be repaired due to safety rea-
sons.
OJD064011
JD eng 6.QXP 3/12/2015 3:05 PM Page 19
Page 448 of 1210
What to do in an emergency
22
6
Distributing the sealant
Immediately drive approximately 3 km
(2 miles) to evenly distribute the
sealant in the tire. Producing the tire inflation pres- sure
1) After driving approximately 3 km (2
miles), stop at a suitable location.
2) Connect the filling hose 2 of the compressor (clip mounted side) directly and then connect the fillinghose 2 (opposite side) to the tire
valve.
3) Connect between compressor and the vehicle power outlet using the
cable and connectors.
4) Adjust the tire inflation pressure to 220 kPa (32 psi). With the ignition
switched on, proceed as follows.
- To increase the inflation pres- sure: Switch on the compressor,
position I. To check the current
inflation pressure setting, briefly
switch off the compressor. - To reduce the inflation pres-
sure: Press the button 8 on the
compressor.
WARNING
Do not let the compressor run for
more than 10 minutes, otherwise
the device will overheat and may
be damaged.
WARNING
The tire inflation pressure must
be at least 220 kPa (32 psi). If it is
not, do not continue driving. Call
for road side service or towing.
CAUTION
Do not exceed a speed of 80 km/h (50 mph). If possible, donot fall below a speed of 20 km/h (12 mph).
While driving, if you experienceany unusual vibration, ride dis-turbance or noise, reduce yourspeed and drive with caution until you can safely pull off ofthe side of the road.
Call for road side service or tow-ing.
CAUTION
If the inflation pressure is notmaintained, drive the vehicle asecond time, refer to Distributing the sealant. Then repeat steps 1to 4.
Use of the TireMobilityKit maybe ineffectual for tire damagelarger than approximately 4 mm (0.16 in).
We recommend that you contactthe nearest Kia A/S center, or aworkshop that works accordingto Kia repair procedures with cor- respondingly trained personnel ifthe tire cannot be made roadwor-thy with the TireMobilityKit.
JD eng 6.QXP 3/12/2015 3:05 PM Page 22
Page 450 of 1210
What to do in an emergency
24
6
TIRE PRESSURE MONITORING SYSTEM (TPMS)
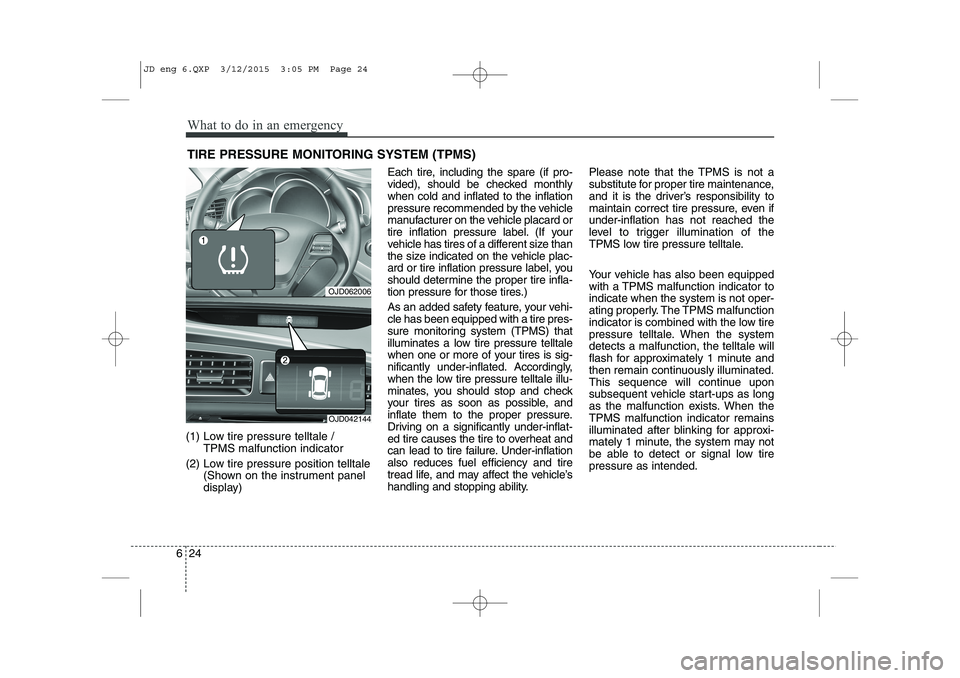
(1) Low tire pressure telltale / TPMS malfunction indicator
(2) Low tire pressure position telltale (Shown on the instrument panel
display) Each tire, including the spare (if pro-
vided), should be checked monthlywhen cold and inflated to the inflation
pressure recommended by the vehicle
manufacturer on the vehicle placard or
tire inflation pressure label. (If your
vehicle has tires of a different size than
the size indicated on the vehicle plac-
ard or tire inflation pressure label, you
should determine the proper tire infla-
tion pressure for those tires.)
As an added safety feature, your vehi- cle has been equipped with a tire pres-
sure monitoring system (TPMS) that
illuminates a low tire pressure telltale
when one or more of your tires is sig-
nificantly under-inflated. Accordingly,
when the low tire pressure telltale illu-
minates, you should stop and check
your tires as soon as possible, and
inflate them to the proper pressure.
Driving on a significantly under-inflat-
ed tire causes the tire to overheat and
can lead to tire failure. Under-inflationalso reduces fuel efficiency and tire
tread life, and may affect the vehicle’s
handling and stopping ability.
Please note that the TPMS is not a
substitute for proper tire maintenance,
and it is the driver’s responsibility to
maintain correct tire pressure, even ifunder-inflation has not reached the
level to trigger illumination of the
TPMS low tire pressure telltale.
Your vehicle has also been equipped
with a TPMS malfunction indicator toindicate when the system is not oper-
ating properly. The TPMS malfunction
indicator is combined with the low tire
pressure telltale. When the systemdetects a malfunction, the telltale will
flash for approximately 1 minute and
then remain continuously illuminated.
This sequence will continue upon
subsequent vehicle start-ups as long
as the malfunction exists. When theTPMS malfunction indicator remains
illuminated after blinking for approxi-
mately 1 minute, the system may not
be able to detect or signal low tirepressure as intended.
OJD062006
OJD042144
JD eng 6.QXP 3/12/2015 3:05 PM Page 24
Page 451 of 1210

625
What to do in an emergency
TPMS malfunctions may occur for a
variety of reasons, including theinstallation of replacement or alter-
nate tires or wheels on the vehicle
that prevent the TPMS from function-
ing properly. Always check the TPMSmalfunction telltale after replacing
one or more tires or wheels on your
vehicle to ensure that the replace-
ment or alternate tires and wheels
allow the TPMS to continue to func-
tion properly.
✽✽NOTICE
If any of the below happens, we rec-
ommend that the system be checked
by an authorized Kia dealer.
1.The low tire pressure telltale/ TPMS malfunction indicator do
not illuminate for 3 seconds when
the ignition switch is turned to the
ON position or engine is running.
2. The TPMS malfunction indicator remains illuminated after blinking
for approximately 1 minute.
3. The Low tire pressure position telltale remains illuminated.
Low tire pressure tell- tale
Low tire pressure posi- tion telltale
When the tire pressure monitoring
system warning indicators are illumi-
nated, one or more of your tires is
significantly under-inflated. The lowtire pressure position telltale light willindicate which tire is significantly
under-inflated by illuminating the cor-responding position light.
If either telltale illuminates, immedi-
ately reduce your speed, avoid hard
cornering and anticipate increased
stopping distances. You should stop
and check your tires as soon as pos-
sible. Inflate the tires to the proper
pressure as indicated on the vehicle’splacard or tire inflation pressure label
located on the driver’s side center pil-
lar outer panel. If you cannot reach a
service station or if the tire cannot
hold the newly added air, replace the
low pressure tire with a spare tire. If you drive the vehicle for about 10
minutes at speeds above 25 km/h
after replaceing the low pressure tire
with the spare tire, the below willhappen:
The TPMS malfunction indicator
may blink for approximately 1
minute and then remain continuous-
ly illuminated because the TPMSsensor is not mounted on the sparewheel.
JD eng 6.QXP 3/12/2015 3:05 PM Page 25
Page 459 of 1210
633
What to do in an emergency
EMERGENCY COMMODITY (IF EQUIPPED)
There are some emergency commodities
in the vehicle to help you respond to theemergency situation.
Fire extinguisher
If there is small fire and you know how to
use the fire extinguisher, take the follow-
ing steps carefully.
1. Pull the pin at the top of the extin- guisher that keeps the handle from being accidentally pressed.
2. Aim the nozzle toward the base of the fire.
3. Stand approximately 2.5 m (8 ft) away from the fire and squeeze the handle
to discharge the extinguisher. If you
release the handle, the discharge will
stop.
4. Sweep the nozzle back and forth at the base of the fire. After the fire appears
to be out, watch it carefully since it
may re-ignite. First aid kit
There are some items such as scissors,
bandage and adhesive tape and etc. in
the kit to give first aid to an injured per-son.
Triangle reflector
Place the triangle reflector on the road to
warn oncoming vehicles during emer-
gencies, such as when the vehicle is
parked by the roadside due to any prob-
lems.
Tire pressure gauge (If equipped)
Tires normally lose some air in day-to-
day use, and you may have to add a few
pounds of air periodically and it is not
usually a sign of a leaking tire, but of nor-
mal wear. Always check tire pressurewhen the tires are cold because tire pres-
sure increases with temperature. To check the tire pressure, take the fol-
lowing steps:
1. Unscrew the inflation valve cap that is
located on the rim of the tire.
2. Press and hold the gauge against the tire valve. Some air will escape as you
begin and more will escape if you don't
press the gauge in firmly.
3. A firm non-leaking push will activate the gauge.
4. Read the tire pressure on the gauge to know whether the tire pressure is lowor high.
5. Adjust the tire pressures to the speci- fied pressure. Refer to “Tires and
wheels” in chapter 8.
6. Reinstall the inflation valve cap.
JD eng 6.QXP 3/12/2015 3:06 PM Page 33
Page 460 of 1210
Maintenance
Engine compartment . . . . . . . . . . . . . . . . . . . . . . . . 7-3
Maintenance services . . . . . . . . . . . . . . . . . . . . . . . . 7-6 Owner’s responsibility . . . . . . . . . . . . . . . . . . . . . . . . . 7-6
Owner maintenance precautions . . . . . . . . . . . . . . . . 7-6
Engine compartment precautions (Diesel engine). . . 7-7
Owner maintenance . . . . . . . . . . . . . . . . . . . . . . . . . 7-8 Owner maintenance schedule . . . . . . . . . . . . . . . . . . . 7-8
Scheduled maintenance service . . . . . . . . . . . . . . . 7-10 For Europe, Except Russia . . . . . . . . . . . . . . . . . . . . . 7-11
Except Europe, For Russia . . . . . . . . . . . . . . . . . . . . . 7-22
Explanation of scheduled maintenance items . . . . 7-34
Engine oil . . . . . . . . . . . . . . . . . . . . . . . . . . . . . . . . . 7-37 Checking the engine oil level . . . . . . . . . . . . . . . . . . . . 7-37
Changing the engine oil and filter . . . . . . . . . . . . . . . 7-38
Engine coolant . . . . . . . . . . . . . . . . . . . . . . . . . . . . . 7-39 Checking the coolant level . . . . . . . . . . . . . . . . . . . . . . 7-39
Changing the coolant . . . . . . . . . . . . . . . . . . . . . . . . . . 7-41
Brake/clutch fluid . . . . . . . . . . . . . . . . . . . . . . . . . . 7-42 Checking the brake fluid level . . . . . . . . . . . . . . . . . . 7-42
Washer fluid . . . . . . . . . . . . . . . . . . . . . . . . . . . . . . . 7-43 Checking the washer fluid level . . . . . . . . . . . . . . . . . 7-43
Parking brake - hand type . . . . . . . . . . . . . . . . . . . 7-43 Checking the parking brake . . . . . . . . . . . . . . . . . . . . 7-43
Fuel filter (for Diesel) . . . . . . . . . . . . . . . . . . . . . . . 7-44 Draining water from fuel filter . . . . . . . . . . . . . . . . . . 7-44 Extracting air from the fuel filter . . . . . . . . . . . . . . . . 7-44
Air cleaner . . . . . . . . . . . . . . . . . . . . . . . . . . . . . . . . 7-45 Filter replacement . . . . . . . . . . . . . . . . . . . . . . . . . . . . 7-45
Climate control air filter . . . . . . . . . . . . . . . . . . . . . 7-47 Filter inspection . . . . . . . . . . . . . . . . . . . . . . . . . . . . . . 7-47
Filter replacement . . . . . . . . . . . . . . . . . . . . . . . . . . . . 7-47
Wiper blades . . . . . . . . . . . . . . . . . . . . . . . . . . . . . . . 7-49 Blade inspection . . . . . . . . . . . . . . . . . . . . . . . . . . . . . . 7-49
Blade replacement . . . . . . . . . . . . . . . . . . . . . . . . . . . . 7-49
Battery. . . . . . . . . . . . . . . . . . . . . . . . . . . . . . . . . . . . 7-52 For best battery service . . . . . . . . . . . . . . . . . . . . . . . . 7-52
Battery capacity label . . . . . . . . . . . . . . . . . . . . . . . . . 7-53
Battery recharging . . . . . . . . . . . . . . . . . . . . . . . . . . . . 7-53
Reset items . . . . . . . . . . . . . . . . . . . . . . . . . . . . . . . . . . 7-54
Tires and wheels . . . . . . . . . . . . . . . . . . . . . . . . . . . . 7-55 Tire care. . . . . . . . . . . . . . . . . . . . . . . . . . . . . . . . . . . . . 7-55
Recommended cold tire inflation pressures. . . . . . . . 7-55
Checking tire inflation pressure . . . . . . . . . . . . . . . . . 7-57
Tire rotation . . . . . . . . . . . . . . . . . . . . . . . . . . . . . . . . . 7-58
Wheel alignment and tire balance . . . . . . . . . . . . . . . 7-59
Tire replacement . . . . . . . . . . . . . . . . . . . . . . . . . . . . . . 7-59
Wheel replacement . . . . . . . . . . . . . . . . . . . . . . . . . . . . 7-61
Tire traction . . . . . . . . . . . . . . . . . . . . . . . . . . . . . . . . . 7-61
Tire maintenance . . . . . . . . . . . . . . . . . . . . . . . . . . . . . 7-61
Tire sidewall labeling . . . . . . . . . . . . . . . . . . . . . . . . . . 7-61
Low aspect ratio tire . . . . . . . . . . . . . . . . . . . . . . . . . . 7-65
7
JD eng 7.QXP 3/4/2015 3:29 PM Page 1
Page 465 of 1210
Maintenance
6
7
MAINTENANCE SERVICES
You should exercise the utmost care to
prevent damage to your vehicle and injury
to yourself whenever performing any
maintenance or inspection procedures.
Inadequate, incomplete or insufficient
servicing may result in operational prob-
lems with your vehicle that could lead to
vehicle damage, an accident, or person-
al injury.
Owner’s responsibility
✽✽ NOTICE
Maintenance Service and Record
Retention are the owner's responsibility.
We recommend in general that you have
your vehicle serviced by an authorized
Kia dealer. You should retain documents
that show proper maintenance has been
performed on your vehicle in accordance
with the maintenance schedule. You need
this information to establish your compli-
ance with the servicing and maintenance
requirements of your vehicle warranties.
Detailed warranty information is provided
in your Warranty & Maintenance book.Repairs and adjustments required as a
result of improper maintenance or a lack
of required maintenance are not covered
when your vehicle is covered by warranty. Owner maintenance precautions
Improper or incomplete service may
result in problems. This chapter gives
instructions only for the maintenance
items that are easy to perform.
✽✽
NOTICE
Improper owner maintenance during
the warranty period may affect warran-
ty coverage. For details, read the sepa-
rate Warranty & Maintenance book
provided with the vehicle. If you're
unsure about any servicing or mainte-
nance procedure, we recommend that
the system be checked by an authorized
Kia dealer.
CAUTION
Do not put heavy objects or apply excessive force on top of the
engine cover (if equipped) or fuelrelated parts.
When you inspect the fuel system (fuel lines and fuel injection
devices), we recommend that youcontact an authorized kia dealer.
Do not drive long time with the engine cover (if equipped)removed.
When checking the engine room, do not go near fire.
Fuel, washer fluid, etc. are flam-mable oils that may cause fire.
Before touching the battery, igni- tion cables and electrical wiring,
you should disconnect the battery "-" terminal. You may get an elec-tric shock from the electric current.
When you remove the interior trim cover with a flat bed (-) driver, be
careful not to damage the cover.
Be careful when you replace and clean bulbs to avoid burns orelectrical shock.
JD eng 7.QXP 3/4/2015 3:29 PM Page 6
Page 466 of 1210
77
Maintenance
Engine compartment precautions (Diesel engine)
• The injector operates at high voltage(maximum 200v). Therefore, the follow-
ing accidents may occur.
- Direct contact with the injector or
injector wiring may cause electric
shock or damage your muscle or
nerve system.
- The electromagnetic wave from the operating injector may cause the arti-
ficial heart pacemaker to malfunction.
Follow the safety tips provided below, when you are checking the engine
room while the engine is running.
- Do not touch the injector, injector
wirings, and the engine computer
while the engine is running.
- Do not remove the injector connector while the engine is running.
- People using pacemakers must not go near the engine while the engine
is starting or running.
WARNING - Maintenance
work
Performing maintenance work on a vehicle can be dangerous. You
can be seriously injured while
performing some maintenance
procedures. If you lack sufficient
knowledge and experience or the
proper tools and equipment to do
the work, we recommend that the
system be serviced by an author-
ized Kia dealer.
Working under the hood with the engine running is dangerous. It
becomes even more dangerous
when you wear jewelry or loose
clothing. These can become
entangled in moving parts and
result in injury. Therefore, if you
must run the engine while work-
ing under the hood, make certain
that you remove all jewelry (espe-
cially rings, bracelets, watches,
and necklaces) and all neckties,
scarves, and similar loose cloth-
ing before getting near theengine or cooling fans.WARNING - Diesel Engine
Never work on injection system with engine running or within 30
seconds after shutting off engine.
High-pressure pump, rail, injectorsand high-pressure pipes are sub-
ject to high pressure even after the
engine stopped. The fuel jet pro-
duced by fuel leaks may cause seri-
ous injury, if it touches the body.
People using pacemakers should
not move than 30cm closer to theECU or wiring harness within the
engine room while engine is run-
ning, since the high currents in the
electronic engine control system
produce considerable magneticfields.
JD eng 7.QXP 3/4/2015 3:29 PM Page 7
Page 496 of 1210
737
Maintenance
ENGINE OIL
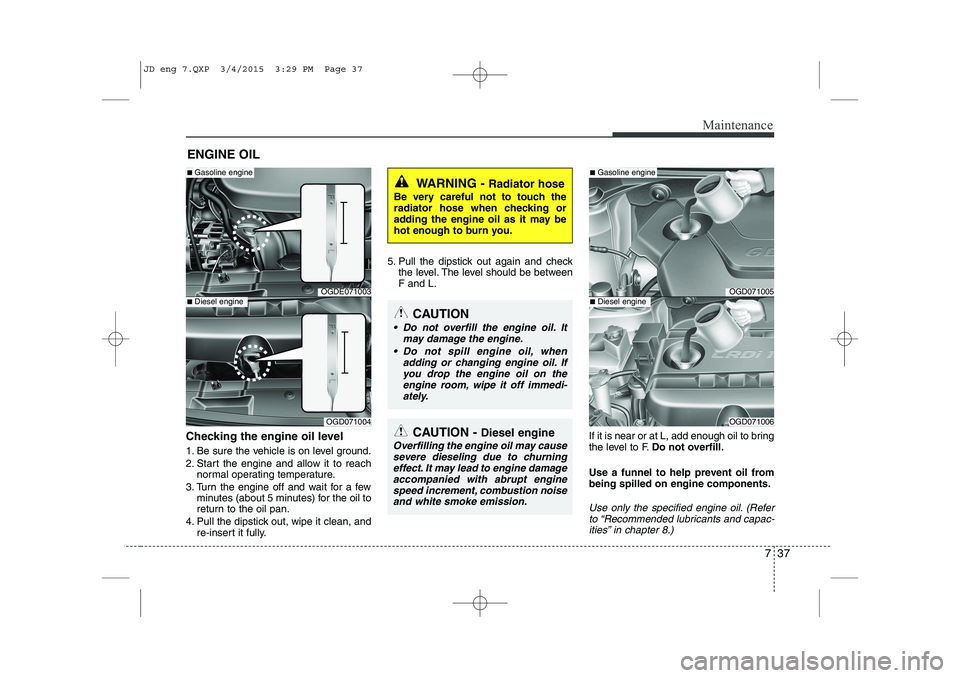
Checking the engine oil level
1. Be sure the vehicle is on level ground.
2. Start the engine and allow it to reach normal operating temperature.
3. Turn the engine off and wait for a few minutes (about 5 minutes) for the oil to
return to the oil pan.
4. Pull the dipstick out, wipe it clean, and re-insert it fully. 5. Pull the dipstick out again and check
the level. The level should be between F and L.
If it is near or at L, add enough oil to bring
the level to F.Do not overfill.
Use a funnel to help prevent oil frombeing spilled on engine components.
Use only the specified engine oil. (Refer to “Recommended lubricants and capac-
ities” in chapter 8.)
WARNING - Radiator hose
Be very careful not to touch the
radiator hose when checking or
adding the engine oil as it may be
hot enough to burn you.
CAUTION - Diesel engine
Overfilling the engine oil may cause
severe dieseling due to churningeffect. It may lead to engine damage
accompanied with abrupt enginespeed increment, combustion noise and white smoke emission.
CAUTION
Do not overfill the engine oil. It
may damage the engine.
Do not spill engine oil, when adding or changing engine oil. Ifyou drop the engine oil on theengine room, wipe it off immedi-
ately.
OGDE071003
■ Gasoline engine
OGD071004
■Diesel engineOGD071005
■Gasoline engine
OGD071006
■Diesel engine
JD eng 7.QXP 3/4/2015 3:29 PM Page 37
Page 521 of 1210
Maintenance
62
7
2. Tire size designation
A tire’s sidewall is marked with a tire
size designation. You will need this
information when selecting replace-
ment tires for your car. The following
explains what the letters and num-
bers in the tire size designationmean.
Example tire size designation:
(These numbers are provided as an
example only; your tire size designa-
tor could vary depending on your
vehicle.) 195/65R15 91H
P - Applicable vehicle type (tires
marked with the prefix “P’’ are
intended for use on passenger
vehicles or light trucks; however,
not all tires have this marking).
195 - Tire width in millimeters.
65 - Aspect ratio. The tire’s chapter height as a percentage of its width.
R - Tire construction code (Radial).
15 - Rim diameter in inches. 91 - Load Index, a numerical code
associated with the maximum
load the tire can carry.
H - Speed Rating Symbol. See the speed rating chart in this chapter
for additional information.
Wheel size designation
Wheels are also marked with impor-
tant information that you need if you
ever have to replace one. The follow-
ing explains what the letters and
numbers in the wheel size designa-tion mean.
Example wheel size designation: 6.0JX15
6.0 - Rim width in inches. J - Rim contour designation.
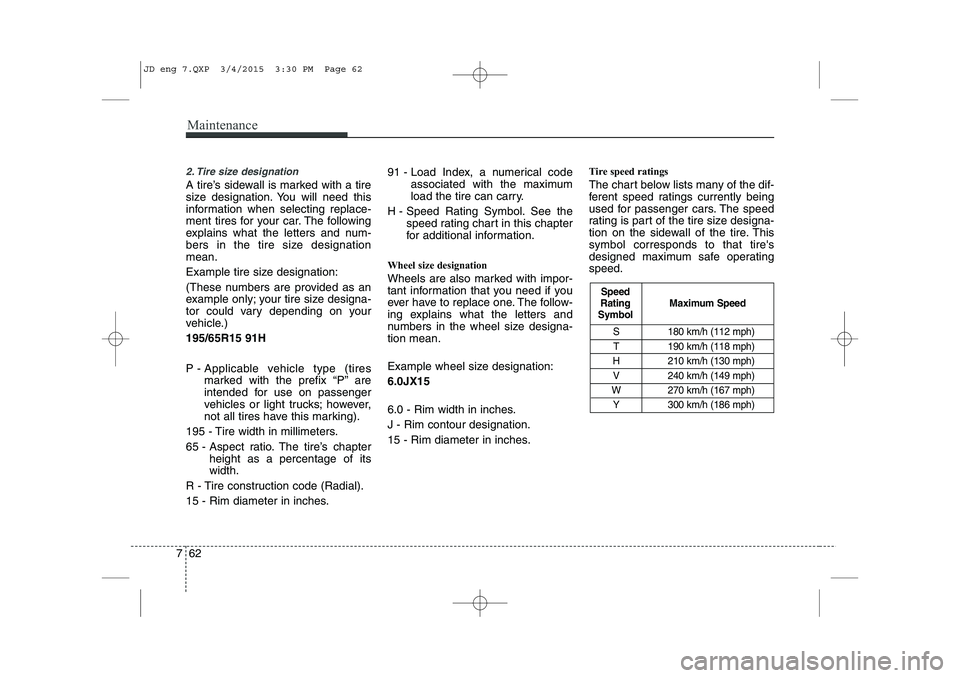
15 - Rim diameter in inches. Tire speed ratings
The chart below lists many of the dif-
ferent speed ratings currently being
used for passenger cars. The speed
rating is part of the tire size designa-
tion on the sidewall of the tire. Thissymbol corresponds to that tire's
designed maximum safe operatingspeed.
S 180 km/h (112 mph)
T 190 km/h (118 mph)
H 210 km/h (130 mph)
V 240 km/h (149 mph)
W 270 km/h (167 mph) Y 300 km/h (186 mph)
Maximum Speed
Speed
Rating
Symbol
JD eng 7.QXP 3/4/2015 3:30 PM Page 62