rear view mirror KIA K900 2016 Owners Manual
[x] Cancel search | Manufacturer: KIA, Model Year: 2016, Model line: K900, Model: KIA K900 2016Pages: 542, PDF Size: 38.35 MB
Page 12 of 542

2-2
Your vehicle at a glance
EXTERIOR OVERVIEW
1. Hood ......................................................4-35
2. Head lamp ...........................................4-131
3. Fog lamp .............................................4-135
4. Tire and wheel ..............................7-54, 8-5
5. Outside rearview mirror .........................4-63
6. Panoramic Sunroof................................4-40
7. Front windshield wiper blades....4-136, 7-47
8. Windows ................................................4-31
OKH015001N
■Front view
❈ The actual shape may differ from the illustration.
KH USA 2:2015my 3/23/2015 11:50 AM Page 2
Page 14 of 542

INTERIOR OVERVIEW
2-4
Your vehicle at a glance
1. Inside door handle ...................................4-18
2. Front power seat adjust switch ..................3-5
3. Outside rearview mirror folding ...............4-65
4. Outside rearview mirror control ...............4-64
5. Power window lock switch .......................4-34
6. Central door lock switch ..........................4-19
7. Power window switch ...............................4-32
8. BSD On/OFF button ................................5-87
9. HUD On/OFF button..............................4-116
10. Parking Assist button ...........................4-118
11. ESC Off button ......................................5-43
12. Trunk lid open button .......................4-21, 22
13. Trunk lid close button .......................4-21, 22
14. Trunk lid open / close button..................4-22
15. Instrument panel illumination controllever........................................................4-68
16. Electric parking brake switch .................5-31
17. Fuel filler lid open switch .......................4-37
18. Hood release lever.................................4-35
19. Steering wheel .......................................4-45
20. Tilt and telescopic steering control lever ...4-45
21. Brake pedal ............................................5-28
22. Accelerator pedal ....................................5-9
OKH013003N
❈ The actual shape may differ from the illustration.
KH USA 2:2015my 3/23/2015 11:50 AM Page 4
Page 25 of 542
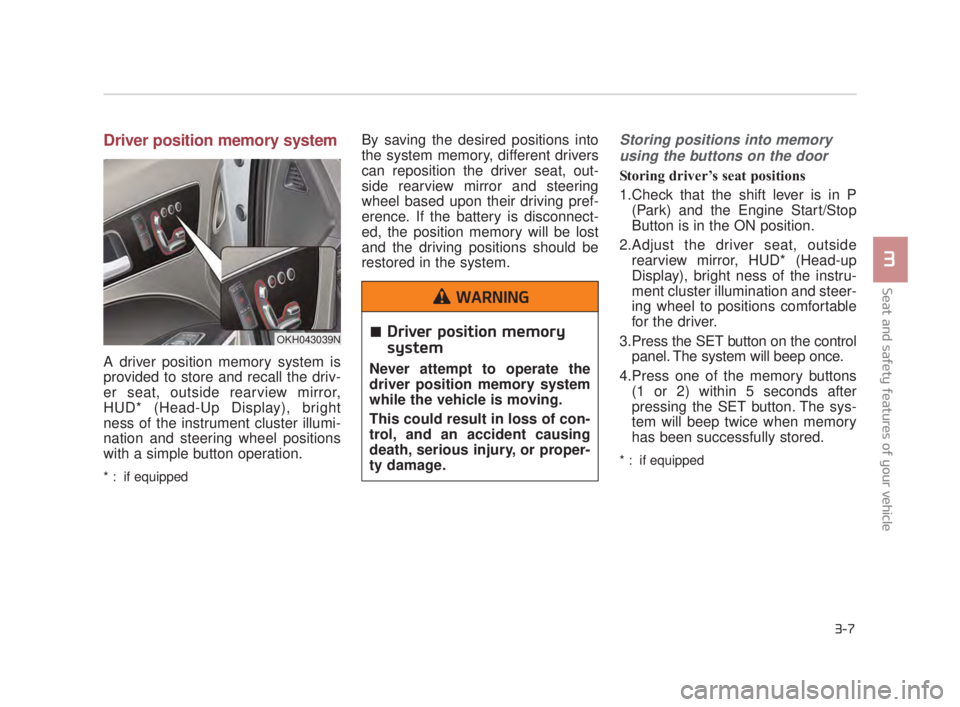
Driver position memory system
A driver position memory system is
provided to store and recall the driv-
er seat, outside rearview mirror,
HUD* (Head-Up Display), bright
ness of the instrument cluster illumi-
nation and steering wheel positions
with a simple button operation.
* : if equipped
By saving the desired positions into
the system memory, different drivers
can reposition the driver seat, out-
side rearview mirror and steering
wheel based upon their driving pref-
erence. If the battery is disconnect-
ed, the position memory will be lost
and the driving positions should be
restored in the system.Storing positions into memoryusing the buttons on the door
Storing driver’s seat positions
1.Check that the shift lever is in P (Park) and the Engine Start/Stop
Button is in the ON position.
2.Adjust the driver seat, outside rearview mirror, HUD* (Head-up
Display), bright ness of the instru-
ment cluster illumination and steer-
ing wheel to positions comfortable
for the driver.
3.Press the SET button on the control panel. The system will beep once.
4.Press one of the memory buttons (1 or 2) within 5 seconds after
pressing the SET button. The sys-
tem will beep twice when memory
has been successfully stored.
* : if equipped
OKH043039N
Seat and safety features of your vehicle
3
3-7
Driver position memory
system
Never attempt to operate the
driver position memory system
while the vehicle is moving.
This could result in loss of con-
trol, and an accident causing
death, serious injury, or proper-
ty damage.
WARNING
KH USA 3:2015my 3/25/2015 3:05 PM Page 7
Page 26 of 542
3-8
Seat and safety features of your vehicle
Recalling positions from memory
1 Check that the shift lever is in P(Park) and the Engine Start/Stop
Button is in the ON position.
2.To recall the position in memory, press the desired memory button
(1 or 2). The system will beep
once, then the driver seat, outside
rearview mirror and steering wheel
will automatically adjust to the
stored positions.
Adjusting the control switch for the
driver seat while the system is recall-
ing the stored position will cause the
movement to stop and move in the
direction that the control switch is
moved.
Use caution when recalling adjust-
ment memory while sitting in the
vehicle. Push the seat position con-
trol switch to the desired position
immediately if the seat moves too far
in any direction.Easy access function
When exiting the vehicle, the steer-
ing wheel will move away from the
driver and the seat will move rear-
ward when the engine is turned off.
When entering the vehicle, the steer-
ing wheel will move toward the driver
and the seat will move forward when
the Engine Start/Stop Button is
pressed to the ACC position or START
position.
You can activate or deactivate this
feature. Refer to "User settings" in
chapter 4.
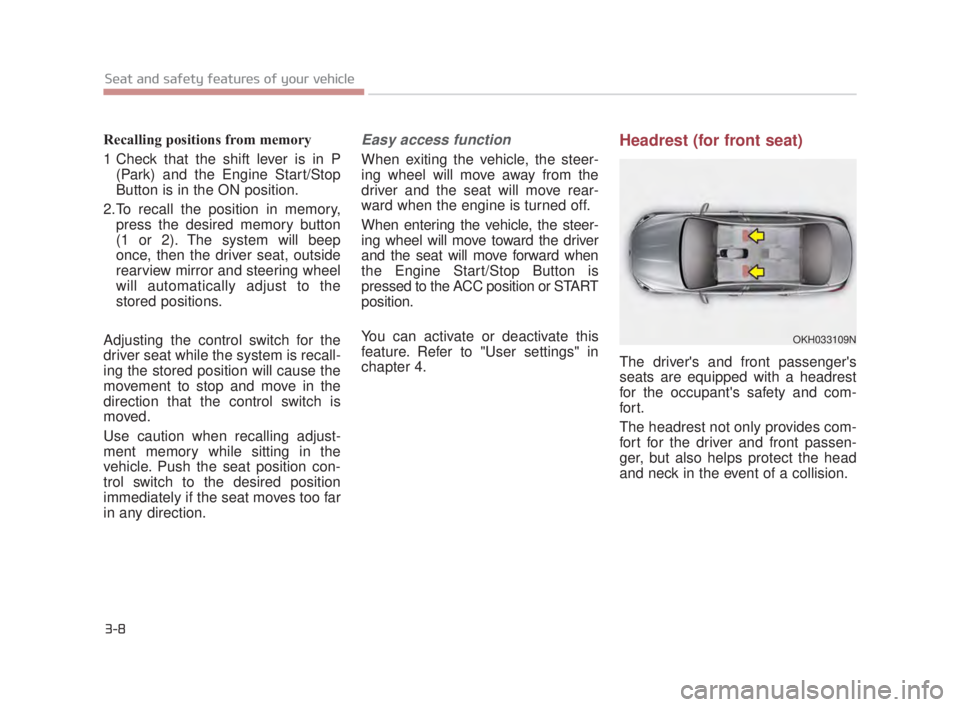
Headrest (for front seat)
The driver's and front passenger's
seats are equipped with a headrest
for the occupant's safety and com-
for t.
The headrest not only provides com-
fort for the driver and front passen-
ger, but also helps protect the head
and neck in the event of a collision.
OKH033109N
KH USA 3:2015my 3/25/2015 3:06 PM Page 8
Page 86 of 542
Features of your vehicle
4-6
Unlocking
Pressing the button of the driver's (or
front passenger’s) outside door han-
dle with all doors closed and locked,
unlocks the driver's door.
If you press the button of the driver's
outside door handle again within 4
seconds, The other doors will be
unlocked. But if you press the button
of the driver's outside door handle
again after 4 seconds, all doors will be
locked. The hazard warning lights will
blink and the chime will sound twice to
indicate that the driver's door is
unlocked. Also, the outside rearview
mirrors will automatically unfold if the
outside rearview mirror folding switch
is in the AUTO position.
The button will only operate when the
smart key is within 28~40 in. (0.7~1
m) from the outside door handle.
Start-up
You can start the engine without
inserting the key. For detailed infor-
mation refer to “Starting the engine
with a smart key” in chapter 5.
Smart key precautions
If you lose your smart key, you willnot be able to start the engine. Tow
the vehicle, if necessary, and con-
tact an authorized K900 Kia dealer.
A maximum of 2 smart keys can be registered to a single vehicle. If you
lose a smart key, you should imme-
diately take the vehicle and key to
your authorized K900 Kia dealer to
protect it from potential theft.
The smart key will not work if any of following occurs:
- The smart key is close to a radiotransmitter such as a radio sta-
tion or an airport which can inter-
fere with normal operation of the
smart key.
- The smart key near a mobile two-way radio system or a cellu-
lar phone.
- Another vehicle’s smart key is being operated close to your
vehicle. When the smart key does not work
correctly, open and close the door
with the mechanical key. If you
have a problem with the smart key,
contact an authorized K900 Kia
dealer.
If the smart key is in close proximity to your cell phone or smart phone,
the signal from the smart key could
be blocked by normal operation of
your cell phone or smart phone.
This is especially important when
the phone is active such as making
call, receiving calls, text messaging,
and/or sending/receiving emails.
Avoid placing the smart key and
your cell phone or smart phone in
the same pants or jacket pocket and
maintain adequate distance
between the two devices.
Transmitter
Keep the smart key away from
water or any liquid as it can
become damaged and not func-
tion properly.
CAUTION
KH USA 4:2015 3/24/2015 4:35 PM Page 6
Page 128 of 542
Features of your vehicle
4-48
MIRRORS
Inside rearview mirror
Adjust the rearview mirror so that the
center view through the rear window
is seen. Make this adjustment before
you start driving.
Do not place objects in the rear seat
which would interfere with your vision
through the rear window.
Electric chromic mirror (ECM)with HomeLink®system and
compass (if equipped)
Your vehicle may be equipped with a
Gentex Automatic-Dimming Mirror
with a Z-Nav
®Electronic Compass
Display and an Integrated HomeLink®
Wireless Control System.
During nighttime driving, this feature
will automatically detect and reduce
rearview mirror glare while the com-
pass indicates the direction the vehi-
cle is pointed. The HomeLink
®
Universal Transceiver allows you to
activate your garage door(s), electric
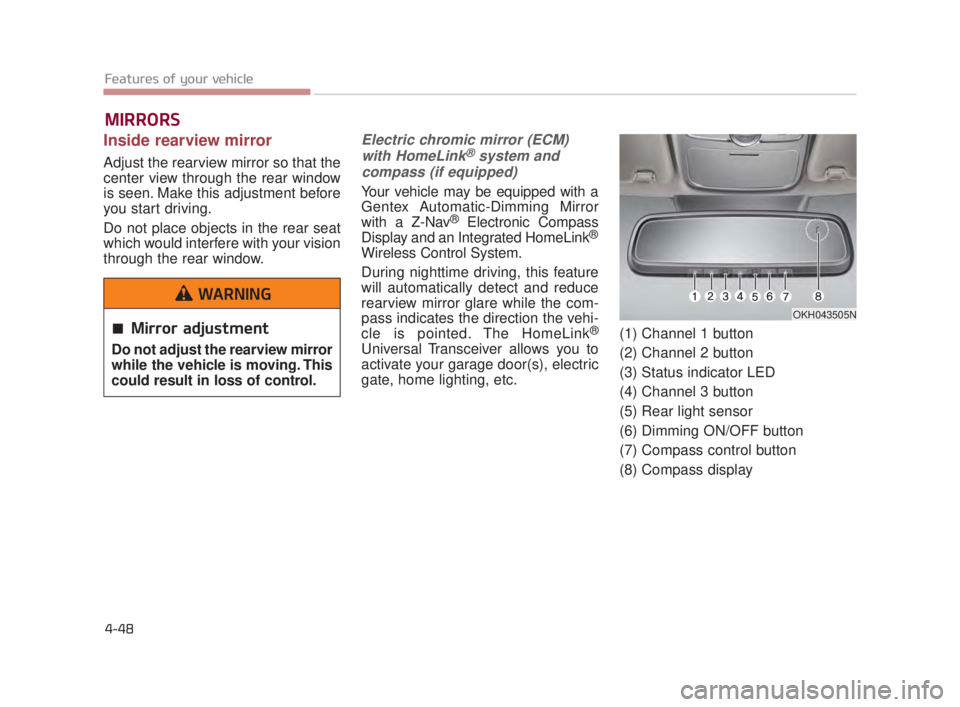
gate, home lighting, etc. (1) Channel 1 button
(2) Channel 2 button
(3) Status indicator LED
(4) Channel 3 button
(5) Rear light sensor
(6) Dimming ON/OFF button
(7) Compass control button
(8) Compass display
OKH043505N
Mirror adjustment
Do not adjust the rearview mirror
while the vehicle is moving. This
could result in loss of control.
WARNING
KH USA 4:2015 3/24/2015 4:37 PM Page 48
Page 129 of 542
Features of your vehicle
4
4-49
Automatic-Dimming Night Vision
Safety™(NVS®) Mirror
The NVS
®Mirror in your vehicle is
the most advanced way to reduce
annoying glare in the rearview mirror
during any driving situation. For more
information regarding NVS
®mirrors
and other applications, please refer
to the Gentex website:
www.gentex.com
❈ Night Vision Safety™ is a registered
trademark of Gentex Corporation.
✽ NOTICE
The NVS®Mirror automatically
reduces glare during driving condi-
tions based upon light levels moni-
tored in front of the vehicle and from
the rear of the vehicle. These light
sensors are visible through openings
in the front and rear of the mirror
case. Any object that obstructs either
light sensor will degrade the automat-
ic dimming control feature.
Automatic-dimming function
Your mirror will automatically dim
upon detecting glare from the vehi-
cles traveling behind you. The auto-
dimming function can be controlled
by the Dimming ON/OFF Button:
1.Pressing the button turns the
auto-dimming function OFF which
is indicated by the green Status
Indicator LED turning off.
2.Pressing the button again turns the auto-dimming function ON
which is indicated by the green
Status Indicator LED turning on.✽ NOTICE
The mirror defaults to the ON posi-
tion each time the vehicle is started.
Z-Nav™ Compass Display
The NVS
®Mirror in your vehicle is
also equipped with a Z-NAV™
Compass that shows the vehicle
Compass heading in the Display
Window using the 8 basic cardinal
headings (N, NE, E, SE, etc.).
❈ Z-Nav™ is a registered trademark
of Gentex Corporation.
KH USA 4:2015 3/24/2015 4:37 PM Page 49
Page 136 of 542
Features of your vehicle
4-56
The transceiver has been tested and
complies with FCC and Industry
Canada rules. Changes or modifica-
tions not expressly approved by the
party responsible for compliance
could void the user's authority to
operate the device.
NVS
®and Z-NAV™ are registered
trademarks. Nav®are of Gentex
Corporation, Zeeland, Michigan.
HomeLink
®is a registered trade-
mark owned by Johnson Controls
Technology Company, Holland,
Michigan.
Electric chromic mirror (ECM) with
HomeLink® system, compass andUVO (for U.S.A, if equipped)
Your vehicle may be equipped with a
Gentex Automatic-Dimming Mirror
with a Z-Nav™ Electronic Compass
Display and an Integrated HomeLink
®
Wireless Control System. During
nighttime driving, this feature will
automatically detect and reduce
rearview mirror glare while the com-
pass indicates the direction the vehi-
cle is pointed. The HomeLink
®
Universal Transceiver allows you to
activate your garage door(s), electric
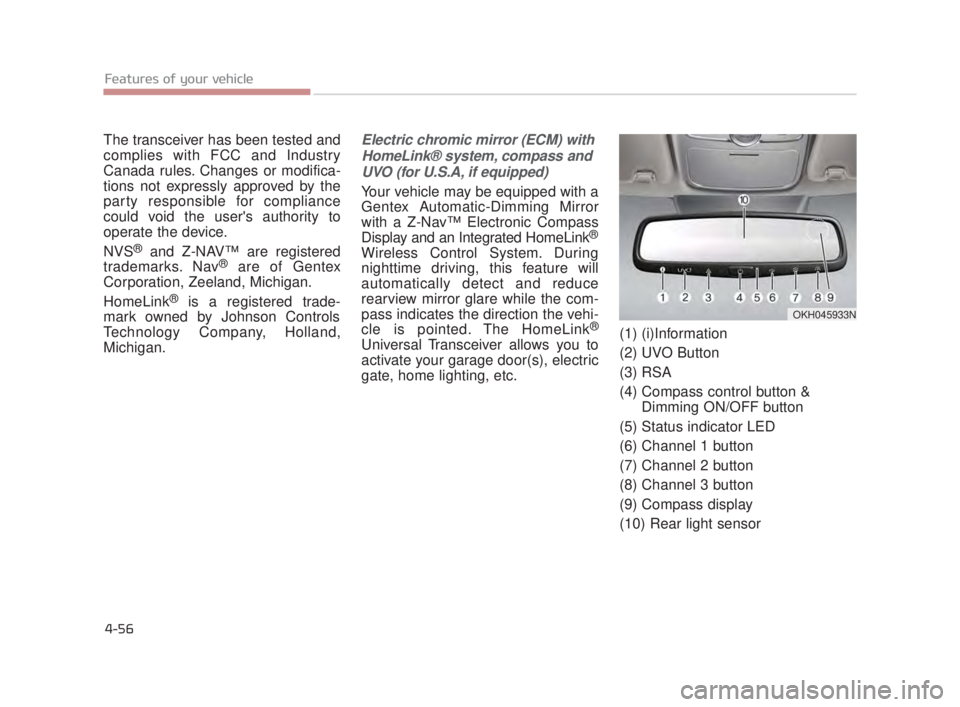
gate, home lighting, etc. (1) (i)Information
(2) UVO Button
(3) RSA
(4) Compass control button &
Dimming ON/OFF button
(5) Status indicator LED
(6) Channel 1 button
(7) Channel 2 button
(8) Channel 3 button
(9) Compass display
(10) Rear light sensor
OKH045933N
KH USA 4:2015 3/24/2015 4:37 PM Page 56
Page 143 of 542
Erasing HomeLink®buttons
Individual buttons cannot be erased.
However, to erase all three pro-
grammed buttons:
1. Press and hold the two outerHomeLink
®buttons until the indi-
cator light begins to flash after 10
seconds.
2. Release both buttons. Do not hold for longer than 20 seconds.
The Integrated HomeLink
®Wireless
Control System is now in the training
(learn) mode and can be programmed
at any time following the appropriate
steps in the Programming chapters
above.
NVS
®is a registered trademark and
Z-Nav™ is a trademark of the Gentex
Corporation, Zeeland, Michigan.
HomeLink
®is a registered trade-
mark owned by Johnson Controls,
Incorporated, Milwaukee, Wisconsin.
FCC ID: NZLTLMHL4
IC: 4112A-TLMHL4
INFORMATION
This device complies with Part 15 of
the FCC Rules.
Operation is subject to the following
three conditions:
1. This device may not cause harm- ful interference, and
2. This device must accept any inter- ference received, including inter-
ference that may cause undesired
operation.
3. The transceiver has been tested and complies with FCC and
Industry Canada rules. Changes
or modifications not expressly
approved by the party responsible
for compliance could void the
user’s authority to operate the
device.
Outside rearview mirror
Be sure to adjust mirror angles before
driving.
Your vehicle is equipped with both
left-hand and right-hand outside
rearview mirrors. The mirrors can be
adjusted remotely with the remote
switch. The mirror heads can be fold-
ed to prevent damage during an auto-
matic car wash or when passing
through a narrow street.
The right outside rearview mirror is
convex. Objects seen in the mirror
are closer than they appear.
Use your interior rearview mirror or
direct observation to determine the
actual distance of following vehicles
when changing lanes.
i
Features of your vehicle
4
4-63
KH USA 4:2015 3/24/2015 4:38 PM Page 63
Page 144 of 542
Features of your vehicle
4-64
Adjusting outside rearview mirror
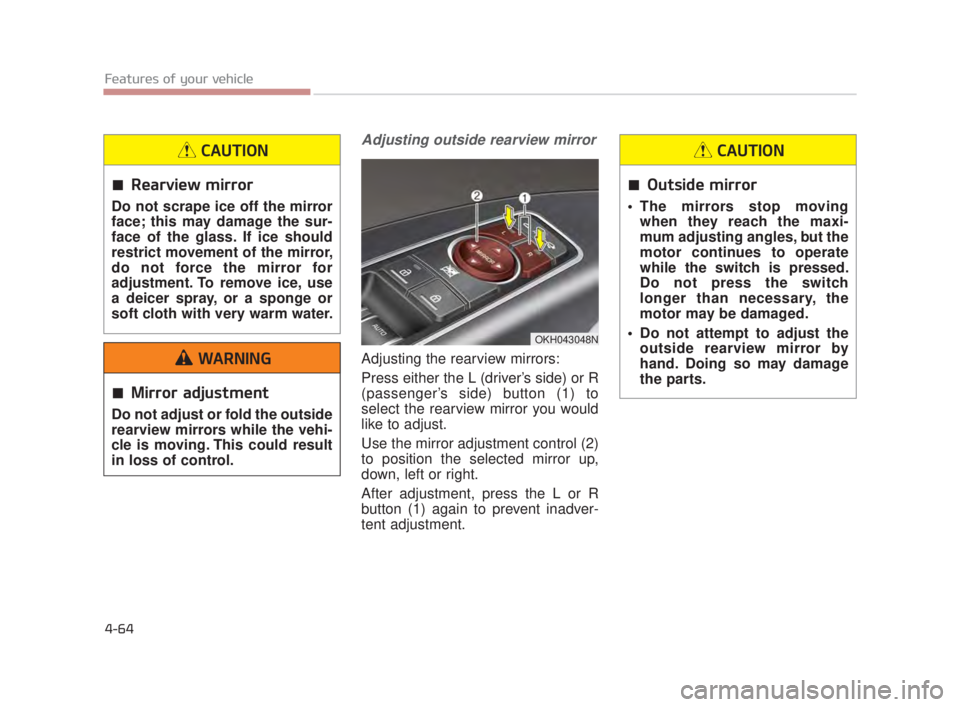
Adjusting the rearview mirrors:
Press either the L (driver’s side) or R
(passenger’s side) button (1) to
select the rearview mirror you would
like to adjust.
Use the mirror adjustment control (2)
to position the selected mirror up,
down, left or right.
After adjustment, press the L or R
button (1) again to prevent inadver-
tent adjustment.
OKH043048N
Rearview mirror
Do not scrape ice off the mirror
face; this may damage the sur-
face of the glass. If ice should
restrict movement of the mirror,
do not force the mirror for
adjustment. To remove ice, use
a deicer spray, or a sponge or
soft cloth with very warm water.
CAUTION
Outside mirror
The mirrors stop movingwhen they reach the maxi-
mum adjusting angles, but the
motor continues to operate
while the switch is pressed.
Do not press the switch
longer than necessary, the
motor may be damaged.
Do not attempt to adjust the outside rearview mirror by
hand. Doing so may damage
the parts.
CAUTION
Mirror adjustment
Do not adjust or fold the outside
rearview mirrors while the vehi-
cle is moving. This could result
in loss of control.
WARNING
KH USA 4:2015 3/24/2015 4:38 PM Page 64