recommended KIA K900 2016 Owners Manual
[x] Cancel search | Manufacturer: KIA, Model Year: 2016, Model line: K900, Model: KIA K900 2016Pages: 542, PDF Size: 38.35 MB
Page 3 of 542
i
Thank you for choosing a Kia vehicle.
When you require service, remember that your Kia dealer
knows your vehicle best. Your dealer has factory-trained tech-
nicians, recommended special tools and genuine Kia replace-
ment parts. It is dedicated to your complete customer satisfac-
tion.
Because subsequent owners require this important information
as well, this publication should remain with the vehicle if it is
sold.
This manual will familiarize you with operational, mainte-
nance and safety information about your new vehicle. It is sup-
plemented by a Warranty and Consumer Information manual
that provides important information on all warranties regarding
your vehicle.
We urge you to read these publications carefully and follow the
recommendations to help assure enjoyable and safe operation
of your new vehicle.
Kia offers a great variety of options, components and features
for its various models. Therefore, some of the equipment
described in this manual, along with the various illustrations,
may not be applicable to your particular vehicle.
The information and specifications provided in this manual
were accurate at the time of printing. Kia reserves the right to
discontinue or change specifications or design at any time
without notice and without incurring any obligation. If you
have questions, always check with your Kia dealer.
We assure you of our continuing interest in your motoring
pleasure and satisfaction in your Kia vehicle.
© 2015 Kia MOTORS AMERICA, Inc.
All rights reserved. May not be reproduced or translated in
whole or in part without the written consent of Kia MOTORS
AMERICA, Inc.
Printed in Korea
Foreword
KH USA FOREWORD:TD usa foreword.qxd 2/22/2015 11:12 AM Page 2
Page 7 of 542
Your new vehicle is designed to
obtain maximum performance with
UNLEADED FUEL, as well as mini-
mize exhaust emissions and spark
plug fouling.
3.8 engine
Your new vehicle is designed to use
only unleaded fuel having an octane
number (R+M)/2) of 87 (Research
Octane Number 91) or higher.(Do
not use methanol blended fuels)
5.0 engine
Your new vehicle is designed to use
only unleaded fuel having an octane
number ((R+M)/2) of 87 (Research
Octane Number 91) or higher.(Do
not use methanol blended fuels)
For improved vehicle performance,
premium unleaded fuel with an
octane number ((R+M)/2) of 91
(Research Octane Number 96) or
higher is recommended.
Never add any fuel system cleaning
agents to the fuel tank other than what
has been specified. (Consult an
authorized K900 Kia dealer for details.)Tighten the cap until it clicks once.
otherwise the Check Engine
light will illuminate.Gasoline containing alcohol and
methanol
Gasohol, a mixture of gasoline and
ethanol (also known as grain alco-
hol), and gasoline or gasohol con-
taining methanol (also known as
wood alcohol) are being marketed
along with or instead of leaded or
unleaded gasoline.
Pursuant to EPA regulations, ethanol
may be used in your vehicle. Do not
use gasohol containing more than
10% ethanol, and do not use gaso-
line or gasohol containing any
methanol. Ethanol provides less
energy than gasoline and it attracts
water, and it is thus likely to reduce
your fuel efficiency and could lower
your MPG results. Methanol may
cause drivability problems and dam-
age to the fuel system, engine con-
trol system and emission control sys-
tem. Discontinue using gasohol of
anykind if drivability problems occur.
Vehicle damage or drivability prob-
lems may not be covered by the
manufacturer's warranty if they result
from the use of:
1.Gasoline or gasohol containing methanol.
2.Leaded fuel or leaded gasohol.
FUEL REQUIREMENTS
Introduction
1
1-3
Refueling
Do not "top off" after the noz- zle automatically shuts off.
Attempts to force more fuel
into the tank can cause fuel
overflow onto you and the
ground causing a risk of fire.
Always check that the fuel cap is installed securely to pre-
vent fuel spillage, especially
in the event of an accident.
WARNING
KH USA 1:2015 3/18/2015 6:26 PM Page 3
Page 22 of 542
Front seat adjustment - power
The front seat can be adjusted by
using the control switches located on
the doors. Before driving, adjust the
seat to the proper position so as to
easily control the steering wheel,
pedals and switches on the instru-
ment panel.
3-4
Seat and safety features of your vehicle
(Continued)
Sit as far back as possiblefrom the steering wheel while
still maintaining comfortable
control of your vehicle. A dis-
tance of at least 10" from your
chest to the steering wheel is
recommended. Failure to do
so could result in air bag infla-
tion injuries to the driver.
Seat adjustment
Do not adjust the seat whilewearing seat belts. Moving the
seat forward will cause strong
pressure on the abdomen.
Do not place your hand near the seat bottom or seat track
while adjusting the seat. Your
hand could get caught in the
seat mechanism.
WARNINGUnattended children
Do not leave children unattend-
ed in the vehicle. Children might
operate features of the vehicle
that could injure them.
WARNING
Small Objects
Use extreme caution when pick-
ing up small objects trapped
under the seats or between the
seat and the center console.
Your hands might be cut or
injured by the sharp edges of
the seats mechanism.
WARNING
Seatback pockets
Do not put heavy or sharp
objects in the seatback pockets.
In an accident they could come
loose from the pocket and
injure vehicle occupants.
WARNING
KH USA 3:2015my 3/25/2015 3:05 PM Page 4
Page 27 of 542
Seat and safety features of your vehicle
3
3-9
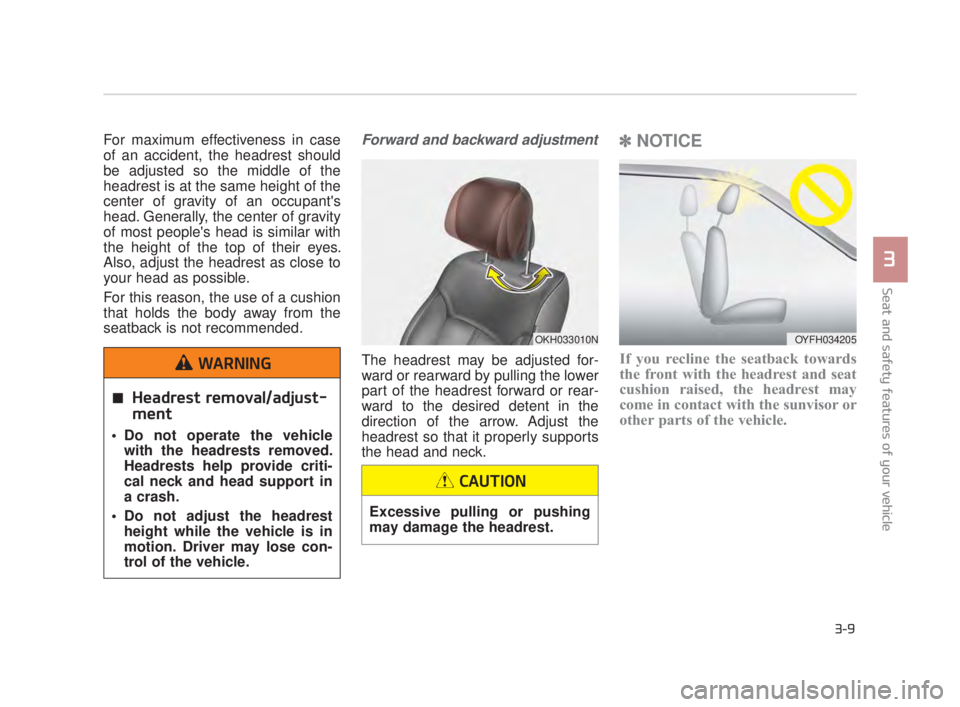
For maximum effectiveness in case
of an accident, the headrest should
be adjusted so the middle of the
headrest is at the same height of the
center of gravity of an occupant's
head. Generally, the center of gravity
of most people's head is similar with
the height of the top of their eyes.
Also, adjust the headrest as close to
your head as possible.
For this reason, the use of a cushion
that holds the body away from the
seatback is not recommended.Forward and backward adjustment
The headrest may be adjusted for-
ward or rearward by pulling the lower
part of the headrest forward or rear-
ward to the desired detent in the
direction of the arrow. Adjust the
headrest so that it properly supports
the head and neck.
✽NOTICE
If you recline the seatback towards
the front with the headrest and seat
cushion raised, the headrest may
come in contact with the sunvisor or
other parts of the vehicle.
OKH033010N
Headrest removal/adjust-
ment
Do not operate the vehicle
with the headrests removed.
Headrests help provide criti-
cal neck and head support in
a crash.
Do not adjust the headrest height while the vehicle is in
motion. Driver may lose con-
trol of the vehicle.
WARNING
OYFH034205
Excessive pulling or pushing
may damage the headrest.
CAUTION
KH USA 3:2015my 3/25/2015 3:06 PM Page 9
Page 34 of 542
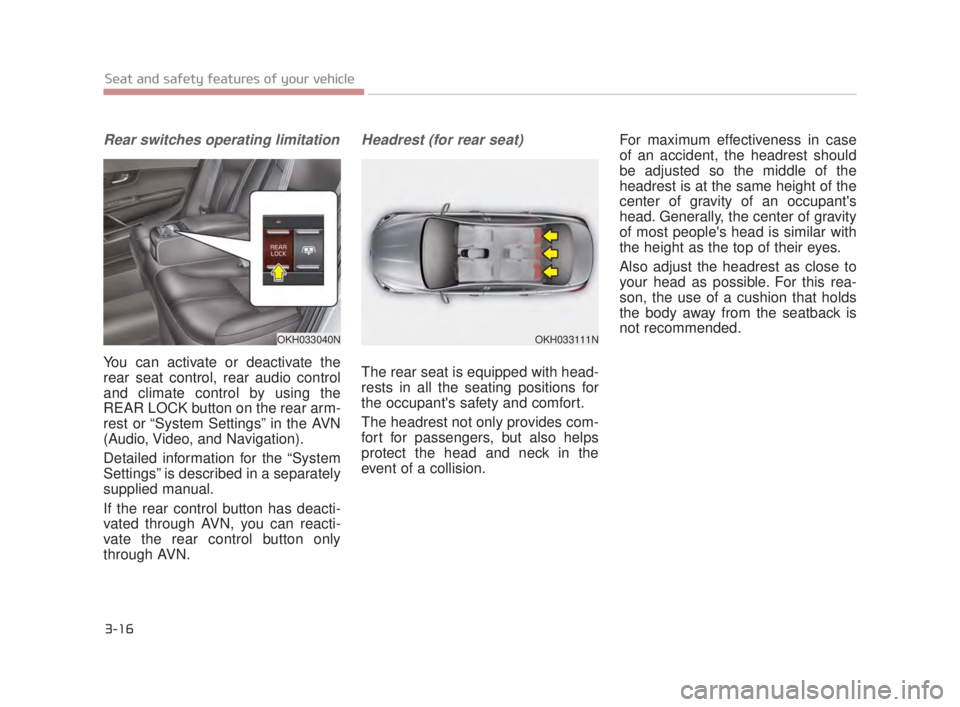
Rear switches operating limitation
You can activate or deactivate the
rear seat control, rear audio control
and climate control by using the
REAR LOCK button on the rear arm-
rest or “System Settings” in the AVN
(Audio, Video, and Navigation).
Detailed information for the “System
Settings” is described in a separately
supplied manual.
If the rear control button has deacti-
vated through AVN, you can reacti-
vate the rear control button only
through AVN.
Headrest (for rear seat)
The rear seat is equipped with head-
rests in all the seating positions for
the occupant's safety and comfort.
The headrest not only provides com-
fort for passengers, but also helps
protect the head and neck in the
event of a collision. For maximum effectiveness in case
of an accident, the headrest should
be adjusted so the middle of the
headrest is at the same height of the
center of gravity of an occupant's
head. Generally, the center of gravity
of most people's head is similar with
the height as the top of their eyes.
Also adjust the headrest as close to
your head as possible. For this rea-
son, the use of a cushion that holds
the body away from the seatback is
not recommended.
3-16
Seat and safety features of your vehicle
OKH033111NOKH033040N
KH USA 3:2015my 3/25/2015 3:06 PM Page 16
Page 56 of 542
3-38
Seat and safety features of your vehicle
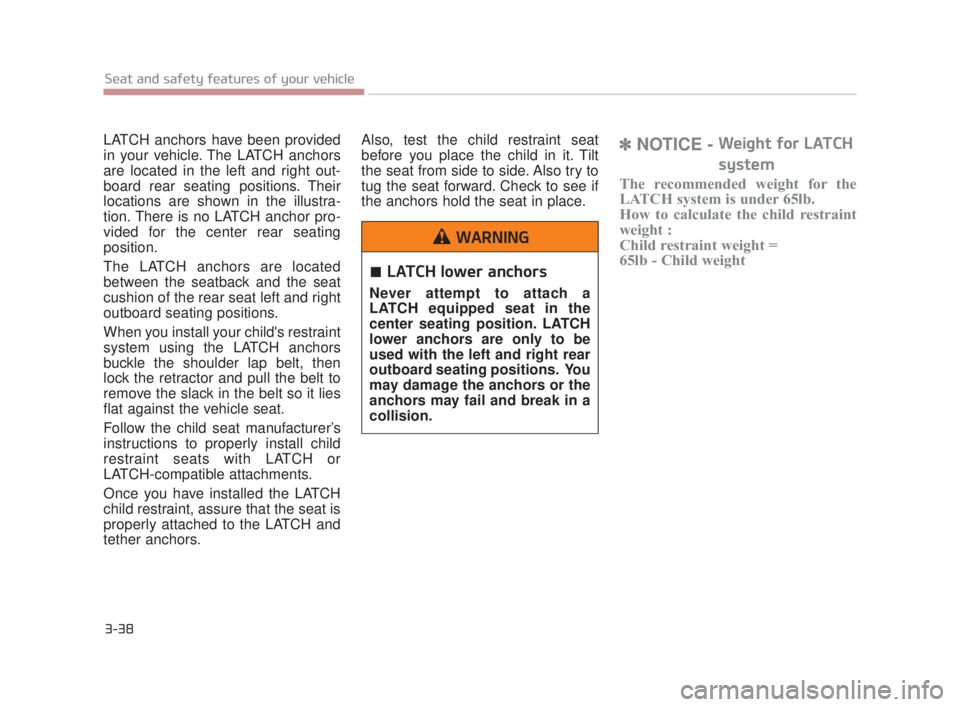
LATCH anchors have been provided
in your vehicle. The LATCH anchors
are located in the left and right out-
board rear seating positions. Their
locations are shown in the illustra-
tion. There is no LATCH anchor pro-
vided for the center rear seating
position.
The LATCH anchors are located
between the seatback and the seat
cushion of the rear seat left and right
outboard seating positions.
When you install your child's restraint
system using the LATCH anchors
buckle the shoulder lap belt, then
lock the retractor and pull the belt to
remove the slack in the belt so it lies
flat against the vehicle seat.
Follow the child seat manufacturer’s
instructions to properly install child
restraint seats with LATCH or
LATCH-compatible attachments.
Once you have installed the LATCH
child restraint, assure that the seat is
properly attached to the LATCH and
tether anchors.Also, test the child restraint seat
before you place the child in it. Tilt
the seat from side to side. Also try to
tug the seat forward. Check to see if
the anchors hold the seat in place.✽
NOTICE - Weight for LATCH
system
The recommended weight for the
LATCH system is under 65lb.
How to calculate the child restraint
weight :
Child restraint weight =
65lb - Child weight
LATCH lower anchors
Never attempt to attach a
LATCH equipped seat in the
center seating position. LATCH
lower anchors are only to be
used with the left and right rear
outboard seating positions. You
may damage the anchors or the
anchors may fail and break in a
collision.
WARNING
KH USA 3:2015my 3/25/2015 3:08 PM Page 38
Page 58 of 542
3-40
Seat and safety features of your vehicle
How does the air bag system
operate
Air bags are activated (able toinflate if necessary) only when the
Engine Start/Stop button is turned
to the ON or engine is running.
Air bags inflate instantly in the event of serious frontal or side col-
lision (if equipped with side air bag
or curtain air bag) in order to help
protect the occupants from serious
physical injury.
There is no single speed at which the air bags will inflate.
Generally, air bags are designed to
inflate based upon the severity of a
collision and its direction. These
two factors determine whether the
sensors produce an electronic
deployment/ inflation signal.
Air bag deployment depends on a number of complex factors includ-
ing vehicle speed, angles of impact
and the density and stiffness of the
vehicles or objects which your
vehicle hits in the collision. Though,
factors are not limited to those
mentioned above. The front air bags will completely
inflate and deflate in an instant.
It is virtually impossible for you to
see the air bags inflate during an
accident. It is much more likely that
you will simply see the deflated air
bags hanging out of their storage
compartments after the collision.
In order to help provide protection in a severe collision, the air bags
must inflate rapidly. The speed of
air bag inflation is a consequence
of extremely short time in which a
collision occurs and the need to
get the air bag between the occu-
pant and the vehicle structures
before the occupant impacts those
structures. This speed of inflation
reduces the risk of serious or life-
threatening injuries in a severe col-
lision and is thus a necessary part
of air bag design.
However, air bag inflation can also
cause injuries which can include
facial abrasions, bruises and bro-
ken bones because the inflation
speed also causes the air bags to
expand with a great deal of force. There are even circumstances
under which contact with the
steering wheel air bag can cause
fatal injuries, especially if the
occupant is positioned exces-
sively close to the steering
wheel.
Airbag inflation
Sit as far back as possible from
the steering wheel while still
maintaining comfortable con-
trol of the your vehicle. A dis-
tance of at least 10" from your
chest to the steering wheel is
recommended. Failure to do so
can result in airbag inflation
injuries to the driver.
WARNING
KH USA 3:2015my 3/25/2015 3:08 PM Page 40
Page 67 of 542
Seat and safety features of your vehicle
3
3-49
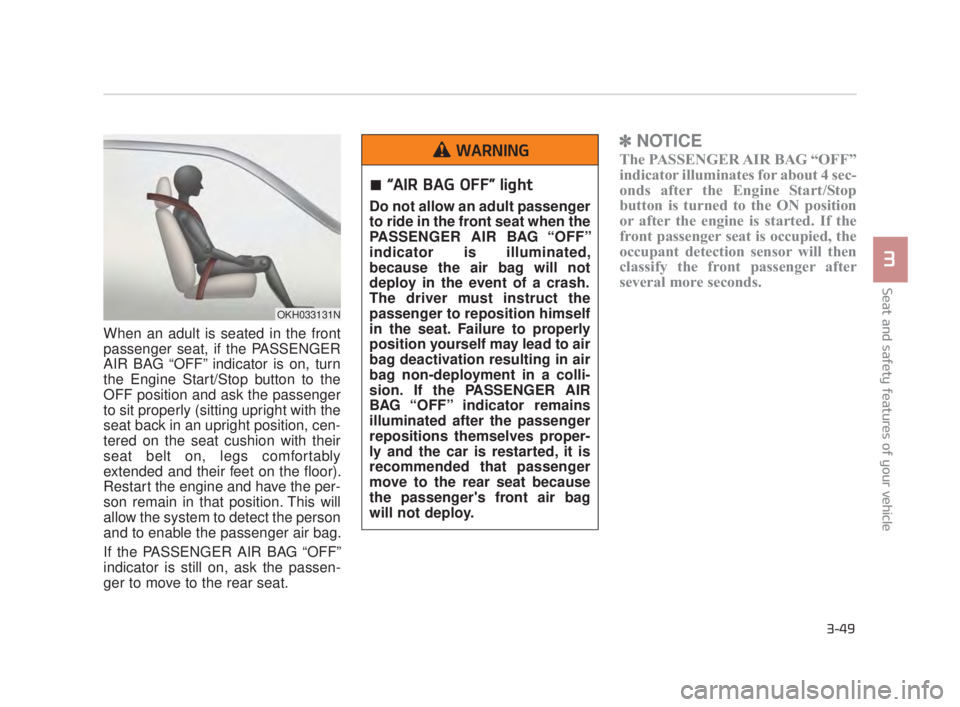
When an adult is seated in the front
passenger seat, if the PASSENGER
AIR BAG “OFF” indicator is on, turn
the Engine Start/Stop button to the
OFF position and ask the passenger
to sit properly (sitting upright with the
seat back in an upright position, cen-
tered on the seat cushion with their
seat belt on, legs comfortably
extended and their feet on the floor).
Restart the engine and have the per-
son remain in that position. This will
allow the system to detect the person
and to enable the passenger air bag.
If the PASSENGER AIR BAG “OFF”
indicator is still on, ask the passen-
ger to move to the rear seat.
✽NOTICE
The PASSENGER AIR BAG “OFF”
indicator illuminates for about 4 sec-
onds after the Engine Start/Stop
button is turned to the ON position
or after the engine is started. If the
front passenger seat is occupied, the
occupant detection sensor will then
classify the front passenger after
several more seconds.
OKH033131N
“AIR BAG OFF” light
Do not allow an adult passenger
to ride in the front seat when the
PASSENGER AIR BAG “OFF”
indicator is illuminated,
because the air bag will not
deploy in the event of a crash.
The driver must instruct the
passenger to reposition himself
in the seat. Failure to properly
position yourself may lead to air
bag deactivation resulting in air
bag non-deployment in a colli-
sion. If the PASSENGER AIR
BAG “OFF” indicator remains
illuminated after the passenger
repositions themselves proper-
ly and the car is restarted, it is
recommended that passenger
move to the rear seat because
the passenger's front air bag
will not deploy.
WARNING
KH USA 3:2015my 3/25/2015 3:08 PM Page 49
Page 132 of 542
Features of your vehicle
4-52
\Retain the original transmitter of the
RF device you are programming for
use in other vehicles as well as for
future HomeLink
®programming. It is
also suggested that upon the sale of
the vehicle, the programmed
HomeLink
®buttons be erased for
security purposes. Programming HomeLink
®
✽
NOTICE
• When programming a garage
door opener, it is advised to park
the vehicle outside of the garage.
• It is recommended that a new bat- tery be placed in the hand-held
transmitter of the device being pro-
grammed to HomeLink
®for quick-
er training and accurate transaxle
of the radio-frequency signal.
• Some vehicles may require the Engine Start/Stop button to be
turned to the second (or "acces-
sories") position for programming
and/or operation of HomeLink
®.
• In the event that there are still pro- gramming difficulties or questions
after following the programming
steps listed below, contact
HomeLink
®at: www.homelink.com
or 1-800-355-3515.
Standard programming
To train most devices, follow these
instructions:
1. For first-time programming, press
and hold the two outside buttons,
HomeLink
®Channel 1 and
Channel 3 Buttons, until the indi-
cator light begins to flash (after 20
seconds). Release both buttons.
Do not hold the buttons for longer
than 30 seconds.
2. Position the end of your hand-held transmitter 1-3 inches (2-8 cm)
away from the HomeLink
®buttons
while keeping the indicator light in
view.
3. Simultaneously press and hold both the HomeLink
®and hand-
held transmitter button. DO NOT
release the buttons until step 4
has been completed.
4. While continuing to hold the but- tons the red Indicator Status LED
will flash slowly and then rapidly
after HomeLink
®successfully
trains to the frequency signal from
the hand-held transmitter. Release
both buttons.
KH USA 4:2015 3/24/2015 4:37 PM Page 52
Page 140 of 542
Programming HomeLink®
Please note the following:
When programming a garage dooropener, it is advised to park the
vehicle outside of the garage.
It is recommended that a new bat- tery be placed in the hand-held
transmitter of the device being pro-
grammed to HomeLink
®for quicker
training and accurate transmission
of the radio-frequency signal.
Some vehicles may require the ignition switch to be placed in the
ACC (or "Accessories") position for
programming and/or operation of
HomeLink
®.
In the event that there are still pro- gramming difficulties or questions
after following the programming
steps listed below, contact
HomeLink
®at: www.homelink.com
or by calling 1-800-355-3515.
Programming
To train most devices, follow these
instructions:
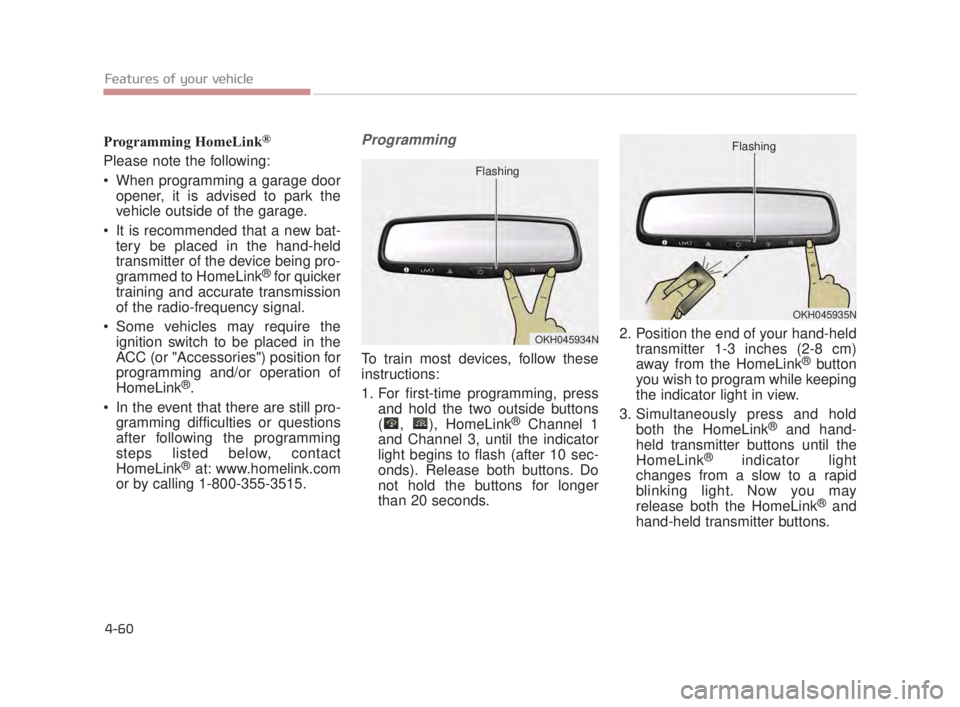
1. For first-time programming, press and hold the two outside buttons
( , ), HomeLink
®Channel 1
and Channel 3, until the indicator
light begins to flash (after 10 sec-
onds). Release both buttons. Do
not hold the buttons for longer
than 20 seconds. 2. Position the end of your hand-held
transmitter 1-3 inches (2-8 cm)
away from the HomeLink
®button
you wish to program while keeping
the indicator light in view.
3. Simultaneously press and hold both the HomeLink
®and hand-
held transmitter buttons until the
HomeLink
®indicator light
changes from a slow to a rapid
blinking light. Now you may
release both the HomeLink
®and
hand-held transmitter buttons.
Features of your vehicle
4-60
OKH045934N
Flashing
OKH045935N
Flashing
KH USA 4:2015 3/24/2015 4:38 PM Page 60