steering wheel KIA NIRO 2020 Workshop Manual
[x] Cancel search | Manufacturer: KIA, Model Year: 2020, Model line: NIRO, Model: KIA NIRO 2020Pages: 687, PDF Size: 11.43 MB
Page 480 of 687
Driving your vehicle
170
5
If at all possible, avoid sharp turns or
abrupt maneuvers, do not load your
roof rack with heavy cargo, and
never modify your vehicle in any way.
WARNING
Your vehicle is equipped with
tires designed to provide safe
ride and handling capability. Do
not use a size and type of tire
and wheel that is different from
the one that is originally
installed on your vehicle. It can
affect the safety and perform-
ance of your vehicle, which
could lead to steering failure or
rollover and serious injury.
When replacing the tires, be
sure to equip all four tires with
the tire and wheel of the same
size, type, tread, brand and
load-carrying capacity. If you
nevertheless decide to equip
your vehicle with any tire/wheel
combination not recommended
by Kia for off road driving, you
should not use these tires for
highway driving.
WARNING - Rollover
As with other Sports Utility
Vehicles (SUV), failure to oper-
ate this vehicle correctly may
result in loss of control, an acci-
dent or vehicle rollover.
Utility vehicles have a signifi- cantly higher rollover rate
than other types of vehicles.
Specific design characteris- tics (higher ground clearance,
narrower track, etc.) give this
vehicle a higher center of
gravity than ordinary vehicles.
A SUV is not designed for cor- nering at the same speeds as
conventional vehicles.
Avoid sharp turns or abrupt maneuvers.
(Continued)
(Continued)
In a rollover crash, an unbelt-ed person is significantly
more likely to die than a per-
son wearing a seat belt. Make
sure everyone in the vehicle is
properly buckled up.
Page 481 of 687
5171
Driving your vehicle
Rocking the vehicle
If it is necessary to rock the vehicle
to free it from snow, sand, or mud,
first turn the steering wheel right and
left to clear the area around your
front wheels. Then, shift back and
forth between R (Reverse) and any
forward gear in vehicles equipped
with a dual clutch transmission. Do
not race the engine, and spin the
wheels as little as possible. If you are
still stuck after a few tries, have the
vehicle pulled out by a tow vehicle to
avoid engine overheating and possi-
ble damage to the transaxle.The ESC system should be turned
OFF prior to rocking the vehicle.
Smooth cornering
Avoid braking or gear changing in
corners, especially when roads are
wet. Ideally, corners should always
be taken under gentle acceleration. If
you follow these suggestions, tire
wear will be held to a minimum.CAUTION- Vehicle rocking
Prolonged rocking may causeengine overheating, transaxledamage or failure, and tire dam-age.
CAUTION- Spinning tires
Do not spin the wheels, espe-cially at speeds more than 35mph (56 km/h). Spinning thewheels at high speeds when thevehicle is stationary couldcause a tire to overheat whichcould result in tire damage thatmay injure bystanders.
WARNING- Sudden
Vehicle Movement
Do not attempt to rock the vehi-
cle if people or objects are near-
by. The vehicle may suddenly
move forward or backwards as it
becomes unstuck.
Page 487 of 687
5177
Driving your vehicle
To keep locks from freezing
To keep the locks from freezing,
squirt an approved de-icer fluid or
glycerine into the key opening. If a
lock is covered with ice, squirt it with
an approved de-icing fluid to remove
the ice. If the lock is frozen internally,
you may be able to thaw it out by
using a heated key. Handle the heat-
ed key with care to avoid injury.
Use approved window washer
anti-freeze in system
To keep the water in the window
washer system from freezing, add an
approved window washer anti-freeze
solution in accordance with instruc-
tions on the container. Window wash-
er anti-freeze is available from an
authorized Kia dealer and most auto
parts outlets. Do not use engine
coolant or other types of anti-freeze
as these may damage the paint fin-
ish.
Don’t let your parking brake
freeze
Under some conditions your parking
brake can freeze in the engaged
position. This is most likely to happen
when there is an accumulation of
snow or ice around or near the rear
brakes or if the brakes are wet. If
there is a risk the parking brake may
freeze, apply it only temporarily while
you put the gear shift lever in P (Park,
Dual clutch transmission) and block
the rear wheels so the vehicle cannot
roll. Then release the parking brake.
Don't let ice and snow accu-
mulate underneath
Under some conditions, snow and
ice can build up under the fenders
and interfere with the steering. When
driving in severe winter conditions
where this may happen, you should
periodically check underneath the
vehicle to be sure the movement of
the front wheels and the steering
components are not obstructed.
Carry emergency equipment
Depending on the severity of the
weather, you should carry appropri-
ate emergency equipment. Some of
the items you may want to carry
include tow straps or chains, flash-
light, emergency flares, sand, shov-
el, jumper cables, window scraper,
gloves, ground cloth, coveralls, blan-
ket, etc.
TRAILER TOWING
We do not recommend using this
vehicle for trailer towing.
Page 525 of 687
633
What to do in an emergency
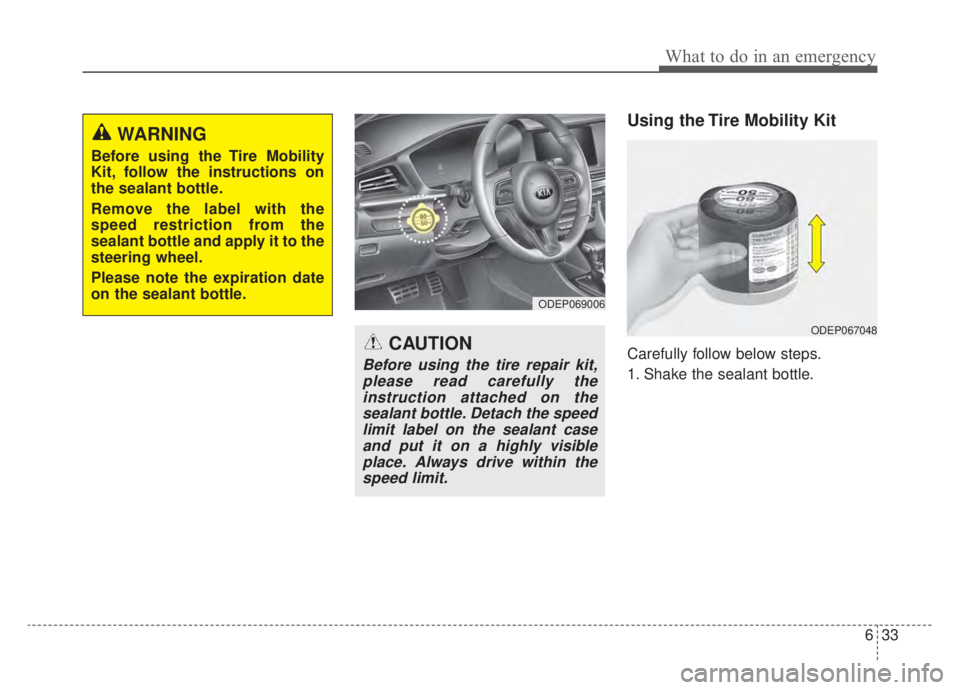
Using the Tire Mobility Kit
Carefully follow below steps.
1. Shake the sealant bottle.
ODEP069006
ODEP067048
WARNING
Before using the Tire Mobility
Kit, follow the instructions on
the sealant bottle.
Remove the label with the
speed restriction from the
sealant bottle and apply it to the
steering wheel.
Please note the expiration date
on the sealant bottle.
CAUTION
Before using the tire repair kit,please read carefully theinstruction attached on thesealant bottle. Detach the speedlimit label on the sealant caseand put it on a highly visibleplace. Always drive within thespeed limit.
Page 533 of 687
3. Install the towing hook by turning itclockwise into the hole until it is
fully secured.
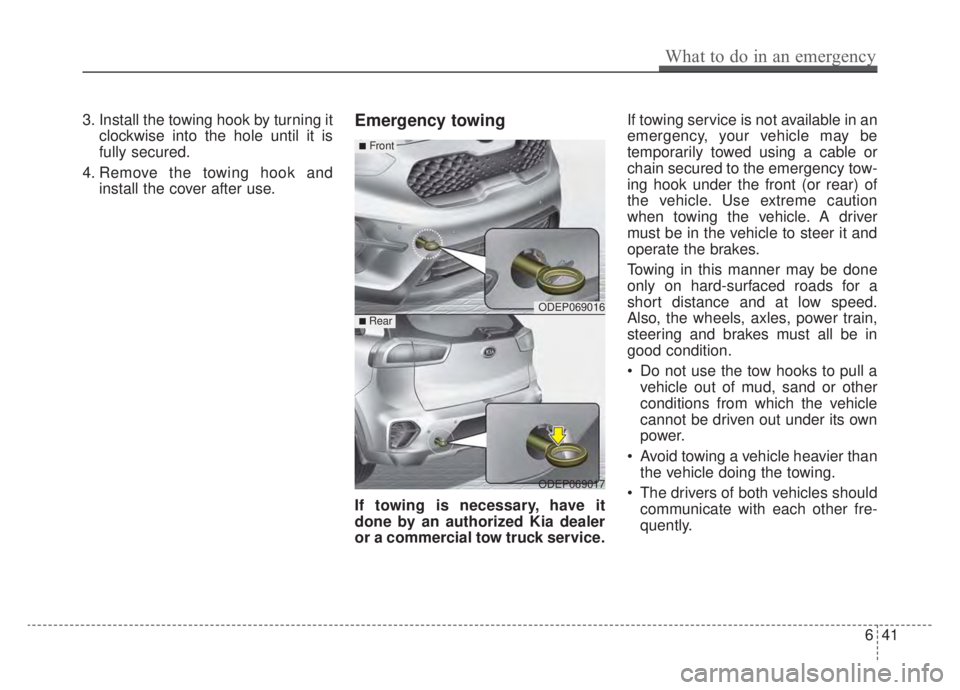
4. Remove the towing hook and install the cover after use.Emergency towing
If towing is necessary, have it
done by an authorized Kia dealer
or a commercial tow truck service. If towing service is not available in an
emergency, your vehicle may be
temporarily towed using a cable or
chain secured to the emergency tow-
ing hook under the front (or rear) of
the vehicle. Use extreme caution
when towing the vehicle. A driver
must be in the vehicle to steer it and
operate the brakes.
Towing in this manner may be done
only on hard-surfaced roads for a
short distance and at low speed.
Also, the wheels, axles, power train,
steering and brakes must all be in
good condition.
Do not use the tow hooks to pull a
vehicle out of mud, sand or other
conditions from which the vehicle
cannot be driven out under its own
power.
Avoid towing a vehicle heavier than the vehicle doing the towing.
The drivers of both vehicles should communicate with each other fre-
quently.
ODEP069016
ODEP069017
■Front
■ Rear
What to do in an emergency
41
6
Page 535 of 687
Emergency towing precautions
Turn the ignition switch to ACC sothe steering wheel isn’t locked.
Place the transmission shift lever in N (Neutral).
Release the parking bake.
Press the brake pedal with more force than normal since you will
have reduced brake performance.
More steering effort will be required because the power steer-
ing system will be disabled.
If you are driving down a long hill, the brakes may overheat and brake
performance will be reduced. Stop
often and let the brakes cool off.
The vehicle should be towed at a speed of 15 mph (25 km/h) or less
within the distance of 12 miles (20
km). If the car is being towed with all
four wheels on the ground, it can
be towed only from the front. Be
sure that the transmission is in N
(Neutral). Be sure the steering is
unlocked by placing the ignition
switch in the ACC position. A driver
must be in the towed vehicle to
operate the steering and brakes.
CAUTION - Dual clutchtransmission
To avoid serious damage to the
dual clutch transmission, limitthe vehicle speed to 10 mph(15 km/h) and drive less than 1mile (1.5 km) when towing.
Before towing, check the dual clutch transmission for fluidleaks under your vehicle. If thedual clutch transmission fluidis leaking, flatbed equipmentor a towing dolly must beused.
What to do in an emergency
43
6
Page 543 of 687
77
Maintenance
OWNER MAINTENANCE
The following lists are vehicle checks
and inspections that should be per-
formed by the owner or an author-
ized Kia dealer at the frequencies
indicated to help ensure safe,
dependable operation of your vehi-
cle.
Any adverse conditions should be
brought to the attention of your deal-
er as soon as possible.
These Owner Maintenance Checks
are generally not covered by war-
ranties and you may be charged for
labor, parts and lubricants used.Owner maintenance schedule
When you stop for fuel:
Check the engine oil level.
Check the coolant level in coolantreservoir.
Check the windshield washer fluid level.
Look for low or under-inflated tires.
While operating your vehicle:
Note any changes in the sound of the exhaust or any smell of
exhaust fumes in the vehicle.
Check for vibrations in the steering wheel. Notice any increased steer-
ing effort or looseness in the steer-
ing wheel, or change in its straight-
ahead position.
Notice if your vehicle constantly turns slightly or “pulls” to one side
when traveling on smooth, level
road.
When stopping, listen and check for unusual sounds, pulling to one
side, increased brake pedal travel
or “hard-to-push” brake pedal.
If any slipping or changes in the operation of your transmission
occurs, check the transmission
fluid level.
Check the dual clutch transmission P (Park) function.
Check the parking brake.
Check for fluid leaks under your vehicle (water dripping from the air
conditioning system during or after
use is normal).
WARNING- Hot coolant
Be careful when checking your
engine coolant level when the
engine is hot. Scalding hot
coolant and steam may blow
out under pressure.
WARNING
When you open the engine
hood, turn the Hybrid system
off. If not, it may result in death
or serious injury because of the
high voltage flow.
Page 554 of 687
Maintenance
18
7
Exhaust pipe and muffler
Visually inspect the exhaust pipes,
muffler and hangers for cracks, dete-
rioration, or damage. Start the
engine and listen carefully for any
exhaust gas leakage. Tighten con-
nections or replace parts as neces-
sary.
Suspension mounting bolts
Check the suspension connections
for looseness or damage. Retighten
to the specified torque.
Steering gear box, linkage &
boots/lower arm ball joint
With the vehicle stopped and engine
off, check for excessive free-play in
the steering wheel.
Check the linkage for bends or dam-
age. Check the dust boots and ball
joints for deterioration, cracks, or
damage. Replace any damaged
parts.
Drive shafts and boots
Check the drive shafts, boots and
clamps for cracks, deterioration, or
damage. Replace any damaged
parts and, if necessary, repack the
grease.
Air conditioning refrigerant
Check the air conditioning lines and
connections for leakage and dam-
age. When checking engine oil, engine
coolant, brake fluid, and washer fluid,
always be sure to clean the area
around any filler plug, drain plug, or
dipstick before checking or draining
any lubricant or fluid. This is espe-
cially important in dusty or sandy
areas and when the vehicle is used
on unpaved roads. Cleaning the plug
and dipstick areas will prevent dirt
and grit from entering the engine and
other mechanisms that could be
damaged.
CHECKING FLUID LEVELS
Page 647 of 687
7111
Maintenance
Taking care of leather seats
Vacuum the seat periodically toremove dust and sand on the seat.
It will prevent abrasion or damage of
the leather and maintain its quality.
Wipe the natural leather seat cover often with dry or soft cloth.
Sufficient use of a leather protec- tive may prevent abrasion of the
cover and helps maintain the color.
Be sure to read the instructions
and consult a specialist when
using leather coating or protective
agents.
Leather with bright colors(beige, cream beige) is easily contaminat-
ed and clear in appearance. Clean
the seats frequently.
Avoid wiping with wet cloth. It may cause the surface to crack.
Cleaning the leather seats
Remove all contaminations instant-ly. Refer to instructions below for
removal of each contaminant.
Cosmetic products(sunscreen, foundation, etc.)
- Apply cleansing cream on a clothand wipe the contaminated point.
Wipe off the cream with a wet
cloth and remove water with a dry
cloth.
Beverages(coffee, soft drink, etc.) - Apply a small amount of neutraldetergent and wipe until contami-
nations do not smear.
Oil - Remove oil instantly withabsorbable cloth and wipe with
stain remover for natural leather
only.
Chewing gum - Harden the gum with ice andremove gradually.CAUTION - Electrical
components
Never allow water or other liq-uids to come in contact withelectrical/electronic compo-nents inside the vehicle as thismay damage them.
CAUTION - Leather
When cleaning leather products(steering wheel, seats etc.), useneutral detergents or low alco-hol content solutions. If you usehigh alcohol content solutionsor acid/alkaline detergents, thecolor of the leather may fade orthe surface may get stripped off.
Page 680 of 687

I5
Index
System malfunction . . . . . . . . . . . . . . . . . . . . . . . . . 5-76
System setting and activation . . . . . . . . . . . . . . . . . . 5-69
Fuel filler door (Hybrid) . . . . . . . . . . . . . . . . . . . . . . . . 4-36 Closing the fuel filler door . . . . . . . . . . . . . . . . . . . . 4-36
Opening the fuel filler door . . . . . . . . . . . . . . . . . . . 4-36
Fuel filler door (Plug-in hybrid) . . . . . . . . . . . . . . . . . . 4-37 Closing the fuel filler door . . . . . . . . . . . . . . . . . . . . 4-38
Opening the fuel filler door . . . . . . . . . . . . . . . . . . . 4-37
Fuel requirements . . . . . . . . . . . . . . . . . . . . . . . . . . . . . . 1-2 Do not use methanol . . . . . . . . . . . . . . . . . . . . . . . . . 1-3
Fuel additives . . . . . . . . . . . . . . . . . . . . . . . . . . . . . . . 1-4
Gasoline containing alcohol and methanol . . . . . . . . 1-2
Operation in foreign countries . . . . . . . . . . . . . . . . . . 1-4
Fuses . . . . . . . . . . . . . . . . . . . . . . . . . . . . . . . . . . . . \
. . . 7-58 Engine compartment fuse replacement . . . . . . . . . . 7-61
Fuse/relay panel description. . . . . . . . . . . . . . . . . . . 7-64
Inner panel fuse replacement . . . . . . . . . . . . . . . . . . 7-59
Gross vehicle weight. . . . . . . . . . . . . . . . . . . . . . . . . . . . 8-6
HEV/PHEV powertrain . . . . . . . . . . . . . . . . . . . . . . . . . 1-5
Highway Driving Assist (HDA) . . . . . . . . . . . . . . . . . 5-149 HDA malfunction . . . . . . . . . . . . . . . . . . . . . . . . . . 5-154
HDA system operation . . . . . . . . . . . . . . . . . . . . . . 5-150 Operating conditions . . . . . . . . . . . . . . . . . . . . . . . 5-150
Setting and activating HDA system . . . . . . . . . . . . 5-150
Warning related to steering wheel . . . . . . . . . . . . . 5-151
When the hands-off warning lasts for
a certain period of time . . . . . . . . . . . . . . . . . . . . 5-152
Hood . . . . . . . . . . . . . . . . . . . . . . . . . . . . . . . . . . . . \
. . . 4-34 Closing the hood . . . . . . . . . . . . . . . . . . . . . . . . . . . 4-35
Opening the hood . . . . . . . . . . . . . . . . . . . . . . . . . . . 4-34
If An Accident Occurs . . . . . . . . . . . . . . . . . . . . . . . . . 6-44
If the engine overheats . . . . . . . . . . . . . . . . . . . . . . . . . 6-11
If the engine will not start . . . . . . . . . . . . . . . . . . . . . . . 6-4 If engine doesn't turn over or turns over slowly . . . . 6-4
If engine turns over normally but does not start . . . . 6-4
If you have a flat tire (with spare tire) . . . . . . . . . . . . . 6-19 Changing tires . . . . . . . . . . . . . . . . . . . . . . . . . . . . . 6-20
Jack and tools . . . . . . . . . . . . . . . . . . . . . . . . . . . . . . 6-19
Removing and storing the spare tire . . . . . . . . . . . . 6-20
If you have a flat tire (with Tire Mobility Kit). . . . . . . 6-28 Checking the tire inflation pressure . . . . . . . . . . . . . 6-36
Components of the Tire Mobility Kit . . . . . . . . . . . 6-32
Distributing the sealant . . . . . . . . . . . . . . . . . . . . . . 6-35
Introduction . . . . . . . . . . . . . . . . . . . . . . . . . . . . . . . 6-29
Notes on the safe use of the Tire Mobility Kit . . . . 6-30
Technical Data . . . . . . . . . . . . . . . . . . . . . . . . . . . . . 6-38
Using the Tire Mobility Kit . . . . . . . . . . . . . . . . . . . 6-33
H
I
G