KIA Opirus 2004 1.G Owner's Manual
Manufacturer: KIA, Model Year: 2004, Model line: Opirus, Model: KIA Opirus 2004 1.GPages: 296, PDF Size: 29.34 MB
Page 221 of 296
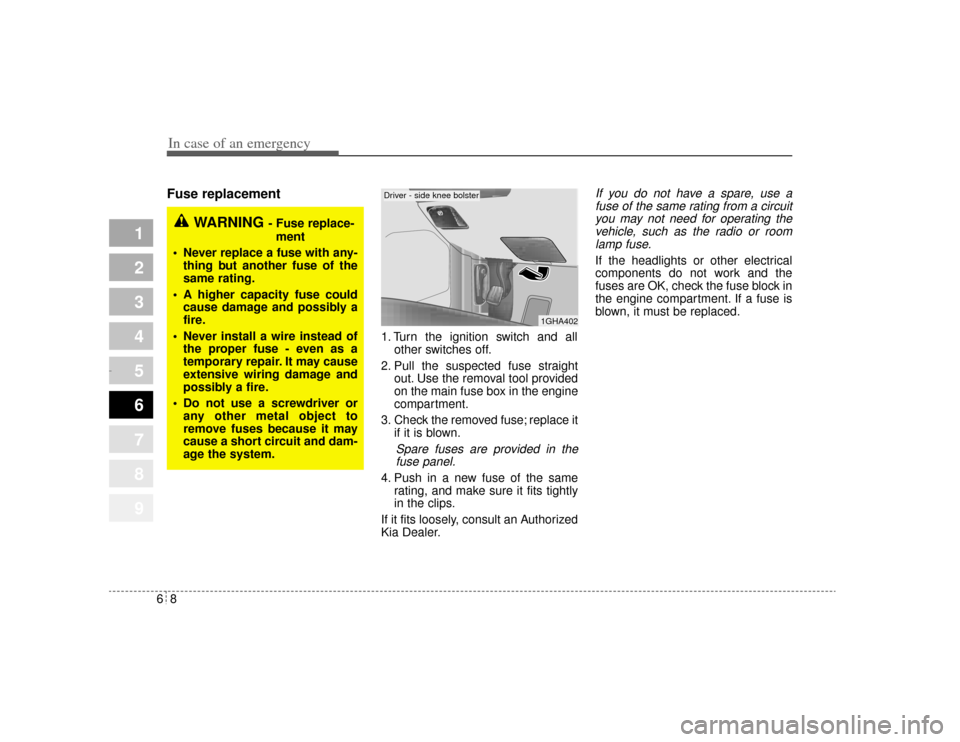
In case of an emergency86Fuse replacement
1. Turn the ignition switch and allother switches off.
2. Pull the suspected fuse straight out. Use the removal tool provided
on the main fuse box in the engine
compartment.
3. Check the removed fuse; replace it if it is blown.
Spare fuses are provided in thefuse panel.
4. Push in a new fuse of the same rating, and make sure it fits tightly
in the clips.
If it fits loosely, consult an Authorized
Kia Dealer.
If you do not have a spare, use a fuse of the same rating from a circuityou may not need for operating thevehicle, such as the radio or roomlamp fuse.If the headlights or other electrical
components do not work and the
fuses are OK, check the fuse block in
the engine compartment. If a fuse is
blown, it must be replaced.
1
2
3
4
5
6
7
8
9
1GHA402
WARNING
- Fuse replace-
ment
Never replace a fuse with any- thing but another fuse of the
same rating.
A higher capacity fuse could cause damage and possibly a
fire.
Never install a wire instead of the proper fuse - even as a
temporary repair. It may cause
extensive wiring damage and
possibly a fire.
Do not use a screwdriver or any other metal object to
remove fuses because it may
cause a short circuit and dam-
age the system.
Driver - side knee bolster
Opirus CAN 6-1.qxd 7/8/03 2:22 PM Page 8
Page 222 of 296
69
In case of an emergency
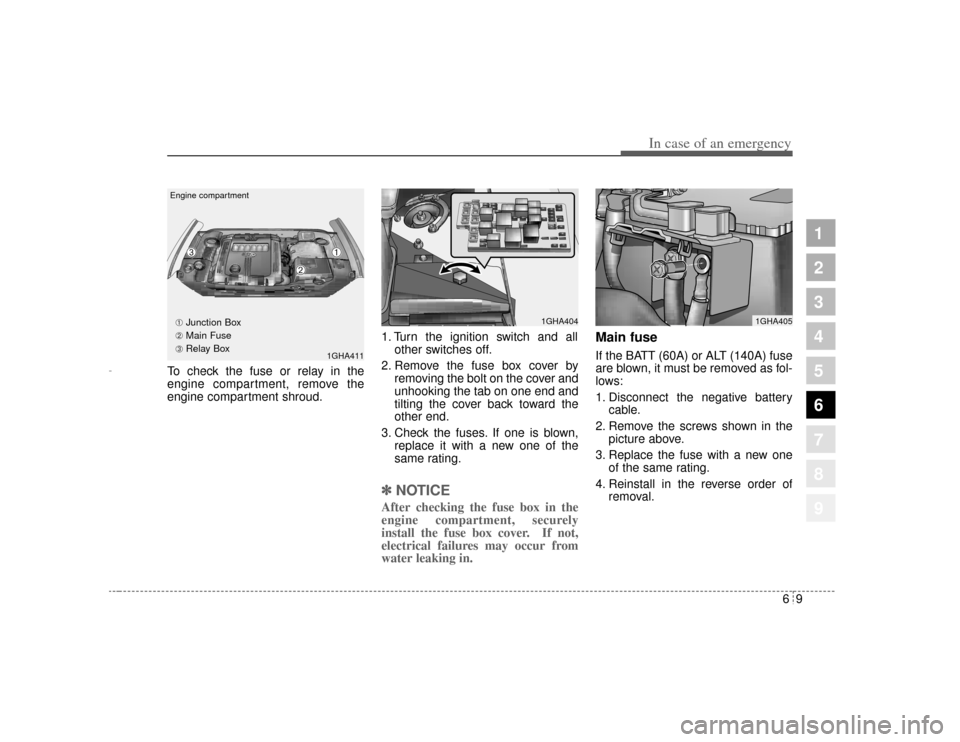
To check the fuse or relay in the
engine compartment, remove the
engine compartment shroud.1. Turn the ignition switch and all
other switches off.
2. Remove the fuse box cover by removing the bolt on the cover and
unhooking the tab on one end and
tilting the cover back toward the
other end.
3. Check the fuses. If one is blown, replace it with a new one of the
same rating.
✽ ✽NOTICEAfter checking the fuse box in the
engine compartment, securely
install the fuse box cover. If not,
electrical failures may occur from
water leaking in.
Main fuseIf the BATT (60A) or ALT (140A) fuse
are blown, it must be removed as fol-
lows:
1. Disconnect the negative battery
cable.
2. Remove the screws shown in the picture above.
3. Replace the fuse with a new one of the same rating.
4. Reinstall in the reverse order of removal.
1
2
3
4
5
6
7
8
9
1GHA404
1GHA411
1GHA405
Engine compartment
➀
➁
➂➀
Junction Box
➁ Main Fuse
➂ Relay Box
Opirus CAN 6-1.qxd 7/8/03 2:22 PM Page 9
Page 223 of 296
In case of an emergency10
6
1
2
3
4
5
6
7
8
9
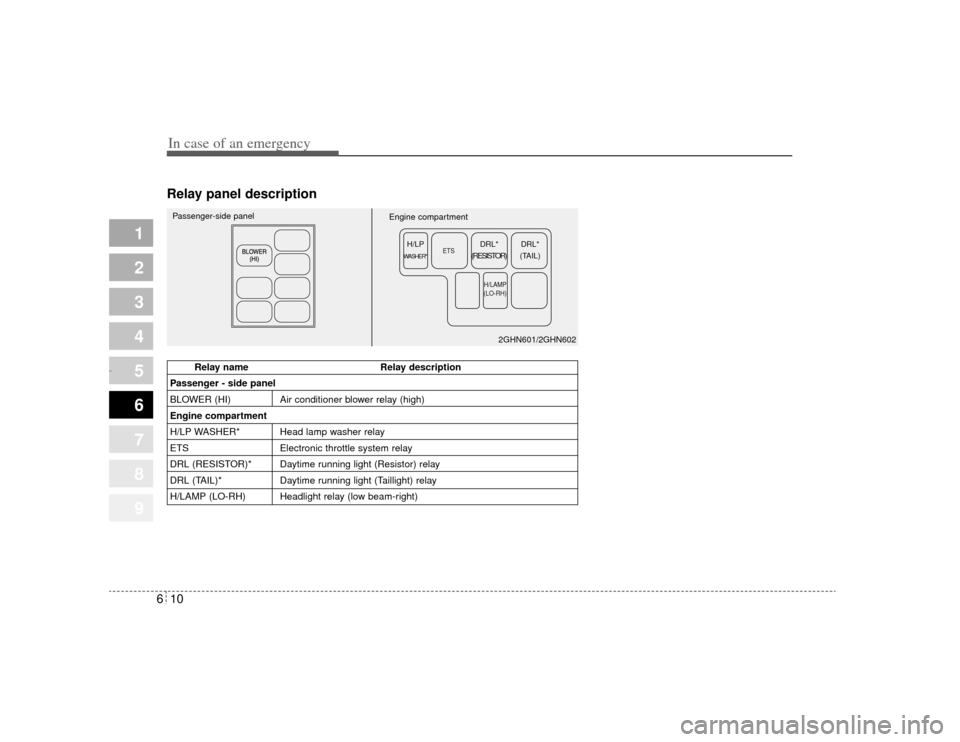
Relay panel description
ETS
H/LAMP
(LO-RH)
DRL*
(TAIL)
DRL*
(RESISTOR)
H/LP
WASHER*
Passenger-side panel
Engine compartment
2GHN601/2GHN602
Relay name Relay description
Passenger - side panel
BLOWER (HI) Air conditioner blower relay (high)
Engine compartment
H/LP WASHER* Head lamp washer relay
ETS Electronic throttle system relay
DRL (RESISTOR)* Daytime running light (Resistor) relay
DRL (TAIL)* Daytime running light (Taillight) relay
H/LAMP (LO-RH) Headlight relay (low beam-right)
Opirus CAN 6-1.qxd 7/8/03 2:22 PM Page 10
Page 224 of 296
611
In case of an emergency
1
2
3
4
5
6
7
8
9
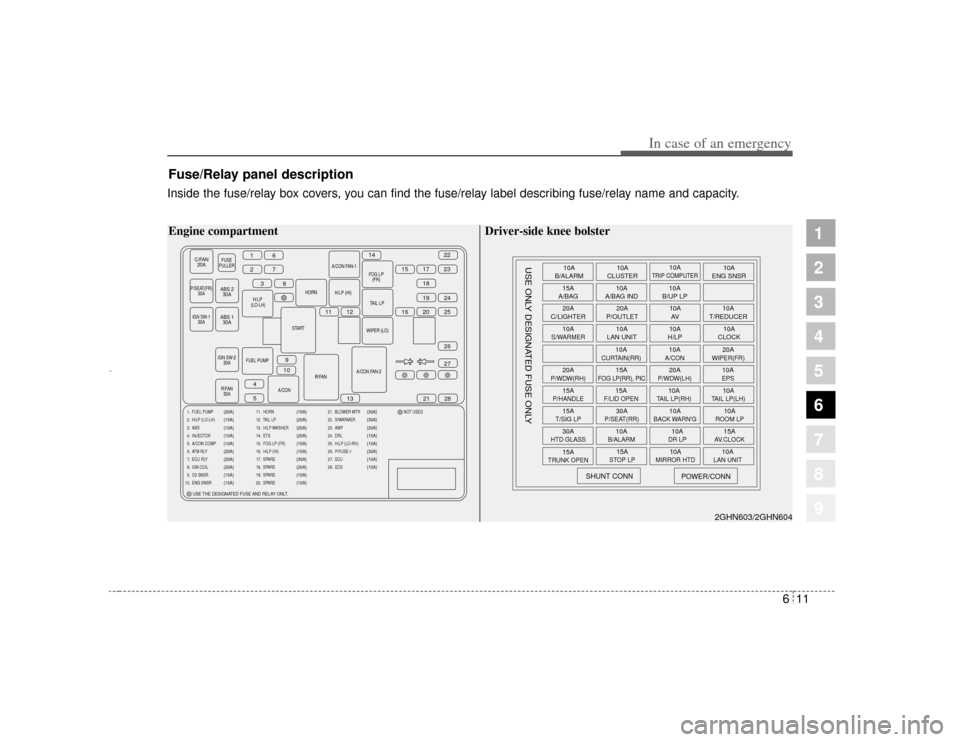
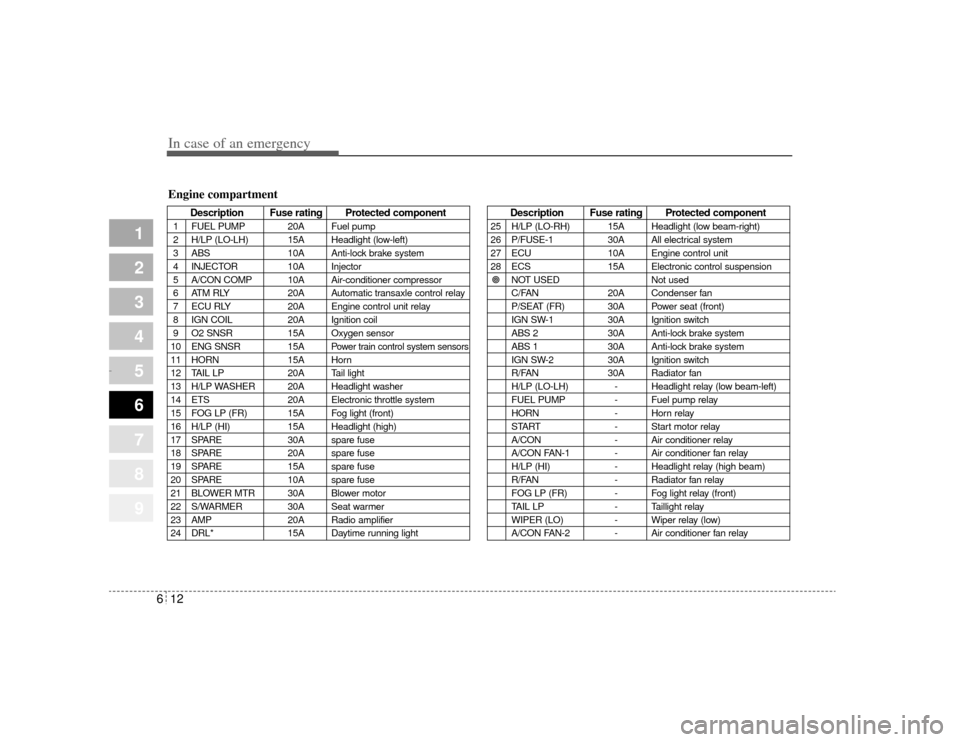
Fuse/Relay panel descriptionInside the fuse/relay box covers, you can find the fuse/relay label describing fuse/relay name and capacity.
C/FAN20A
FUSE
PULLER
P/SEAT(FR) 30A
H/
LP (LO-LH) HORN
START
IGN SW-2 30A
R/FAN 30A R/FAN
A/CON FAN-2WIPER (LO)
TAIL
LP
H/LP (HI)
A/CON FAN-1
FOG
LP(FR)
FUEL PUMP A/CON
16
2738
11 12 16 20
15
14
17
1822
23
19 25 24
27
21
13
9
10
4
5 28
26
IGN SW-1
30A
ABS 230A
ABS 1 30A
1. FUEL PUMP
2. H/LP (LO-LH)
3. ABS
4. INJECTOR
5. A/CON COMP
6. ATM RLY
7. ECU RLY
8. IGN COIL
9. O2 SNSR
10. ENG SNSR
(20A)
(15A)
(10A)
(10A)
(10A)
(20A)
(20A)
(20A)
(15A)
(15A)
11. HORN
12. TAIL LP
13. H/LP WASHER
14. ETS
15. FOG LP (FR)
16. H/LP (HI)
17. SPARE
18. SPARE
19. SPARE
20. SPARE
(15A)
(20A)
(20A)
(20A)
(15A)
(15A)
(30A)
(20A)
(15A)
(10A)
21. BLOWER MTR
22. S/WARMER
23. AMP
24. DRL
25. H/LP (LO-RH)
26. P/FUSE-1
27. ECU
28. ECS NOT USED
(30A)
(30A)
(20A)
(15A)
(15A)
(30A)
(10A)
(15A)
USE THE DESIGNATED FUSE AND RELAY ONLT.
Engine compartment
10A
B/ALARM
15A
A/BAG
20A
C/LIGHTER
10AS/WARMER20AP/WDW(RH)15AP/HANDLE15AT/SIG LP30AHTD GLASS15A
TRUNK OPEN
SHUNT CONN
USE ONLY DESIGNATED FUSE ONLY
POWER/CONN
15ASTOP LP
10A
MIRROR HTD
10ALAN UNIT
10AB/ALARM
10ADR LP
15AAV.CLOCK
30AP/SEAT(RR)
10A
BACK WARN'G
10AROOM LP
15AF/LID OPEN
10ATAIL LP(RH)
10ATAIL LP(LH)
15A
FOG LP(RR), PIC
20AP/WDW(LH)
10AEPS
10A
CURTAIN(RR)
10AA/CON
20AWIPER(FR)
10A
LAN UNIT 10A
H/LP 10A
CLOCK
20A
P/OUTLET 10A
T/REDUCER
10A
AV
10A
A/BAG IND 10A
B/UP LP
10A
CLUSTER 10A
ENG SNSR
10A
TRIP COMPUTER
2GHN603/2GHN604
Driver-side knee bolster
Opirus CAN 6-1.qxd 7/8/03 2:22 PM Page 11
Page 225 of 296
In case of an emergency12
6
1
2
3
4
5
6
7
8
9
Description Fuse rating Protected component
1 FUEL PUMP 20A Fuel pump
2 H/LP (LO-LH) 15A Headlight (low-left)
3 ABS 10A Anti-lock brake system
4 INJECTOR 10A Injector
5 A/CON COMP 10A Air-conditioner compressor
6 ATM RLY 20A Automatic transaxle control relay
7 ECU RLY 20A Engine control unit relay
8 IGN COIL 20A Ignition coil
9 O2 SNSR 15A Oxygen sensor
10 ENG SNSR 15A
Power train control system sensors
11 HORN 15A Horn
12 TAIL LP 20A Tail light
13 H/LP WASHER 20A Headlight washer
14 ETS 20A Electronic throttle system
15 FOG LP (FR) 15A Fog light (front)
16 H/LP (HI) 15A Headlight (high)
17 SPARE 30A spare fuse
18 SPARE 20A spare fuse
19 SPARE 15A spare fuse
20 SPARE 10A spare fuse
21 BLOWER MTR 30A Blower motor
22 S/WARMER 30A Seat warmer
23 AMP 20A Radio amplifier
24 DRL* 15A Daytime running light
Description Fuse rating Protected component
25 H/LP (LO-RH) 15A Headlight (low beam-right)
26 P/FUSE-1 30A All electrical system
27 ECU 10A Engine control unit
28 ECS 15A Electronic control suspension
! NOT USED Not used
C/FAN 20A Condenser fan
P/SEAT (FR) 30A Power seat (front)
IGN SW-1 30A Ignition switch
ABS 2 30A Anti-lock brake system
ABS 1 30A Anti-lock brake system
IGN SW-2 30A Ignition switch
R/FAN 30A Radiator fan
H/LP (LO-LH) - Headlight relay (low beam-left)
FUEL PUMP - Fuel pump relay
HORN - Horn relay
START - Start motor relay
A/CON - Air conditioner relay
A/CON FAN-1 - Air conditioner fan relay
H/LP (HI) - Headlight relay (high beam)
R/FAN - Radiator fan relay
FOG LP (FR) - Fog light relay (front)
TAIL LP - Taillight relay
WIPER (LO) - Wiper relay (low)
A/CON FAN-2 - Air conditioner fan relay
Engine compartment
Opirus CAN 6-1.qxd 7/8/03 2:22 PM Page 12
Page 226 of 296
613
In case of an emergency
1
2
3
4
5
6
7
8
9
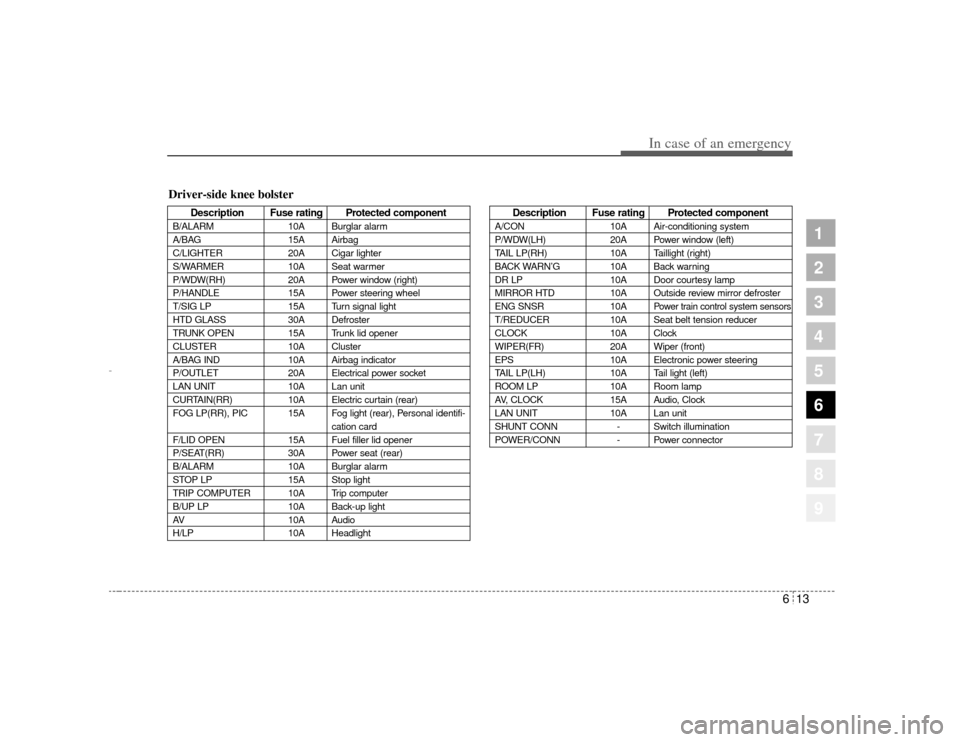
Driver-side knee bolster
Description Fuse rating Protected component
B/ALARM10A Burglar alarm
A/BAG 15A Airbag
C/LIGHTER 20A Cigar lighter
S/WARMER 10A Seat warmer
P/WDW(RH) 20A Power window (right)
P/HANDLE 15A Power steering wheel
T/SIG LP 15A Turn signal light
HTD GLASS 30A Defroster
TRUNK OPEN 15A Trunk lid opener
CLUSTER 10A Cluster
A/BAG IND 10A Airbag indicator
P/OUTLET 20A Electrical power socket
LAN UNIT 10A Lan unit
CURTAIN(RR) 10A Electric curtain (rear)
FOG LP(RR), PIC 15A Fog light (rear), Personal identifi- cation card
F/LID OPEN 15A Fuel filler lid opener
P/SEAT(RR) 30A Power seat (rear)
B/ALARM 10A Burglar alarm
STOP LP 15A Stop light
TRIP COMPUTER 10A Trip computer
B/UP LP 10A Back-up light
AV 10A Audio
H/LP 10A Headlight
Description Fuse rating Protected component
A/CON10A Air-conditioning system
P/WDW(LH) 20A Power window (left)
TAIL LP(RH) 10A Taillight (right)
BACK WARN’ G10A Back warning
DR LP 10A Door courtesy lamp
MIRROR HTD 10A Outside review mirror defroster
ENG SNSR 10A
Power train control system sensors
T/REDUCER10A Seat belt tension reducer
CLOCK 10A Clock
WIPER(FR) 20A Wiper (front)
EPS 10A Electronic power steering
TAIL LP(LH) 10A Tail light (left)
ROOM LP 10A Room lamp
AV, CLOCK 15A Audio, Clock
LAN UNIT 10A Lan unit
SHUNT CONN - Switch illumination
POWER/CONN - Power connector
Opirus CAN 6-1.qxd 7/8/03 2:22 PM Page 13
Page 227 of 296
In case of an emergency14
6
1
2
3
4
5
6
7
8
9
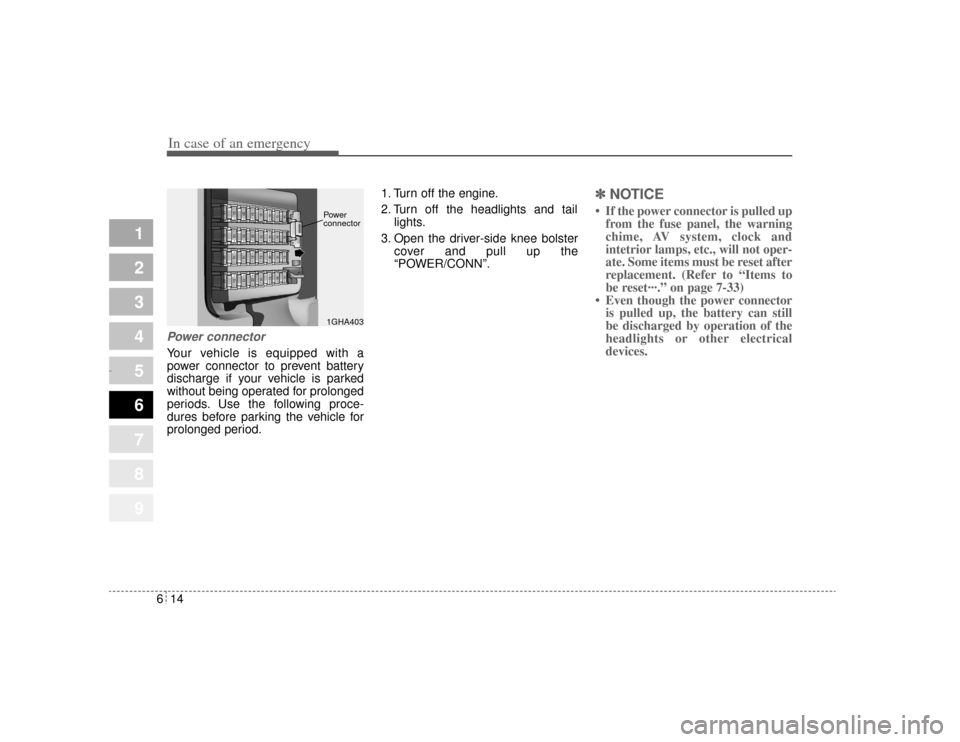
Power connectorYour vehicle is equipped with a
power connector to prevent battery
discharge if your vehicle is parked
without being operated for prolonged
periods. Use the following proce-
dures before parking the vehicle for
prolonged period. 1. Turn off the engine.
2. Turn off the headlights and tail
lights.
3. Open the driver-side knee bolster cover and pull up the
“POWER/CONN”.
✽ ✽NOTICE• If the power connector is pulled up
from the fuse panel, the warning
chime, AV system, clock and
intetrior lamps, etc., will not oper-
ate. Some items must be reset after
replacement. (Refer to “Items to
be reset···.” on page 7-33)
• Even though the power connector is pulled up, the battery can still
be discharged by operation of the
headlights or other electrical
devices.
1GHA403
Power
connector
Opirus CAN 6-1.qxd 7/8/03 2:22 PM Page 14
Page 228 of 296
615
In case of an emergency
1
2
3
4
5
6
7
8
9
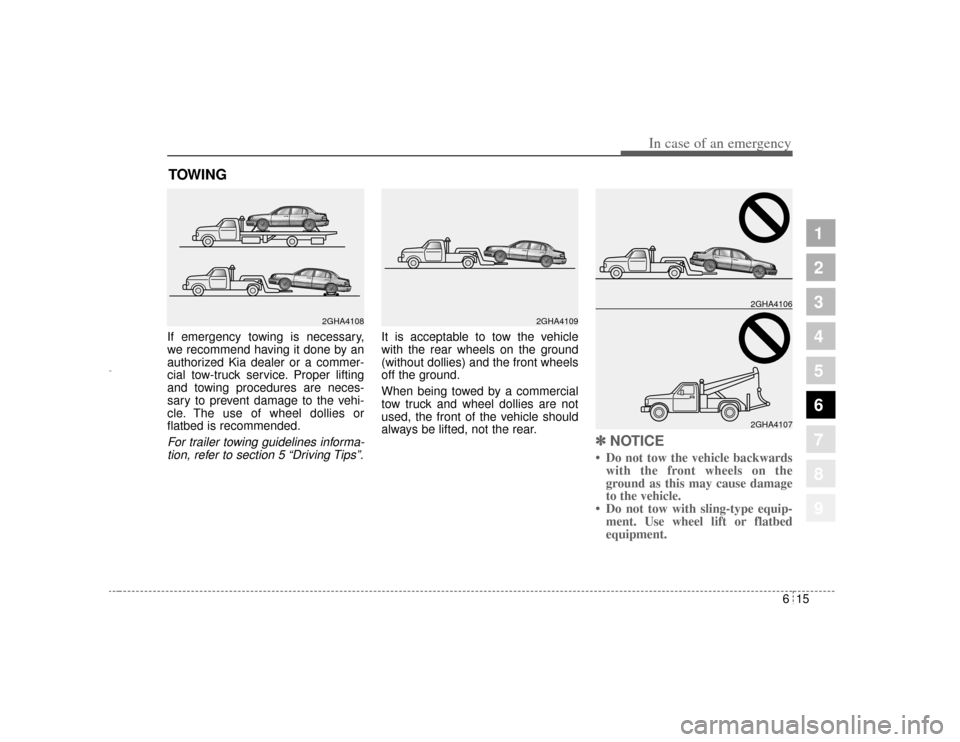
TOWING If emergency towing is necessary,
we recommend having it done by an
authorized Kia dealer or a commer-
cial tow-truck service. Proper lifting
and towing procedures are neces-
sary to prevent damage to the vehi-
cle. The use of wheel dollies or
flatbed is recommended.For trailer towing guidelines informa-tion, refer to section 5 “Driving Tips”.
It is acceptable to tow the vehicle
with the rear wheels on the ground
(without dollies) and the front wheels
off the ground.
When being towed by a commercial
tow truck and wheel dollies are not
used, the front of the vehicle should
always be lifted, not the rear.
✽ ✽
NOTICE• Do not tow the vehicle backwards
with the front wheels on the
ground as this may cause damage
to the vehicle.
• Do not tow with sling-type equip- ment. Use wheel lift or flatbed
equipment.
2GHA4107 2GHA4106
2GHA4108
2GHA4109
Opirus CAN 6-1.qxd 7/8/03 2:22 PM Page 15
Page 229 of 296
In case of an emergency16
6
1
2
3
4
5
6
7
8
9
When towing your vehicle in an
emergency without wheel dollies :
1. Set the ignition switch in the ACC
position.
2. Place the transaxle shift lever in N (Neutral).
3. Release the parking brake.✽ ✽ NOTICEFailure to place the transaxle shift
lever in N (Neutral) may cause
internal damage to the transaxle.
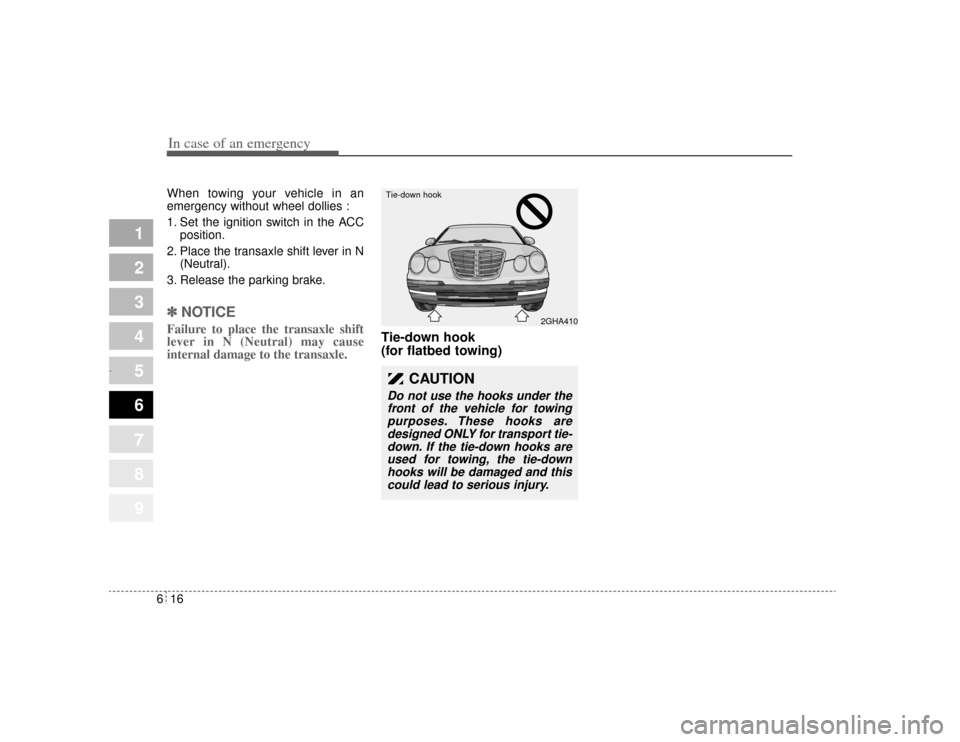
Tie-down hook
(for flatbed towing)
2GHA410
Tie-down hook
CAUTION
Do not use the hooks under the
front of the vehicle for towingpurposes. These hooks aredesigned ONLY for transport tie-down. If the tie-down hooks areused for towing, the tie-downhooks will be damaged and thiscould lead to serious injury.
Opirus CAN 6-1.qxd 7/8/03 2:22 PM Page 16
Page 230 of 296
617
In case of an emergency
1
2
3
4
5
6
7
8
9
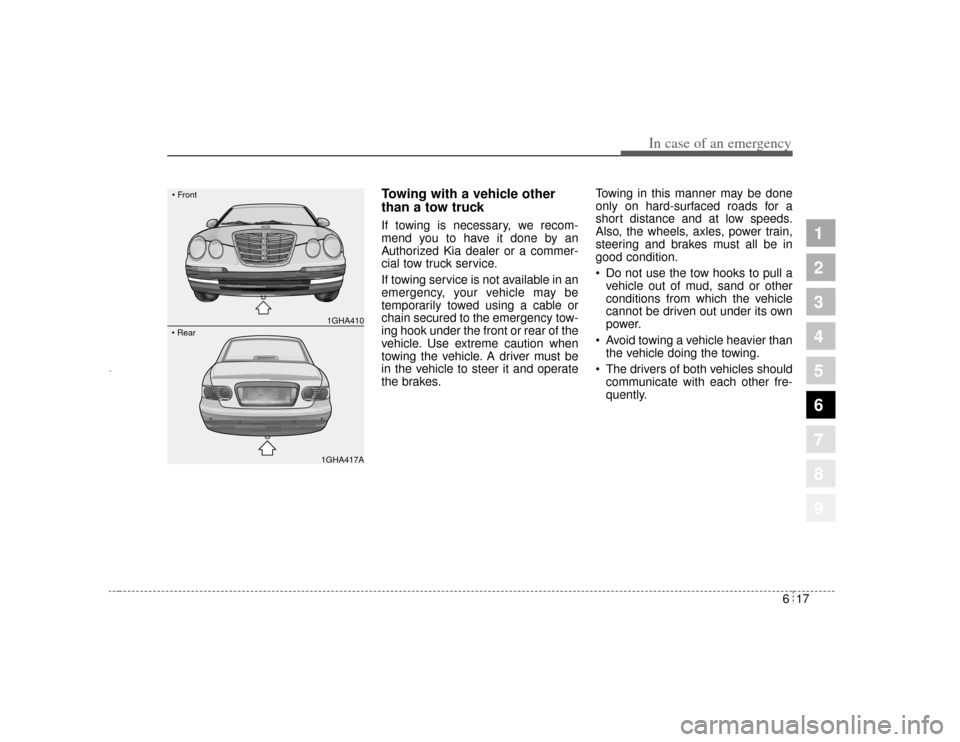
Towing with a vehicle other
than a tow truck If towing is necessary, we recom-
mend you to have it done by an
Authorized Kia dealer or a commer-
cial tow truck service.
If towing service is not available in an
emergency, your vehicle may be
temporarily towed using a cable or
chain secured to the emergency tow-
ing hook under the front or rear of the
vehicle. Use extreme caution when
towing the vehicle. A driver must be
in the vehicle to steer it and operate
the brakes.Towing in this manner may be done
only on hard-surfaced roads for a
short distance and at low speeds.
Also, the wheels, axles, power train,
steering and brakes must all be in
good condition.
Do not use the tow hooks to pull a
vehicle out of mud, sand or other
conditions from which the vehicle
cannot be driven out under its own
power.
Avoid towing a vehicle heavier than
the vehicle doing the towing.
The drivers of both vehicles should
communicate with each other fre-
quently.
1GHA410
Front1GHA417A
Rear
Opirus CAN 6-1.qxd 7/8/03 2:22 PM Page 17