instrument cluster KIA Optima Hybrid 2014 3.G Owner's Manual
[x] Cancel search | Manufacturer: KIA, Model Year: 2014, Model line: Optima Hybrid, Model: KIA Optima Hybrid 2014 3.GPages: 474, PDF Size: 12.73 MB
Page 10 of 474
H7
Starting the Hybrid System
1.Carry the smart key into the vehi-cle.
2.Make sure the parking brake is firmly applied.
3.Place the shift lever in the P(Park) position.
In N (neutral) position, the engine
(hybrid system) will not start.
4.Depress the brake pedal.
5.Press the engine start/stop button.
6.The engine should be started with- out pressing the accelerator. In
extremely cold weather or after the
vehicle has not been operated for
several days, let the engine warm
up without depressing the acceler-
ator.
• Even if the smart key is in thevehicle, it muse be within range of
the antenna before the engine
(hybrid system) will not start.
ton is in the ACC or ON position,
if any door is open, the system
checks for the smart key. If the
smart key is not in the vehicle, the
warning, "Key is not in vehicle"
will come on, and if all doors are
closed, the chime will also sound
for about 5 seconds. The indica-
tor will turn off while the vehicle is
moving. Keep the smart key in the
vehicle when using the ACC posi-
tion or if the vehicle engine is on. If the starting procedure is fol-
lowed, the "READY" symbol on
the instrument cluster will turn on.
For more details, Please check
chapter 5.
STARTING THE HYBRID VEHICLE (SMART KEY)
Page 32 of 474
25
Your vehicle at a glance
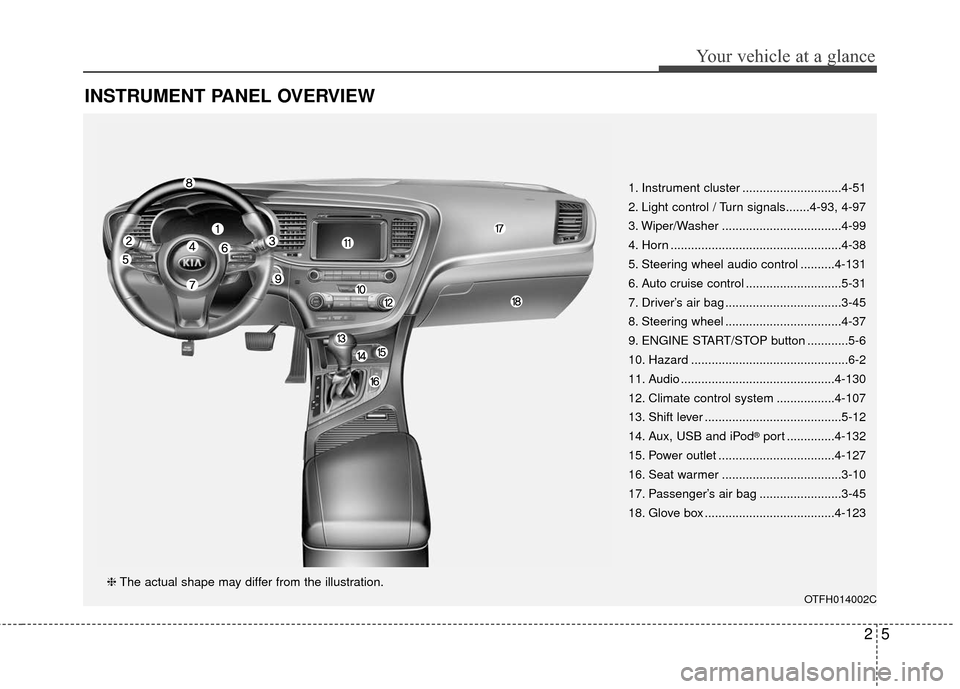
INSTRUMENT PANEL OVERVIEW
1. Instrument cluster .............................4-51
2. Light control / Turn signals.......4-93, 4-97
3. Wiper/Washer ...................................4-99
4. Horn ..................................................4-38
5. Steering wheel audio control ..........4-131
6. Auto cruise control ............................5-31
7. Driver’s air bag ..................................3-45
8. Steering wheel ..................................4-37
9. ENGINE START/STOP button ............5-6
10. Hazard ..............................................6-2
11. Audio .............................................4-130
12. Climate control system .................4-107
13. Shift lever ........................................5-12
14. Aux, USB and iPod
®port ..............4-132
15. Power outlet ..................................4-127
16. Seat warmer ...................................3-10
17. Passenger’s air bag ........................3-45
18. Glove box ......................................4-123
OTFH014002C
❈ The actual shape may differ from the illustration.
Page 92 of 474
Instrument cluster . . . . . . . . . . . . . . . . . . . . . . . . . 4-52
. . . . . . . . . . . . . . . . . . . . 4-52
. . . . . . . . . . . . . . . . . . . . . . . . . 4-53
. . . . . . . . . . . . . . . . . . . . . . . . . . . . . . . . . . . . \
. 4-53
. . . . . . . . . . . . . . . . . . . . . . 4-56
LCD Display . . . . . . . . . . . . . . . . . . . . . . . . . . . . . . 4-57
. . . . . . . . . . . . . . . . . . . . . . . . . . . . . . . . . 4-57
. . . . . . . . . . . . . . . . . . . . . 4-58
. . . . . . . . . . . . . . . . . . . . . . . . . . . . . . . . 4-61
. . . . . . . . . . . . . . . . . . . . . . . . . . . 4-62
. . . . . . . . . . . . . . . . . . . . . . . . . . . . 4-65
Trip computer . . . . . . . . . . . . . . . . . . . . . . . . . . . . . 4-74
. . . . . . . . . . . . . . . . . . . . . . . . . . . . . . . 4-74
. . . . . . . . . . . . . . . . . . . . . . . . . . . . . . . . . . . . \
4-76
. . . . . . . . . . . . . 4-77
Warning and indicator lights . . . . . . . . . . . . . . . . 4-78
. . . . . . . . . . . . . . . . . . . . . . . . . . . . . . . 4-78
. . . . . . . . . . . . . . . . . . . . . . . . . . . . . . 4-86
Back-Up Warning System . . . . . . . . . . . . . . . . . . . 4-88
. . . . . . . 4-88
System. . . . . . . . . . . . . . . . . . . . . . . . . . . . . . . . . . . . \
. 4-89
. . . . . . . . . . . 4-89
. . . . . . . . . . . . . . . . . . . . . . . . . . . . . . . . 4-90
Rear Camera Display. . . . . . . . . . . . . . . . . . . . . . . 4-91
Welcome system . . . . . . . . . . . . . . . . . . . . . . . . . . . 4-92
positon light). . . . . . . . . 4-92
. . . . . . . . . . . . . . . . . . 4-92
. . . . . . . . . . . . . . . . . . . . . . . . . . . . . . . . 4-92
Lighting . . . . . . . . . . . . . . . . . . . . . . . . . . . . . . . . . . 4-93\
. . . . . . . . . . . . . . . . . . . . . . 4-93
. . . . . . . . . . . . . . . . . . . . . . . . . 4-94
. . . . . . . . . . . . . . . . . . . . . . . . . . . . . . 4-94
. . . . . . . . . . . . 4-97
. . . . . . . . . . . . . . . . . . . . . . . . . . . . . . . 4-98
Wipers and washers . . . . . . . . . . . . . . . . . . . . . . . . 4-99
. . . . . . . . . . . . . . . . . . . . . . . . . . . . 4-99
Interior light . . . . . . . . . . . . . . . . . . . . . . . . . . . . . 4-102
. . . . . . . . . . . . . . . . . . . 4-102
. . . . . . . . . . . . . . . . . . . . . . . . . . . . . . . . . . 4-10\
2
. . . . . . . . . . . . . . . . . . . . . . . . . . . . . . . . . 4-103
. . . . . . . . . . . . . . . . . . . . . . . . . . . 4-104
. . . . . . . . . . . . . . . . . . . . . . . . . . . . . 4-105
. . . . . . . . . . . . . . . . . . . . . . . . . . 4-105
4
Page 141 of 474
451
Features of your vehicle
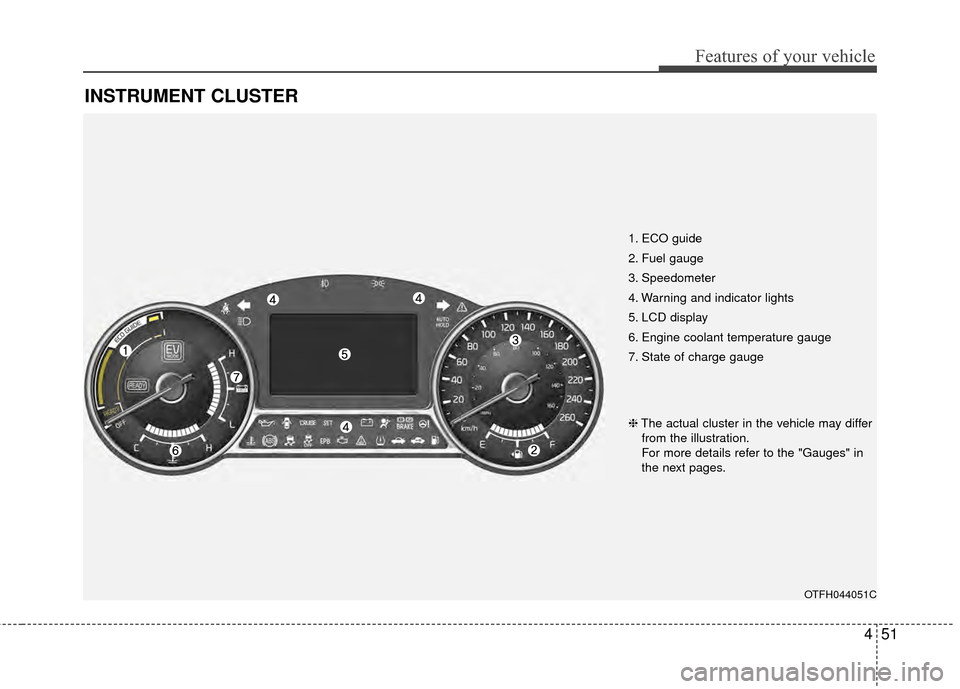
INSTRUMENT CLUSTER
1. ECO guide
2. Fuel gauge
3. Speedometer
4. Warning and indicator lights
5. LCD display
6. Engine coolant temperature gauge
7. State of charge gauge
OTFH044051C
❈The actual cluster in the vehicle may differ
from the illustration.
For more details refer to the "Gauges" in
the next pages.
Page 142 of 474
Features of your vehicle
52
4
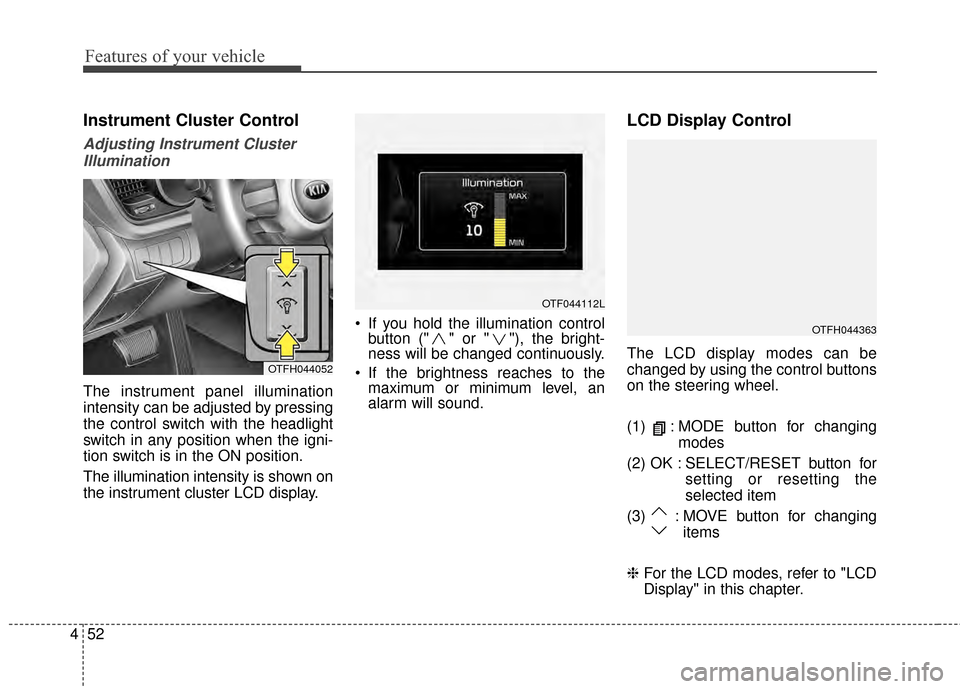
Instrument Cluster Control
Adjusting Instrument Cluster
Illumination
The instrument panel illumination
intensity can be adjusted by pressing
the control switch with the headlight
switch in any position when the igni-
tion switch is in the ON position.
The illumination intensity is shown on
the instrument cluster LCD display. If you hold the illumination control
button (" " or " "), the bright-
ness will be changed continuously.
If the brightness reaches to the maximum or minimum level, an
alarm will sound.
LCD Display Control
The LCD display modes can be
changed by using the control buttons
on the steering wheel.
(1) : MODE button for changing
modes
(2) OK : SELECT/RESET button for setting or resetting the
selected item
(3) : MOVE button for changing items
❈ For the LCD modes, refer to "LCD
Display" in this chapter.OTFH044052
OTF044112L
OTFH044363
Page 290 of 474
513
Driving your vehicle
For smooth operation, depress thebrake pedal when shifting from N(Neutral) to a forward or reversegear.
When stopped on an incline, do not
hold the vehicle with engine power.
Use the service brake or the parking
brake.
Transaxle ranges
The indicator light in the instrument
cluster displays the shift lever posi-
tion when the ignition switch is in the
ON position.
P (Park)
Always come to a complete stop
before shifting into P (Park). This
position locks the transaxle and pre-
vents the front wheels from rotating.
Shifting into P (Park) while the vehi-
cle is in motion will cause the drive
wheels to lock which will cause you
to lose control of the vehicle.CAUTION - Transaxle
To avoid damage to yourtransaxle, do not accelerate theengine in R (Reverse) or any for-ward gear position with thebrakes on. The transaxle may bedamaged if you shift into P(Park) while the vehicle is inmotion.
Page 305 of 474
Driving your vehicle
28
5
The VSM does not operate when:
Driving on bank road such as gra-
dient or incline
Driving rearward
ESC OFF indicator light ( ) remains on the instrument
cluster
EPS (Electronic Power Steering) indicator light remains on the
instrument cluster
VSM operation off
If you press the ESC OFF button to
turn off the ESC, the VSM will also
cancel and the ESC OFF indicator
light ( ) illuminates.
To turn on the VSM, press the button
again. The ESC OFF indicator light
goes out.
Malfunction indicator
The VSM can be deactivated even if
you don’t cancel the VSM operation
by pressing the ESC OFF button. It
indicates that a malfunction has
been detected somewhere in the
Electric Power Steering system or
VSM system. If the ESC indicator
light ( ) or EPS warning light
remains on, take your vehicle to an
authorized Kia dealer and have the
system checked.
The VSM is designed to functionabove approximately 9 mph (15
km/h) on curves.
The VSM is designed to function above approximately 18 mph (30
km/h) when a vehicle is braking on
a split-mu road. The split-mu road
is made of surfaces which have dif-
ferent friction forces. The Vehicle Stability Management
system is not a substitute for safe
driving practices but a supplemen-
tary function only. It is the respon-
sibility of the driver to always check
the speed and the distance to the
vehicle ahead. Always hold the
steering wheel firmly while driving.
Your vehicle is designed to react according to the driver’s intention,
even with installed VSM. Always
follow all the normal precautions
for driving at safe speeds for the
conditions – including driving in
inclement weather and on a slip-
pery road.
Page 308 of 474
531
Driving your vehicle
The cruise control system allows you
to program the vehicle to maintain a
constant speed without depressing
the accelerator pedal.
This system is designed to function
above approximately 40 km/h (25
mph).
If the cruise control is left on,
(CRUISE indicator light in the instru-
ment cluster illuminated) the cruise
control can be switched on acciden-
tally. Keep the cruise control system
off (CRUISE indicator light OFF)
when the cruise control is not in use,
to avoid inadvertently setting a
speed.
Use the cruise control system only
when traveling on open highways in
good weather.
Do not use the cruise control when
driving in heavy or varying traffic, or
on slippery (rainy, icy or snow-cov-
ered) or winding roads or over 6%
up-hill or down-hill roads.✽ ✽NOTICE
• During normal cruise control
operation, when the SET switch is
activated or reactivated after
applying the brakes, the cruise
control will energize after approx-
imately 3 seconds. This delay is
normal.
• To activate cruise control, depress the brake pedal at least once after
turning the ignition switch to the
ON position or starting the engine.
This is to check if the brake switch
which is important part to cancel
cruise control is in normal condi-
tion.
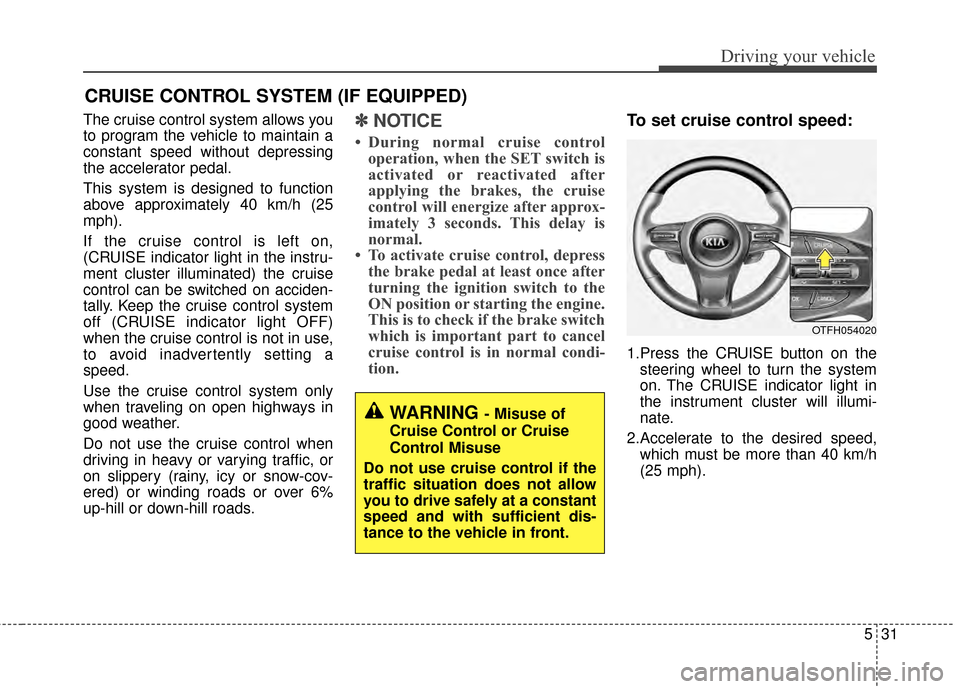
To set cruise control speed:
1.Press the CRUISE button on the
steering wheel to turn the system
on. The CRUISE indicator light in
the instrument cluster will illumi-
nate.
2.Accelerate to the desired speed, which must be more than 40 km/h
(25 mph).
CRUISE CONTROL SYSTEM (IF EQUIPPED)
WARNING - Misuse of
Cruise Control or Cruise
Control Misuse
Do not use cruise control if the
traffic situation does not allow
you to drive safely at a constant
speed and with sufficient dis-
tance to the vehicle in front.
OTFH054020
Page 309 of 474
Driving your vehicle
32
5
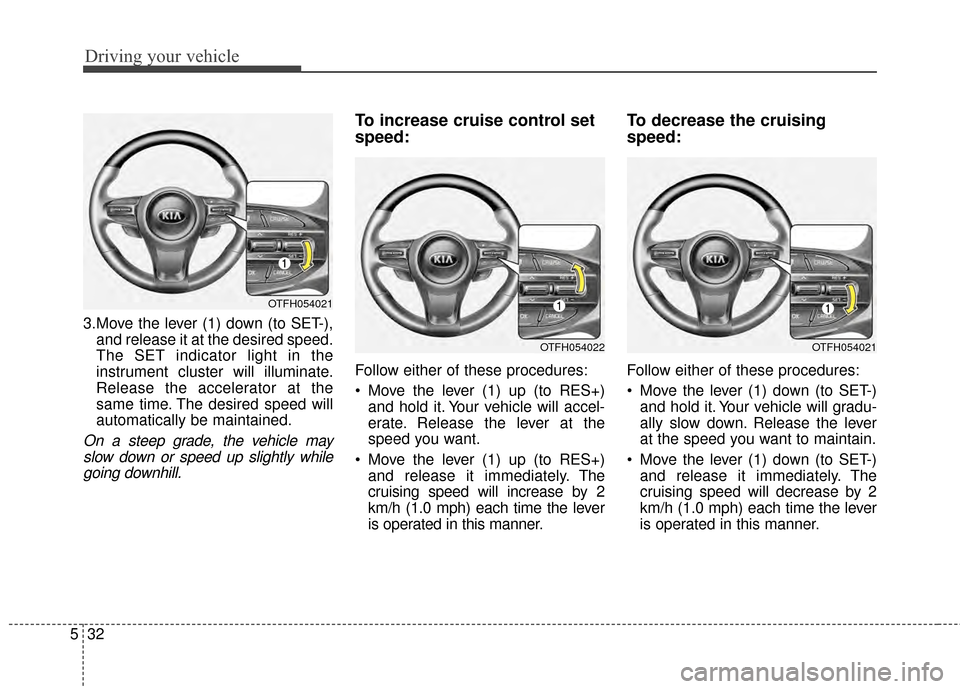
3.Move the lever (1) down (to SET-),
and release it at the desired speed.
The SET indicator light in the
instrument cluster will illuminate.
Release the accelerator at the
same time. The desired speed will
automatically be maintained.
On a steep grade, the vehicle mayslow down or speed up slightly whilegoing downhill.
To increase cruise control set
speed:
Follow either of these procedures:
Move the lever (1) up (to RES+) and hold it. Your vehicle will accel-
erate. Release the lever at the
speed you want.
Move the lever (1) up (to RES+) and release it immediately. The
cruising speed will increase by 2
km/h (1.0 mph) each time the lever
is operated in this manner.
To decrease the cruising
speed:
Follow either of these procedures:
Move the lever (1) down (to SET-)and hold it. Your vehicle will gradu-
ally slow down. Release the lever
at the speed you want to maintain.
Move the lever (1) down (to SET-) and release it immediately. The
cruising speed will decrease by 2
km/h (1.0 mph) each time the lever
is operated in this manner.
OTFH054021
OTFH054022OTFH054021
Page 311 of 474
Driving your vehicle
34
5
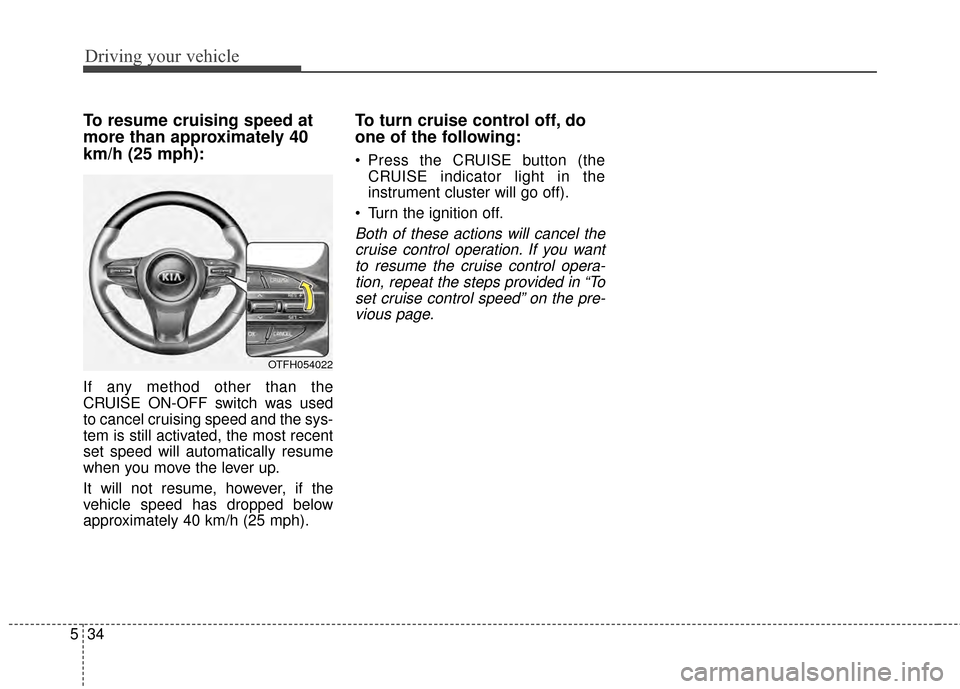
To resume cruising speed at
more than approximately 40
km/h (25 mph):
If any method other than the
CRUISE ON-OFF switch was used
to cancel cruising speed and the sys-
tem is still activated, the most recent
set speed will automatically resume
when you move the lever up.
It will not resume, however, if the
vehicle speed has dropped below
approximately 40 km/h (25 mph).
To turn cruise control off, do
one of the following:
Press the CRUISE button (the
CRUISE indicator light in the
instrument cluster will go off).
Turn the ignition off.
Both of these actions will cancel the cruise control operation. If you wantto resume the cruise control opera-tion, repeat the steps provided in “Toset cruise control speed” on the pre-vious page.
OTFH054022