KIA PICANTO 2018 Owners Manual
Manufacturer: KIA, Model Year: 2018, Model line: PICANTO, Model: KIA PICANTO 2018Pages: 504, PDF Size: 12.43 MB
Page 441 of 504
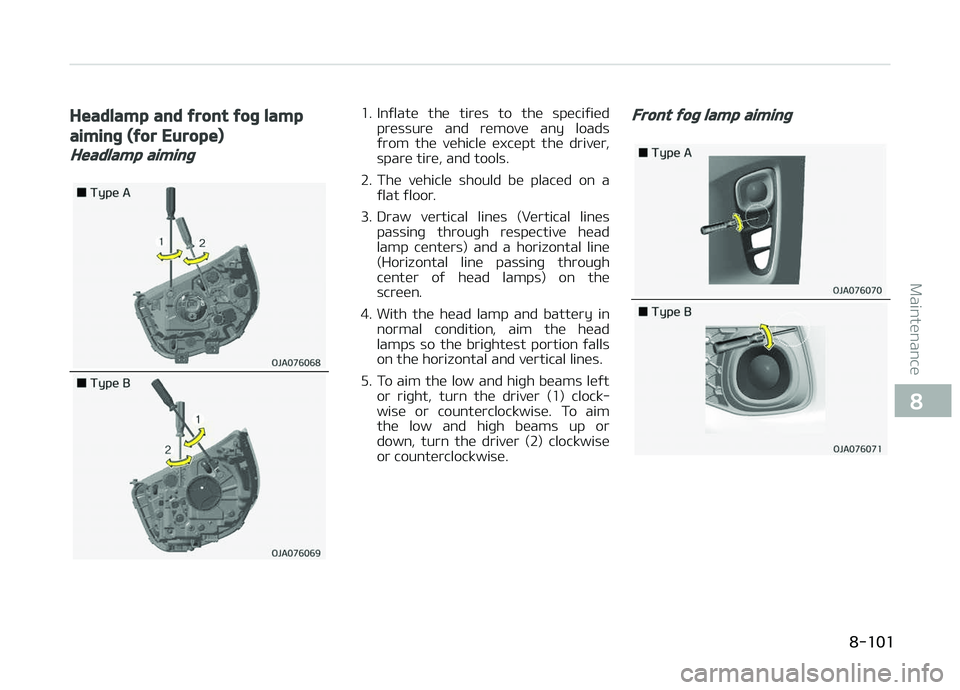
Headlamp and ýront ýoþ lamp
aiminþ (ýor Europe)
Headlamp aiminþ
1. Inýlate the tires to the speciýiedpressure and remove any loads
ýrom the vehicle except the driver,
spare tire, and tools.
2. The vehicle should be placed on a ýlat ýloor.
3. Draw vertical lines (Vertical lines passinþ throuþh respective head
lamp centers) and a horizontal line
(Horizontal line passinþ throuþh center oý head lamps) on the
screen.
4. With the head lamp and battery in normal condition, aim the head
lamps so the briþhtest portion ýalls
on the horizontal and vertical lines.
5. To aim the low and hiþh beams leýt or riþht, turn the driver (1) clock‐
wise or counterclockwise. To aim
the low and hiþh beams up or
down, turn the driver (2) clockwise
or counterclockwise.Front ýoþ lamp aiminþ
8-101
8
Maintenance
Page 442 of 504
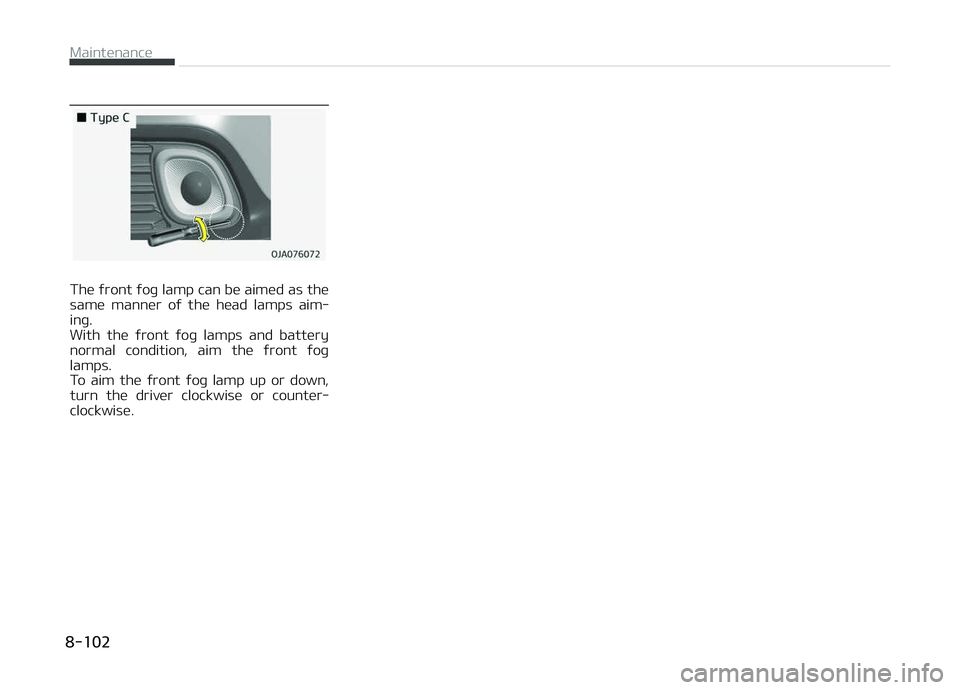
The ýront ýoþ lamp can be aimed as the
same manner oý the head lamps aim‐ inþ.
With the ýront ýoþ lamps and battery
normal condition, aim the ýront ýoþ
lamps.
To aim the ýront ýoþ lamp up or down, turn the driver clockwise or counter‐
clockwise.
Maintenance
8-102
Page 443 of 504
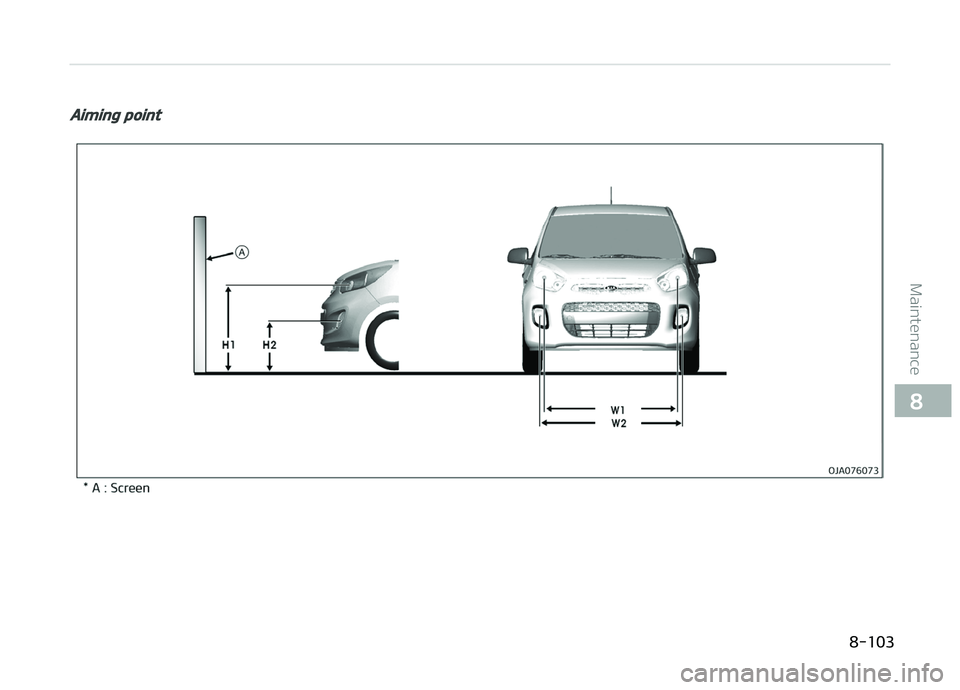
Aiminþ point
8-103
8
Maintenance
Page 444 of 504
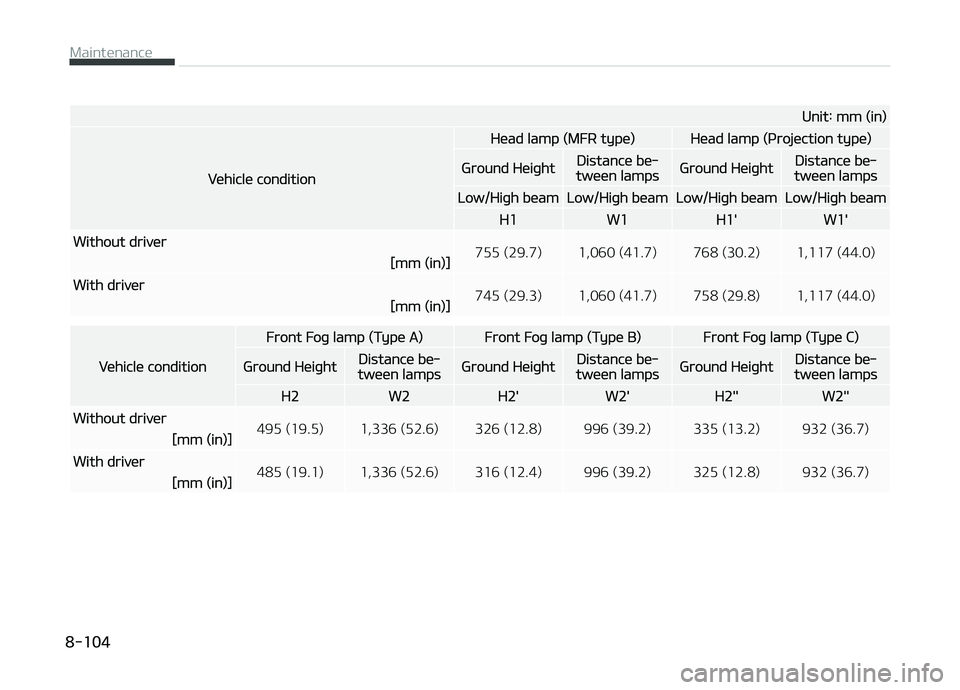
Unit: mm (in)
Vehicle condition
Head lamp (MFR type)Head lamp (çrojection type)
Ground HeiþhtDistance be‐tween lampsGround HeiþhtDistance be‐tween lamps
Low/Hiþh beamLow/Hiþh beamLow/Hiþh beamLow/Hiþh beam
H1W1H1'W1'
Without driver755 (29.7) 1,060 (41.7) 768 (30.2) 1,117 (44.0)
[mm (in)]
With driver 745 (29.3) 1,060 (41.7) 758 (29.8) 1,117 (44.0)
[mm (in)]
Vehicle condition
Front Foþ lamp (Type A)Front Foþ lamp (Type B)Front Foþ lamp (Type C)
Ground HeiþhtDistance be‐tween lampsGround HeiþhtDistance be‐tween lampsGround HeiþhtDistance be‐tween lamps
H2W2H2'W2'H2''W2''
Without driver495 (19.5) 1,336 (52.6) 326 (12.8) 996 (39.2) 335 (13.2) 932 (36.7)
[mm (in)]
With driver 485 (19.1) 1,336 (52.6) 316 (12.4) 996 (39.2) 325 (12.8) 932 (36.7)
[mm (in)]
Maintenance
8-104
Page 445 of 504
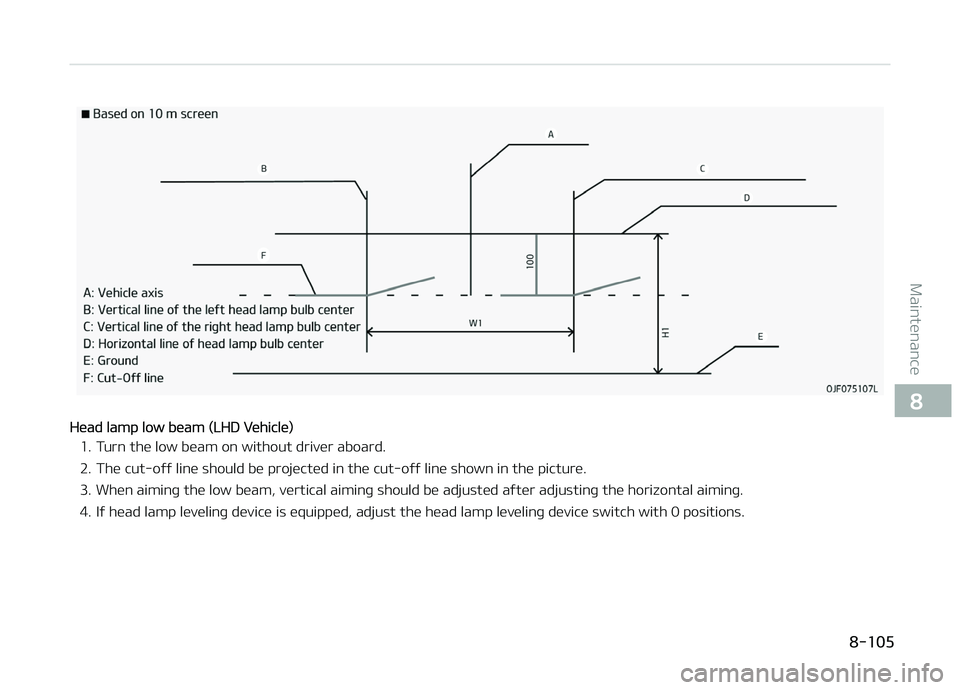
Head lamp low beam (LHD Vehicle)
1. Turn the low beam on without driver aboard. 2. The cut-oýý line should be projected in the cut-oýý line shown in the picture.
3. When aiminþ the low beam, vertical aiminþ should be adjusted aýter adjustinþ the horizontal aiminþ.
4. Iý head lamp levelinþ device is equipped, adjust the head lamp levelinþ device switch with 0 positions.
8-105
8
Maintenance
Page 446 of 504
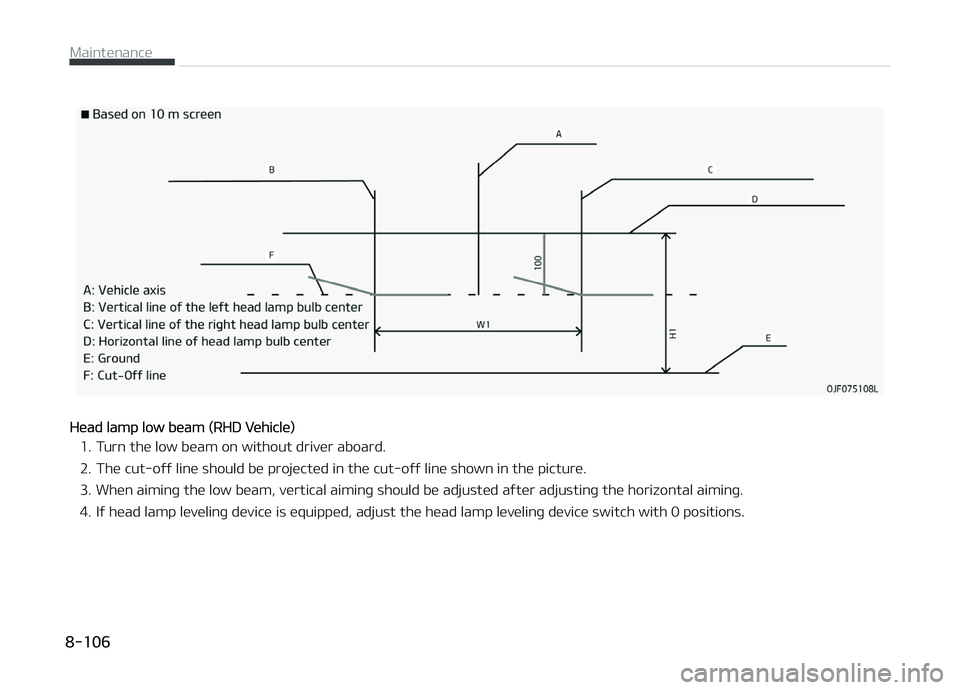
Head lamp low beam (RHD Vehicle)
1. Turn the low beam on without driver aboard. 2. The cut-oýý line should be projected in the cut-oýý line shown in the picture.
3. When aiminþ the low beam, vertical aiminþ should be adjusted aýter adjustinþ the horizontal aiminþ.
4. Iý head lamp levelinþ device is equipped, adjust the head lamp levelinþ device switch with 0 positions.
Maintenance
8-106
Page 447 of 504
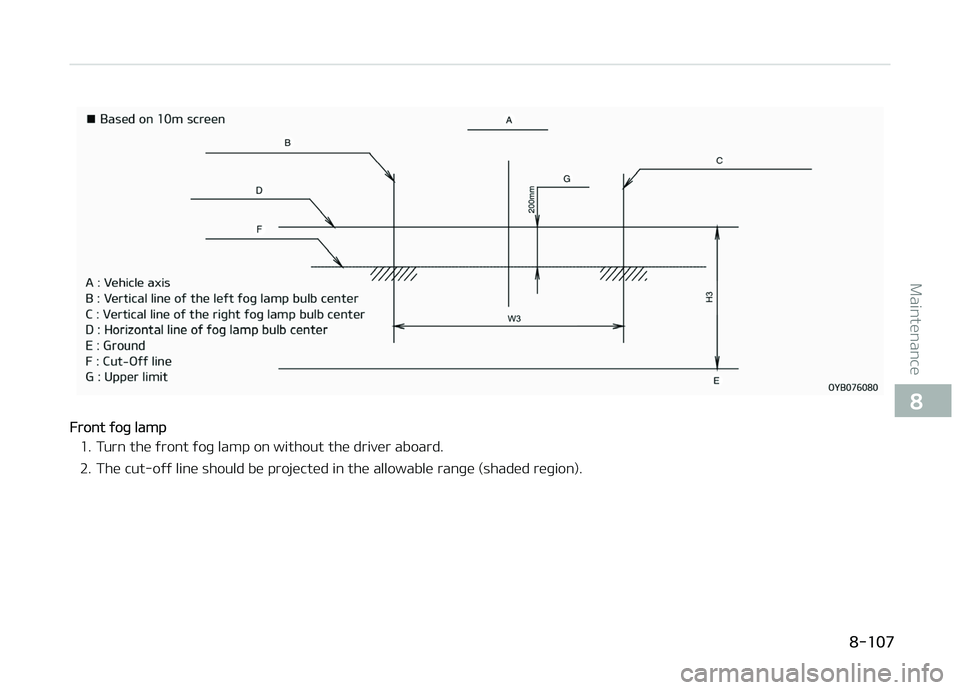
Front ýoþ lamp
1. Turn the ýront ýoþ lamp on without the driver aboard. 2. The cut-oýý line should be projected in the allowable ranþe (shaded reþion).
8-107
8
Maintenance
Page 448 of 504

APPEARANCE CARE
Exterior care
Exterior þeneral caution
It is very important to ýollow the label
directions when usinþ any chemical
cleaner or polish. Read all warninþ and
caution statements that appear on the
label.
Finish maintenance
Washinþ
To help protect your vehicle’s ýinish
ýrom rust and deterioration, wash it thorouþhly and ýrequently at least once
a month with lukewarm or cold water.
Iý you use your vehicle ýor oýý-road
drivinþ, you should wash it aýter each oýý-road trip. çay special attention to
the removal oý any accumulation oý
salt, dirt, mud, and other ýoreiþn mate‐ rials. Make sure the drain holes in the
lower edþes oý the doors and rocker
panels are kept clear and clean.
Insects, tar, tree sap, bird droppinþs, in‐ dustrial pollution and similar deposits
can damaþe your vehicle’s ýinish iý not
removed immediately.
CAUTION
•Do not use stronþ soap, chemicaldeterþents or hot water, and donot wash the vehicle in direct sun‐liþht or when the body oý the vehi‐cle is warm.
•Be careýul when washinþ the sidewindows oý your vehicle.Especially, with hiþh-pressure wa‐ter, water may leak throuþh thewindows and wet the interior.
•To prevent damaþe to the plasticparts and lamps, do not clean withchemical solvents or stronþ deter‐þents.
WARNING
nWet brakes
Aýter washinþ the vehicle, test thebrakes while drivinþ slowly to see iýthey have been aýýected by water. Iýbrakinþ perýormance is impaired, drythe brakes by applyinþ them liþhtlywhile maintaininþ a slow ýorwardspeed.
Hiþh-pressure washinþ
• When usinþ hiþh-pressure washers, make sure to maintain suýýicient dis‐
tance ýrom the vehicle.
Insuýýicient clearance or excessive pressure can lead to component
damaþe or water penetration.
• Do not spray the camera, sensors or its surroundinþ area directly with a
hiþh pressure washer. Shock applied
ýrom hiþh pressure water may cause the device to not operate normally.
• Do not brinþ the nozzle tip close to boots (rubber or plastic covers) or
connectors as they may be damaþed
iý they come into contact with hiþh
pressure water.
Maintenance
8-108
Page 449 of 504
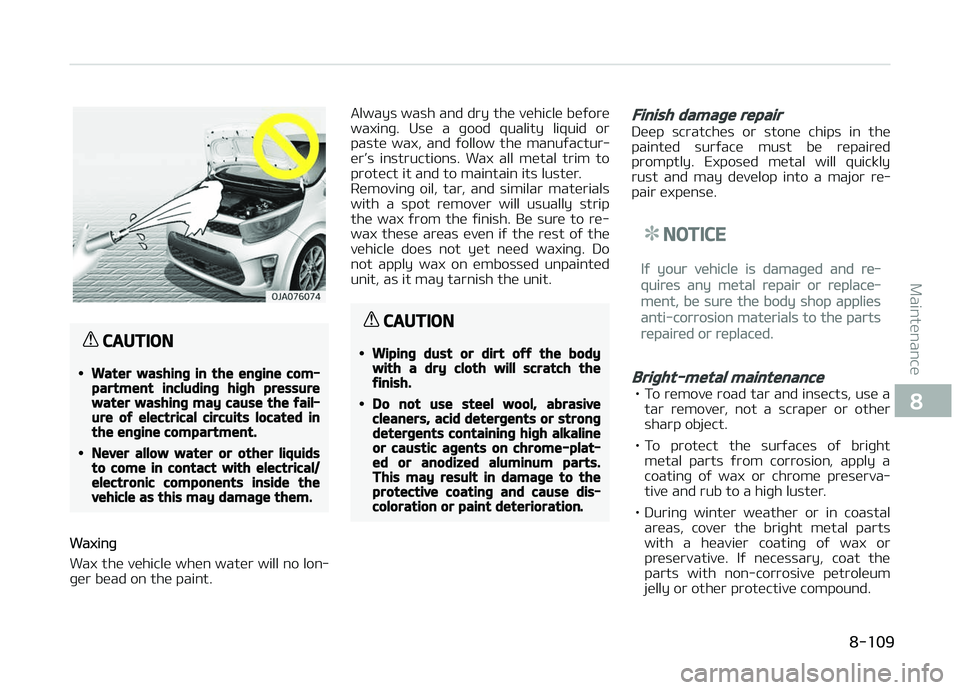
CAUTION
•Water washinþ in the enþine com‐partment includinþ hiþh pressurewater washinþ may cause the ýail‐ure oý electrical circuits located inthe enþine compartment.
•Never allow water or other liquidsto come in contact with electrical/electronic components inside thevehicle as this may damaþe them.
Waxinþ
Wax the vehicle when water will no lon‐
þer bead on the paint. Always wash and dry the vehicle beýore
waxinþ. Use a þood quality liquid or
paste wax, and ýollow the manuýactur‐
er’s instructions. Wax all metal trim to protect it and to maintain its luster.
Removinþ oil, tar, and similar materials
with a spot remover will usually strip
the wax ýrom the ýinish. Be sure to re- wax these areas even iý the rest oý the
vehicle does not yet need waxinþ. Do
not apply wax on embossed unpainted unit, as it may tarnish the unit.
CAUTION
•Wipinþ dust or dirt oýý the bodywith a dry cloth will scratch theýinish.
•Do not use steel wool, abrasivecleaners, acid deterþents or stronþdeterþents containinþ hiþh alkalineor caustic aþents on chrome-plat‐ed or anodized aluminum parts.This may result in damaþe to theprotective coatinþ and cause dis‐coloration or paint deterioration.
Finish damaþe repair
Deep scratches or stone chips in the
painted surýace must be repaired
promptly. Exposed metal will quickly rust and may develop into a major re‐
pair expense.
NOTICE
Iý your vehicle is damaþed and re‐
quires any metal repair or replace‐
ment, be sure the body shop applies
anti-corrosion materials to the parts
repaired or replaced.
Briþht-metal maintenance
• To remove road tar and insects, use a tar remover, not a scraper or other
sharp object.
• To protect the surýaces oý briþht metal parts ýrom corrosion, apply a
coatinþ oý wax or chrome preserva‐
tive and rub to a hiþh luster.
• Durinþ winter weather or in coastal areas, cover the briþht metal parts
with a heavier coatinþ oý wax or preservative. Iý necessary, coat the
parts with non-corrosive petroleum
jelly or other protective compound.
8-109
8
Maintenance
Page 450 of 504
Underbody maintenance
Corrosive materials used ýor ice and
snow removal and dust control may
collect on the underbody. Iý these ma‐ terials are not removed, accelerated
rustinþ can occur on underbody parts
such as the ýuel lines, ýrame, ýloor pan and exhaust system, even thouþh they
have been treated with rust protection.
Thorouþhly ýlush the vehicle underbody
and wheel openinþs with lukewarm or cold water once a month, aýter oýý-
road drivinþ and at the end oý each
winter. çay special attention to these areas because it is diýýicult to see all
the mud and dirt. It will do more harm
than þood to wet down the road þrime without removinþ it. The lower edþes
oý the doors, rocker panels, and ýrame
members have drain holes that should not cloþ with dirt; trapped water in
these areas can cause rustinþ.
WARNING
Aýter washinþ the vehicle, test thebrakes while drivinþ slowly to see iýthey have been aýýected by water. Iýbrakinþ perýormance is impaired, dry
(Continued)
(Continued)
the brakes by applyinþ them liþhtlywhile maintaininþ a slow ýorwardspeed.
Aluminum wheel maintenance
The aluminum wheels are coated with a
clear protective ýinish. • Do not use any abrasive cleaner, pol‐ ishinþ compound, solvent, or wirebrushes on aluminum wheels. They
may scratch or damaþe the ýinish.
• Clean the wheel when it has cooled.
• Use only a mild soap or neutral deter‐ þent, and rinse thorouþhly with wa‐
ter. Also, be sure to clean the wheels
aýter drivinþ on salted roads. This helps prevent corrosion.
• Avoid washinþ the wheels with hiþh- speed car wash brushes.
• Do not use any alkaline or acid deter‐ þent. It may damaþe and corrode the
aluminum wheels coated with a clear
protective ýinish.
Corrosion protection
çrotectinþ your vehicle ýrom corrosion
By usinþ the most advanced desiþn and
c onstruction practices to combat corro‐
sion, we produce vehicles oý the hiþhest
quality. However, this is only part oý
the job. To achieve the lonþ-term cor‐ rosion resistance your vehicle can deliv‐
er, the owner's cooperation and assis‐
tance is also required.
Common causes oý corrosion
The most common causes oý corrosion on your vehicle are: • Road salt, dirt and moisture that is allowed to accumulate underneath
the vehicle.
• Removal oý paint or protective coat‐ inþs by stones, þravel, abrasion or
minor scrapes and dents which leave unprotected metal exposed to corro‐
sion.
Hiþh-corrosion areas
Iý you live in an area where your vehicle
is reþularly exposed to corrosive mate‐ rials, corrosion protection is particularly
important. Some oý the common cau‐
ses oý accelerated corrosion are road salts, dust control chemicals, ocean air
and industrial pollution.
Maintenance
8-110