KIA Rio 2005 2.G Owner's Manual
Manufacturer: KIA, Model Year: 2005, Model line: Rio, Model: KIA Rio 2005 2.GPages: 238, PDF Size: 2.6 MB
Page 211 of 238
Tire Size Designation
A tire’s sidewall is marked with a tire size designation.
You will need this information when selecting
replacement tires for your car. The following explains
what the letters and numbers in the tire size
designation mean.
Example tire size designation: P175/70R13 82T
P– Applicable vehicle type (tires marked with the
prefix “P’’ are intended for use on passenger cars;
however, not all tires have this marking).
175– Tire width in millimeters.
65– Aspect Ratio. The tire’s section height as a
percentage of tire width.
7-39
R– Tire construction code (radial).
14– Rim diameter in inches.
81– Load Index; A numerical code associated with the
maximum load the tire can carry.
T– Speed Rating Symbol. See the speed rating chart
in this section for additional information.
Wheel Size Designation
Wheels are also marked with important information
that you need if you ever need to replace one. The
following explains what the letters and numbers in the
wheel size designation mean.
Example wheel size designation: 14 x 5.5J
14– Rim diameter in inches.
5.5– Rim width in inches.
J– Rim contour designation.
CAUTION
A wheel that is not the correct size may adversely
affect wheel and bearing life, braking and
stopping abilities, handling characteristics,
ground clearance, body-to-tire clearance, snow
chain clearance, speedometer calibration,
headlight aim and bumper height.
RIO ENG CNA 7-2.qxd 7/29/05 5:18 PM Page 39
Page 212 of 238
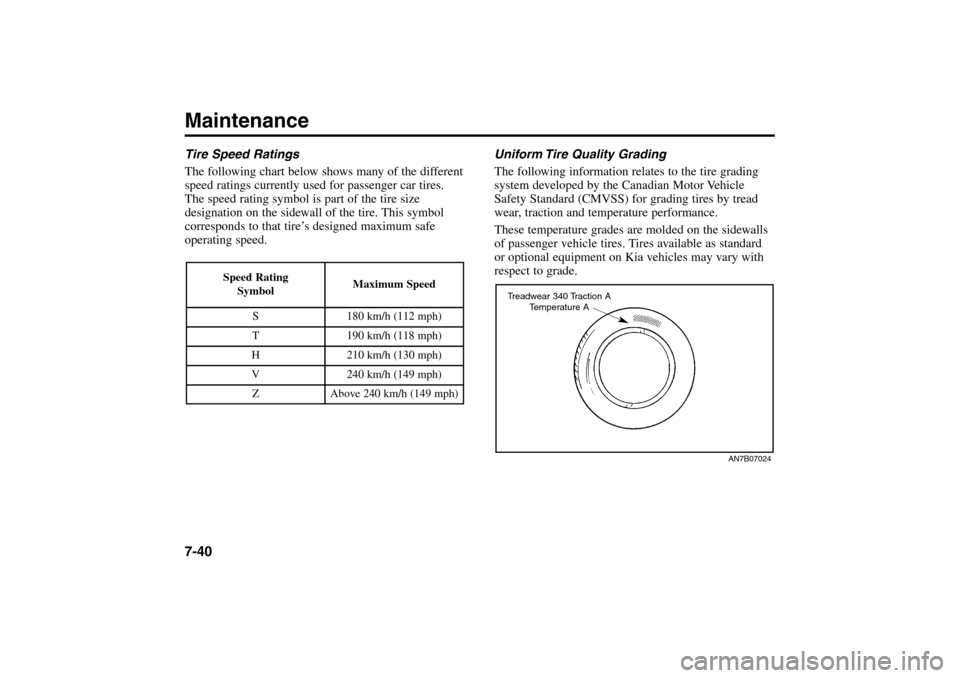
Uniform Tire Quality Grading
The following information relates to the tire grading
system developed by the Canadian Motor Vehicle
Safety Standard (CMVSS) for grading tires by tread
wear, traction and temperature performance.
These temperature grades are molded on the sidewalls
of passenger vehicle tires. Tires available as standard
or optional equipment on Kia vehicles may vary with
respect to grade.
Maintenance7-40Tire Speed Ratings
The following chart below shows many of the different
speed ratings currently used for passenger car tires.
The speed rating symbol is part of the tire size
designation on the sidewall of the tire. This symbol
corresponds to that tire’s designed maximum safe
operating speed.
Speed Rating
Symbol
Maximum Speed
S
180 km/h (112 mph)
T
190 km/h (118 mph)
H
210 km/h (130 mph)
V
240 km/h (149 mph)
Z
Above 240 km/h (149 mph)
AN7B07024
Treadwear 340 Traction A
Temperature A
RIO ENG CNA 7-2.qxd 7/29/05 5:18 PM Page 40
Page 213 of 238
Temperature – A, B and C
The temperature grades are A (the highest), B and C,
representing the tire’s resistance to generate heat and to
dissipate heat when tested under controlled conditions
on a specified indoor laboratory test wheel. Sustained
high temperatures can cause the material of the tire to
degenerate and reduce tire life, and excessive
temperature can lead to sudden tire failure. Grade C
corresponds to a level of performance that all
passenger vehicle tires must meet under the Canadian
Motor Vehicle Safety Standard No. 109. Grades A and
B represent higher levels of performance on the
laboratory test wheel than the maximum required by
law.
7-41
Tread Wear
The tread wear grade is a comparative rating based on
the wear rate of the tire when tested under controlled
conditions on a specified government test course. For
example, a tire graded 150 would wear one-and-a-half
times as well on the government course as a tire
graded 100.
The relative performance of tires depends upon the
actual conditions of their use. Variations in driving
habits, service practices and differences in road
characteristics and climate may significantly affect
performance.
Traction – A, B and C
The traction grades, from highest to lowest, are A, B
and C, and they represent the tire’s ability to stop on
wet pavement as measured under controlled conditions
on specified government test surfaces of asphalt and
concrete. A tire marked C may have poor traction
performance.
WARNING -Tire Temperature
The temperature grade for a tire is established
for a tire that is properly inflated and not
overloaded. Excessive speed, underinflation, or
excessive loading, either separately or in
combination, can cause heat build-up and
possible sudden tire failure. This can cause loss
of vehicle control and death or personal injury.
RIO ENG CNA 7-2.qxd 7/29/05 5:18 PM Page 41
Page 214 of 238
Maintenance7-42
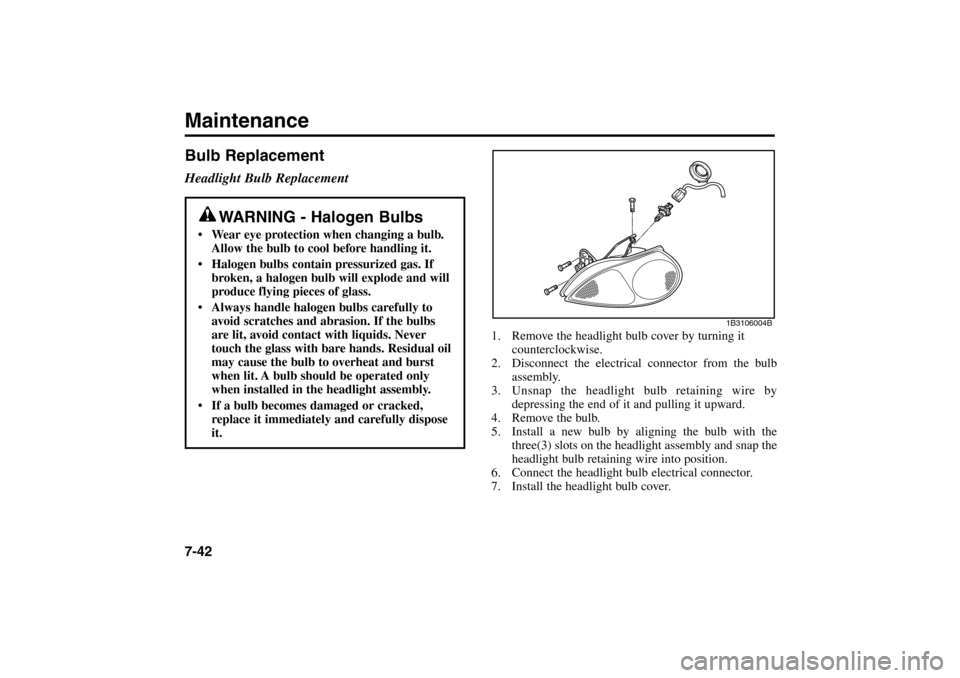
1. Remove the headlight bulb cover by turning it
counterclockwise.
2. Disconnect the electrical connector from the bulb
assembly.
3. Unsnap the headlight bulb retaining wire by
depressing the end of it and pulling it upward.
4. Remove the bulb.
5. Install a new bulb by aligning the bulb with the
three(3) slots on the headlight assembly and snap the
headlight bulb retaining wire into position.
6. Connect the headlight bulb electrical connector.
7. Install the headlight bulb cover.
Bulb ReplacementHeadlight Bulb Replacement
WARNING - Halogen Bulbs
Wear eye protection when changing a bulb.
Allow the bulb to cool before handling it.
Halogen bulbs contain pressurized gas. If
broken, a halogen bulb will explode and will
produce flying pieces of glass.
Always handle halogen bulbs carefully to
avoid scratches and abrasion. If the bulbs
are lit, avoid contact with liquids. Never
touch the glass with bare hands. Residual oil
may cause the bulb to overheat and burst
when lit. A bulb should be operated only
when installed in the headlight assembly.
If a bulb becomes damaged or cracked,
replace it immediately and carefully dispose
it.
1B3106004B
RIO ENG CNA 7-2.qxd 7/29/05 5:18 PM Page 42
Page 215 of 238
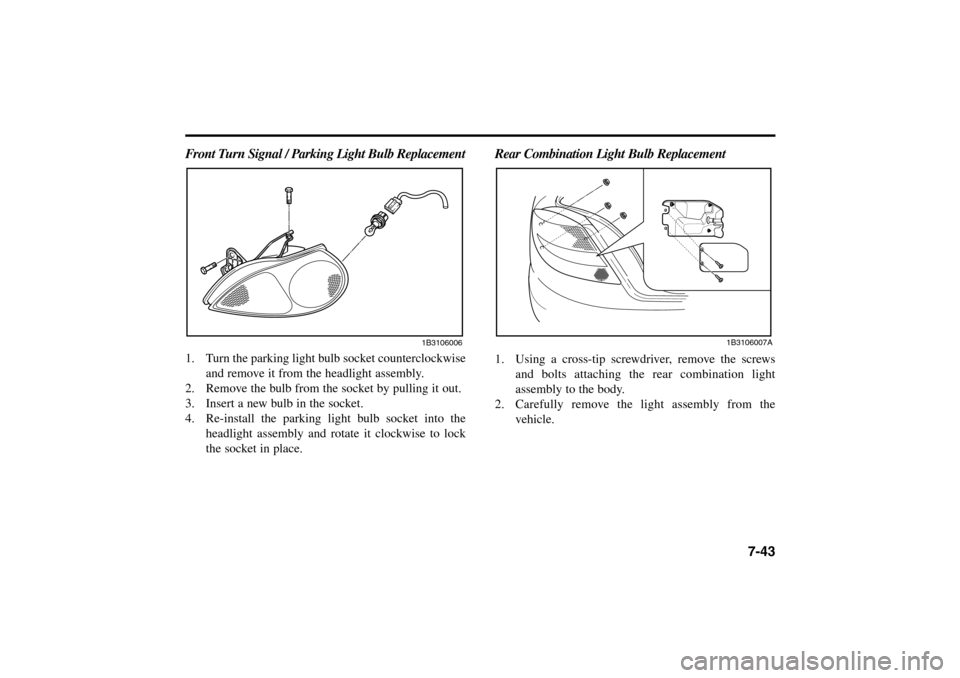
7-43 Front Turn Signal / Parking Light Bulb Replacement
1. Turn the parking light bulb socket counterclockwise
and remove it from the headlight assembly.
2. Remove the bulb from the socket by pulling it out.
3. Insert a new bulb in the socket.
4. Re-install the parking light bulb socket into the
headlight assembly and rotate it clockwise to lock
the socket in place.
1B3106006
Rear Combination Light Bulb Replacement1. Using a cross-tip screwdriver, remove the screws
and bolts attaching the rear combination light
assembly to the body.
2. Carefully remove the light assembly from the
vehicle.
1B3106007A
RIO ENG CNA 7-2.qxd 7/29/05 5:18 PM Page 43
Page 216 of 238
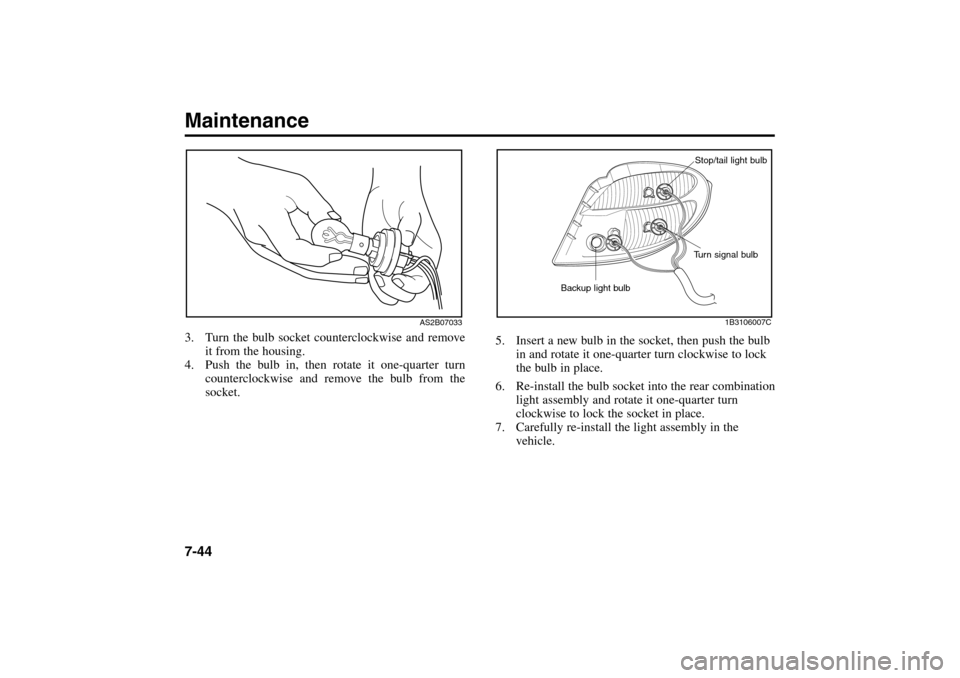
5. Insert a new bulb in the socket, then push the bulb
in and rotate it one-quarter turn clockwise to lock
the bulb in place.
6. Re-install the bulb socket into the rear combination
light assembly and rotate it one-quarter turn
clockwise to lock the socket in place.
7. Carefully re-install the light assembly in the
vehicle.
Maintenance7-44
AS2B07033
3. Turn the bulb socket counterclockwise and remove
it from the housing.
4. Push the bulb in, then rotate it one-quarter turn
counterclockwise and remove the bulb from the
socket.
1B3106007C
Turn signal bulbStop/tail light bulb
Backup light bulb
RIO ENG CNA 7-2.qxd 7/29/05 5:18 PM Page 44
Page 217 of 238
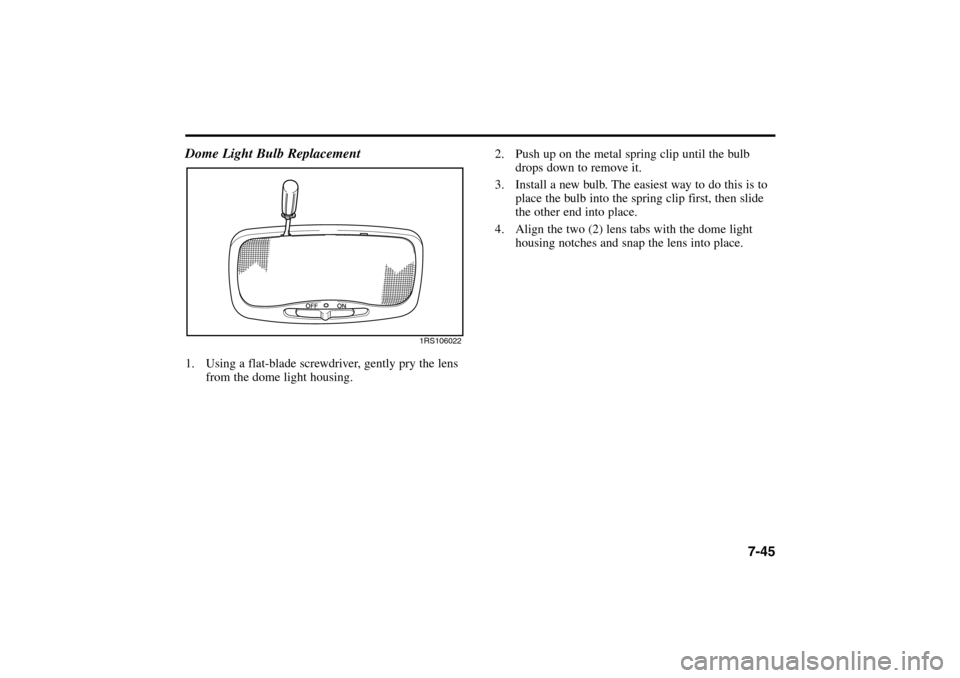
7-45
2. Push up on the metal spring clip until the bulb
drops down to remove it.
3. Install a new bulb. The easiest way to do this is to
place the bulb into the spring clip first, then slide
the other end into place.
4. Align the two (2) lens tabs with the dome light
housing notches and snap the lens into place.
Dome Light Bulb Replacement1. Using a flat-blade screwdriver, gently pry the lens
from the dome light housing.
1RS106022
RIO ENG CNA 7-2.qxd 7/29/05 5:18 PM Page 45
Page 218 of 238
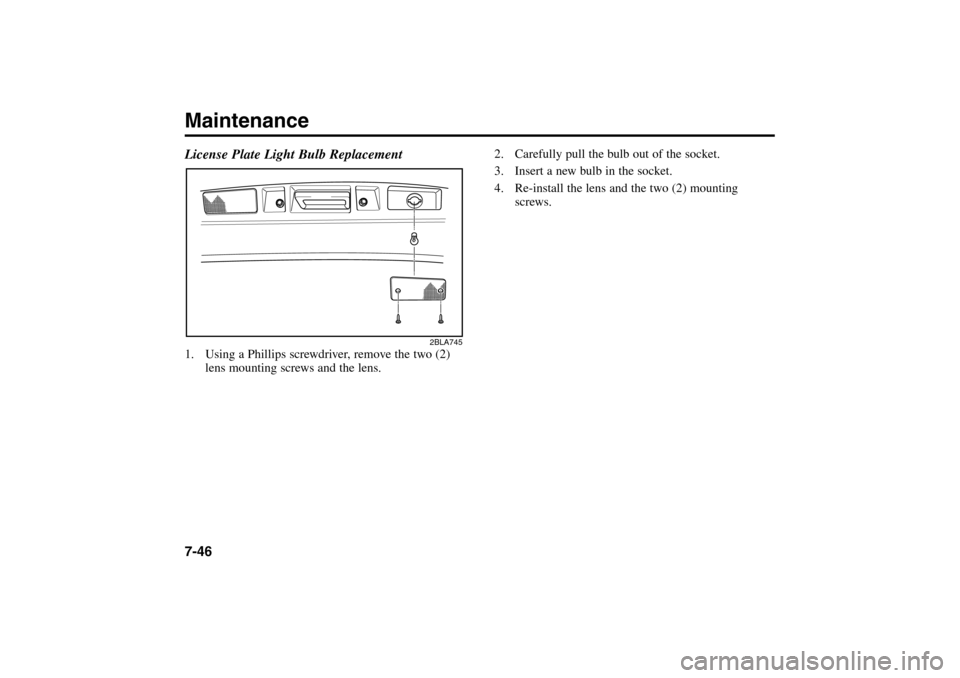
License Plate Light Bulb Replacement1. Using a Phillips screwdriver, remove the two (2)
lens mounting screws and the lens.Maintenance7-46
2. Carefully pull the bulb out of the socket.
3. Insert a new bulb in the socket.
4. Re-install the lens and the two (2) mounting
screws.
2BLA745
RIO ENG CNA 7-2.qxd 7/29/05 5:18 PM Page 46
Page 219 of 238
7-47
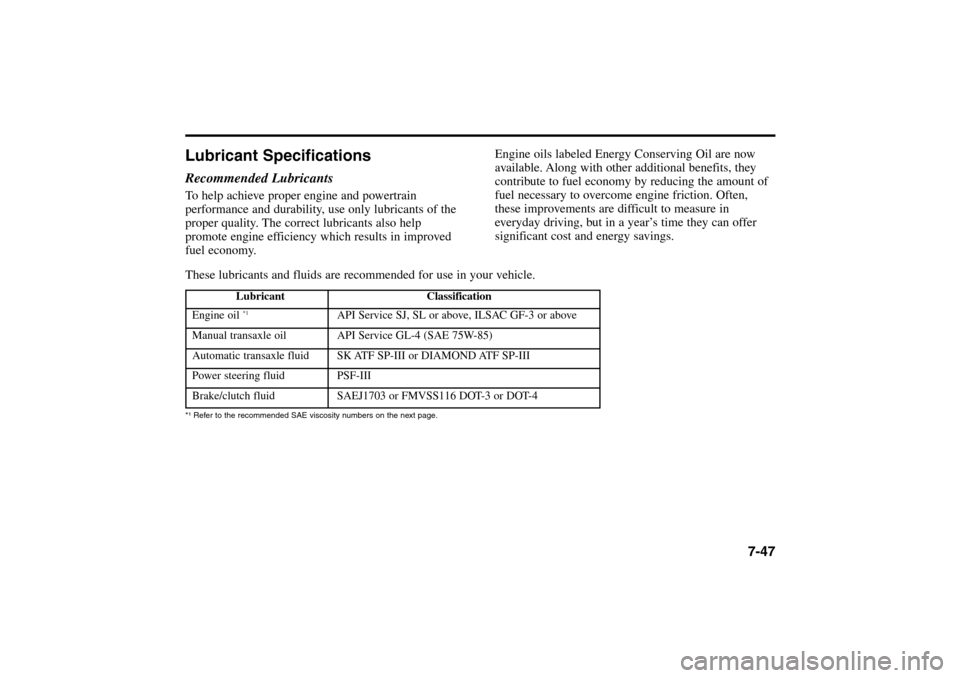
Lubricant SpecificationsRecommended LubricantsTo help achieve proper engine and powertrain
performance and durability, use only lubricants of the
proper quality. The correct lubricants also help
promote engine efficiency which results in improved
fuel economy.Engine oils labeled Energy Conserving Oil are now
available. Along with other additional benefits, they
contribute to fuel economy by reducing the amount of
fuel necessary to overcome engine friction. Often,
these improvements are difficult to measure in
everyday driving, but in a year’s time they can offer
significant cost and energy savings.
These lubricants and fluids are recommended for use in your vehicle.
Lubricant Classification
Engine oil *1
API Service SJ, SL or above, ILSAC GF-3 or above
Manual transaxle oil API Service GL-4 (SAE 75W-85)
Automatic transaxle fluid SK ATF SP-III or DIAMOND ATF SP-III
Power steering fluid PSF-III
Brake/clutch fluid SAEJ1703 or FMVSS116 DOT-3 or DOT-4
*¹ Refer to the recommended SAE viscosity numbers on the next page.
RIO ENG CNA 7-2.qxd 7/29/05 5:18 PM Page 47
Page 220 of 238
Maintenance7-48
Engine oil viscosity (thickness) has an effect on fuel
economy and cold weather operation (starting and oil
flow). Lower viscosity engine oils can provide better
fuel economy and cold weather performance, however,
higher viscosity engine oils are required for
satisfactory lubrication in hot weather. Using oils of
any viscosity other than those recommended could
result in engine damage.
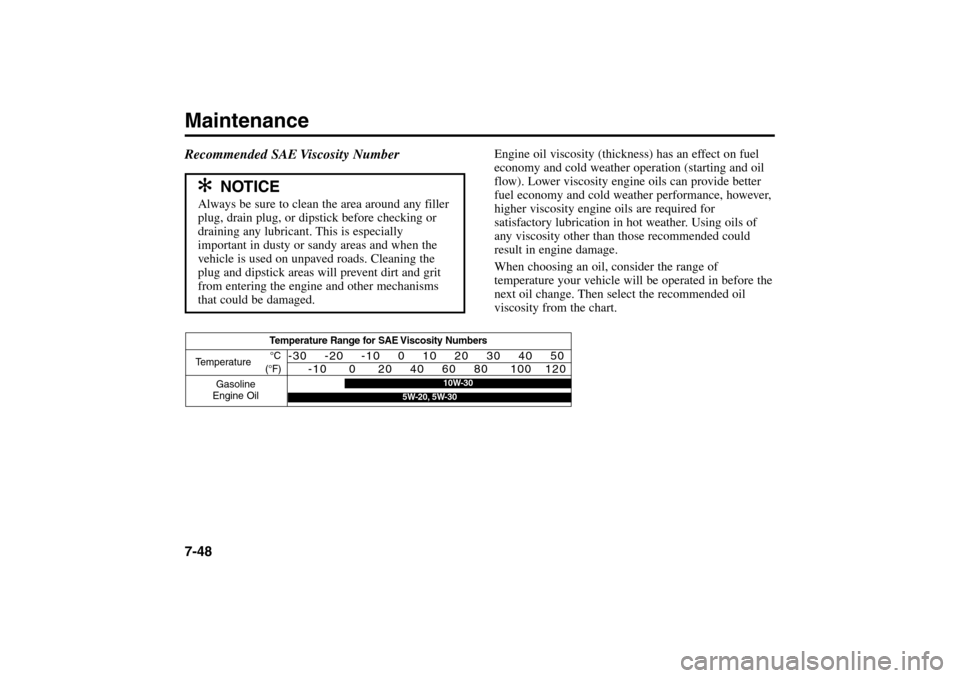
When choosing an oil, consider the range of
temperature your vehicle will be operated in before the
next oil change. Then select the recommended oil
viscosity from the chart.
✻ ✻
NOTICE
Always be sure to clean the area around any filler
plug, drain plug, or dipstick before checking or
draining any lubricant. This is especially
important in dusty or sandy areas and when the
vehicle is used on unpaved roads. Cleaning the
plug and dipstick areas will prevent dirt and grit
from entering the engine and other mechanisms
that could be damaged.
Recommended SAE Viscosity Number
Temperature Range for SAE Viscosity Numbers
Temperature
Gasoline
Engine Oil°C
(°F)
-30 -20 -10 0 10 20 30 40 50
-10 0 20 40 60 80 100 120
10W-30
5W-20, 5W-30
RIO ENG CNA 7-2.qxd 7/29/05 5:18 PM Page 48