KIA SEDONA 2019 Owners Manual
Manufacturer: KIA, Model Year: 2019, Model line: SEDONA, Model: KIA SEDONA 2019Pages: 593, PDF Size: 15.93 MB
Page 541 of 593
Maintenance
74
7
Front turn signal lamp bulb
replacement (Headlamp Type B)
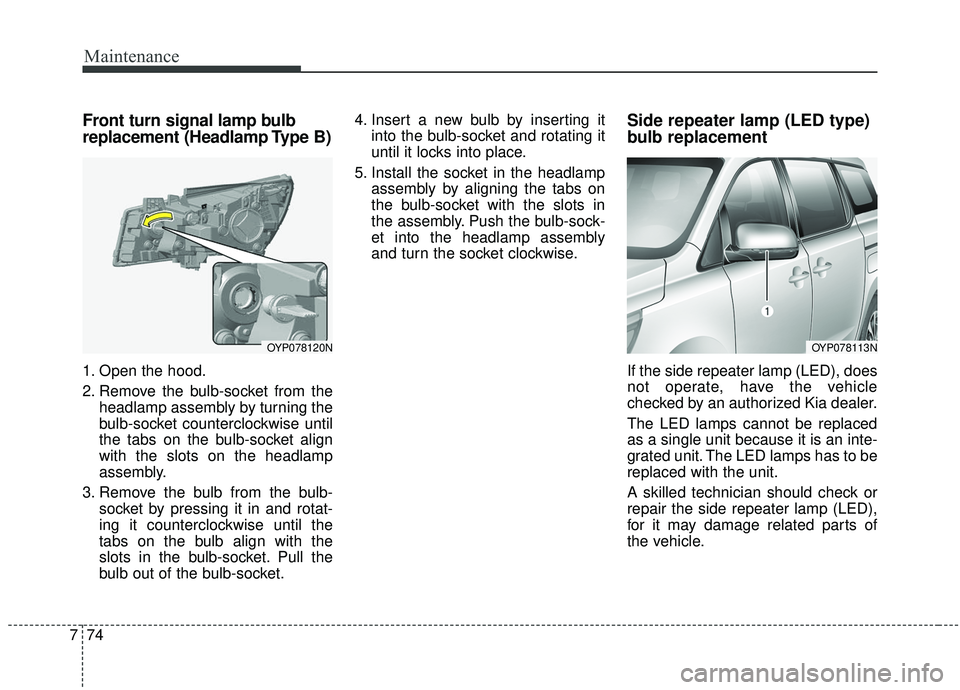
1. Open the hood.
2. Remove the bulb-socket from the
headlamp assembly by turning the
bulb-socket counterclockwise until
the tabs on the bulb-socket align
with the slots on the headlamp
assembly.
3. Remove the bulb from the bulb- socket by pressing it in and rotat-
ing it counterclockwise until the
tabs on the bulb align with the
slots in the bulb-socket. Pull the
bulb out of the bulb-socket. 4. Insert a new bulb by inserting it
into the bulb-socket and rotating it
until it locks into place.
5. Install the socket in the headlamp assembly by aligning the tabs on
the bulb-socket with the slots in
the assembly. Push the bulb-sock-
et into the headlamp assembly
and turn the socket clockwise.
Side repeater lamp (LED type)
bulb replacement
If the side repeater lamp (LED), does
not operate, have the vehicle
checked by an authorized Kia dealer.
The LED lamps cannot be replaced
as a single unit because it is an inte-
grated unit. The LED lamps has to be
replaced with the unit.
A skilled technician should check or
repair the side repeater lamp (LED),
for it may damage related parts of
the vehicle.
OYP078120NOYP078113N
Page 542 of 593
775
Maintenance
Front fog lamp bulb replace-
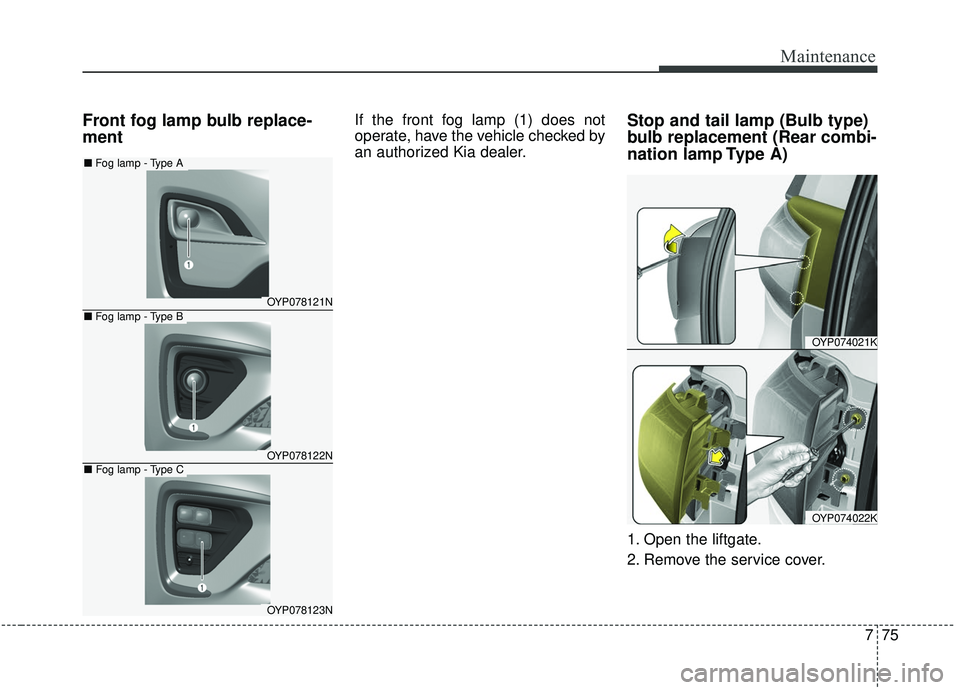
mentIf the front fog lamp (1) does not
operate, have the vehicle checked by
an authorized Kia dealer.Stop and tail lamp (Bulb type)
bulb replacement (Rear combi-
nation lamp Type A)
1. Open the liftgate.
2. Remove the service cover.
OYP078121N
OYP078122N
OYP078123N
■Fog lamp - Type A
■Fog lamp - Type B
■Fog lamp - Type C
OYP074021K
OYP074022K
Page 543 of 593
Maintenance
76
7
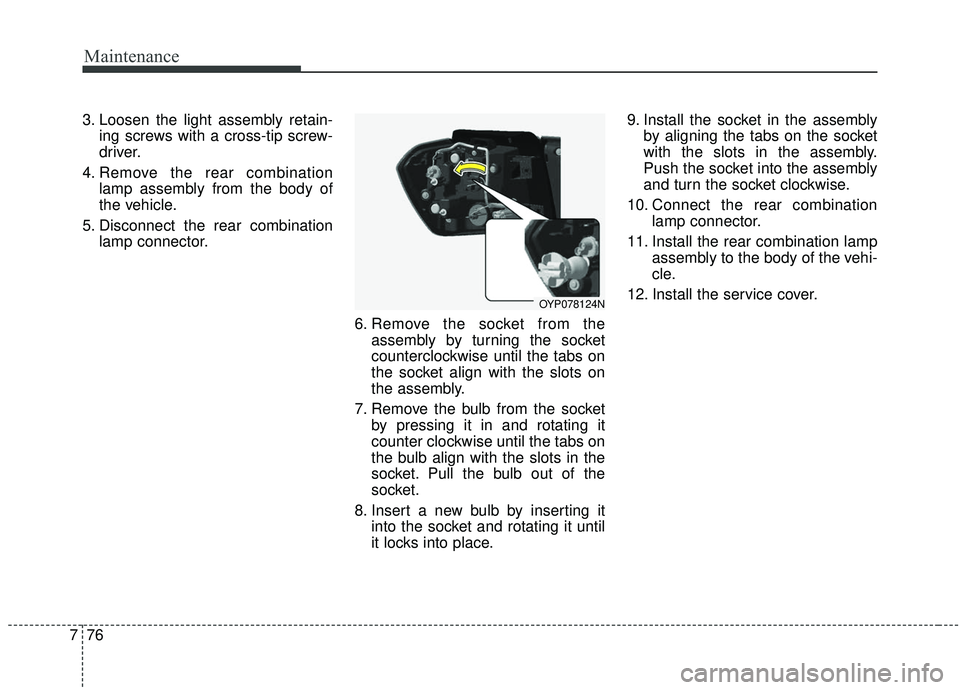
3. Loosen the light assembly retain-
ing screws with a cross-tip screw-
driver.
4. Remove the rear combination lamp assembly from the body of
the vehicle.
5. Disconnect the rear combination lamp connector.
6. Remove the socket from theassembly by turning the socket
counterclockwise until the tabs on
the socket align with the slots on
the assembly.
7. Remove the bulb from the socket by pressing it in and rotating it
counter clockwise until the tabs on
the bulb align with the slots in the
socket. Pull the bulb out of the
socket.
8. Insert a new bulb by inserting it into the socket and rotating it until
it locks into place. 9. Install the socket in the assembly
by aligning the tabs on the socket
with the slots in the assembly.
Push the socket into the assembly
and turn the socket clockwise.
10. Connect the rear combination lamp connector.
11. Install the rear combination lamp assembly to the body of the vehi-
cle.
12. Install the service cover.
OYP078124N
Page 544 of 593
777
Maintenance
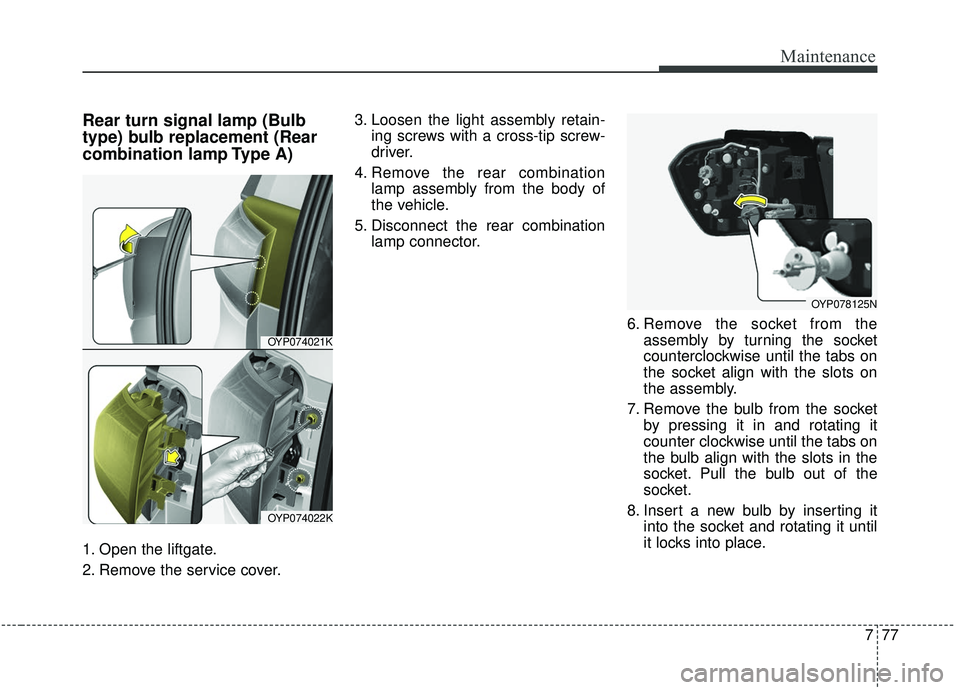
Rear turn signal lamp (Bulb
type) bulb replacement (Rear
combination lamp Type A)
1. Open the liftgate.
2. Remove the service cover.3. Loosen the light assembly retain-
ing screws with a cross-tip screw-
driver.
4. Remove the rear combination lamp assembly from the body of
the vehicle.
5. Disconnect the rear combination lamp connector.
6. Remove the socket from theassembly by turning the socket
counterclockwise until the tabs on
the socket align with the slots on
the assembly.
7. Remove the bulb from the socket by pressing it in and rotating it
counter clockwise until the tabs on
the bulb align with the slots in the
socket. Pull the bulb out of the
socket.
8. Insert a new bulb by inserting it into the socket and rotating it until
it locks into place.
OYP074021K
OYP074022K
OYP078125N
Page 545 of 593
Maintenance
78
7
9. Install the socket in the assembly
by aligning the tabs on the socket
with the slots in the assembly.
Push the socket into the assembly
and turn the socket clockwise.
10. Connect the rear combination lamp connector.
11. Install the rear combination lamp assembly to the body of the vehi-
cle.
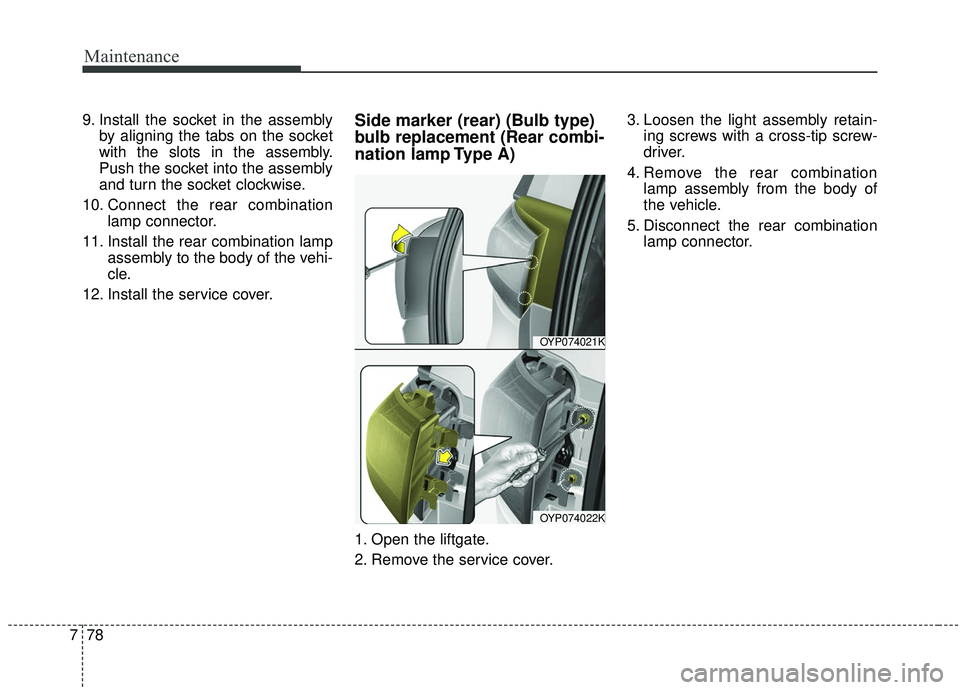
12. Install the service cover.Side marker (rear) (Bulb type)
bulb replacement (Rear combi-
nation lamp Type A)
1. Open the liftgate.
2. Remove the service cover. 3. Loosen the light assembly retain-
ing screws with a cross-tip screw-
driver.
4. Remove the rear combination lamp assembly from the body of
the vehicle.
5. Disconnect the rear combination lamp connector.
OYP074021K
OYP074022K
Page 546 of 593
779
Maintenance
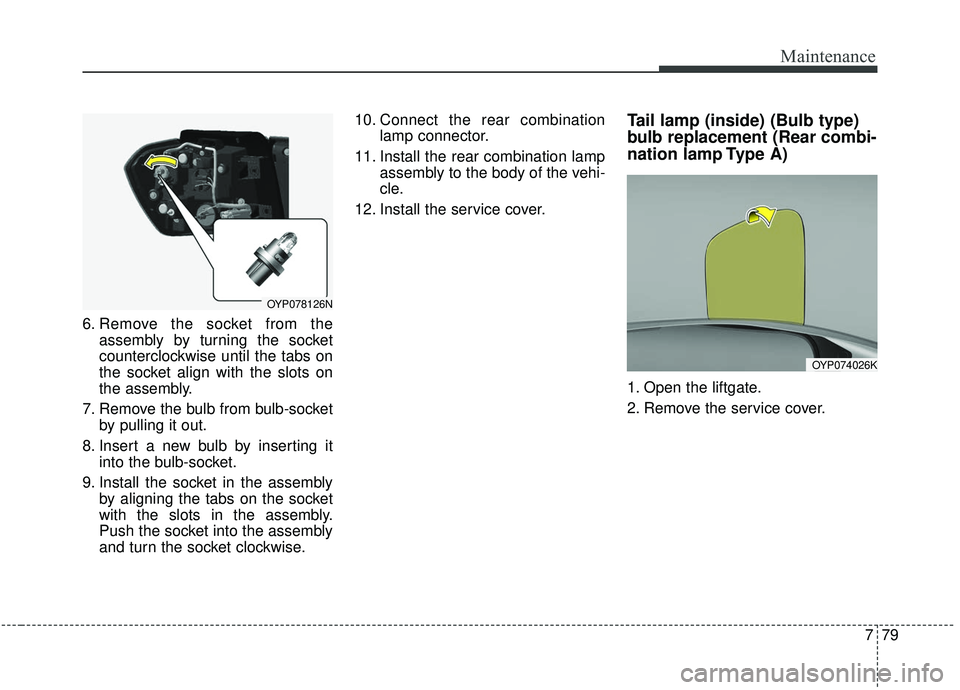
6. Remove the socket from theassembly by turning the socket
counterclockwise until the tabs on
the socket align with the slots on
the assembly.
7. Remove the bulb from bulb-socket by pulling it out.
8. Insert a new bulb by inserting it into the bulb-socket.
9. Install the socket in the assembly by aligning the tabs on the socket
with the slots in the assembly.
Push the socket into the assembly
and turn the socket clockwise. 10. Connect the rear combination
lamp connector.
11. Install the rear combination lamp assembly to the body of the vehi-
cle.
12. Install the service cover.
Tail lamp (inside) (Bulb type)
bulb replacement (Rear combi-
nation lamp Type A)
1. Open the liftgate.
2. Remove the service cover.
OYP078126N
OYP074026K
Page 547 of 593
Maintenance
80
7
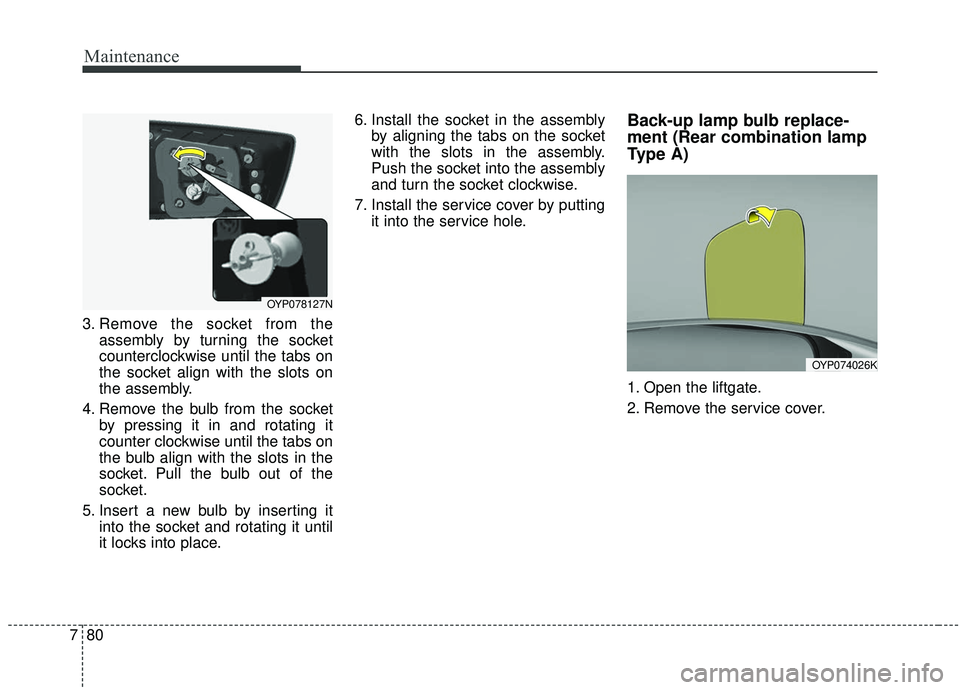
3. Remove the socket from the
assembly by turning the socket
counterclockwise until the tabs on
the socket align with the slots on
the assembly.
4. Remove the bulb from the socket by pressing it in and rotating it
counter clockwise until the tabs on
the bulb align with the slots in the
socket. Pull the bulb out of the
socket.
5. Insert a new bulb by inserting it into the socket and rotating it until
it locks into place. 6. Install the socket in the assembly
by aligning the tabs on the socket
with the slots in the assembly.
Push the socket into the assembly
and turn the socket clockwise.
7. Install the service cover by putting it into the service hole.
Back-up lamp bulb replace-
ment (Rear combination lamp
Type A)
1. Open the liftgate.
2. Remove the service cover.
OYP078127N
OYP074026K
Page 548 of 593
781
Maintenance
3. Remove the socket from theassembly by turning the socket
counterclockwise until the tabs on
the socket align with the slots on
the assembly.
4. Remove the bulb from bulb-socket by pulling it out.
5. Insert a new bulb by inserting it into the bulb-socket.
6. Install the socket in the assembly by aligning the tabs on the socket
with the slots in the assembly.
Push the socket into the assembly
and turn the socket clockwise.
7. Install the service cover by putting it into the service hole.
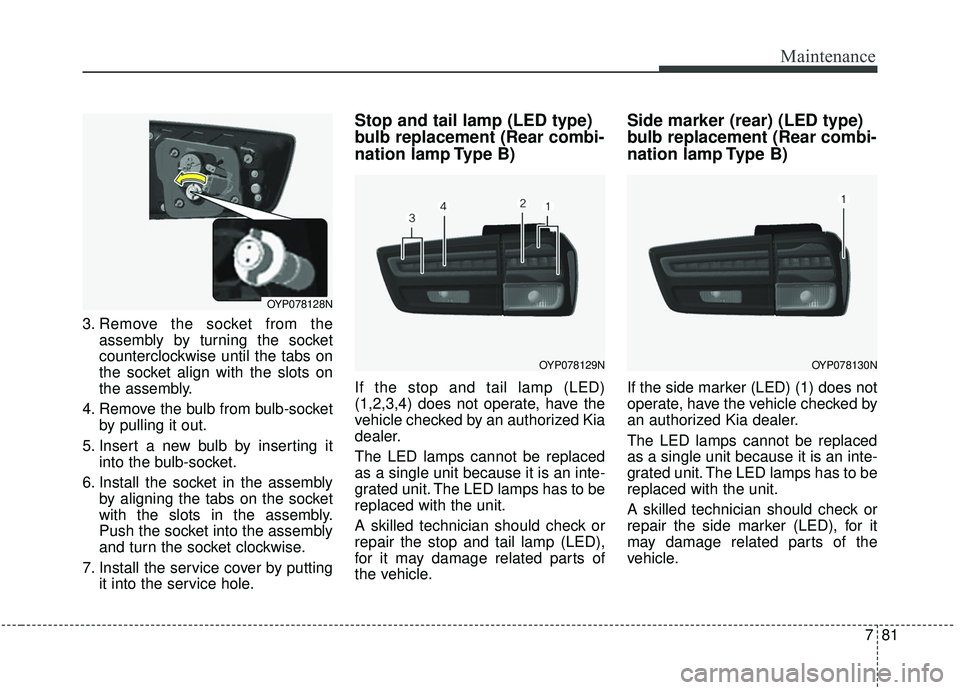
Stop and tail lamp (LED type)
bulb replacement (Rear combi-
nation lamp Type B)
If the stop and tail lamp (LED)
(1,2,3,4) does not operate, have the
vehicle checked by an authorized Kia
dealer.
The LED lamps cannot be replaced
as a single unit because it is an inte-
grated unit. The LED lamps has to be
replaced with the unit.
A skilled technician should check or
repair the stop and tail lamp (LED),
for it may damage related parts of
the vehicle.
Side marker (rear) (LED type)
bulb replacement (Rear combi-
nation lamp Type B)
If the side marker (LED) (1) does not
operate, have the vehicle checked by
an authorized Kia dealer.
The LED lamps cannot be replaced
as a single unit because it is an inte-
grated unit. The LED lamps has to be
replaced with the unit.
A skilled technician should check or
repair the side marker (LED), for it
may damage related parts of the
vehicle.
OYP078128N
OYP078129NOYP078130N
Page 549 of 593
Maintenance
82
7
Rear turn signal lamp (Bulb
type) bulb replacement (Rear
combination lamp Type B)
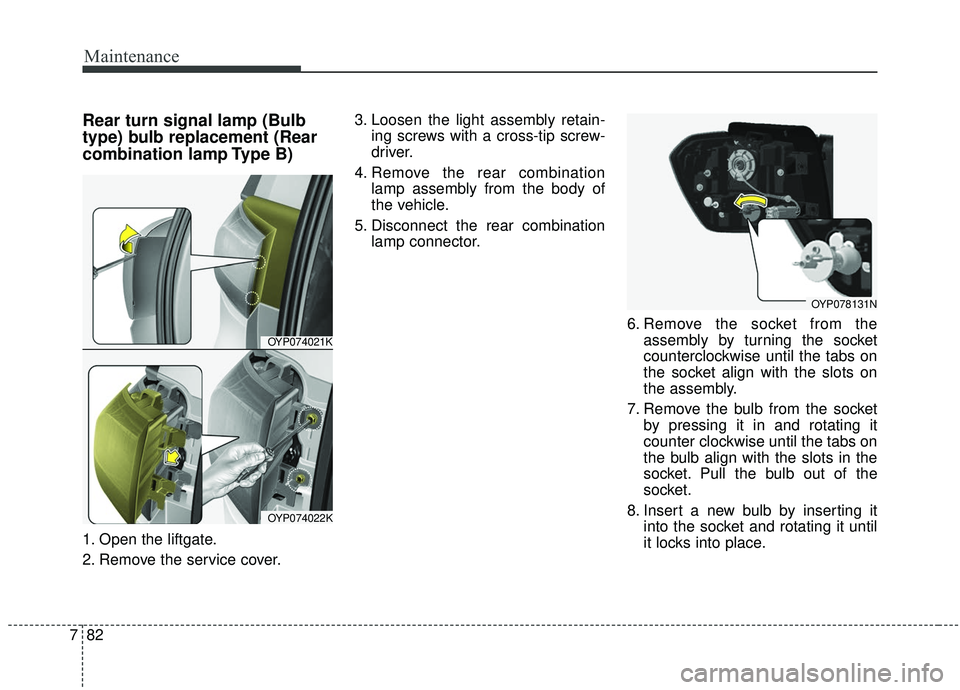
1. Open the liftgate.
2. Remove the service cover. 3. Loosen the light assembly retain-
ing screws with a cross-tip screw-
driver.
4. Remove the rear combination lamp assembly from the body of
the vehicle.
5. Disconnect the rear combination lamp connector.
6. Remove the socket from theassembly by turning the socket
counterclockwise until the tabs on
the socket align with the slots on
the assembly.
7. Remove the bulb from the socket by pressing it in and rotating it
counter clockwise until the tabs on
the bulb align with the slots in the
socket. Pull the bulb out of the
socket.
8. Insert a new bulb by inserting it into the socket and rotating it until
it locks into place.
OYP074021K
OYP074022K
OYP078131N
Page 550 of 593
783
Maintenance
9. Install the socket in the assemblyby aligning the tabs on the socket
with the slots in the assembly.
Push the socket into the assembly
and turn the socket clockwise.
10. Connect the rear combination lamp connector.
11. Install the rear combination lamp assembly to the body of the vehi-
cle.
12. Install the service cover.Back-up lamp bulb replace-
ment (Rear combination lamp
Type B)
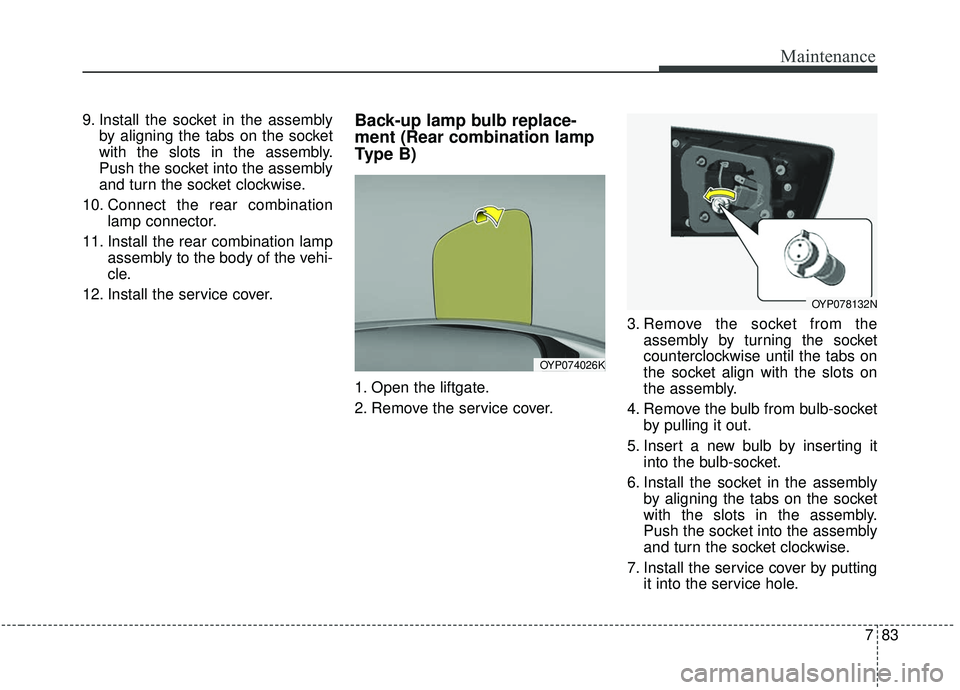
1. Open the liftgate.
2. Remove the service cover. 3. Remove the socket from the
assembly by turning the socket
counterclockwise until the tabs on
the socket align with the slots on
the assembly.
4. Remove the bulb from bulb-socket by pulling it out.
5. Insert a new bulb by inserting it into the bulb-socket.
6. Install the socket in the assembly by aligning the tabs on the socket
with the slots in the assembly.
Push the socket into the assembly
and turn the socket clockwise.
7. Install the service cover by putting it into the service hole.
OYP074026K
OYP078132N