clock KIA Sorento 2009 2.G Owner's Manual
[x] Cancel search | Manufacturer: KIA, Model Year: 2009, Model line: Sorento, Model: KIA Sorento 2009 2.GPages: 327, PDF Size: 5.03 MB
Page 80 of 327
371
Knowing your vehicle
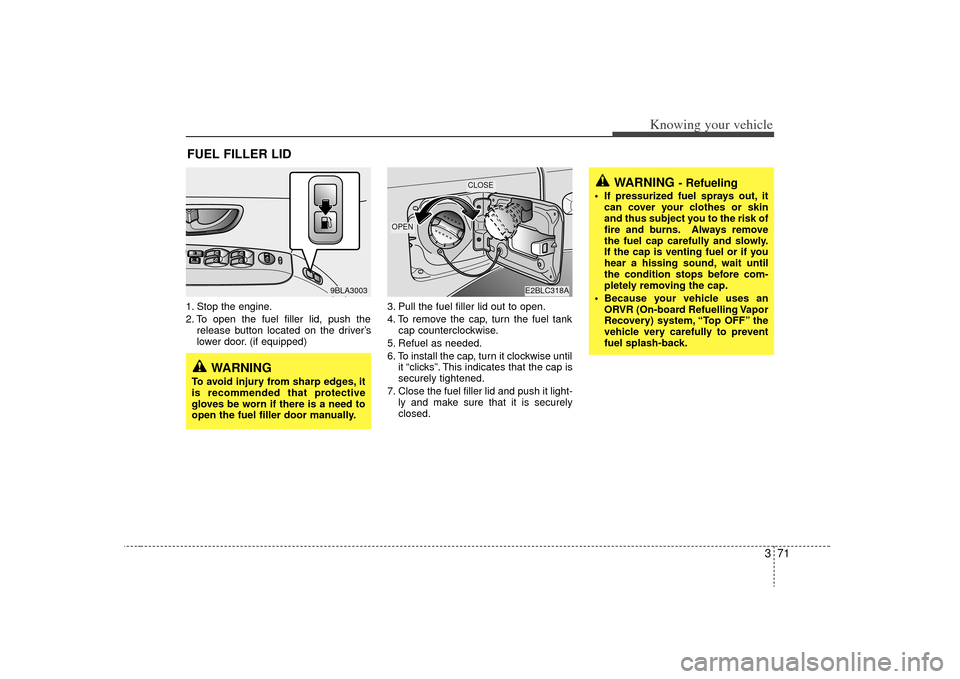
1. Stop the engine.
2. To open the fuel filler lid, push therelease button located on the driver’s
lower door. (if equipped) 3. Pull the fuel filler lid out to open.
4. To remove the cap, turn the fuel tank
cap counterclockwise.
5. Refuel as needed.
6. To install the cap, turn it clockwise until it “clicks”. This indicates that the cap is
securely tightened.
7. Close the fuel filler lid and push it light- ly and make sure that it is securely
closed.FUEL FILLER LID
WARNING
- Refueling
If pressurized fuel sprays out, itcan cover your clothes or skin
and thus subject you to the risk of
fire and burns. Always remove
the fuel cap carefully and slowly.
If the cap is venting fuel or if you
hear a hissing sound, wait until
the condition stops before com-
pletely removing the cap.
Because your vehicle uses an ORVR (On-board Refuelling Vapor
Recovery) system, “Top OFF” the
vehicle very carefully to prevent
fuel splash-back.
E2BLC318A
OPEN
CLOSE
WARNING
To avoid injury from sharp edges, it
is recommended that protective
gloves be worn if there is a need to
open the fuel filler door manually.
9BLA3003
Page 98 of 327
389
Knowing your vehicle
Digital clockWhen the ignition switch is in the ACC or
ON position, the clock buttons operates
as follows:
HOUR:Pressing the “H” button with your fin-
ger, a pencil or similar object will
advance the time displayed by one
hour.
MINUTE: Pressing the “M” button with your fin-
ger, a pencil or similar object will
advance the time displayed by one
minute. RESET:
To clear away minutes, press the “R”
button with your finger, a pencil or sim-
ilar object. Then the clock will be set
precisely on the hour.
For example, if the “R” button is
pressed while the time is between 9:01
and 9:29, the display will be reset to
9:00.
9:01 ~ 9:29 ➾ 9:00
9:30 ~ 9:59 ➾ 10:00
OBL026016N
Page 112 of 327
3 103
Knowing your vehicle
1. Power ON-OFF / Volume ControlknobPower
To operate your audio system, your igni-
tion key must be in the "ACC" or "ON"
position.
Press the knob to switch on the audio
system. The audio system resumes oper-
ation in either the Radio or CD mode.
Press the knob again to switch off the
audio system.
Volume Control Knob
Rotate the knob clockwise to increase
the volume and rotate the knob counter-
clockwise to reduce the volume.
2. Loading CDsModel D445:
Only one CD can be loaded at any one
time. If there is already a disc inserted in
the CD player, eject the disc before load-
ing a new CD.
To load a CD, gently insert the CD into
the CD slot. The CD will be automatically
loaded. The CD player then starts to play
the CD.✽ ✽NOTICE• Do not force-load the CD as it will
damage the loading mechanism and
cause your disc to jam in the player.
• If a CD cannot be loaded, check if there is already a disc in the player
and eject it first.
Model D465:
Press the LOAD button to automatically
switch the audio system on in CD player
mode.
Follow the instructions on the LCD
screen to load and play your CDs.✽ ✽ NOTICETo load more than 1 CD (maximum of
6), press and hold the load button for
more than 2 seconds. The disc number
indicator will flash to indicate how
many CDs you can still load.
Page 113 of 327
Knowing your vehicle104
33. CD EJECT ( ) ButtonModel D445:
Press the button once to eject the CD
from the CD player.
Model D465
Press the button once to eject the
last CD played.
Press and hold button for more than
2 seconds to eject all the CDs in the
changer in sequence beginning with the
last CD played.✽ ✽
NOTICEYou can eject discs even if the audio sys-
tem is switched off.4. Audio Control knobUse the audio control knob to change
how music playback sounds and also to
control how sound is distributed to the
speaker system. Sound properties
Press the knob repeatedly to display the
corresponding audio control settings
(Bass, Middle, Treble, Fader, Balance
).
The LCD screen displays the audio con-
trol settings in sequence. Once the audio
control setting you want is displayed,
rotate the knob clockwise/anti-clock-
wise to change the level of that audio
setting.
Bass
Increases/decreases Bass response of
audio reproduction
Middle
Increases/decreases Mid-range
response of audio reproduction
Treble
Increases/decreases Treble response of
audio reproduction
Fader
Sets front/rear balance level for your
speaker system
Balance
Sets left/right balance level for your
speaker system
✽ ✽ NOTICETo return all audio control settings to
the default (centered) positions, press
and hold the audio control knob for
more than 2 seconds. An audible beep
indicates that all audio controls have
been returned to the default setting.
Page 116 of 327
3 107
Knowing your vehicle
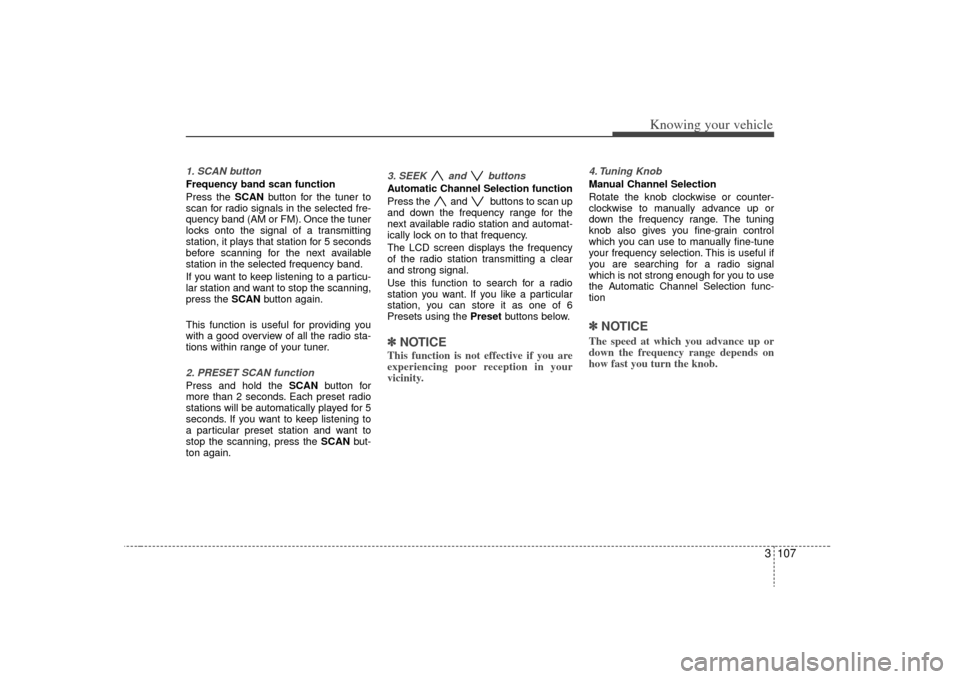
1. SCAN buttonFrequency band scan function
Press the SCANbutton for the tuner to
scan for radio signals in the selected fre-
quency band (AM or FM). Once the tuner
locks onto the signal of a transmitting
station, it plays that station for 5 seconds
before scanning for the next available
station in the selected frequency band.
If you want to keep listening to a particu-
lar station and want to stop the scanning,
press the SCAN button again.
This function is useful for providing you
with a good overview of all the radio sta-
tions within range of your tuner.2. PRESET SCAN functionPress and hold the SCAN button for
more than 2 seconds. Each preset radio
stations will be automatically played for 5
seconds. If you want to keep listening to
a particular preset station and want to
stop the scanning, press the SCAN but-
ton again.
3. SEEK and buttonsAutomatic Channel Selection function
Press the and buttons to scan up
and down the frequency range for the
next available radio station and automat-
ically lock on to that frequency.
The LCD screen displays the frequency
of the radio station transmitting a clear
and strong signal.
Use this function to search for a radio
station you want. If you like a particular
station, you can store it as one of 6
Presets using the Preset buttons below.✽ ✽
NOTICEThis function is not effective if you are
experiencing poor reception in your
vicinity.
4. Tuning KnobManual Channel Selection
Rotate the knob clockwise or counter-
clockwise to manually advance up or
down the frequency range. The tuning
knob also gives you fine-grain control
which you can use to manually fine-tune
your frequency selection. This is useful if
you are searching for a radio signal
which is not strong enough for you to use
the Automatic Channel Selection func-
tion✽ ✽NOTICEThe speed at which you advance up or
down the frequency range depends on
how fast you turn the knob.
Page 120 of 327
3 111
Knowing your vehicle
6. File Search KnobRotate the knob clockwise or counter-
clockwise to manually advance up or
down the track list of the CD currently
played. This function allows you to quick-
ly scroll to a specific track number. It is
especially useful if you are playing a MP3
or WMA CD which contains many direc-
tories and tracks. The LCD screen dis-
plays the track number you have scrolled
to.
Once the track number you want is dis-
played, press the File Search knob to
ENTER your selection and begin play-
back of the selected track.✽ ✽ NOTICEYou must push the File Search knob to
select the track for playback. Otherwise,
the CD player will not jump to the track
number displayed in the number count-
er.
Use the File Search knob and the DIR
and buttons in together to quick-
ly search for a track you want on a MP3
CD with many directories and tracks.
7. RPT, RDM, MARK & INFO buttons These buttons correspond to the Repeat,
Random Playback, Marklist and Disc
Information functions.
Turn to the next section of your handbook
for detailed instructions.
Playing CDs, MP3 and WMA discs1. Loading CDsModel D445:
Only one CD can be loaded at any one
time. If there is already a disc inserted in
the CD player, eject the disc before load-
ing a new CD.
To load a CD, gently insert the CD into
the CD slot. The CD will be automatically
loaded. The CD player then starts to play
the CD.✽ ✽ NOTICE• Do not force-load the CD as it will
damage the loading mechanism and
cause your disc to jam in the player.
• If a CD cannot be loaded, check if there is already a disc in the player
and eject it first.
Only one CD can be loaded at any one
time.
Page 224 of 327
Driving tips18
5Driving uphillOnce you decide you can safely drive up
the hill, you need to take some special
steps.
Use a low gear and get a firm grip on
the steering wheel.
Get a smooth start up the hill and try to maintain your speed. Don’t use more
power than you need, because you
don’t want your wheels to start spin-
ning or sliding.
Try to drive straight up the hill, if at all possible. If the path twists and turns,
you may have to find another route. Slow down as you approach the top of
the hill.
Attach a flag to the vehicle to make you more visible to approaching traffic on
trails or hills.
Sound the horn as you approach the top of the hill to let opposing traffic
know you’re there.
Use your headlights even during the day. They make you more visible to
other drivers.
Stalling while driving uphill
What should I do if my vehicle stalls, or isabout to stall, and I can’t make it up thehill?If your vehicle stalls, or is about to stall
while driving uphill, there are some
things you should do, and there are some
things you must not do. First, here’s what
you should do:
Push the brake pedal to stop the vehi- cle and keep it from rolling backwards.
Also, apply the parking brake.
If your engine is still running, shift the transmission into reverse, release the
parking brake, and slowly back down
the hill in reverse.
If your engine has stopped running, you’ll need to restart it. With the brake
pedal depressed and the parking
brake still applied, shift a manual trans-
mission to N (Neutral), or an automatic
transmission to P (Park) and restart
the engine. Then, shift to reverse,
release the parking brake, and slowly
back down the hill in reverse.
As you are backing down the hill, put your left hand on the steering wheel at
the 12 o’clock position. This way, you’ll
be able to tell if your wheels are
straight or turned to the left or right as
you back down.
WARNING -
Driving across
hills
Turning or driving across steep
hills can be dangerous. You could
lose traction, slide sideways, or just
reach an area too steep to traverse.
In any case, it could cause you to
roll over. You could be seriously or
fatally injured. When driving up
hills, always try to go as straight up
as possible.
WARNING
- Driving overhills
Driving to the top (crest) of a hill at
full speed can cause an accident
and result in serious or fatal injury.
There could be a drop-off, embank-
ment, cliff, another vehicle or peo-
ple sitting on the ground. As you
near the top of a hill, slow down and
stay alert.
Page 258 of 327
In case of an emergency12
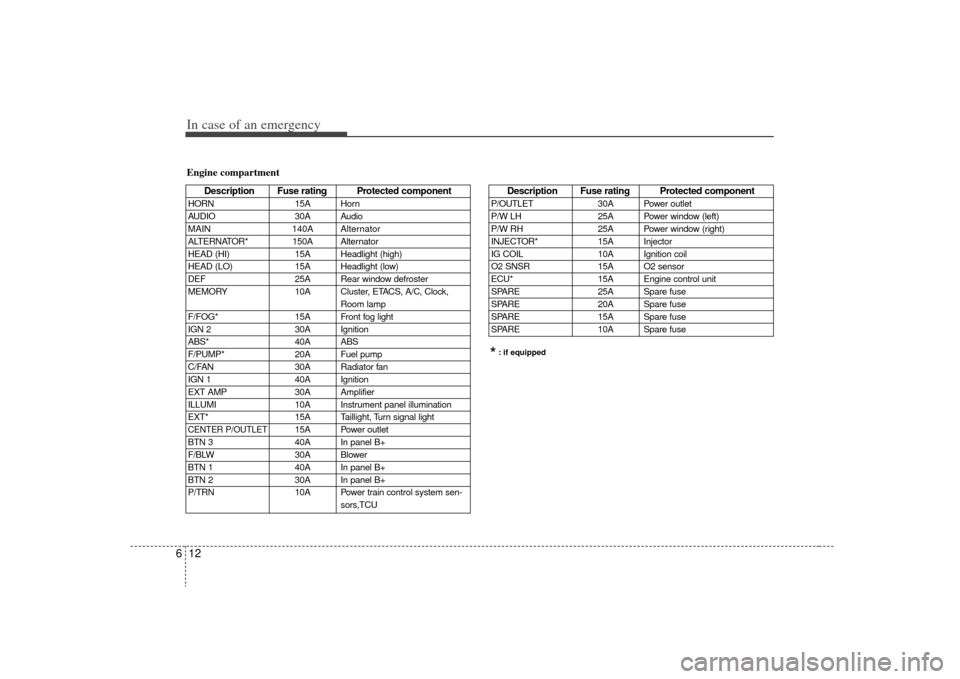
6Engine compartment
Description Fuse rating Protected component
HORN 15A Horn
AUDIO 30A Audio
MAIN 140A Alternator
ALTERNATOR* 150A Alternator
HEAD (HI) 15A Headlight (high)
HEAD (LO) 15A Headlight (low)
DEF 25A Rear window defroster
MEMORY 10A Cluster, ETACS, A/C, Clock,
Room lamp
F/FOG* 15A Front fog light
IGN 2 30A Ignition
ABS* 40A ABS
F/PUMP* 20A Fuel pump
C/FAN 30A Radiator fan
IGN 1 40A Ignition
EXT AMP 30A Amplifier
ILLUMI 10A Instrument panel illumination
EXT* 15A Taillight, Turn signal lightCENTER P/OUTLET
15A Power outlet
BTN 3 40A In panel B+
F/BLW 30A Blower
BTN 1 40A In panel B+
BTN 2 30A In panel B+
P/TRN 10A Power train control system sen- sors,TCU
*: if equippedDescription Fuse rating Protected component
P/OUTLET30A Power outlet
P/W LH 25A Power window (left)
P/W RH 25A Power window (right)
INJECTOR* 15A Injector
IG COIL 10A Ignition coil
O2 SNSR 15A O2 sensor
ECU* 15A Engine control unit
SPARE 25A Spare fuse
SPARE 20A Spare fuse
SPARE 15A Spare fuse
SPARE 10A Spare fuse
Page 259 of 327
613
In case of an emergency
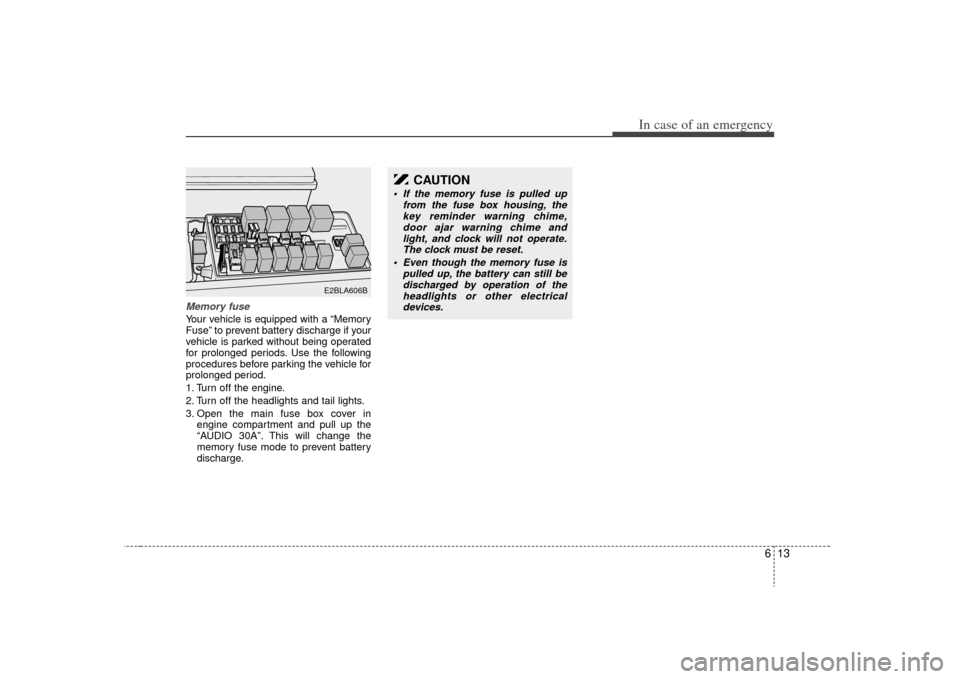
Memory fuseYour vehicle is equipped with a “Memory
Fuse” to prevent battery discharge if your
vehicle is parked without being operated
for prolonged periods. Use the following
procedures before parking the vehicle for
prolonged period.
1. Turn off the engine.
2. Turn off the headlights and tail lights.
3. Open the main fuse box cover inengine compartment and pull up the
“AUDIO 30A”. This will change the
memory fuse mode to prevent battery
discharge.
E2BLA606B
CAUTION
If the memory fuse is pulled up from the fuse box housing, thekey reminder warning chime,door ajar warning chime and light, and clock will not operate.The clock must be reset.
Even though the memory fuse is pulled up, the battery can still bedischarged by operation of theheadlights or other electricaldevices.
Page 265 of 327
619
In case of an emergency
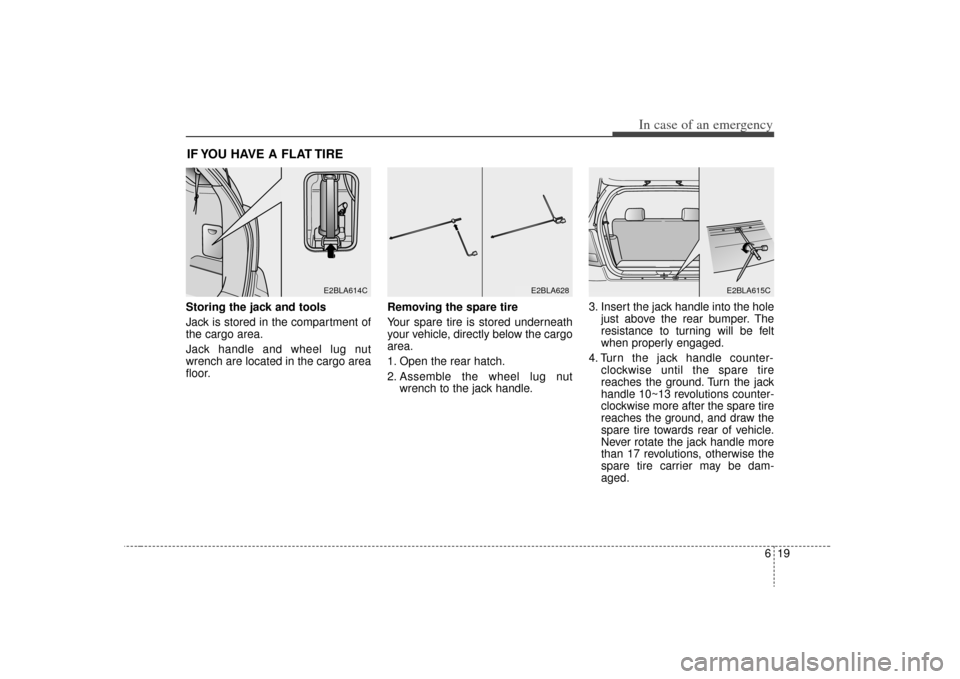
IF YOU HAVE A FLAT TIRE Storing the jack and tools
Jack is stored in the compartment of
the cargo area.
Jack handle and wheel lug nut
wrench are located in the cargo area
floor.Removing the spare tire
Your spare tire is stored underneath
your vehicle, directly below the cargo
area.
1. Open the rear hatch.
2. Assemble the wheel lug nut
wrench to the jack handle. 3. Insert the jack handle into the hole
just above the rear bumper. The
resistance to turning will be felt
when properly engaged.
4. Turn the jack handle counter- clockwise until the spare tire
reaches the ground. Turn the jack
handle 10~13 revolutions counter-
clockwise more after the spare tire
reaches the ground, and draw the
spare tire towards rear of vehicle.
Never rotate the jack handle more
than 17 revolutions, otherwise the
spare tire carrier may be dam-
aged.
E2BLA614C
E2BLA628
E2BLA615C