display KIA SORENTO 2014 Navigation System Quick Reference Guide
[x] Cancel search | Manufacturer: KIA, Model Year: 2014, Model line: SORENTO, Model: KIA SORENTO 2014Pages: 236, PDF Size: 7.61 MB
Page 191 of 236
Using Setup
Setup l
8-5
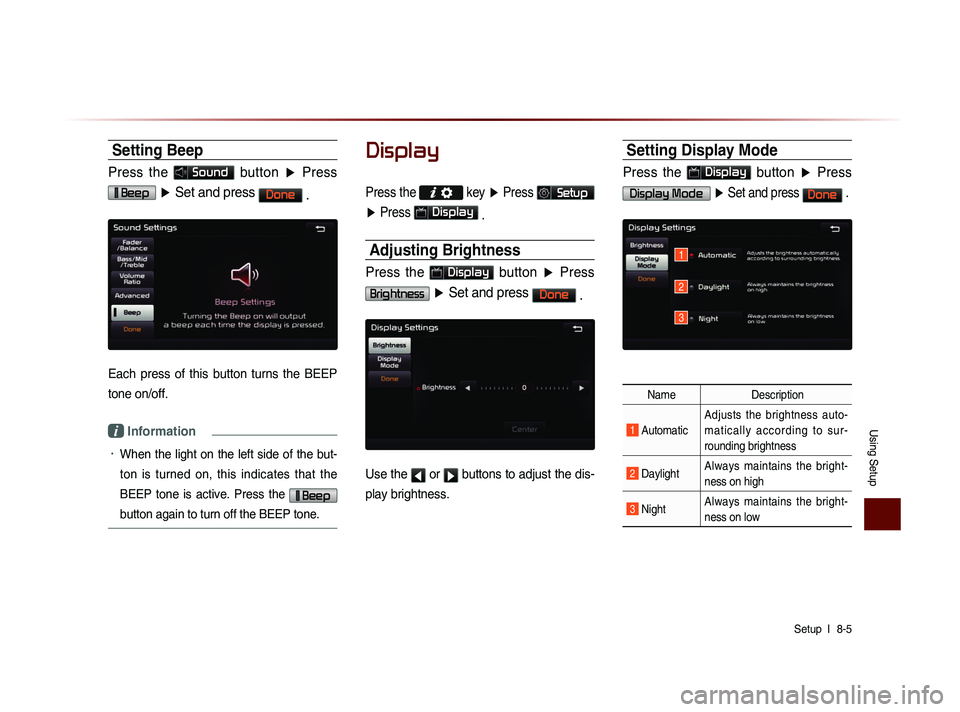
Setting Beep
Press the Sound button ▶ Press
Beep ▶ Set and press Done
.
Each press of this button turns the BEEP
tone on/off.
i Information
• When the light on the left side of the but-
ton is turned on, this indicates that the
BEEP tone is active. Press the
Beep
button again to turn off the BEEP tone.
Display
Press the
key ▶ Press Setup
▶ Press
Display
.
Adjusting Brightness
Press the Display button ▶ Press
Brightness ▶ Set and press Done
.
Use the ◀ or ▶ buttons to adjust the dis-
play brightness.
Setting Display Mode
Press the Display button ▶ Press
Display Mode ▶ Set and press Done .
Name Description
1 Automatic Adjusts the brightness auto-
m a t i c a l l y a c c o r d i n g t o s u r -
rounding brightness
2 Daylight
Always maintains the bright-
ness on high
3 Night Always maintains the bright-
ness on low
1
2
3
Page 197 of 236
Using Setup
Setup l
8-11
Navigation
Press the key ▶ Press Setup
▶ Press
Navigation
.
Main
Press the Navigation button ▶
Press
Main ▶ Set and press Done .
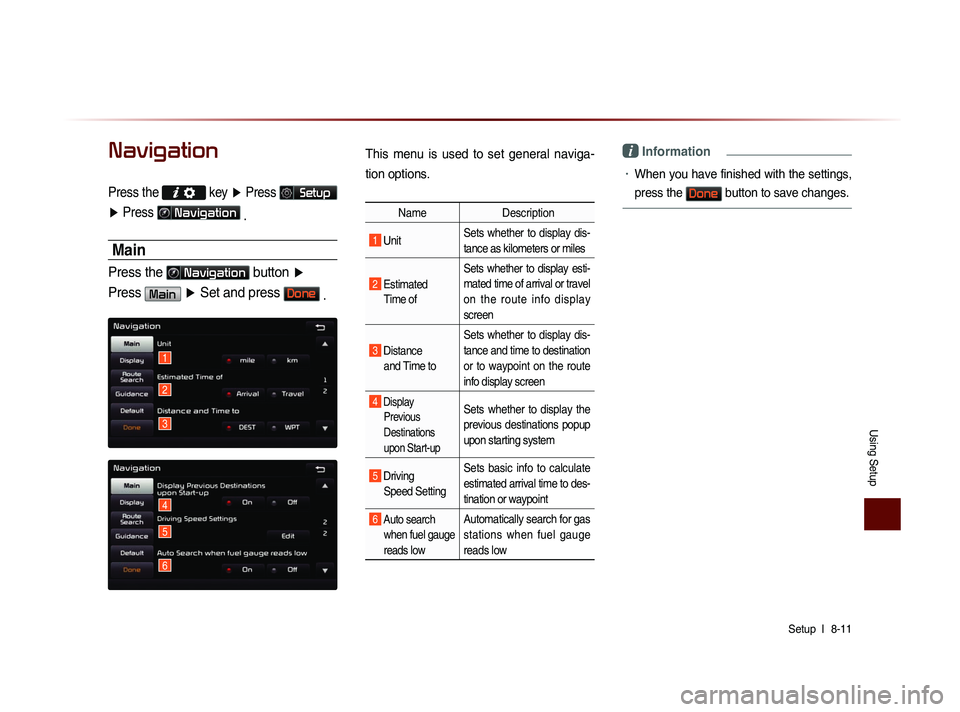
This menu is used to set general naviga-
tion options.
Name Description
1 Unit Sets whether to display dis-
tance as kilometers or miles
2 Estimated
Time of Sets whether to display esti-
mated time of arrival or travel
on the route info display
screen
3 Distance
and Time to Sets whether to display dis-
tance and time to destination
or to waypoint on the route
info display screen
4 Display
Previous
Destinations
upon Start-up Sets whether to display the
previous destinations popup
upon starting system
5 Driving Speed Setting Sets basic info to calculate
estimated arrival time to des-
tination or waypoint
6 Auto search
when fuel gauge
reads lowAutomatically search for gas
stations when fuel gauge
reads low
i Information
• When you have finished with the settings,
press the
Done button to save changes.
1
2
3
4
5
6
Page 198 of 236
8-12
Using Setup
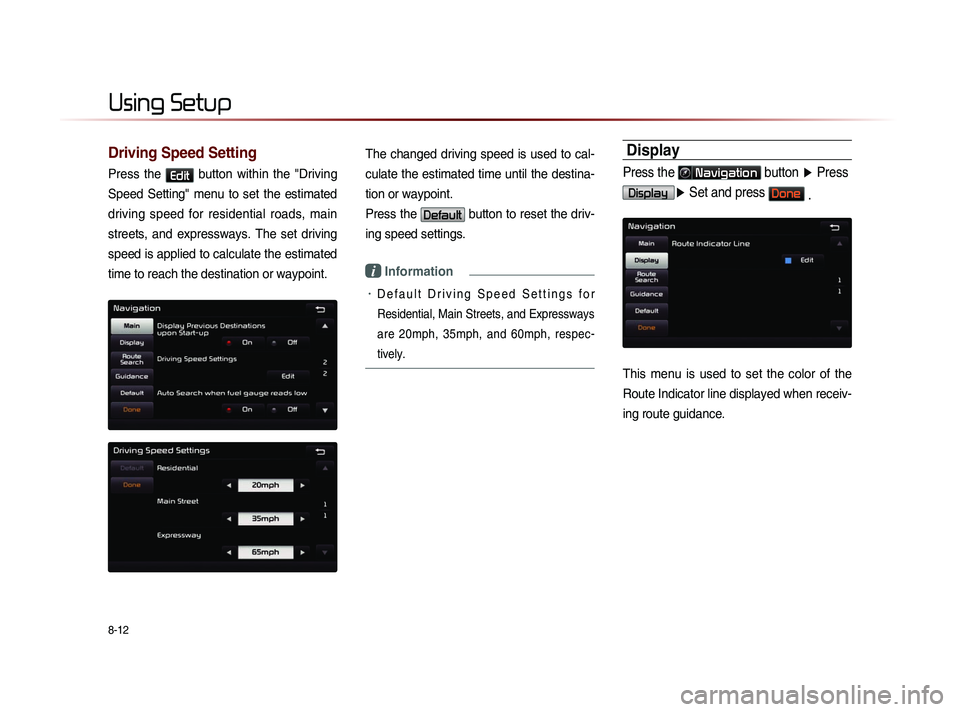
Driving Speed Setting
Press the Edit button within the "Driving
Speed Setting" menu to set the estimated
driving speed for residential roads, main
streets, and expressways. The set driving
speed is applied to calculate the estimated
time to reach the destination or waypoint.
The changed driving speed is used to cal-
culate the estimated time until the destina-
tion or waypoint.
Press the
Default button to reset the driv-
ing speed settings.
i Information
• D e f a u l t D r i v i n g S p e e d S e t t i n g s f o r
Residential, Main Streets, and Expressways
are 20mph, 35mph, and 60mph, respec-
tively.
Display
Press the Navigation button ▶ Press
Display▶ Set and press Done .
This menu is used to set the color of the
Route Indicator line displayed when receiv-
ing route guidance.
Page 199 of 236
Using Setup
Setup l
8-13
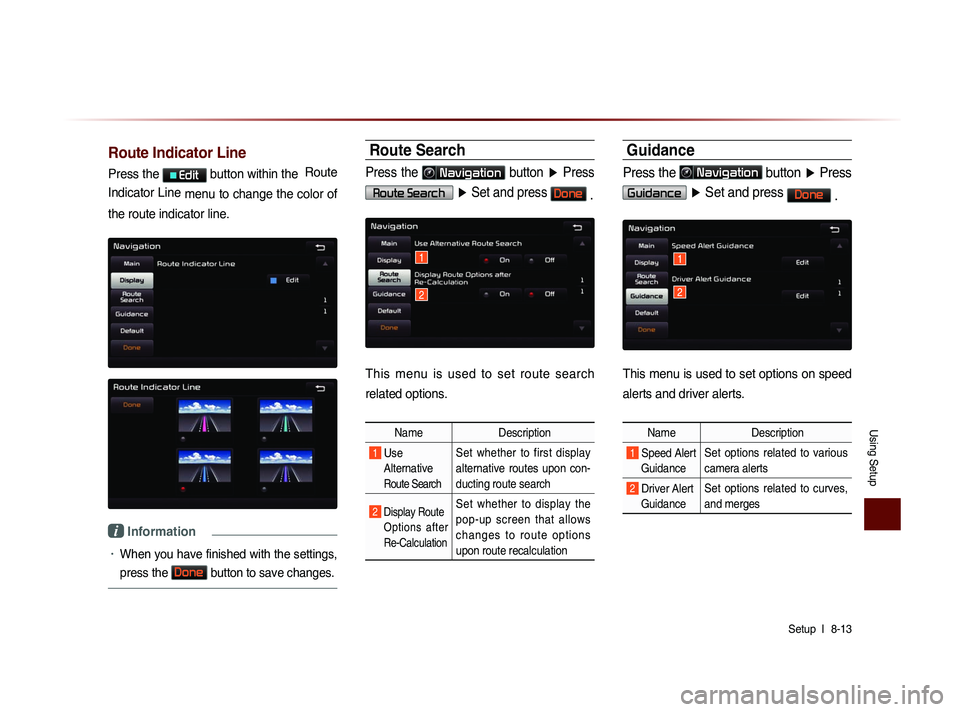
Route Indicator Line
Press the Edit button within the Route
Indicator Line menu to change the color of
the route indicator line.
i Information
• When you have finished with the settings,
press the
Done
button to save changes.
Route Search
Press the Navigation button ▶ Press
Route Search ▶ Set and press Done .
This menu is used to set route search
related options.
Name Description
1 Use
Alternative
Route Search
Set whether to first display
alternative routes upon con-
ducting route search
2 Display Route Options after
Re-Calculation Set whether to display the
pop-up screen that allows
c h a n g e s t o r o u t e o p t i o n s
upon route recalculation
Guidance
Press the Navigation button ▶ Press
Guidance ▶ Set and press Done
.
This menu is used to set options on speed
alerts and driver alerts.
Name Description
1 Speed Alert
Guidance Set options related to various
camera alerts
2 Driver Alert
Guidance Set options related to curves,
and merges
1
2
1
2
Page 204 of 236
8-18
Using Setup
Name Description
1 Data Radio ID C h e c k i n f o r m a t i o n o n
SIRIUS traffic data service
activation and activation ID
2 Display Traffic
and Flow Data
on Map Sets whether to display real-
time traffic information on
map
3 Voice Prompt
for Traffic and
Flow Warning S e t s w h e t h e r t o r e c e i v e
voice prompts for real-time
traffic information and condi-
tions
4 Provide
Re-Routing
Options S e t s w h e t h e r t o u s e r e -
routing options by reflecting
traffic conditions
i Information
• SIRIUS Traffic Data service requires a
separate subscription. To subscribe to
this service, please contact the number
displayed on the screen.
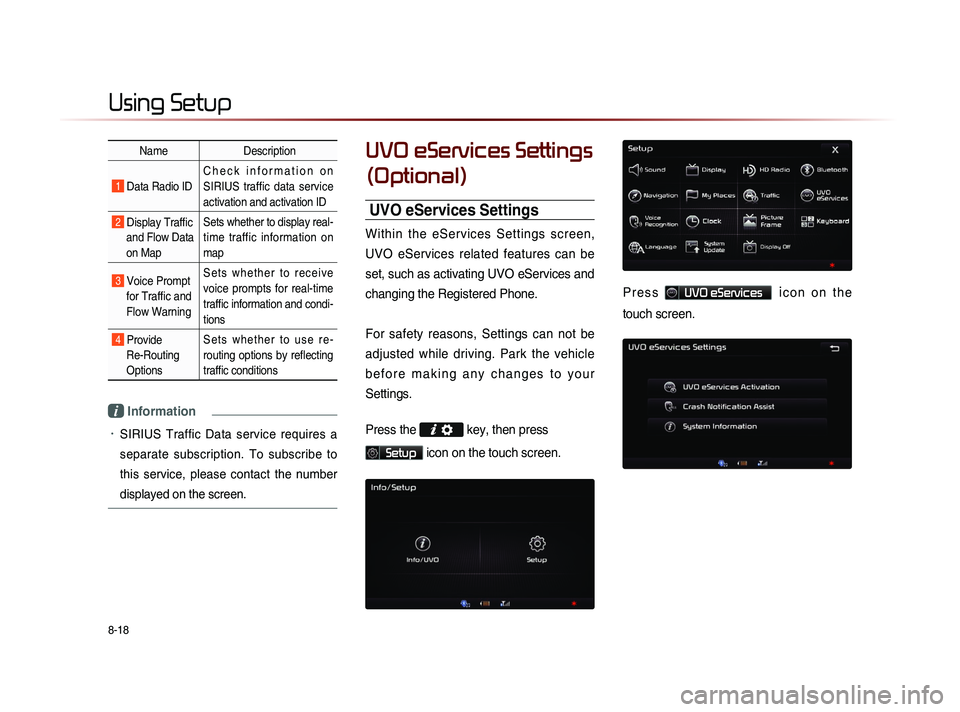
UVO eServices Settings
(Optional)
UVO eServices Settings
Within the eServices Settings screen,
UVO eServices related features can be
set, such as activating UVO eServices and
changing the Registered Phone.
For safety reasons, Settings can not be
adjusted while driving. Park the vehicle
b e f o r e m a k i n g a n y c h a n g e s t o y o u r
Settings.
Press the
key, then press
Setup icon on the touch screen.
P r e s s UVO eServices ic o n o n t h e
touch screen.
Page 207 of 236
Using Setup
Setup l
8-21
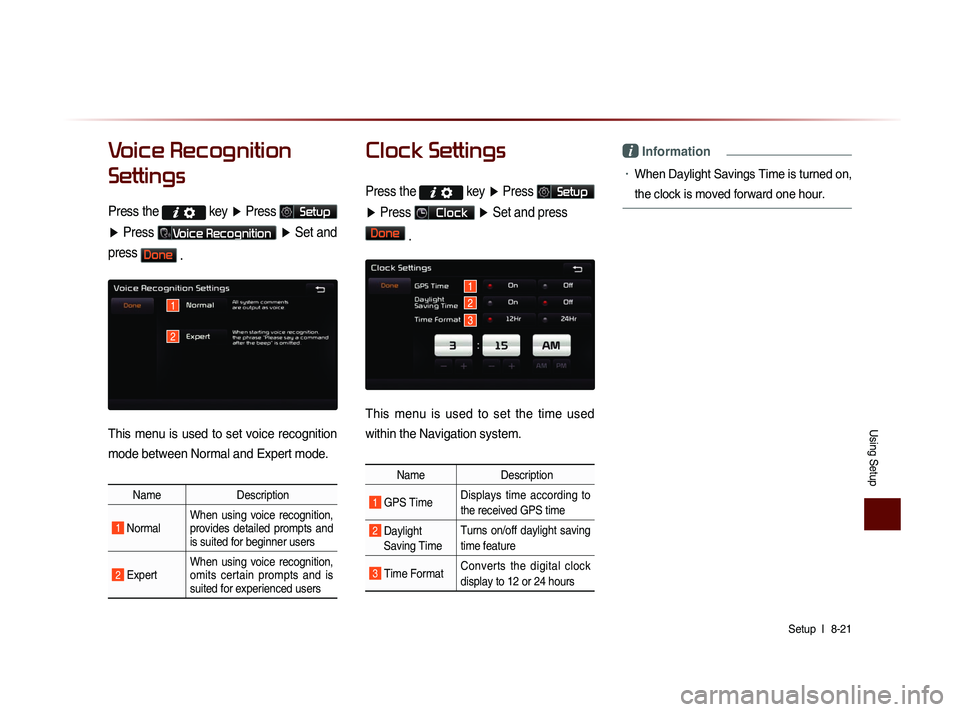
Voice Recognition
Settings
Press the key
▶ Press Setup
▶ Press
Voice Recognition ▶ Set and
press
Done .
This menu is used to set voice recognition
mode between Normal and Expert mode.
Name Description
1 Normal When using voice recognition,
provides detailed prompts and
is suited for beginner users
2 Expert When using voice recognition,
omits certain prompts and is
suited for experienced users
Clock Settings
Press the key
▶ Press Setup
▶ Press
Clock ▶ Set and press
Done
.
This menu is used to set the time used
within the Navigation system.
Name Description
1 GPS Time Displays time according to
the received GPS time
2 Daylight
Saving Time Turns on/off daylight saving
time feature
3 Time Format
Converts the digital clock
display to 12 or 24 hours
i Information
• When Daylight Savings Time is turned on,
the clock is moved forward one hour.
1
2
1
2
3
Page 208 of 236
8-22
Using Setup
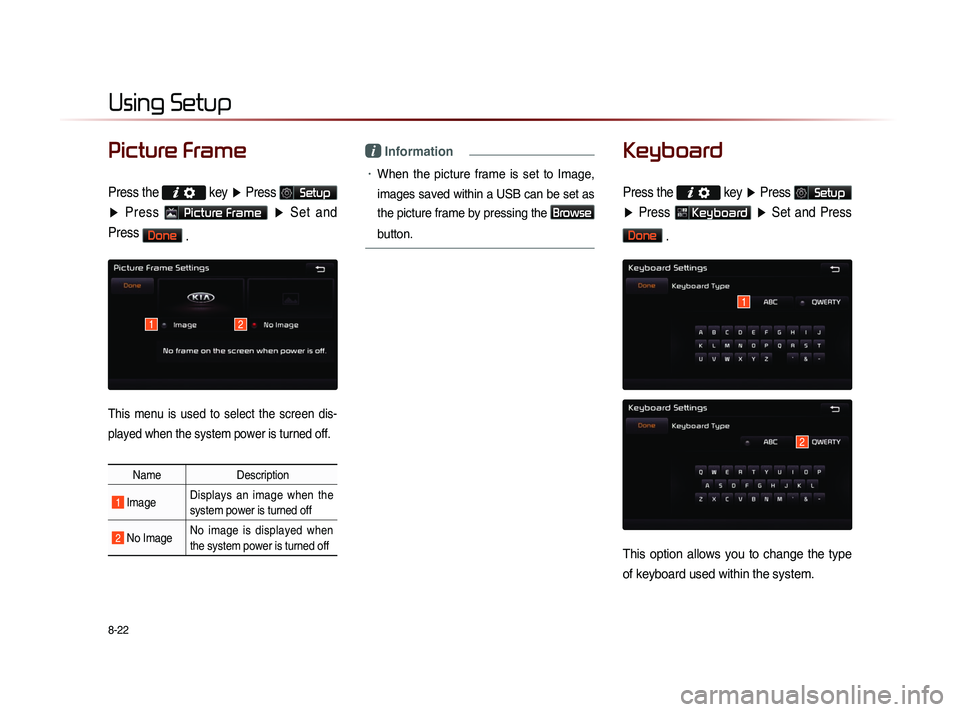
Picture Frame
Press the
key ▶ Press Setup
▶ Press
Picture Frame ▶ Set and
Press
Done .
This menu is used to select the screen dis-
played when the system power is turned off.
Name Description
1 Image Displays an image when the
system power is turned off
2 No Image No image is displayed when
the system power is turned off
i Information
• When the picture frame is set to Image,
images saved within a USB can be set as
the picture frame by pressing the
Browse
button.
Keyboard
Press the
key ▶ Press Setup
▶ Press
Keyboard ▶ Set and Press
Done
.
This option allows you to change the type
of keyboard used within the system.
1
2
12
Page 209 of 236
Using Setup
Setup l
8-23
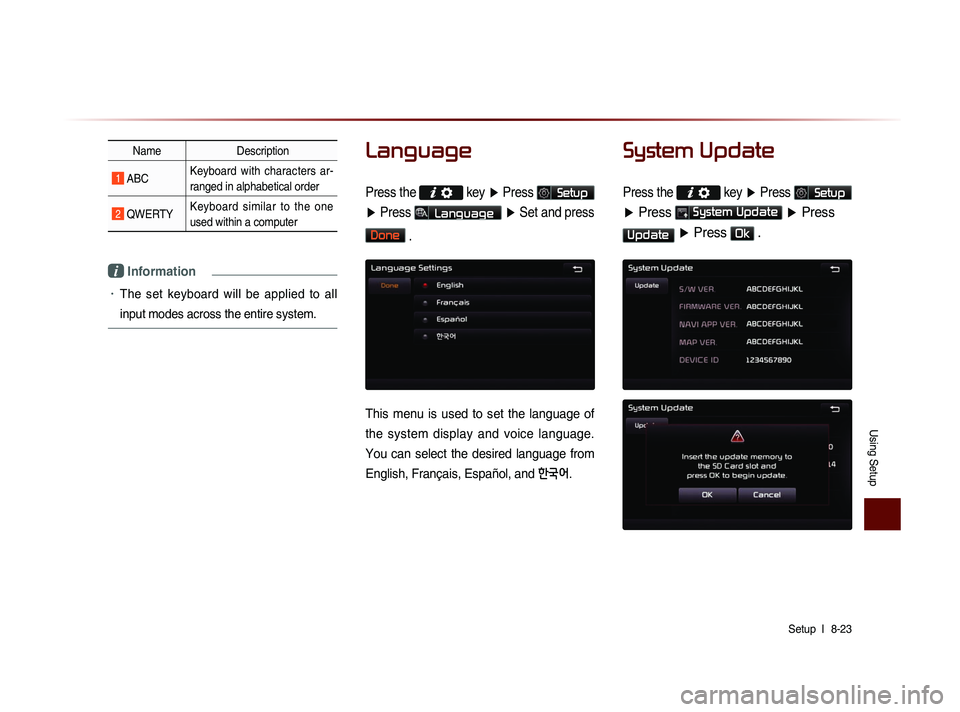
Name Description
1 ABC Keyboard with characters ar-
ranged in alphabetical order
2 QWERTY Keyboard similar to the one
used within a computer
i Information
• The set keyboard will be applied to all
input modes across the entire system.
Language
Press the key
▶ Press Setup
▶ Press
Language ▶ Set and press
Done
.
This menu is used to set the language of
the system display and voice language.
You can select the desired language from
English, Français, Español, and
한국어.
System Update
Press the key ▶ Press Setup
▶ Press System Update ▶ Press
Update ▶ Press Ok .
Page 210 of 236
8-24
Using Setup
After inserting the SD card with the update
file, press
Ok to start the update.
Once updating is complete, the system will
automatically restart.
i Information
• This product requires regular updates for
software corrections, new functions and
map updates. Updating may require up to
1 hour depending on the data size.
• Turning off the power or ejecting the
SD card during the update process may
result in data loss. Make sure to keep the
ignition on and wait until updating is com-
plete.
• Map and software updates can be down-
loaded from the designated website
(http://www.mapnsoft.com) and updated
through the SD card.
CAUTION
• Please use only the SD card that was
included with the vehicle purchase.
• The use of a separately purchased SD
card may result in damage due to heat
related deformation.
• Product malfunctions caused by the use
of separately purchased SD cards shall
not be covered within the product war-
ranty.
• Repeatedly connecting/disconnecting
the SD card in a short period of time may
cause damage to the device.
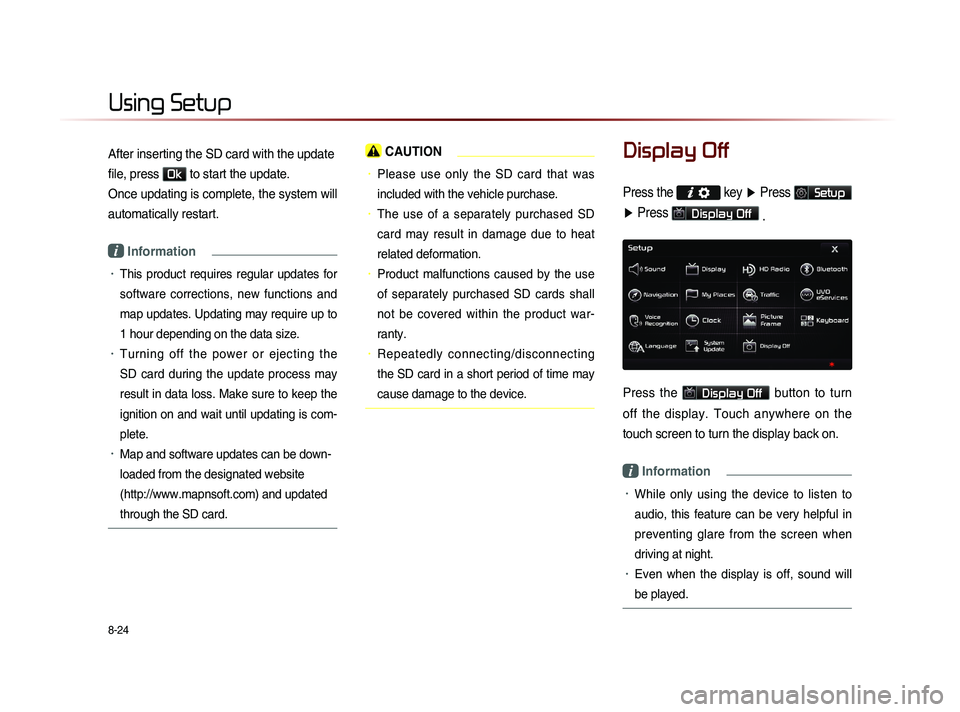
Display Off
Press the key ▶ Press Setup
▶ Press
Display Off
.
Press the Display Off button to turn
off the display. Touch anywhere on the
touch screen to turn the display back on.
i Information
• While only using the device to listen to
audio, this feature can be very helpful in
preventing glare from the screen when
driving at night.
• Even when the display is off, sound will
be played.
Page 212 of 236

9-2
Appendix
Product Specification
TFT-LCD
Screen Size Navigation Device - 20.32cm (176.4 x 99.36mm)
Resolution
Navigation Device - 384,000 pixels (Resolution: 800 x 480)
Operating
MethodTFT(Thin Film Transistor) Active Matrix
Viewing Angle Left/Right, Top/Bottom : ALL 80 °
Internal LightingLED 18EA
Radio
Channels FM : 87.5 MHz ~ 107.9 MHz(Step : 200 kHz)
AM : 530 kHz ~ 1710 kHz(Step : 10 kHz)
Sensitivity FM : Under 10dBu/AM : Under 40dBu
Distortion FactorWithin 2% Speakers 2 ~ 8 Ω
Integrated Antenna
Operating
Temperature -30 ~ +85
℃
(-22 ℉
~ +185 ℉
)
Storage
Temperature -40 ~
105℃
(-
40℉
~ 220 ℉
)
Dimensions 132.9mm(W) x 63.2mm(H) x 225.5mm(L)
Weight 270g
Common
NameCar TFT LCD Display Navigation Unit
Power Supply DC 14.4V Operating
PowerDC 9V ~ DC 16V
Current
Consumption 2.5A
Dark Current2mA
(Head Unit Only)
Operating
Temperature -20 ~ +70
℃
(-4 ~ +158
℉) Storage
Temperature -30 ~ 80
℃
(-22 ~ 176℉)
Dimensions 264mm(W) x 198mm(H) x 239mm(D)
Weight 2.7Kg
Appendix