driver KIA Sorento 2016 3.G User Guide
[x] Cancel search | Manufacturer: KIA, Model Year: 2016, Model line: Sorento, Model: KIA Sorento 2016 3.GPages: 565, PDF Size: 10.63 MB
Page 32 of 565
315
Safety features of your vehicle
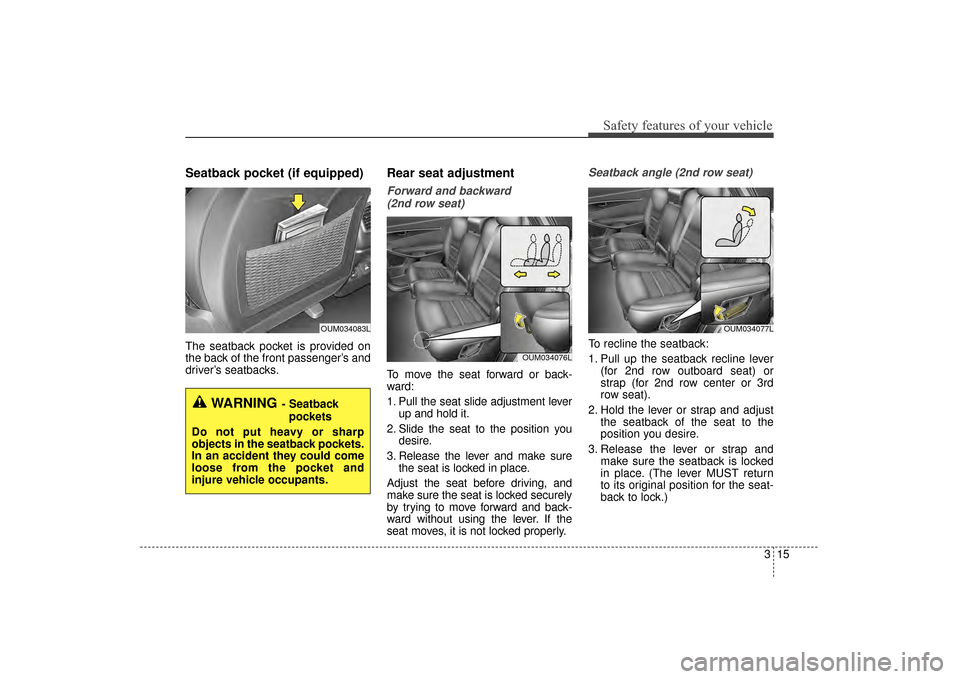
Seatback pocket (if equipped)
The seatback pocket is provided on
the back of the front passenger’s and
driver’s seatbacks.
Rear seat adjustment
Forward and backward (2nd row seat)
To move the seat forward or back-
ward:
1. Pull the seat slide adjustment lever up and hold it.
2. Slide the seat to the position you desire.
3. Release the lever and make sure the seat is locked in place.
Adjust the seat before driving, and
make sure the seat is locked securely
by trying to move forward and back-
ward without using the lever. If the
seat moves, it is not locked properly.
Seatback angle (2nd row seat)
To recline the seatback:
1. Pull up the seatback recline lever (for 2nd row outboard seat) or
strap (for 2nd row center or 3rd
row seat).
2. Hold the lever or strap and adjust the seatback of the seat to the
position you desire.
3. Release the lever or strap and make sure the seatback is locked
in place. (The lever MUST return
to its original position for the seat-
back to lock.)
WARNING- Seatback
pockets
Do not put heavy or sharp
objects in the seatback pockets.
In an accident they could come
loose from the pocket and
injure vehicle occupants.
OUM034083L
OUM034076L
OUM034077L
UM CAN (ENG) 3.QXP 12/1/2014 11:58 AM Page 15
Page 42 of 565
325
Safety features of your vehicle
No modifications or additionsshould be made by the user which
will either prevent the seat belt
adjusting devices from operating to
remove slack, or prevent the seat
belt assembly from being adjusted
to remove slack.
When you fasten the seat belt, be careful not to latch the seat belt in
buckles of other seat. It's very dan-
gerous and you may not be pro-
tected by the seat belt properly.
Do not unfasten the seat belt and do not fasten and unfasten the seat
belt repeatedly while driving. This
could result in loss of control, and
an accident causing death, serious
injury, or property damage.
When fastening the seat belt, make sure that the seat belt does
not pass over objects that are hard
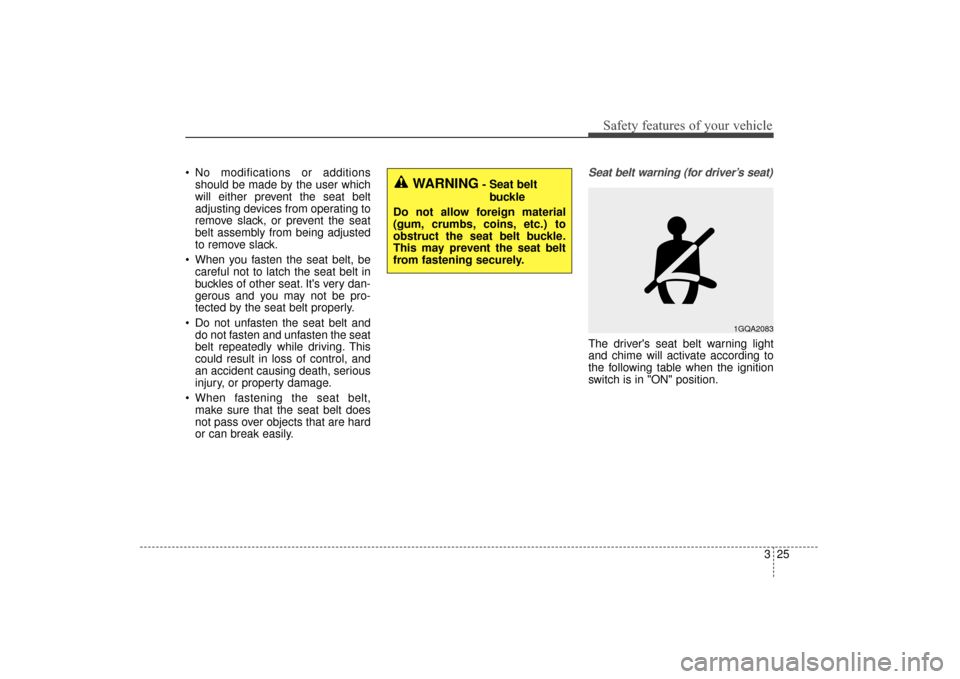
or can break easily.Seat belt warning (for driver’s seat)
The driver's seat belt warning light
and chime will activate according to
the following table when the ignition
switch is in "ON" position.
1GQA2083
WARNING- Seat belt
buckle
Do not allow foreign material
(gum, crumbs, coins, etc.) to
obstruct the seat belt buckle.
This may prevent the seat belt
from fastening securely.
UM CAN (ENG) 3.QXP 12/1/2014 11:59 AM Page 25
Page 43 of 565
Safety features of your vehicle
26
3
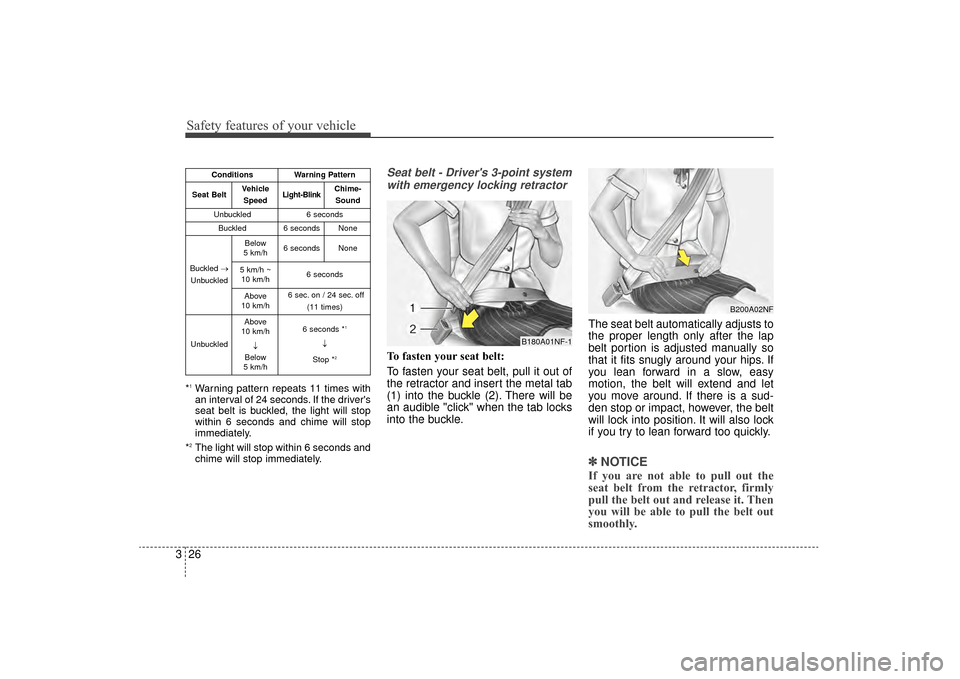
*1Warning pattern repeats 11 times with
an interval of 24 seconds. If the driver's
seat belt is buckled, the light will stop
within 6 seconds and chime will stop
immediately.
*
2The light will stop within 6 seconds and
chime will stop immediately.
Seat belt - Driver's 3-point system with emergency locking retractor
To fasten your seat belt:
To fasten your seat belt, pull it out of
the retractor and insert the metal tab
(1) into the buckle (2). There will be
an audible "click" when the tab locks
into the buckle. The seat belt automatically adjusts to
the proper length only after the lap
belt portion is adjusted manually so
that it fits snugly around your hips. If
you lean forward in a slow, easy
motion, the belt will extend and let
you move around. If there is a sud-
den stop or impact, however, the belt
will lock into position. It will also lock
if you try to lean forward too quickly.
✽ ✽
NOTICE
If you are not able to pull out the
seat belt from the retractor, firmly
pull the belt out and release it. Then
you will be able to pull the belt out
smoothly.
ConditionsWarning Pattern
Seat BeltVehicle
SpeedLight-BlinkChime-Sound
Unbuckled6 seconds
Buckled6 secondsNone
Buckled →
Unbuckled
Below
5 km/h6 secondsNone
5 km/h ~ 10 km/h6 seconds
Above
10 km/h6 sec. on / 24 sec. off
(11 times)
Unbuckled
Above
10 km/h
↓
Below
5 km/h6 seconds *1
↓
Stop *
2
B180A01NF-1
B200A02NF
UM CAN (ENG) 3.QXP 12/1/2014 11:59 AM Page 26
Page 44 of 565
327
Safety features of your vehicle
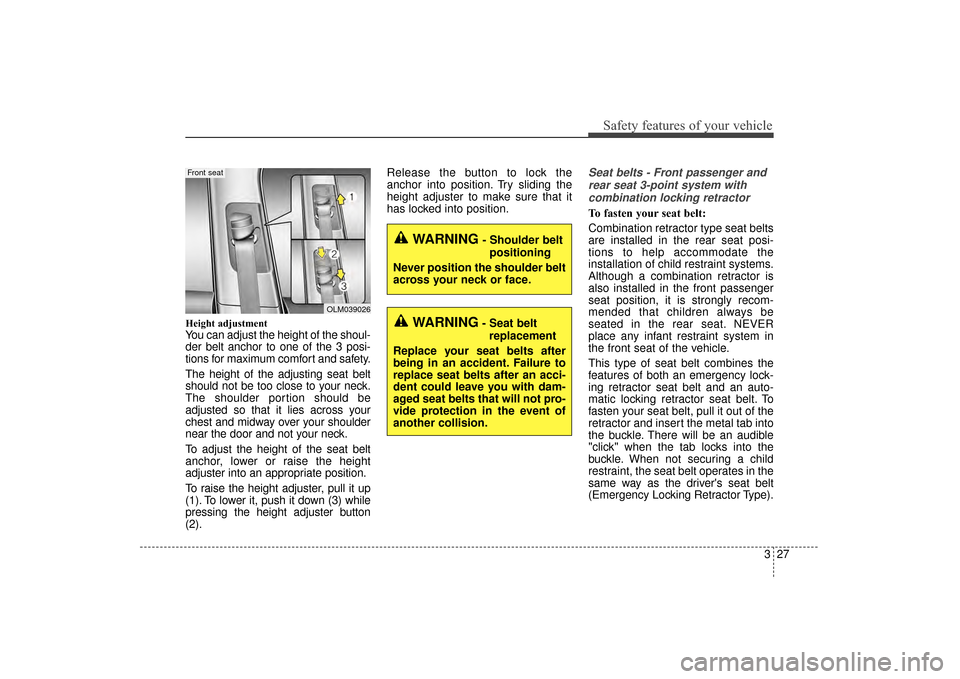
Height adjustment
You can adjust the height of the shoul-
der belt anchor to one of the 3 posi-
tions for maximum comfort and safety.
The height of the adjusting seat belt
should not be too close to your neck.
The shoulder portion should be
adjusted so that it lies across your
chest and midway over your shoulder
near the door and not your neck.
To adjust the height of the seat belt
anchor, lower or raise the height
adjuster into an appropriate position.
To raise the height adjuster, pull it up
(1). To lower it, push it down (3) while
pressing the height adjuster button
(2).Release the button to lock the
anchor into position. Try sliding the
height adjuster to make sure that it
has locked into position.
Seat belts - Front passenger and
rear seat 3-point system withcombination locking retractor
To fasten your seat belt:
Combination retractor type seat belts
are installed in the rear seat posi-
tions to help accommodate the
installation of child restraint systems.
Although a combination retractor is
also installed in the front passenger
seat position, it is strongly recom-
mended that children always be
seated in the rear seat. NEVER
place any infant restraint system in
the front seat of the vehicle.
This type of seat belt combines the
features of both an emergency lock-
ing retractor seat belt and an auto-
matic locking retractor seat belt. To
fasten your seat belt, pull it out of the
retractor and insert the metal tab into
the buckle. There will be an audible
"click" when the tab locks into the
buckle. When not securing a child
restraint, the seat belt operates in the
same way as the driver's seat belt
(Emergency Locking Retractor Type).
OLM039026
Front seat
WARNING- Shoulder belt positioning
Never position the shoulder belt
across your neck or face.
WARNING- Seat belt replacement
Replace your seat belts after
being in an accident. Failure to
replace seat belts after an acci-
dent could leave you with dam-
aged seat belts that will not pro-
vide protection in the event of
another collision.
UM CAN (ENG) 3.QXP 12/1/2014 11:59 AM Page 27
Page 47 of 565
Safety features of your vehicle
30
3
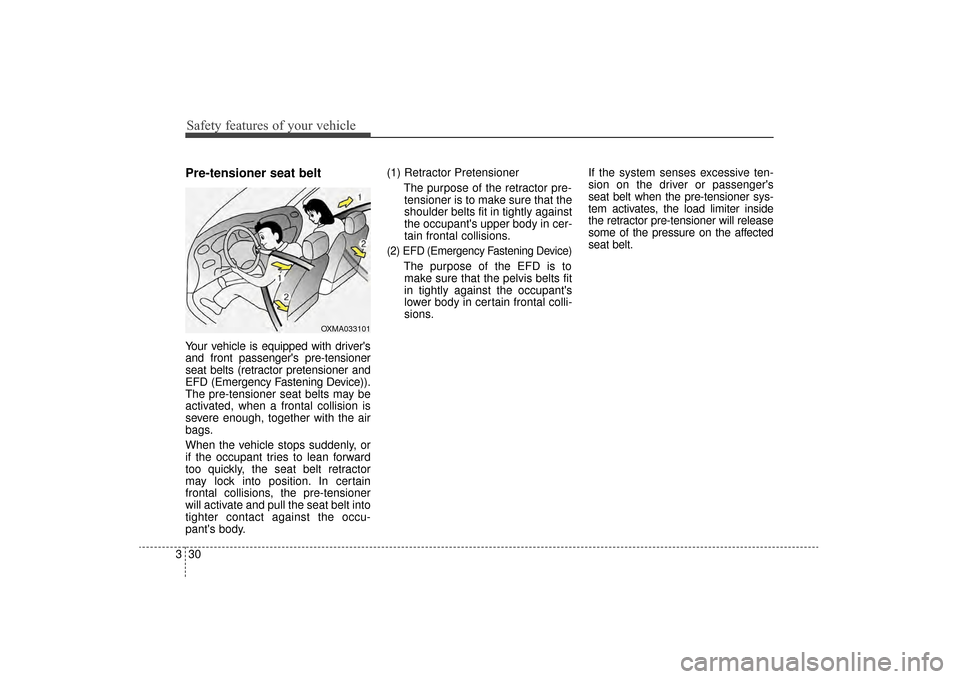
Pre-tensioner seat belt
Your vehicle is equipped with driver's
and front passenger's pre-tensioner
seat belts (retractor pretensioner and
EFD (Emergency Fastening Device)).
The pre-tensioner seat belts may be
activated, when a frontal collision is
severe enough, together with the air
bags.
When the vehicle stops suddenly, or
if the occupant tries to lean forward
too quickly, the seat belt retractor
may lock into position. In certain
frontal collisions, the pre-tensioner
will activate and pull the seat belt into
tighter contact against the occu-
pant's body. (1) Retractor Pretensioner
The purpose of the retractor pre-tensioner is to make sure that the
shoulder belts fit in tightly against
the occupant's upper body in cer-
tain frontal collisions.
(2) EFD (Emergency Fastening Device)
The purpose of the EFD is tomake sure that the pelvis belts fit
in tightly against the occupant's
lower body in certain frontal colli-
sions. If the system senses excessive ten-
sion on the driver or passenger's
seat belt when the pre-tensioner sys-
tem activates, the load limiter inside
the retractor pre-tensioner will release
some of the pressure on the affected
seat belt.
OXMA033101
UM CAN (ENG) 3.QXP 12/1/2014 11:59 AM Page 30
Page 48 of 565
331
Safety features of your vehicle
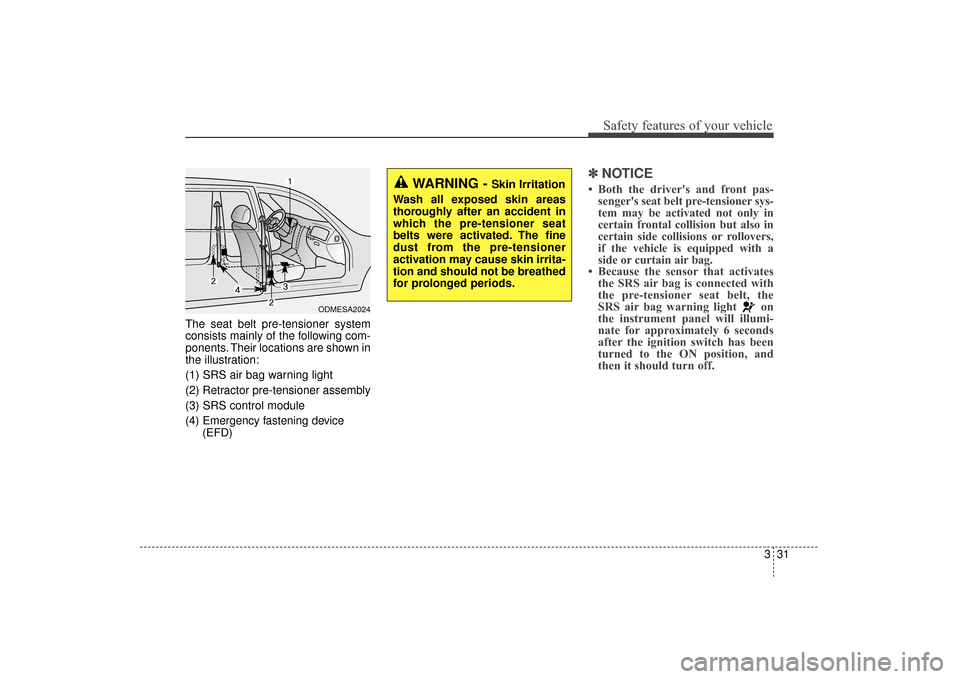
The seat belt pre-tensioner system
consists mainly of the following com-
ponents. Their locations are shown in
the illustration:
(1) SRS air bag warning light
(2) Retractor pre-tensioner assembly
(3) SRS control module
(4) Emergency fastening device(EFD)
✽ ✽NOTICE
• Both the driver's and front pas-
senger's seat belt pre-tensioner sys-
tem may be activated not only in
certain frontal collision but also in
certain side collisions or rollovers,
if the vehicle is equipped with a
side or curtain air bag.
• Because the sensor that activates the SRS air bag is connected with
the pre-tensioner seat belt, the
SRS air bag warning light on
the instrument panel will illumi-
nate for approximately 6 seconds
after the ignition switch has been
turned to the ON position, and
then it should turn off.
ODMESA2024
WARNING - Skin Irritation
Wash all exposed skin areas
thoroughly after an accident in
which the pre-tensioner seat
belts were activated. The fine
dust from the pre-tensioner
activation may cause skin irrita-
tion and should not be breathed
for prolonged periods.
UM CAN (ENG) 3.QXP 12/1/2014 11:59 AM Page 31
Page 60 of 565
343
Safety features of your vehicle
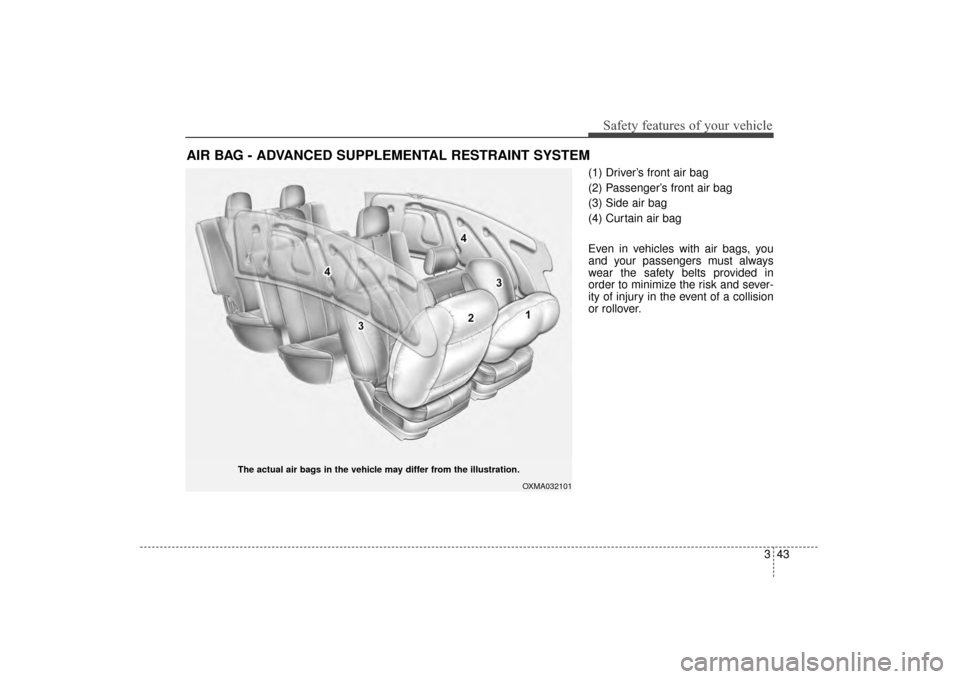
(1) Driver’s front air bag
(2) Passenger’s front air bag
(3) Side air bag
(4) Curtain air bag
Even in vehicles with air bags, you
and your passengers must always
wear the safety belts provided in
order to minimize the risk and sever-
ity of injury in the event of a collision
or rollover.
AIR BAG - ADVANCED SUPPLEMENTAL RESTRAINT SYSTEM
The actual air bags in the vehicle may differ from the illustration.
OXMA032101
UM CAN (ENG) 3.QXP 12/1/2014 12:00 PM Page 43
Page 62 of 565
345
Safety features of your vehicle
Noise and smoke
When inflated, the air bags make a
loud noise and leave smoke and
powder in the air inside the vehicle.
This is normal and is a result of the
ignition of the air bag inflator. After
the air bag inflates, you may feel sub-
stantial discomfort in breathing due
to the contact of your chest with both
the seat belt and the air bag, as well
as from breathing the smoke and
powder.Open your doors and/or
windows as soon as possible after
impact in order to reduce discom-
fort and prevent prolonged expo-
sure to the smoke and powder.
Though smoke and powder are non-
toxic, it may cause irritation to the
skin (eyes, nose and throat, etc). If
this is the case, wash and rinse with
cold water immediately and consult a
doctor if the symptom persists.WARNING- Hot compo-
nents
Do not touch the air bag storage
area's internal components
immediately after airbag infla-
tion. The air bag related parts in
the steering wheel, instrument
panel and the roof rails above
the front and rear doors are
very hot. Hot components can
result in burn injuries.WARNING- Airbag infla- tion
Sit as far back as possible from
the steering wheel while still
maintaining comfortable con-
trol of your vehicle. A distance
of at least 10" from your chest
to the steering wheel is recom-
mended. Failure to do so can
result in airbag inflation injuries
to the driver.
UM CAN (ENG) 3.QXP 12/1/2014 12:00 PM Page 45
Page 64 of 565
347
Safety features of your vehicle
SRS components and functions
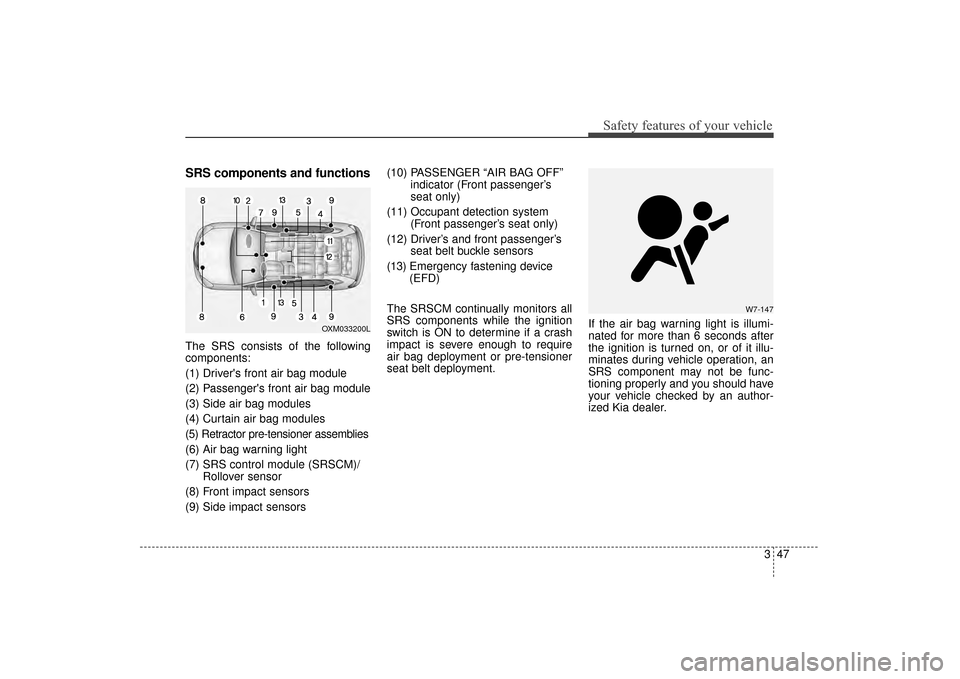
The SRS consists of the following
components:
(1) Driver's front air bag module
(2) Passenger's front air bag module
(3) Side air bag modules
(4) Curtain air bag modules
(5) Retractor pre-tensioner assemblies
(6) Air bag warning light
(7) SRS control module (SRSCM)/Rollover sensor
(8) Front impact sensors
(9) Side impact sensors (10) PASSENGER “AIR BAG OFF”
indicator (Front passenger’s
seat only)
(11) Occupant detection system (Front passenger’s seat only)
(12) Driver’s and front passenger’s seat belt buckle sensors
(13) Emergency fastening device
(EFD)
The SRSCM continually monitors all
SRS components while the ignition
switch is ON to determine if a crash
impact is severe enough to require
air bag deployment or pre-tensioner
seat belt deployment. If the air bag warning light is illumi-
nated for more than 6 seconds after
the ignition is turned on, or of it illu-
minates during vehicle operation, an
SRS component may not be func-
tioning properly and you should have
your vehicle checked by an author-
ized Kia dealer.
W7-147
OXM033200L
UM CAN (ENG) 3.QXP 12/1/2014 12:00 PM Page 47
Page 65 of 565
Safety features of your vehicle
48
3
If any of the following conditions
occurs, this indicates a malfunction
in the air bag system. Have an
authorized Kia dealer inspect the air
bag system as soon as possible.
The light does not turn on briefly
when you turn the ignition ON.
The light stays on after illuminating for approximately 6 seconds.
The light comes on while the vehi- cle is in motion.
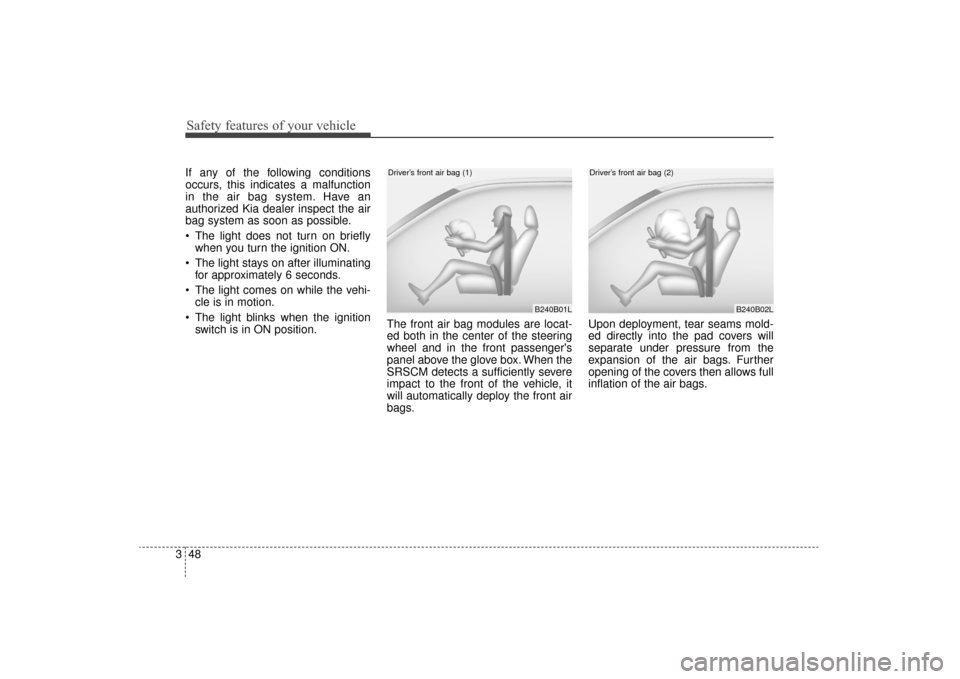
The light blinks when the ignition switch is in ON position. The front air bag modules are locat-
ed both in the center of the steering
wheel and in the front passenger's
panel above the glove box. When the
SRSCM detects a sufficiently severe
impact to the front of the vehicle, it
will automatically deploy the front air
bags. Upon deployment, tear seams mold-
ed directly into the pad covers will
separate under pressure from the
expansion of the air bags. Further
opening of the covers then allows full
inflation of the air bags.
B240B01L
Driver’s front air bag (1)
B240B02L
Driver’s front air bag (2)
UM CAN (ENG) 3.QXP 12/1/2014 12:00 PM Page 48