turn KIA SOUL 2021 Navigation System Quick Reference Guide
[x] Cancel search | Manufacturer: KIA, Model Year: 2021, Model line: SOUL, Model: KIA SOUL 2021Pages: 211, PDF Size: 6.67 MB
Page 24 of 211
1-4
Turning the system on or off
The following explains how to turn on or off the system. Before
using the system, be sure to read the user's manual for safe and
convenient manipulation.
Turning on the system
1 Turn on the vehicle.
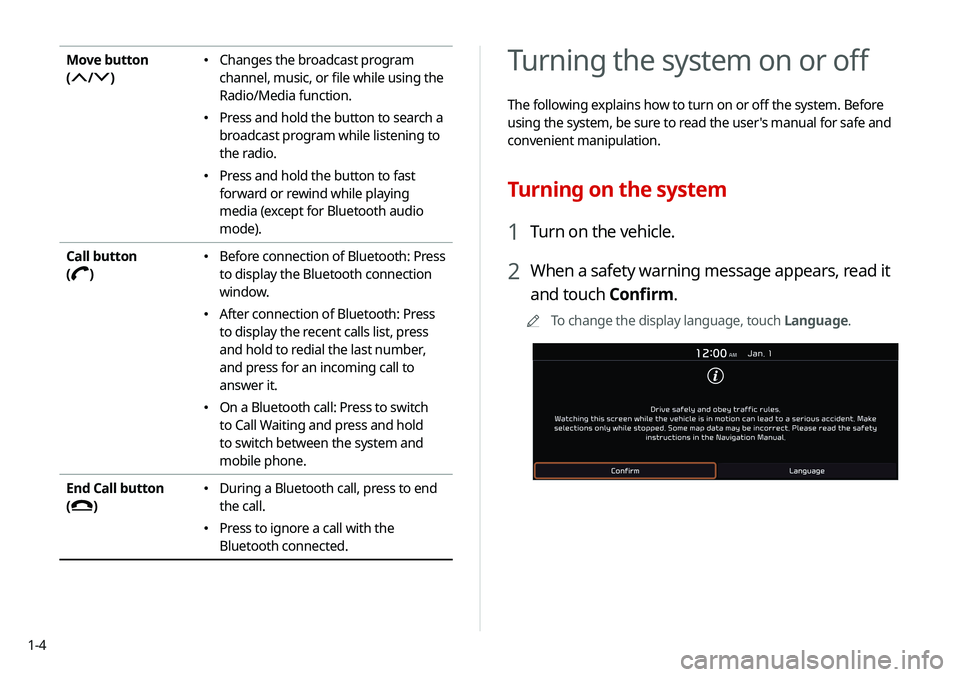
2 When a safety warning message appears, read it
and touch Confirm.
0000
A
To change the display language, touch Language.
Move button
(
/)
\225Changes the broadcast program
channel, music, or file while using the
Radio/Media function.
\225Press and hold the button to search a
broadcast program while listening to
the radio.
\225Press and hold the button to fast
forward or rewind while playing
media (except for Bluetooth audio
mode).
Call button
(
)
\225 Before connection of Bluetooth: Press
to display the Bluetooth connection
window.
\225After connection of Bluetooth: Press
to display the recent calls list, press
and hold to redial the last number,
and press for an incoming call to
answer it.
\225On a Bluetooth call: Press to switch
to Call Waiting and press and hold
to switch between the system and
mobile phone.
End Call button
(
)
\225 During a Bluetooth call, press to end
the call.
\225Press to ignore a call with the
Bluetooth connected.
Page 25 of 211
1-5
\335Warning
\225 Driving while distracted can result in a loss of vehicle control
that may lead to an accident, severe bodily injury, or death.
The driver's primary responsibility is the safe and legal
operation of the vehicle, and the use of any vehicle systems,
including the touch screen and steering wheel controls, which
take the driver's eyes, attention, and focus away from the safe
operation of the vehicle, or which are not permissible by law,
should never be used during the operation of the vehicle.
\225 Some functions may not be active while driving to ensure
safety. Those functions run only when the vehicle is stationary.
In order to use them, first stop the vehicle.
\225 When the screen is not displayed, the volume is muted, or
other system failures occur, immediately stop using the
system. When you use the faulty system continuously, it may
cause fire, electric shock, or fatal system failure.
Turning off the system
To turn off the system while driving, press and hold
the [POWER] button on the panel.
The screen and sound will be turned off.
0000
A
To use the system again, press the [ POWER] button.
0000
A
When a specified period of time elapses after turning off the
vehicle, the system automatically shuts down. When you open
the driver's door, the system immediately shuts down.
Page 26 of 211
1-6
Using the touch screen
This system is equipped with a touch-type screen. You can use
various practices by using this feature.
\335Warning
Do not use the touch screen while driving as this will divert your
attention away from the safe operation of the vehicle. You may
lose your steering control which could cause an accident and
severe bodily injuries.
\334Caution
\225 Do not press the touch screen with excessive force or a sharp
object. The touch screen may become damaged.
\225 Be careful for the touch screen not to contact any electrically
charged object. Static or other electric shock may cause the
system to malfunction or damage the touch screen.
0000
A
The touch screen will not respond when you are wearing
gloves. Take off the gloves or wear electrostatic touch gloves.
\334Caution
\225 The system can be turned on even when the ignition switch is
in “ACC” or “ON.” However, when you use the system without
turning on the vehicle for a long time, it may cause battery
discharge. To use the system for a long time, be sure to turn
on the vehicle.
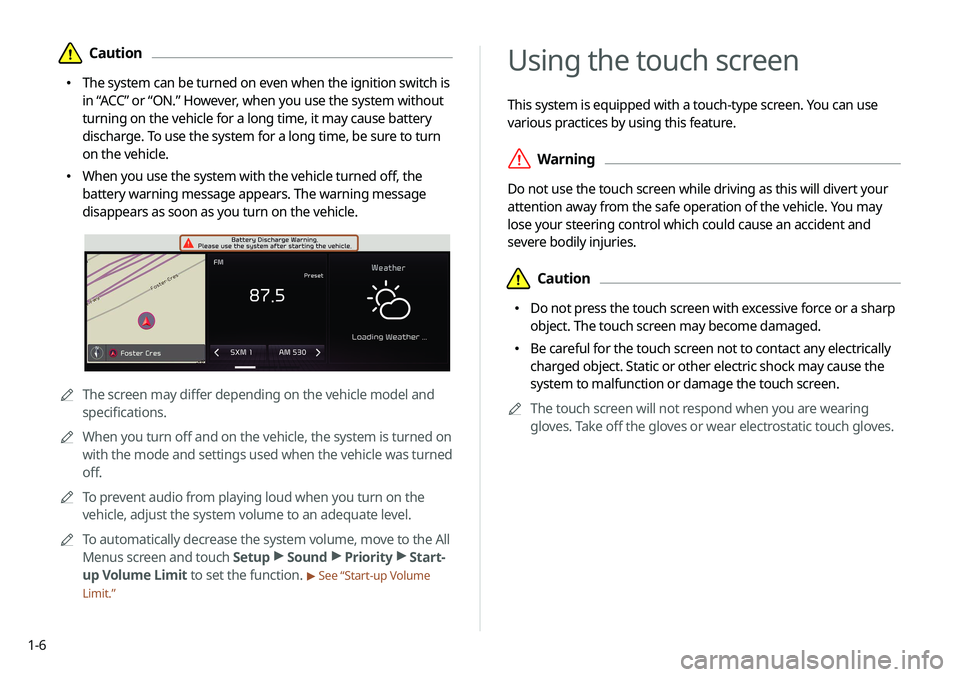
\225 When you use the system with the vehicle turned off, the
battery warning message appears. The warning message
disappears as soon as you turn on the vehicle.
0000AThe screen may differ depending on the vehicle model and
specifications.
0000
A
When you turn off and on the vehicle, the system is turned on
with the mode and settings used when the vehicle was turned
off.
0000
A
To prevent audio from playing loud when you turn on the
vehicle, adjust the system volume to an adequate level.
0000
A
To automatically decrease the system volume, move to the All
Menus screen and touch Setup >
Sound >
Priority >
Start-
up Volume Limit to set the function.
> See “Start-up Volume
Limit.”
Page 30 of 211
1-10
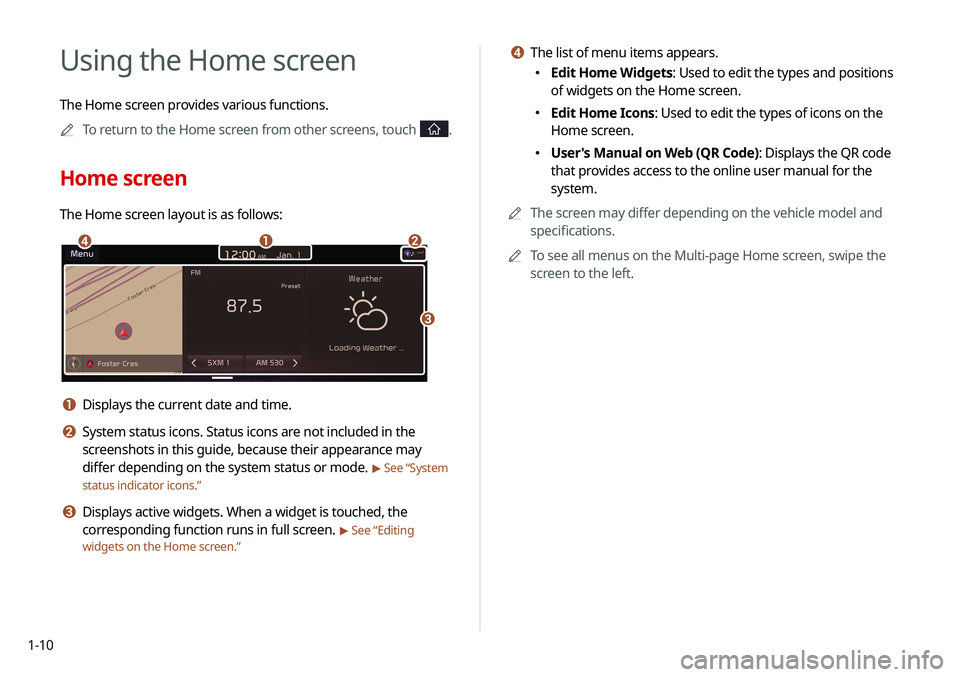
d The list of menu items appears.
\225Edit Home Widgets: Used to edit the types and positions
of widgets on the Home screen.
\225Edit Home Icons: Used to edit the types of icons on the
Home screen.
\225User's Manual on Web (QR Code): Displays the QR code
that provides access to the online user manual for the
system.
0000
A
The screen may differ depending on the vehicle model and
specifications.
0000
A
To see all menus on the Multi-page Home screen, swipe the
screen to the left.
Using the Home screen
The Home screen provides various functions.
0000
A
To return to the Home screen from other screens, touch
.
Home screen
The Home screen layout is as follows:
\037\036
\035
\034
a Displays the current date and time.
b System status icons. Status icons are not included in the
screenshots in this guide, because their appearance may
differ depending on the system status or mode.
> See “System
status indicator icons.”
c Displays active widgets. When a widget is touched, the
corresponding function runs in full screen.
> See “Editing
widgets on the Home screen.”
Page 41 of 211
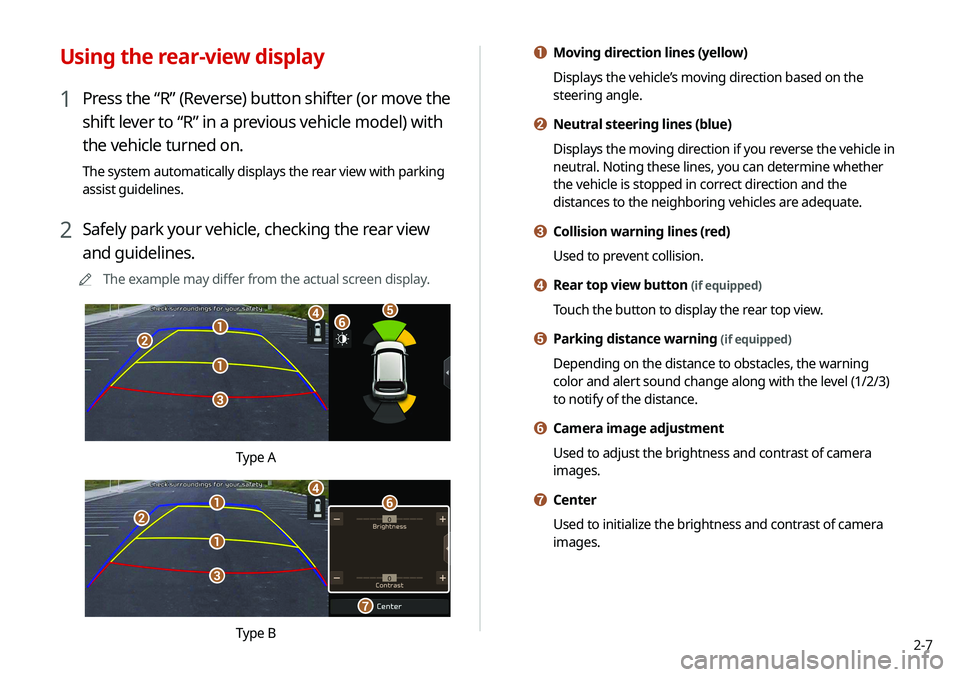
2-7
a Moving direction lines (yellow)
Displays the vehicle’s moving direction based on the
steering angle.
b Neutral steering lines (blue)
Displays the moving direction if you reverse the vehicle in
neutral. Noting these lines, you can determine whether
the vehicle is stopped in correct direction and the
distances to the neighboring vehicles are adequate.
c Collision warning lines (red)
Used to prevent collision.
d Rear top view button (if equipped)
Touch the button to display the rear top view.
e Parking distance warning (if equipped)
Depending on the distance to obstacles, the warning
color and alert sound change along with the level (1/2/3)
to notify of the distance.
f Camera image adjustment
Used to adjust the brightness and contrast of camera
images.
g Center
Used to initialize the brightness and contrast of camera
images.
Using the rear-view display
1 Press the “R” (Reverse) button shifter (or move the
shift lever to “R” in a previous vehicle model) with
the vehicle turned on.
The system automatically displays the rear view with parking
assist guidelines.
2 Safely park your vehicle, checking the rear view
and guidelines.
0000
A
The example may differ from the actual screen display.
\037
\037
\036
\035
\034\033\032
Type A
\037
\037
\036
\035
\034
\033
\032
Type B
Page 42 of 211
2-8
Using the HD Radio Data
You can access an array of information with HD radio data such
as HD Radio™.0000
A
HD radio data are available only in metropolitan areas.
1 On the All Menus screen, touch HD Radio Data.
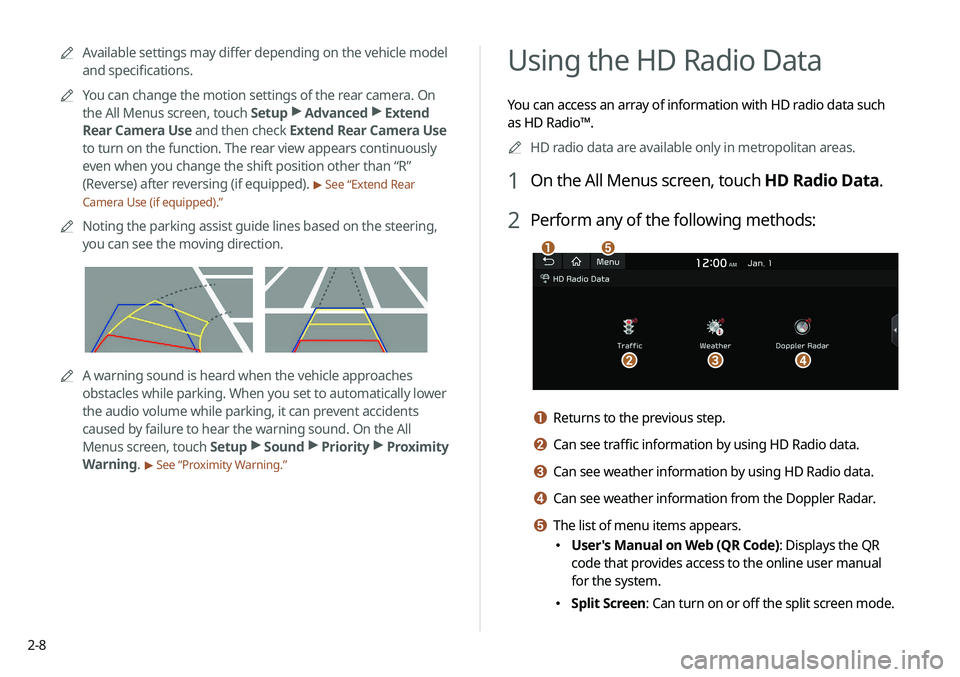
2 Perform any of the following methods:
\037
\036\035\034
\033
a Returns to the previous step.
b Can see traffic information by using HD Radio data.
c Can see weather information by using HD Radio data.
d Can see weather information from the Doppler Radar.
e The list of menu items appears.
\225User's Manual on Web (QR Code): Displays the QR
code that provides access to the online user manual
for the system.
\225Split Screen: Can turn on or off the split screen mode.
0000
A
Available settings may differ depending on the vehicle model
and specifications.
0000
A
You can change the motion settings of the rear camera. On
the All Menus screen, touch Setup >
Advanced >
Extend
Rear Camera Use and then check Extend Rear Camera Use
to turn on the function. The rear view appears continuously
even when you change the shift position other than “R”
(Reverse) after reversing (if equipped).
> See “Extend Rear
Camera Use (if equipped).”
0000
A
Noting the parking assist guide lines based on the steering,
you can see the moving direction.
0000AA warning sound is heard when the vehicle approaches
obstacles while parking. When you set to automatically lower
the audio volume while parking, it can prevent accidents
caused by failure to hear the warning sound. On the All
Menus screen, touch Setup >
Sound >
Priority >
Proximity
Warning.
> See “Proximity Warning.”
Page 45 of 211
2-11
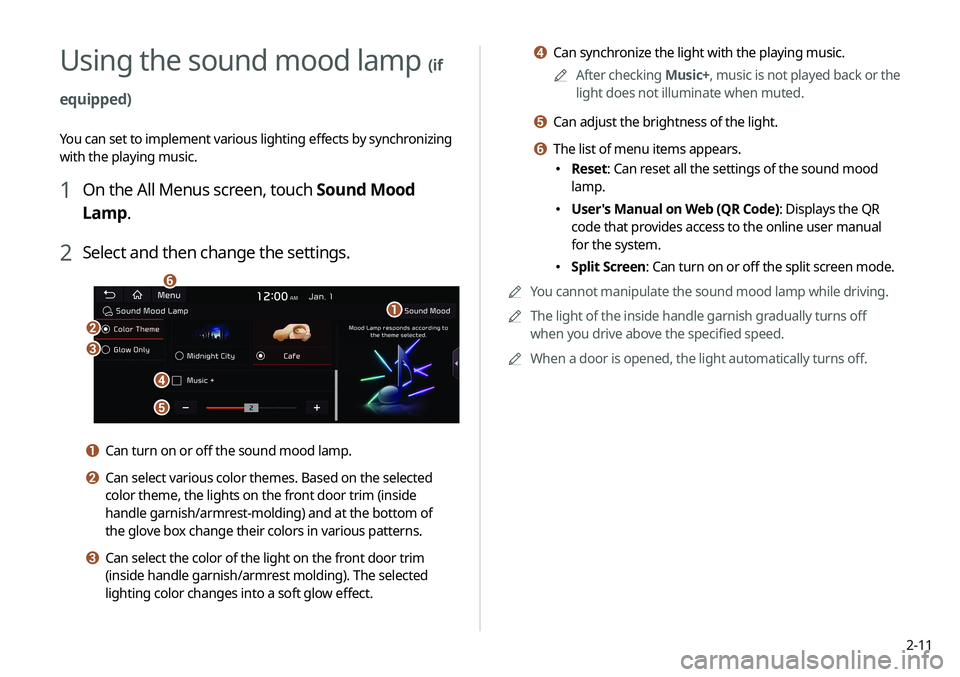
d Can synchronize the light with the playing music.0000
A
After checking Music+, music is not played back or the
light does not illuminate when muted.
e Can adjust the brightness of the light.
f The list of menu items appears.
\225 Reset: Can reset all the settings of the sound mood
lamp.
\225User's Manual on Web (QR Code): Displays the QR
code that provides access to the online user manual
for the system.
\225Split Screen: Can turn on or off the split screen mode.
0000
A
You cannot manipulate the sound mood lamp while driving.
0000
A
The light of the inside handle garnish gradually turns off
when you drive above the specified speed.
0000
A
When a door is opened, the light automatically turns off.
Using the sound mood lamp (if
equipped)
You can set to implement various lighting effects by synchronizing
with the playing music.
1 On the All Menus screen, touch Sound Mood
Lamp.
2 Select and then change the settings.
\037
\036
\035
\034
\033
\032
a Can turn on or off the sound mood lamp.
b Can select various color themes. Based on the selected
color theme, the lights on the front door trim (inside
handle garnish/armrest-molding) and at the bottom of
the glove box change their colors in various patterns.
c Can select the color of the light on the front door trim
(inside handle garnish/armrest molding). The selected
lighting color changes into a soft glow effect.
Page 48 of 211
3-2
Listening to the radio
You can scan radio channels by using various options. Save your
favorite channels to the presets list.
Perform any of the following methods:
\225On the All Menus screen, touch Radio.
\225On the control panel, press the [ RADIO] button.
Radio screen
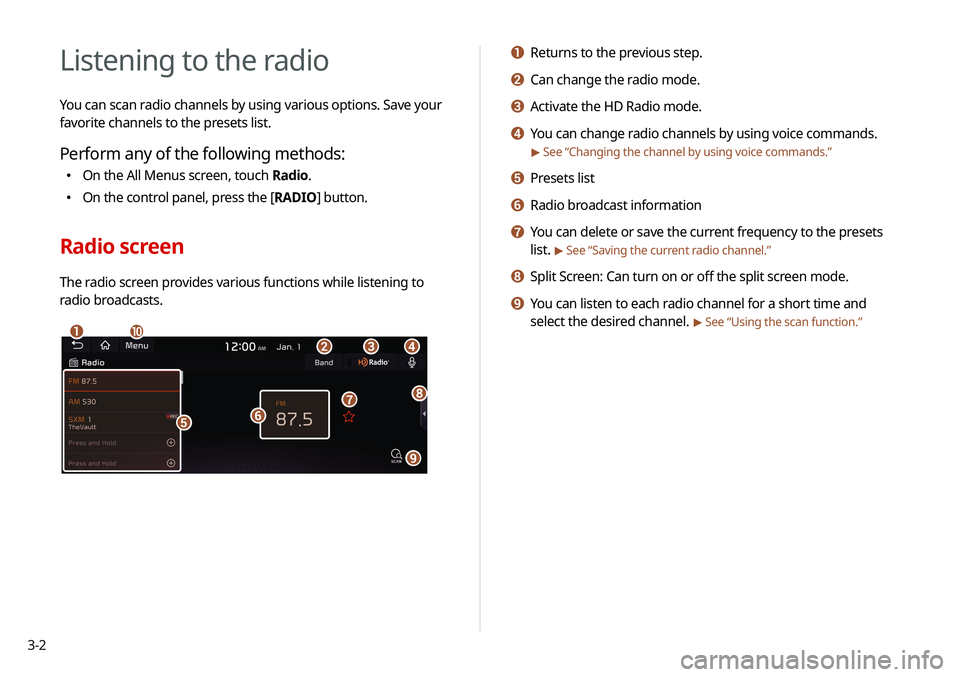
The radio screen provides various functions while listening to
radio broadcasts.
\037\036\035
\034
\033\032
\031
\030
\027
\026
a Returns to the previous step.
b Can change the radio mode.
c Activate the HD Radio mode.
d You can change radio channels by using voice commands.
> See “Changing the channel by using voice commands.”
e Presets list
f Radio broadcast information
g You can delete or save the current frequency to the presets
list.
> See “Saving the current radio channel.”
h Split Screen: Can turn on or off the split screen mode.
i You can listen to each radio channel for a short time and
select the desired channel.
> See “Using the scan function.”
Page 49 of 211
3-3
\335Warning
Driving while distracted can result in a loss of vehicle control
that may lead to an accident, severe bodily injury, or death. The
driver's primary responsibility is the safe and legal operation of
the vehicle, and the use of any vehicle systems, including the
touch screen and steering wheel controls, which take the driver's
eyes, attention, and focus away from the safe operation of the
vehicle, or which are not permissible by law, should never be used
during the operation of the vehicle.
j The list of menu items appears.
\225Enter Station: Can select or directly enter the desired
radio frequency.
\225Station List: Can see the list of available radio stations.
\225Info: Turns the Radio text information transmitted from
the broadcasting station on and off.
\225Reorder Presets: Can change the location of a channel
by dragging on the presets list.
> See “Changing the order of
registered channels.”
\225 Delete Presets: Can delete a registered channel from the
presets list.
> See “Deleting a registered channel.”
\225Set Number of Presets: Used to set the number of
channels to display on the preset list.
> See “Changing the
number of channels to display on the preset list.”
\225 Sound Settings: Can configure system sound settings.
> See “Configuring the sound settings.”
\225User's Manual on Web (QR Code): Displays the QR code
that provides access to the online user manual for the
system.
\225Split Screen: Can turn on or off the split screen mode.
0000
A
The broadcast station names and local information are
displayed using GPS data. Those information may not appear
when there is no GPS data received.
0000
A
The displayed broadcast station names may not match the
actual ones.
Page 50 of 211
3-4
Changing the radio channel
Perform any of the following methods:
\225On the Radio screen, touch the desired channel from the
presets list.
0000
A
You can change the channel simply by using the [
/]
lever on the steering wheel.
\225 On the control panel, press the [ SEEK ] or [TRACK ] button.
You can move to the previous or next channel with good
reception.
\225 When you know an accurate frequency, turn the [TUNE/FILE]
knob on the control panel to change the frequency.
You can listen to the changed radio broadcast.
Changing the channel by using voice
commands
You can change the radio channel by using voice commands.
1 On the Radio screen, touch .
2 When a guiding beep is heard, say the desired
radio station channel.
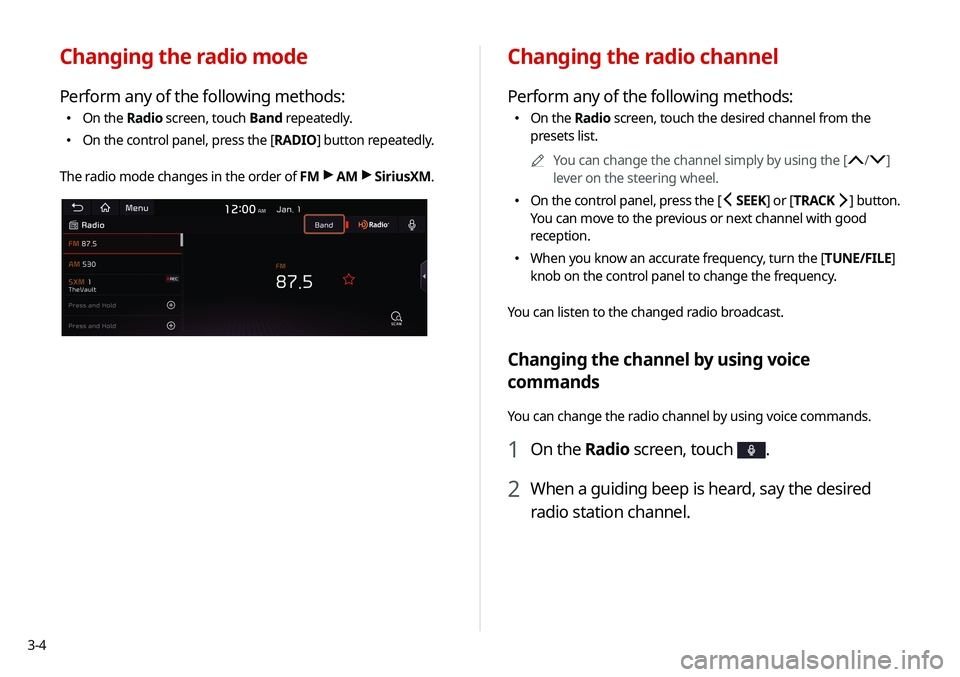
Changing the radio mode
Perform any of the following methods:
\225 On the Radio screen, touch Band repeatedly.
\225On the control panel, press the [ RADIO] button repeatedly.
The radio mode changes in the order of FM >
AM >
SiriusXM.