KIA Spectra 2006 2.G Owner's Manual
Manufacturer: KIA, Model Year: 2006, Model line: Spectra, Model: KIA Spectra 2006 2.GPages: 273, PDF Size: 2.83 MB
Page 121 of 273
Driving your vehicle44
1
2
3
4
5
6
7
8
9
1. Make sure the parking brake isapplied.
2. Manual Transaxle - Depress the
clutch pedal fully and shift the
transaxle into Neutral. Keep the
clutch pedal depressed while turn-
ing the ignition switch to the start
position. The starter will not oper-
ate if the clutch pedal is not fully
depressed.
Automatic Transaxle - Place the
transaxle shift lever in P (Park).
Depress the brake pedal fully.
You can also start the engine
when the shift lever is in the N
(Neutral) position.
3. Turn the ignition switch to START and hold it there until the engine
starts (a maximum of 10 seconds),
then release the key. 4. In extremely cold weather (below
-18°C / 0°F) or after the vehicle
has not been operated for several
days, let the engine warm up with-
out depressing the accelerator.
Whether the engine is cold or warm,
it should be started without
depressing the accelerator.
✽ ✽ NOTICEDo not engage the starter for more
than 10 seconds. If the engine stalls
or fails to start, wait 5 to 10 seconds
before re-engaging the starter.
Excessive or improper use of the
starter may damage it.The starter will not operate if:
Automatic Transaxle - the shift
lever is NOT in P (Park) or N
(Neutral).
Manual Transaxle - the clutch
pedal is not fully depressed.
STARTING THE ENGINE
CAUTION
If the engine stalls while you are
in motion, do not attempt to
move the shift lever to the P
(Park) position. If traffic and
road conditions permit, you may
put the shift lever in the N
(Neutral) position while the
vehicle is still moving and turn
the ignition switch to the START
position in an attempt to restart
the engine.
LD CAN (ENG) 4.qxd 7/29/05 10:16 AM Page 4
Page 122 of 273
45
1
2
3
4
5
6
7
8
9
Driving your vehicle
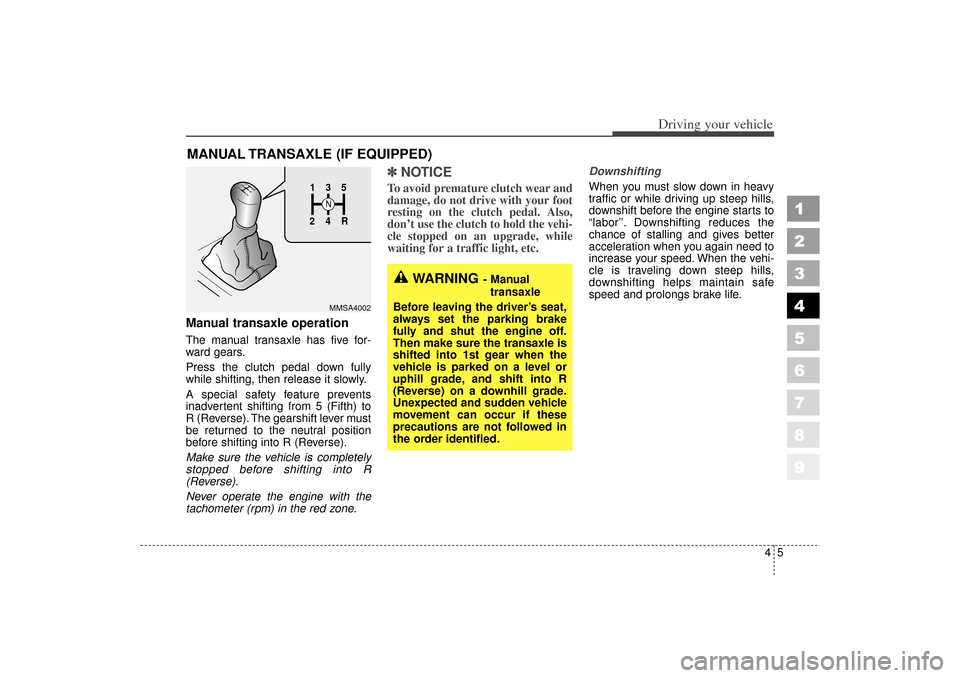
Manual transaxle operationThe manual transaxle has five for-
ward gears.
Press the clutch pedal down fully
while shifting, then release it slowly.
A special safety feature prevents
inadvertent shifting from 5 (Fifth) to
R (Reverse). The gearshift lever must
be returned to the neutral position
before shifting into R (Reverse).
Make sure the vehicle is completely
stopped before shifting into R
(Reverse).
Never operate the engine with the
tachometer (rpm) in the red zone.
✽ ✽NOTICETo avoid premature clutch wear and
damage, do not drive with your foot
resting on the clutch pedal. Also,
don’t use the clutch to hold the vehi-
cle stopped on an upgrade, while
waiting for a traffic light, etc.
Downshifting
When you must slow down in heavy
traffic or while driving up steep hills,
downshift before the engine starts to
“labor’’. Downshifting reduces the
chance of stalling and gives better
acceleration when you again need to
increase your speed. When the vehi-
cle is traveling down steep hills,
downshifting helps maintain safe
speed and prolongs brake life.
MANUAL TRANSAXLE (IF EQUIPPED)
1
2 4
R
3
S
N
135
R42
MMSA4002
WARNING
- Manualtransaxle
Before leaving the driver ’s seat,
always set the parking brake
fully and shut the engine off.
Then make sure the transaxle is
shifted into 1st gear when the
vehicle is parked on a level or
uphill grade, and shift into R
(Reverse) on a downhill grade.
Unexpected and sudden vehicle
movement can occur if these
precautions are not followed in
the order identified.
LD CAN (ENG) 4.qxd 7/29/05 10:16 AM Page 5
Page 123 of 273

Driving your vehicle64
1
2
3
4
5
6
7
8
9
AUTOMATIC TRANSAXLE (IF EQUIPPED)
2LDN3019
The lock release button must be depressed while moving the shift lever. Depress the brake pedal and push the button when shifting.The shift lever can be moved without depressing the lock release button.
Lock release button
Prevents shift lever movement
without first depressing the button.
LD CAN (ENG) 4.qxd 7/29/05 10:16 AM Page 6
Page 124 of 273
47
1
2
3
4
5
6
7
8
9
Driving your vehicle
Automatic transaxle operationAll normal forward driving is done
with the shift lever in the D (Drive)
position.
To move the shift lever from the P
(Park) position, the brake pedal must
be depressed and the lock release
button must be depressed.For smooth operation, depress the
brake pedal when shifting from N
(Neutral) to a forward or reverse
gear.
✽ ✽
NOTICE To avoid damage to your
transaxle, do not accelerate the
engine in R (Reverse) or any for-
ward gear position with the
brakes on.
When stopped on an upgrade, do not hold the vehicle stationary
with engine power. Use the service
brake or the parking brake.
Do not shift from N (Neutral) or P (Park) into D (Drive), or R
(Reverse) when the engine is
above idle speed.
WARNING
- Automatic
transaxle
Before leaving the driver ’s seat,
always make sure the shift lever
is in the P (PARK) position; then
set the parking brake fully and
shut the engine off. Unexpected
and sudden vehicle movement
can occur if these precautions
are not followed in the order
identified.
LD CAN (ENG) 4.qxd 7/29/05 10:16 AM Page 7
Page 125 of 273
Driving your vehicle84
1
2
3
4
5
6
7
8
9
Transaxle rangesP (park)
This position locks the transaxle and
prevents the front wheels from rotat-
ing. Always come to a complete stop
before shifting into this position.
✽ ✽
NOTICEThe transaxle may be damaged if
you shift into P (Park) while the
vehicle is in motion.(Continued)
Before leaving the driver’ s
seat, always make sure the
shift lever is in the P (PARK)
position. Set the parking
brake fully, shut the engine off
and take the key with you.
Unexpected and sudden vehi-
cle movement can occur if you
do not follow these precau-
tions in the order specified.
Never leave a child unattend-
ed in a vehicle.
WARNING
Shifting into P (Park) while the
vehicle is in motion will cause
the drive wheels to lock which
will cause you to lose control
of the vehicle.
Do not use the P (Park) posi-
tion in place of the parking
brake. Always make sure the
shift lever is latched in the P
(Park) position so that it can-
not be moved unless the lock
release button is pushed in,
AND set the parking brake
fully.
(Continued)
LD CAN (ENG) 4.qxd 7/29/05 10:16 AM Page 8
Page 126 of 273
49
1
2
3
4
5
6
7
8
9
Driving your vehicle
R (reverse)
Use this position to drive the vehicle
backward.✽ ✽
NOTICEAlways come to a complete stop
before shifting into or out of R
(Reverse); you may damage the
transaxle if you shift into R while
the vehicle is in motion, except as
explained in “Rocking the Vehicle”,
in this manual.
N (neutral)
With the gearshift in the N position,
the wheels and transaxle are not
locked. The vehicle will roll freely
even on the slightest incline unless
the parking brake or service brakes
are applied. D (drive)
This is the normal forward driving
position. The transaxle will automati-
cally shift through a 4-gear
sequence, providing the best fuel
economy and power.
For extra power when passing anoth-
er vehicle or climbing grades,
depress the accelerator fully, at
which time the transaxle will auto-
matically downshift to the next lower
gear.
LD CAN (ENG) 4.qxd 7/29/05 10:16 AM Page 9
Page 127 of 273
Driving your vehicle10
4
1
2
3
4
5
6
7
8
9
3 (Third Gear)
Move the shift lever to this position
for towing a trailer during hill climb-
ing.
This position also provides engine
braking when going down hills.
2 (Second Gear)
Use 2 (Second Gear) for more power
when climbing hills and for increased
braking when going down hills. This
position also helps reduce wheel
spin on slippery surfaces. When the
shift lever is placed in 2 (Second
Gear), the transaxle will automatical-
ly shift from first to second gear. L (Low)
Move the shift lever to this position in
hard pulling situations and for climb-
ing steep grades.
CAUTION
Do not exceed the recommend-
ed maximum speeds in 2
(Second Gear) or L (Low).
Operating the vehicle at speeds
above the maximum recom-
mended, for 2 (Second Gear) or
L (Low) may cause excessive
heat to develop which could
result in damage to or failure of
the automatic transaxle.
LD CAN (ENG) 4.qxd 7/29/05 10:16 AM Page 10
Page 128 of 273

411
1
2
3
4
5
6
7
8
9
Driving your vehicle
Moving up a steep grade from
a standing startTo move up a steep grade from a
standing start, depress the brake
pedal, shift the shift lever to D
(Drive). Select the appropriate gear
depending on load weight and steep-
ness of the grade, and release the
parking brake. Depress the accelera-
tor gradually while releasing the
service brakes.
Shift lock systemFor your safety, the Automatic
Transaxle has a shift lock system
which prevents shifting the transaxle
out of P (Park) unless the brake
pedal is depressed.
To shift the transaxle out of P (Park):
1. Depress and hold the brake pedal.
2. Start the engine or turn the ignitionto the ON position.
3. Depress the lock release button and move the shift lever.
When the ignition switch is in the
LOCK position, the transaxle cannot
be shifted from P (Park).
If the brake pedal is repeatedly
depressed and released with the
shift lever in the P (Park) position, a
chattering sound near the shift lever
may be heard. This is a normal con-
dition.
Ignition key interlock systemThe ignition key cannot be removed
unless the shift lever is in the P
(Park) position. If the ignition switch
is in any other position, the key can-
not be removed.
LD CAN (ENG) 4.qxd 7/29/05 10:16 AM Page 11
Page 129 of 273
Driving your vehicle12
4
1
2
3
4
5
6
7
8
9
Power brakes Your vehicle has power-assisted
brakes that adjust automatically
through normal usage.
In the event that the power-assisted
brakes lose power because of a
stalled engine or some other reason,
you can still stop your vehicle by
applying greater force to the brake
pedal than you normally would. The
stopping distance, however, will be
longer.
When the engine is not running, the
reserve brake power is partially
depleted each time the brake pedal
is applied. Do not pump the brake
pedal when the power assist has
been interrupted.
Pump the brake pedal only when
necessary to maintain steering con-
trol on slippery surfaces.
In the event of brake failure If service brakes fail to operate while
the vehicle is in motion, you can
make an emergency stop with the
parking brake. The stopping dis-
tance, however, will be much greater
than normal.
BRAKE SYSTEM
WARNING
- Parking brake
Applying the parking brake
while the vehicle is moving at
normal speeds can cause a sud-
den loss of control of the vehi-
cle. If you must use the parking
brake to stop the vehicle, use
great caution in applying the
brake.
WARNING -
Brakes
Do not drive with your foot
resting on the brake pedal.
This will create abnormal high
brake temperatures, exces-
sive brake lining and pad
wear, and increased stopping
distances.
When descending a long or
steep hill, shift to a lower gear
and avoid continuous applica-
tion of the brakes. Continuous
brake application will cause
the brakes to overheat and
could result in a temporary
loss of braking performance.
(Continued)
LD CAN (ENG) 4.qxd 7/29/05 10:16 AM Page 12
Page 130 of 273
413
1
2
3
4
5
6
7
8
9
Driving your vehicle
Disc brakes wear indicator Your vehicle has disc brakes.
When your brake pads are worn and
it's time for new pads, you will hear a
high-pitched warning sound from
your front brakes or rear brakes (if
equipped). You may hear this sound
come and go or it may occur when-
ever you depress the brake pedal.
Please remember that some driving
conditions or climates may cause a
brake squeal when you first apply (or
lightly apply) the brakes. This is nor-
mal and does not indicate a problem
with your brakes.
✽ ✽NOTICETo avoid costly brake repairs, do not
continue to drive with worn brake
pads.
WARNING
- Brake wear
This brake wear warning sound
means your vehicle needs serv-
ice. If you ignore this audible
warning, you will eventually lose
braking performance, which
could lead to a serious accident.
CAUTION
Always replace brake pads as
complete front or rear axle sets.
(Continued)
Wet brakes may result in the
vehicle not slowing down at
the usual rate and pulling to
one side when the brakes are
applied. Applying the brakes
lightly will indicate whether
they have been affected in this
way. Always test your brakes
in this fashion after driving
through deep water. To dry the
brakes, apply them lightly
while maintaining a safe for-
ward speed until brake per-
formance returns to normal.
LD CAN (ENG) 4.qxd 7/29/05 10:16 AM Page 13