automatic KIA VENGA 2015 Owner's Guide
[x] Cancel search | Manufacturer: KIA, Model Year: 2015, Model line: VENGA, Model: KIA VENGA 2015Pages: 480, PDF Size: 23.15 MB
Page 162 of 480

419
Features of your vehicle
(1) Driver’s door power window switch
(2) Front passenger’s door power win-dow switch
(3) Rear door (left) power window switch*
(4) Rear door (right) power window switch*
(5) Window opening and closing
(6) Automatic power window*
(7) Power window lock switch* * if equipped
✽✽ NOTICE
In cold and wet climates, power windows
may not work properly due to freezing
conditions.
WINDOWS
OYN049013
■ Type A■Type B■Type C
Page 164 of 480

421
Features of your vehicle
Type B - Auto down window (if equipped)
Depressing the power window switch
momentarily to the second detent posi-
tion (6) completely lowers the window
even when the switch is released. To stop
the window at the desired position while
the window is in operation, pull up the
switch momentarily to the opposite direc-
tion of the window movement.Type C - Auto up/down window
(if equipped)
Pressing or pulling up the power window
switch momentarily to the second detent
position (6) completely lowers or lifts the
window even when the switch is
released. To stop the window at the
desired position while the window is in
operation, pull up or press down and
release the switch.
If the power window does not operate
normally, the automatic power window
system must be reset as follows: 1.
Turn the ignition switch to the ON position.
2. Close the window and continue pulling up the power window switch for at
least 1 second after the window iscompletely closed. Automatic reversal
(for Type C, if equipped)
If the upward movement of the window is
blocked by an object or part of the body,
the window will detect the resistance and
will stop upward movement. The window
will then lower approximately 30 cm (11.8
in.) to allow the object to be cleared.
If the window detects the resistance
while the power window switch is pulled
up continuously, the window will stop
upward movement then lower approxi-
mately 2.5 cm (1 in.). And if the power
window switch is pulled up continuously
again within 5 seconds after the window
is lowered by the automatic window
reversal feature, the automatic window
reversal will not operate.
OYN049137
■
Type BOYN049138
■
Type COUN026013
Page 165 of 480

Features of your vehicle
22
4
✽✽
NOTICE
The automatic reverse feature for the
window is only active when the “auto
up” feature is used by fully pulling up
the switch. The automatic reverse fea-
ture will not operate if the window is
raised using the halfway position on the
power window switch.
Power window lock button
The driver can disable the power window switches on the rear passenger doors by
pressing the power window lock button
located on the driver's door to the LOCK
position(pressed). (For Europe)
When the power window lock button is
in the LOCK position (pressed), the dri-
ver’s master control can operate all
power windows. (For Europe)
CAUTION
To prevent possible damage to
the power window system, do not
open or close two windows or more at the same time. This willalso ensure the longevity of thefuse.
Never try to operate the main switch on the driver's door andthe individual door window switch in opposing directions at
the same time. If this is done, the window will stop and cannot beopened or closed.
WARNING
Always check for obstructions
before raising any window to avoid
injuries or vehicle damage. If anobject less than 4 mm (0.16 in.) indiameter is caught between the
window glass and the upper win-
dow channel, the automatic reverse
window may not detect the resist-
ance and will not stop and reversedirection.
OYN049017
Page 167 of 480
Features of your vehicle
24
4
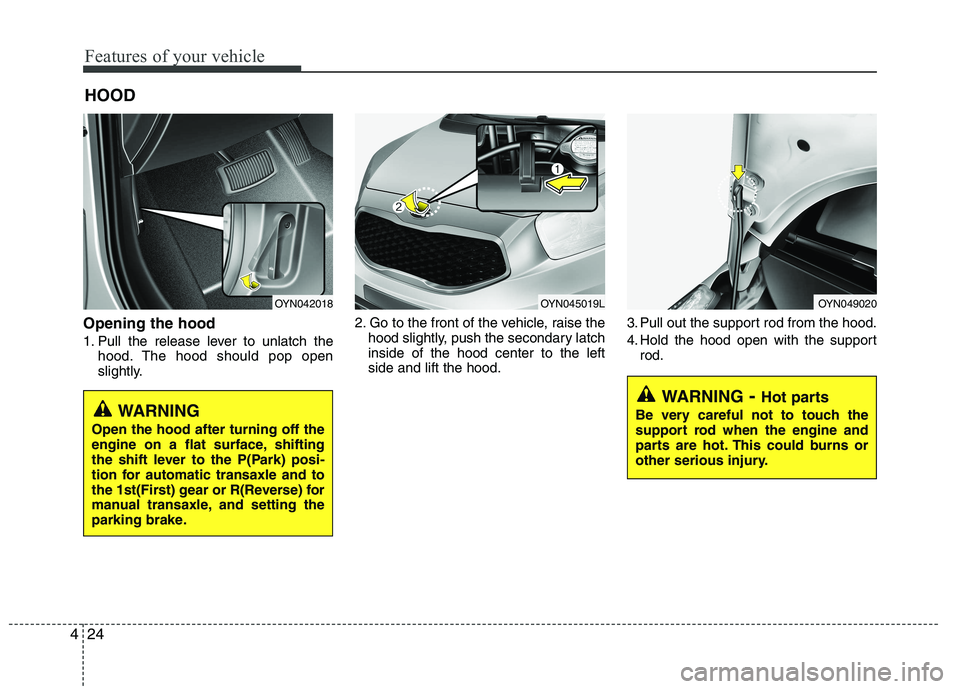
Opening the hood
1. Pull the release lever to unlatch the
hood. The hood should pop open
slightly. 2. Go to the front of the vehicle, raise the
hood slightly, push the secondary latchinside of the hood center to the leftside and lift the hood. 3. Pull out the support rod from the hood.
4. Hold the hood open with the support
rod.
HOOD
WARNING
- Hot parts
Be very careful not to touch the
support rod when the engine and
parts are hot. This could burns or
other serious injury.
OYN042018OYN045019LOYN049020
WARNING
Open the hood after turning off the
engine on a flat surface, shifting
the shift lever to the P(Park) posi-
tion for automatic transaxle and to
the 1st(First) gear or R(Reverse) for
manual transaxle, and setting the
parking brake.
Page 169 of 480
Features of your vehicle
26
4
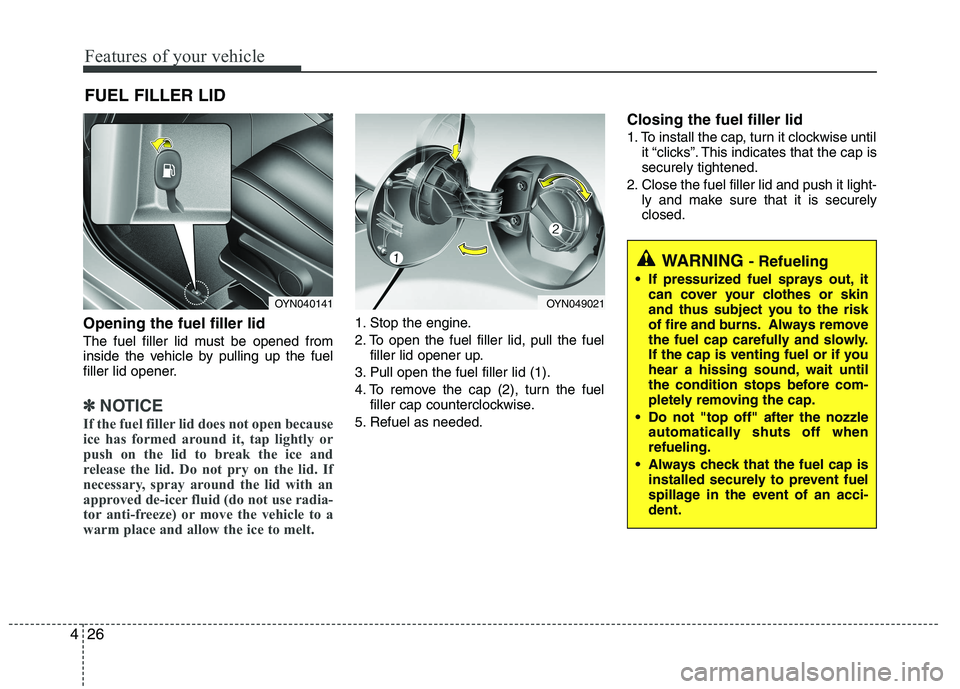
Opening the fuel filler lid
The fuel filler lid must be opened from
inside the vehicle by pulling up the fuel
filler lid opener.
✽✽
NOTICE
If the fuel filler lid does not open because
ice has formed around it, tap lightly or
push on the lid to break the ice and
release the lid. Do not pry on the lid. If
necessary, spray around the lid with an
approved de-icer fluid (do not use radia-
tor anti-freeze) or move the vehicle to a
warm place and allow the ice to melt.
1. Stop the engine.
2. To open the fuel filler lid, pull the fuel filler lid opener up.
3. Pull open the fuel filler lid (1).
4. To remove the cap (2), turn the fuel filler cap counterclockwise.
5. Refuel as needed. Closing the fuel filler lid
1. To install the cap, turn it clockwise until
it “clicks”. This indicates that the cap is securely tightened.
2. Close the fuel filler lid and push it light- ly and make sure that it is securelyclosed.
FUEL FILLER LID
WARNING
- Refueling
If pressurized fuel sprays out, it can cover your clothes or skin
and thus subject you to the risk
of fire and burns. Always remove
the fuel cap carefully and slowly.
If the cap is venting fuel or if you
hear a hissing sound, wait until
the condition stops before com-
pletely removing the cap.
Do not "top off" after the nozzle automatically shuts off whenrefueling.
Always check that the fuel cap is installed securely to prevent fuel
spillage in the event of an acci-dent.
OYN040141OYN049021
Page 173 of 480

Features of your vehicle
30
4
Sliding the sunroof
Before opening or closing the sunroof,
open the roller blind.
To open or close the sunroof (manual
slide feature), pull or push the sunroof
control lever backward or forward to thefirst detent position.
Pulling the control lever downward also
closes the sunroof. To open the sunroof automatically:
Pull the sunroof control lever backward to the second detent position and then
release it. The sunroof will automatically
slide open all the way. However, the sec-
ond time the lever is pulled the sunroof
will open only while the lever is pulled.
To stop the sunroof sliding at any point,
pull or push the sunroof control lever
momentarily.
To close the sunroof automatically:
Push the sunroof control lever forward to the second detent position and then
release it. The sunroof will close auto-
matically but will not close all the way. If
you desire to completely close the sun-
roof, push the lever once more until the
sunroof moves to closed position.
To stop the sunroof sliding at any point,
pull or push the sunroof control lever
momentarily.Automatic reversal
If an object or part of the body is detect- ed while the sunroof is closing automati-
cally, it will reverse the direction, and then
stop.
The auto reverse function does not work
if a tiny obstacle is between the sliding
glass and the sunroof sash. You should
always check that all passengers and
objects are away from the sunroof beforeclosing it.
OYN049023OYN049026
Page 177 of 480
Features of your vehicle
34
4
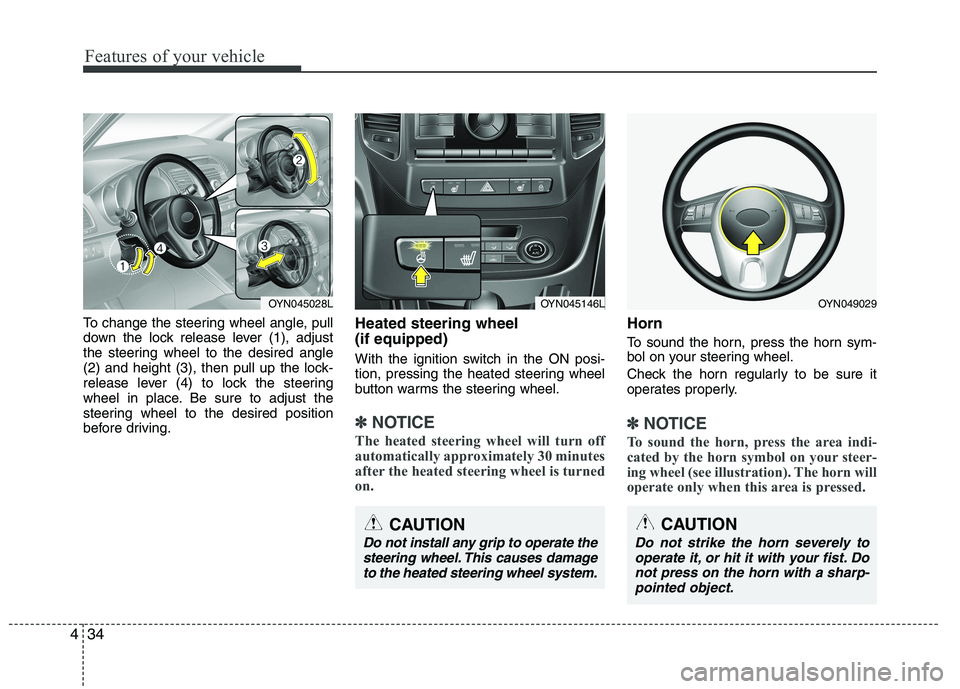
To change the steering wheel angle, pull
down the lock release lever (1), adjust
the steering wheel to the desired angle
(2) and height (3), then pull up the lock-
release lever (4) to lock the steering
wheel in place. Be sure to adjust the
steering wheel to the desired position
before driving. Heated steering wheel (if equipped)
With the ignition switch in the ON posi-
tion, pressing the heated steering wheel
button warms the steering wheel.
✽✽
NOTICE
The heated steering wheel will turn off
automatically approximately 30 minutes
after the heated steering wheel is turned
on.
Horn
To sound the horn, press the horn sym-
bol on your steering wheel.
Check the horn regularly to be sure it
operates properly.
✽✽ NOTICE
To sound the horn, press the area indi-
cated by the horn symbol on your steer-
ing wheel (see illustration). The horn will
operate only when this area is pressed.
CAUTION
Do not strike the horn severely to operate it, or hit it with your fist. Do not press on the horn with a sharp-pointed object.
OYN049029OYN045028LOYN045146L
CAUTION
Do not install any grip to operate the
steering wheel. This causes damageto the heated steering wheel system.
Page 178 of 480
435
Features of your vehicle
Inside rearview mirror
Adjust the rearview mirror so that the
center view through the rear window is
seen. Make this adjustment before you
start driving.
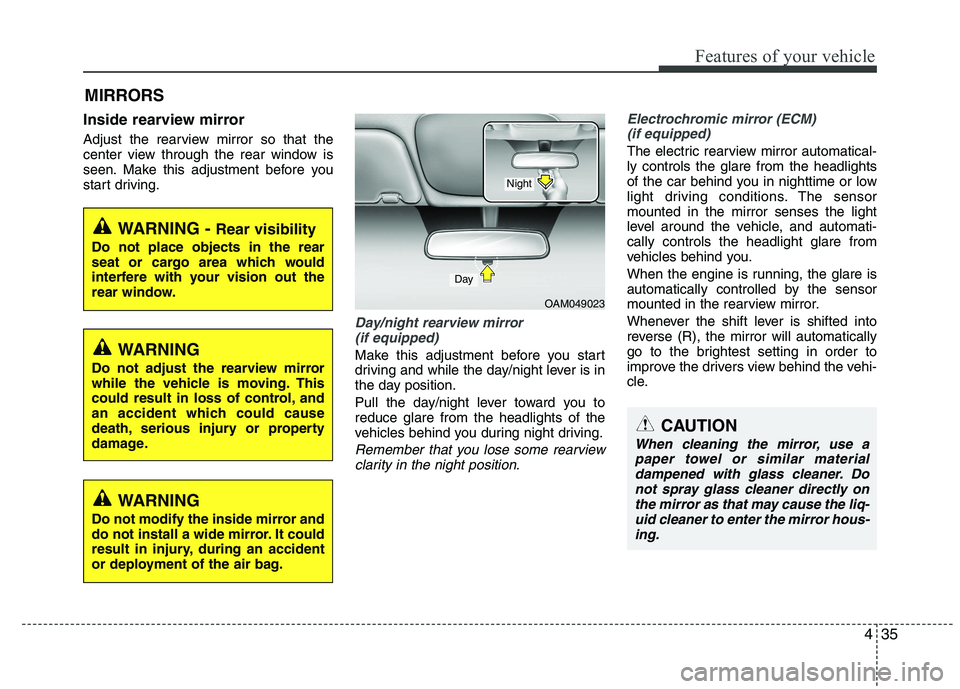
Day/night rearview mirror (if equipped)
Make this adjustment before you start
driving and while the day/night lever is in
the day position.
Pull the day/night lever toward you to reduce glare from the headlights of the
vehicles behind you during night driving.
Remember that you lose some rearviewclarity in the night position.
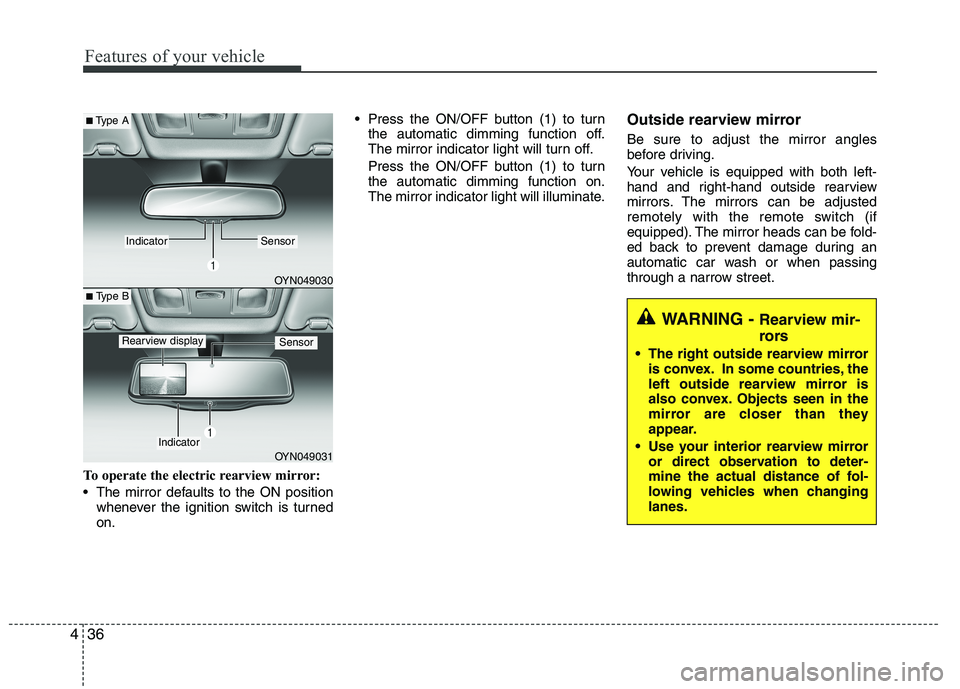
Electrochromic mirror (ECM)
(if equipped)
The electric rearview mirror automatical- ly controls the glare from the headlights
of the car behind you in nighttime or low
light driving conditions. The sensormounted in the mirror senses the light
level around the vehicle, and automati-cally controls the headlight glare from
vehicles behind you.
When the engine is running, the glare is
automatically controlled by the sensor
mounted in the rearview mirror.
Whenever the shift lever is shifted into
reverse (R), the mirror will automatically
go to the brightest setting in order to
improve the drivers view behind the vehi-
cle.
MIRRORS
OAM049023
CAUTION
When cleaning the mirror, use a
paper towel or similar material dampened with glass cleaner. Donot spray glass cleaner directly on
the mirror as that may cause the liq-uid cleaner to enter the mirror hous-ing.
Day
Night
WARNING - Rear visibility
Do not place objects in the rear
seat or cargo area which would
interfere with your vision out the
rear window.
WARNING
Do not adjust the rearview mirror
while the vehicle is moving. This
could result in loss of control, and
an accident which could cause
death, serious injury or property
damage.
WARNING
Do not modify the inside mirror and
do not install a wide mirror. It could
result in injury, during an accident
or deployment of the air bag.
Page 179 of 480
Features of your vehicle
36
4
To operate the electric rearview mirror:
The mirror defaults to the ON position
whenever the ignition switch is turned on. Press the ON/OFF button (1) to turn
the automatic dimming function off.
The mirror indicator light will turn off.
Press the ON/OFF button (1) to turn the automatic dimming function on.
The mirror indicator light will illuminate. Outside rearview mirror Be sure to adjust the mirror angles
before driving.
Your vehicle is equipped with both left-
hand and right-hand outside rearview
mirrors. The mirrors can be adjusted
remotely with the remote switch (if
equipped). The mirror heads can be fold-
ed back to prevent damage during an
automatic car wash or when passing
through a narrow street.
WARNING -
Rearview mir-
rors
The right outside rearview mirror is convex. In some countries, the
left outside rearview mirror is
also convex. Objects seen in the
mirror are closer than they
appear.
Use your interior rearview mirror or direct observation to deter-
mine the actual distance of fol-
lowing vehicles when changinglanes.
OYN049030
OYN049031
■Type A
■ Type B
IndicatorSensor
Indicator
SensorRearview display
Page 183 of 480
Features of your vehicle
40
4
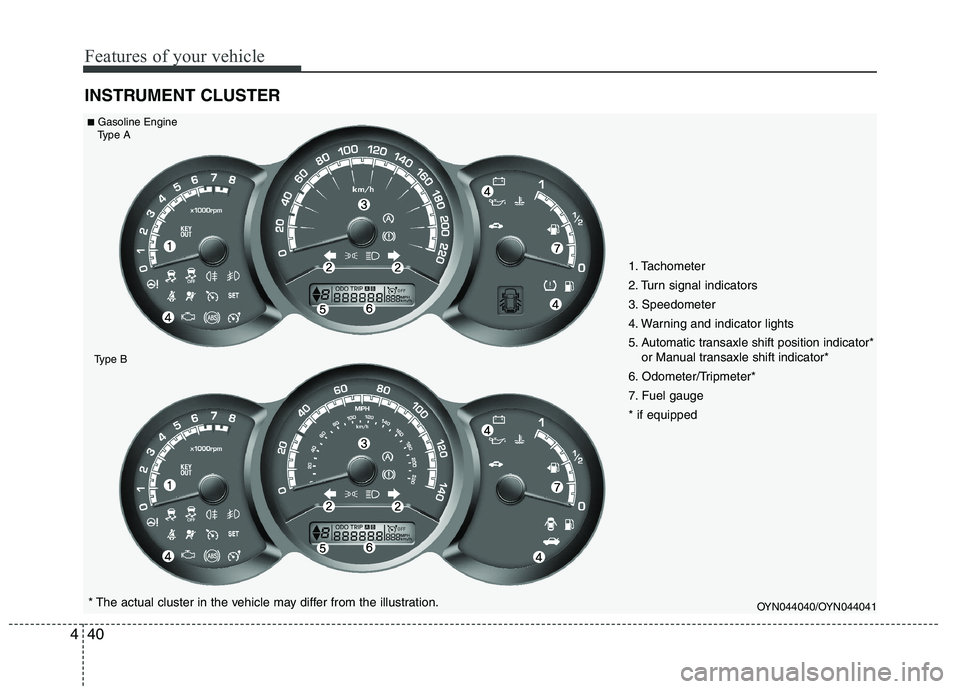
INSTRUMENT CLUSTER
OYN044040/OYN044041* The actual cluster in the vehicle may differ from the illustration.
■
Gasoline Engine
Type A
Type B
1. Tachometer
2. Turn signal indicators
3. Speedometer
4. Warning and indicator lights
5. Automatic transaxle shift position indicator* or Manual transaxle shift indicator*
6. Odometer/Tripmeter*
7. Fuel gauge* if equipped