steering wheel Lancia Delta 2012 Owner handbook (in English)
[x] Cancel search | Manufacturer: LANCIA, Model Year: 2012, Model line: Delta, Model: Lancia Delta 2012Pages: 295, PDF Size: 8.29 MB
Page 9 of 295
KNOWING YOUR CAR7
1
Instrument panel ........................................ 8
Control panel and instruments ................... 9
Display ...................................................... 23
Menu items ................................................ 28
Trip Computer ........................................... 38
Symbols ..................................................... 40
Lancia Code system ................................... 41
Keys ........................................................... 42
Alarm ........................................................ 46
Ignition device ........................................... 49
Seats .......................................................... 50
Headrest .................................................... 53
Steering wheel ............................................ 54
Rear view mirrors ...................................... 54
Climatic comfort ........................................ 56
Manual climate control system ................... 57
Automatic dual zone climate control system . 59
External lights ........................................... 65
Window washing ........................................ 68
Cruise Control ............................................ 71
Roof lights ................................................. 73
Controls ..................................................... 75
Fuel cut-off system .................................... 78
Interior fittings ........................................... 79Sunroof ...................................................... 84
Doors ......................................................... 87
Power windows .......................................... 90
Boot ........................................................... 94
Bonnet ....................................................... 100
Roof rack/ski rack ..................................... 102
Headlights ................................................. 103
DST system ................................................ 105
SPORT function ......................................... 105
Reactive Suspension System ....................... 107
Driving Advisor .......................................... 108
Advanced ESP system ................................ 114
Start&Stop system ..................................... 121
EOBD system ............................................. 126
“Dualdrive” electric power steering system ... 127
TPMS system ............................................. 129
Parking sensors .......................................... 133
Magic Parking ............................................ 136
Radio wiring system ................................... 150
Electrical/electronic devices installation ..... 151
Refuelling the car ....................................... 152
Protecting the environment ........................ 154
Page 10 of 295
8KNOWING YOUR CAR
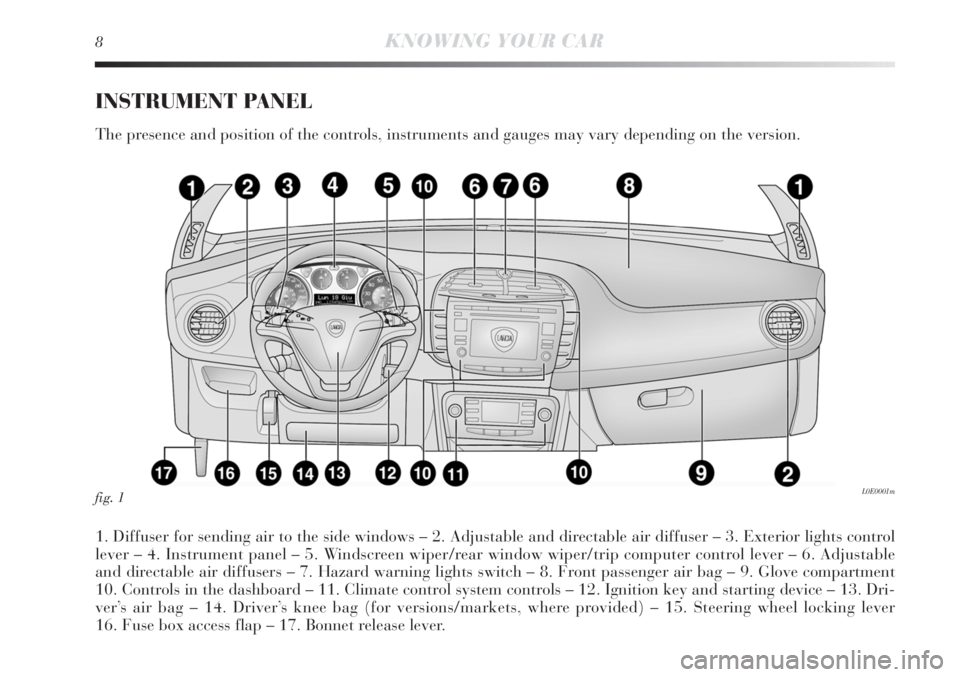
INSTRUMENT PANEL
The presence and position of the controls, instruments and gauges may vary depending on the version.
1. Diffuser for sending air to the side windows – 2. Adjustable and directable air diffuser – 3. Exterior lights control
lever – 4. Instrument panel – 5. Windscreen wiper/rear window wiper/trip computer control lever – 6. Adjustable
and directable air diffusers – 7. Hazard warning lights switch – 8. Front passenger air bag – 9. Glove compartment
10. Controls in the dashboard – 11. Climate control system controls – 12. Ignition key and starting device – 13. Dri-
ver’s air bag – 14. Driver’s knee bag (for versions/markets, where provided) – 15. Steering wheel locking lever
16. Fuse box access flap – 17. Bonnet release lever.
fig. 1L0E0001m
Page 16 of 295
Degraded engine oil should be replaced as
soon as possible after the warning light
comes on, and never more than 500 km af-
ter it first comes on. Failure to observe the above
may result in severe damage to the engine and in-
validate the warranty. Please note also that the
switching on of this warning light does not depend
on the oil quantity in the engine; when the warn-
ing light flashes, never add oil.
14KNOWING YOUR CAR
“Dualdrive” electric power steering
failure (red)
This warning light switches on when the igni-
tion key is turned to MAR, but it should switch
off after a few seconds.
If the warning light (or symbol on the display) remains on,
you will not have steering assistance and the effort re-
quired to operate the steering wheel will be increased;
steering is, however, possible. In this case, go to a Lancia
Dealership. The display will show a dedicated message.
g
“Dualdrive” electric steering engagement
The warning light switches on (or the word
“CITY” appears on the display) when the
“Dual drive” electric power steering system is
activated by pressing the relevant control button. Press
the button again to turn the “CITY” wording off.
CITY
2. Degraded engine oil
(only Multijet versions with DPF)
The warning light will turn on flashing together with the
message on the display (for versions/markets where pro-
vided). Depending on the versions, the warning light
flashing modes are as follows:
– one minute every two hours;
– for three minute cycles with the warning light off for
intervals of five seconds until oil is changed.
After the first indication, at each engine start up the
warning light will continue flashing as above described
until the oil is changed. For those versions/markets where
provided, the display shows a dedicated message together
with the warning light.
The flashing of the warning light should not be consid-
ered as fault, it simply informs the customer that the oil
needs to be changed following normal car use.
Remember that the deterioration of the engine oil is ac-
celerated by:
– mainly town use of the car which makes the DPF re-
generation process more frequent
– use of the car for short journeys, preventing the engine
from reaching operating temperature
– repeated interruption of the regeneration process, sig-
nalled by the DPF warning light coming on.
Page 19 of 295
1
KNOWING YOUR CAR17
Parking sensor fault
(for versions/markets, where provided)
This warning light (or symbol on the display) switches on
when a fault is detected in the parking sensors. The dis-
play shows the dedicated message.
Tyre pressure monitoring system (TPMS) failure
(for versions/markets, where provided)
This warning light (or symbol on the display) switches on
when a failure is detected in the T.P.M.S. system (where
provided). Should one or more wheels without a sensor
be fitted, the instrument panel warning light will come
on and stay on until the initial conditions are restored.
The display shows the dedicated message.
NOTE If one of the above mentioned faults occurs,
contact a Lancia Dealership as soon as possible.
AFS system failure
This warning light (or symbol on the display) switches on
when a failure is detected in the AFS system (see “Head-
lights” paragraph in this chapter). The display shows the
dedicated message.
Steering corrector not available
This warning light (or symbol on the display) switches on
when the steering corrector is not available. The display
will show a dedicated message.DPF (diesel particulate filter) cleaning
in progress (only Multijet versions
with DPF) (amber)
When the key is turned to the MAR–ON position
the warning light comes on but should go out after a few
seconds. The warning light turns on constantly when the
DPF system needs to eliminate the trapped pollutants
through the regeneration process.
The warning light does not come on every time the DPF
is being regenerated, rather only when the driving con-
ditions are such that the driver needs to know it. To
switch the warning light off, the car must be kept mov-
ing until the regeneration process is completed.
As an average, the process lasts fifteen minutes. The best
conditions to complete the regeneration process are
reached driving the car at about 60 km/h with engine
speed over 2000 rpm. When this warning light switches
on, it does not indicate a car failure and thus it should not
be taken to a workshop. For versions/markets where pro-
vided, the display shows the dedicated message and the
warning light comes on.
h
Page 21 of 295
1
KNOWING YOUR CAR19
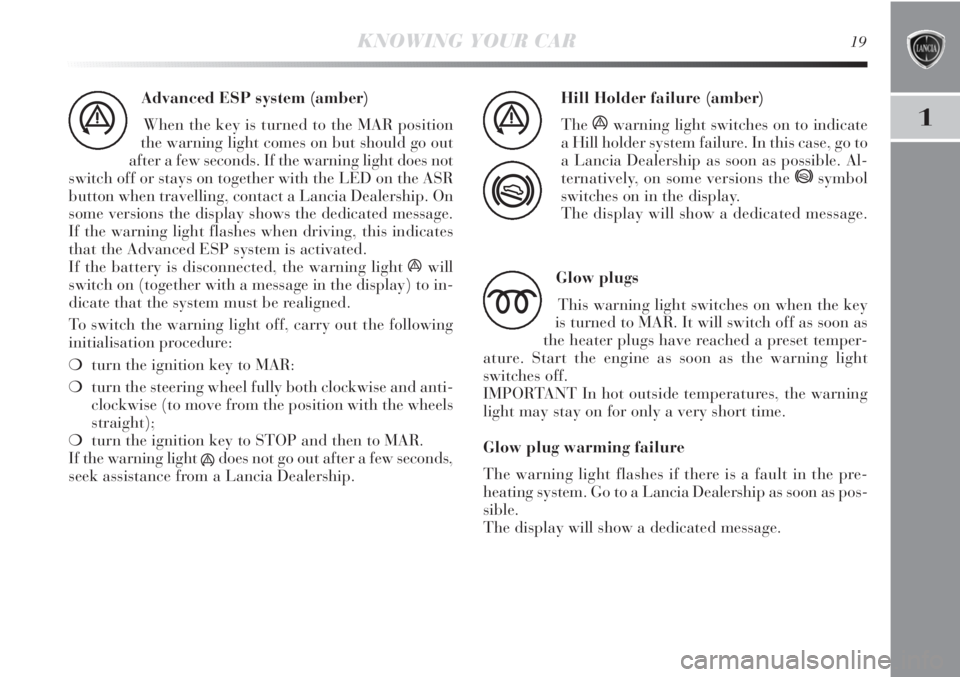
Advanced ESP system (amber)
When the key is turned to the MAR position
the warning light comes on but should go out
after a few seconds. If the warning light does not
switch off or stays on together with the LED on the ASR
button when travelling, contact a Lancia Dealership. On
some versions the display shows the dedicated message.
If the warning light flashes when driving, this indicates
that the Advanced ESP system is activated.
If the battery is disconnected, the warning light áwill
switch on (together with a message in the display) to in-
dicate that the system must be realigned.
To switch the warning light off, carry out the following
initialisation procedure:
❍turn the ignition key to MAR:
❍turn the steering wheel fully both clockwise and anti-
clockwise (to move from the position with the wheels
straight);
❍turn the ignition key to STOP and then to MAR.
If the warning light
ádoes not go out after a few seconds,
seek assistance from a Lancia Dealership.
á
Hill Holder failure (amber)
The
áwarning light switches on to indicate
a Hill holder system failure. In this case, go to
a Lancia Dealership as soon as possible. Al-
ternatively, on some versions the
*symbol
switches on in the display.
The display will show a dedicated message.
á
*
Glow plugs
This warning light switches on when the key
is turned to MAR. It will switch off as soon as
the heater plugs have reached a preset temper-
ature. Start the engine as soon as the warning light
switches off.
IMPORTANT In hot outside temperatures, the warning
light may stay on for only a very short time.
Glow plug warming failure
The warning light flashes if there is a fault in the pre-
heating system. Go to a Lancia Dealership as soon as pos-
sible.
The display will show a dedicated message.
m
Page 23 of 295

1
KNOWING YOUR CAR21
Insufficient tyre pressure
(for versions/markets where provided)
This warning light switches on when the igni-
tion key is turned to MAR, but it should switch
off after a few seconds. The warning light (amber), or
symbol in the display (red), switch on when the inflation
pressure of one or more tyres falls below a preset level.
In this way the T.P.M.S. warns the driver and signals the
possibility of the tyre being dangerously deflated and a
probable puncture (see paragraph “T.P.M.S.” in this
chapter).
IMPORTANT Do not continue driving with one or more
flat tyres as handling may be compromised. Stop the car,
avoiding harsh braking or steering manoeuvres. Replace
the wheel immediately with the space-saver wheel (for
versions/markets where provided) or carry out a repair
using the dedicated kit (see “Changing a wheel” in the
chapter “4”) and contact a Lancia Dealership as soon as
possible.
Check tyre pressures
This warning light (for versions/markets where provided)
switches on when the ignition key is turned to MAR, but
it should switch off after a few seconds.
The warning light (or symbol in the display) switches on
to show the flat tyre (see “T.P.M.S.” paragraph in this
chapter).
n
Should two or more tyres be flat, the display will show
the indications corresponding to each tyre in sequence.
Restore the correct inflation pressure values as soon as
possible (see paragraph “Cold tyre pressures” in chap-
ter “6”).
Tyre pressure unsuitable for speed
This warning light (for versions/markets where provided)
switches on when the ignition key is turned to MAR, but
it should switch off after a few seconds.
Should it be necessary to travel at a speed higher than
160 km/h, inflate the tyres more than the pressure value
specified in paragraph “Cold tyre pressures” in chapter
“6”.
If the T.P.M.S. system (for versions/markets where pro-
vided) detects that the pressure of one or more tyres is
unsuitable for the current speed, the warning light or
symbol will switch on (together with the message on the
display) (see “Tyre pressure low” in this chapter) and
it will stay on until the car slows down to a speed below
the preset threshold (see “T.P.M.S.” paragraph in this
chapter).
IMPORTANT In this case, slow down immediately be-
cause tyre overheating could damage tyre performance
and durability beyond repair, and may even make the
tyre explode.
Page 51 of 295

1
KNOWING YOUR CAR49
IGNITION DEVICE
The key can be turned to 3 different positions fig. 15:
❍STOP: engine off, key can be removed, steering
locked. Some electrical devices (e.g. sound system,
central door locking system, etc.) can operate.
❍MAR: driving position. All electrical devices can op-
erate.
❍AVV: engine starting.
The ignition switch is fitted with a safety system that re-
quires the ignition key to be turned back to STOP if the
engine does not start before the starting operation can be
repeated.STEERING LOCK
Engagement
When the key is at STOP, remove the key and turn the
steering wheel until it locks.
Disengagement
Move the steering wheel slightly as you turn the ignition
key to MAR.
IMPORTANT In some parking conditions (e.g.: wheels
turned) the effort required to move the steering wheel and
disengage the steering lock may be increased.
fig. 15L0E0107m
Never remove the key while the car is mov-
ing. The steering wheel would automatically
lock as soon as you try to turn it. This also
applies to when the car is towed. Under no cir-
cumstances should aftermarket operations be car-
ried out involving steering system or steering col-
umn modifications (e.g. installation of anti-theft
device). This could negatively affect performance
and safety, invalidate the warranty, cause serious
safety problems and also result in non-compliance
of the car with type-approval requirements.
Page 52 of 295

50KNOWING YOUR CAR
SEATS
FRONT SEATS
Lengthwise direction adjustment fig. 16
Lift the lever A and push the seat forwards or backwards:
in the driving position your arms should rest on the rim
of the steering wheel.
Backrest angle adjustment fig. 16
Turn knob B.
All adjustments on the front and rear seats
must be made with the car stationary.
After releasing the adjustment levers always
check that the seat is locked into place by try-
ing to move it back and forth. Failure to lock
the seat in place could result in the seat moving sud-
denly and the driver losing control of the car.
fig. 16L0E0008m
Page 56 of 295

54KNOWING YOUR CAR
STEERING WHEEL
It can be adjusted vertically (and axially).
To adjust the steering wheel, move the lever fig. 20 up-
wards to position 1. Adjust the steering wheel into the
most suitable position and lock it in this position by mov-
ing the lever to position 2.
REAR VIEW MIRRORS
INTERIOR REAR VIEW MIRROR fig. 21
The mirror is fitted with a safety device that causes its re-
lease in the event of a violent impact with the passenger.
Lever A can be used to move the mirror to two different
positions: normal or antiglare.
INTERIOR ELECTROCHROMIC
REAR VIEW MIRROR
(for versions/markets where provided)
Some versions have an electrochromic mirror with auto-
matic antiglare function.
Engaging reverse gear, the mirror is automatically set for
daytime use.
Any adjustments must be carried out only
with the car stationary and engine off.
fig. 21L0E0013mfig. 20L0E0012m
Page 68 of 295

66KNOWING YOUR CAR
Deactivation
When the lights are switched off by the sensor, the dipped
beam headlights and side lights are switched off and the
day lights are switched on (if activated).
The sensor is not capable of detecting the presence of fog
therefore, in these circumstances, the lights have to be
turned on manually.
FRONT FOG LIGHTS WITH CORNERING LIGHTS
FUNCTION
When the dipped headlamps are on and the speed is be-
low 40 km/h, if the steering wheel rotation angle is large
or the direction indicators are on, a light (incorporated in
the fog light) will come on on the relevant side to improve
visibility at nightime. The function can be acti-
vated/deactivated via the display menu (see “Display”
paragraph in this chapter). AUTOMATIC HEADLIGHT SENSOR
(dusk sensor) fig. 27
(for versions/markets, where provided)
It detects variations in brightness outside the vehicle de-
pending on the light setting: the greater the sensitivity,
the less outside light needed to activate the exterior lights
being turned on. The sensitivity of the dusk sensor may
be adjusted, using the “Set-up menu” on the instrument
panel.
Activation
When the ring nut is turned to the AUTO position the ex-
ternal lights automatically switch on depending on the
exterior brightness.
The headlights can only be flashed with the sensor on.The daytime running lights are an alterna-
tive to the dipped beam headlights for dri-
ving during the daytime in countries where
it is compulsory to have lights on during the day,
and they are also permitted in those countries
where this not obligatory.
Daytime running lights cannot replace dipped
headlights when driving at night or through tunnels.
The use of daytime running lights is governed by
the highway code of the country in which you are
driving. Comply with legal requirements.