low beam Lancia Delta 2014 Owner handbook (in English)
[x] Cancel search | Manufacturer: LANCIA, Model Year: 2014, Model line: Delta, Model: Lancia Delta 2014Pages: 291, PDF Size: 5.24 MB
Page 27 of 291

KNOWING YOUR CAR25
1
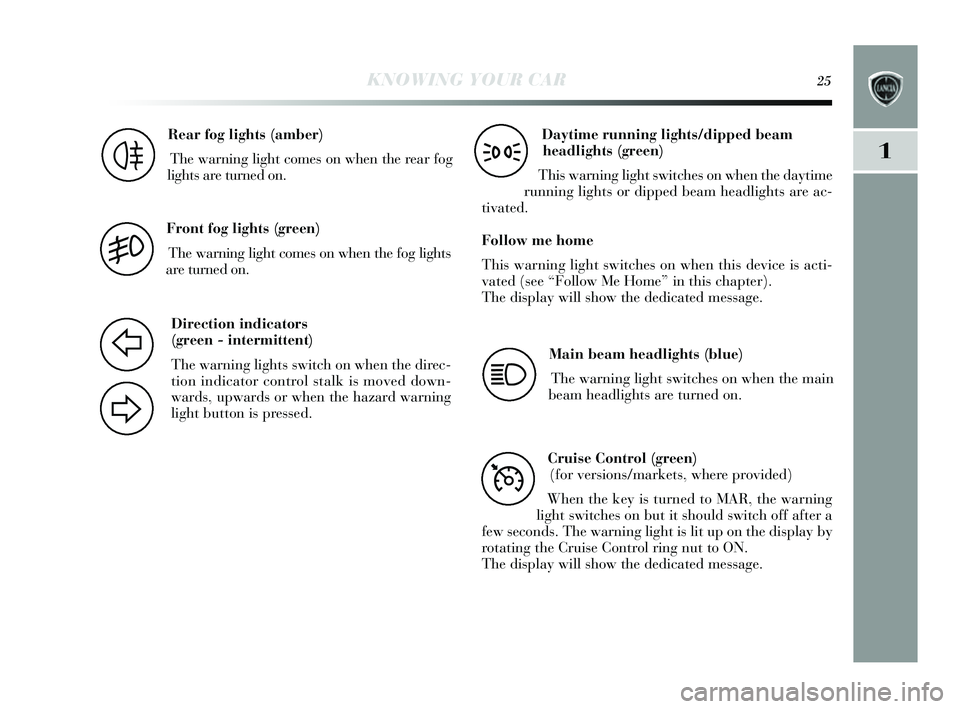
Rear fog lights (amber)
The warning light come s on when the rear fog
lights are turned on.
4
Front fog lights (g reen)
The warning light comes on when the fog lights
are turned on.
5
Direction indicators
( g reen - intermittent)
The warning light s s witch on when the direc-
tion indicator control s talk is moved down-
wards , upwards or when the hazard warning
light button is pressed.
F
D
Daytime running lights/dipped beam
headlig hts (green)
This warning light s witches on when the day time
running light s or dipped beam headlight s are ac-
tivated.
Follow me home
This warning light switches on when this device is acti-
vated (s ee “Follow Me Home” in thi s chapter).
The dis play will s how the dedicated me ssage.
Main beam headli ghts (blue)
The warning light switches on when the main
beam headlight s are turned on.
1
C ruise Control (g reen)
(for vers ions/markets , where provided)
When the key i s turned to MAR, the warning
light switches on but it s hould switch off after a
few seconds . The warning light i s lit up on the dis play by
rotating the Cruis e Control ring nut to ON.
The dis play will s how the dedicated me ssage.
Ü
3
001-154 Delta GB 2ed 27/01/14 10.46 Pagina 25
Page 28 of 291

26KNOWING YOUR CAR
DISPLAY
The car may be provided with a multifunction/reconfig-
urable multifunction di splay that s hows useful informa-
tion, according to the previou s s ettings , when driving. MULTIFUNC
TION DISPLAY “STANDARD”
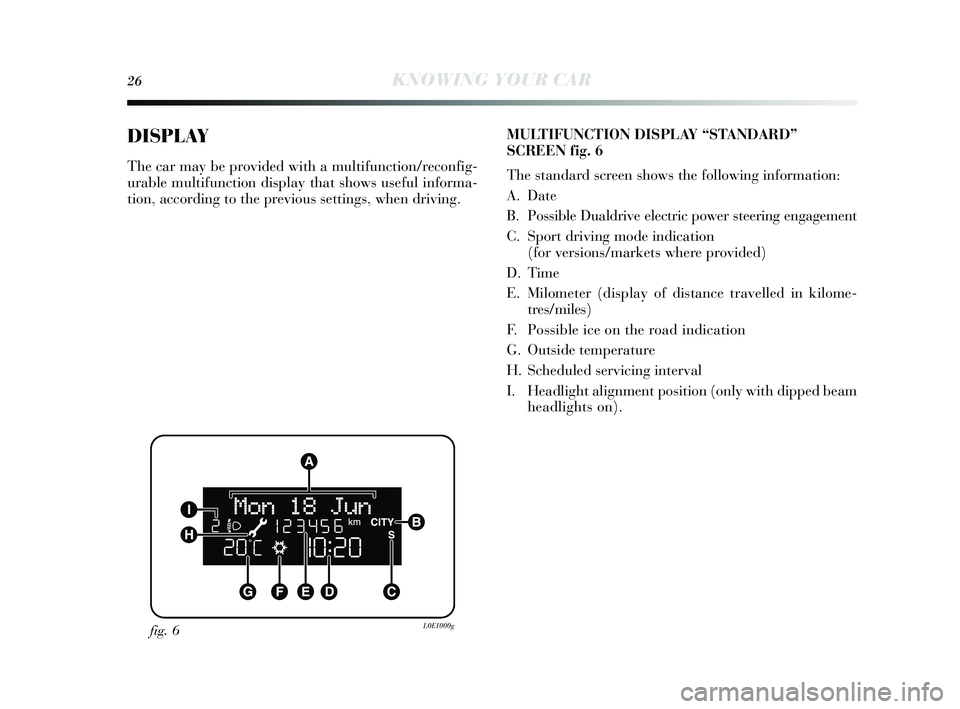
SCREEN fig . 6
The standard screen shows the following information:
A. Date
B. Po ssible Dualdrive electric power steering engagement
C. Sport driving mode indication
(for vers ions/markets where provided)
D. Time
E. Milometer (display of distance travelled in kilome- tres /miles )
F. P o ssible ice on the road indication
G . Outs ide temperature
H. Scheduled servicing interval
I. Headlight alignment po sition (only with dipped beam
headlights on).
fig. 6L0E1000g
001-154 Delta GB 2ed 27/01/14 10.46 Pagina 26
Page 70 of 291

68KNOWING YOUR CAR
Activation
When the ring nut is turned to the AUTO pos ition the
external lights automatically s witch on depending on the
exterior brightne ss.
The headlight s can only be flashed with the s ensor on.
Deactivation
When the lights are switched off by the sensor, the dipped
beam headlight s and s ide lights are switched off and the
day lights are switched on (if activated).
The sens or is not capable of detecting the pre sence of fog
therefore, in thes e circumstances, the lights have to be
turned on manuall y.
FRONT FOG LIGHT S WITH
C ORNERING LIGHTS FUNCTION
When the dipped beam headlights are on and the speed is
below 40 km/h, if the s teering wheel rotation angle is large
or the direction indicators are on, a light (incorporated
in the fog light) will come on on the relevant side to im-
pr
ove vis ibility at night time. The function can be acti-
vated/deactivated via the di splay menu (s ee “Display”
paragraph in thi s chapter).
AUTOMATIC
HEADLIGHT S ENSOR (dusk sensor)
(for vers ions/markets , where provided)
It detects variation s in brightness outs ide the vehicle de-
pending on the light setting: the greater the sens itivity , the
less outs ide light needed to activate the exterior light s be-
ing turned on. The sens itivity of the dus k sens or may be
adjus ted, us ing the “S etup menu” on the ins trument pan-
el.
The daytime running lights are an alterna-
tive to the dipped beam headlights for driving
during the daytime in countries where it is
compulsory to have lights on during the day, and
they are also permitted in those countries where this
is not obligatory.
Daytime running lights cannot replace dipped beam
headlights when driving at night or through tunnels.
The use of daytime running lights is governed by
the highway code of the country in which you are
driving. Comply with the prescriptions.
001-154 Delta GB 2ed 27/01/14 10.46 Pagina 68
Page 78 of 291

76KNOWING YOUR CAR
For versions/markets , where provided the roof light, some
bulbs light the car interior when the main beam headlight s
or dipped beam headlight s are on.
IMPORTANT The roof light, for some vers ions, may also
be in a rear central pos ition (electric sun roof vers ion).
IMPORTANT Before getting out of the car, make sure both
s witches are in the middle po sition; when the door s are
clos ed, the lights s witch off preventing a possible dis charge
of the battery . In any case, if the s witch is left in on pos i-
tion, the roof light s witches off automaticall y 15 minutes
after the engine s witching off.
Roof lig ht timing
To make getting in and out the vehicle eas ier, especially
at night time or in poorl y lit areas, two timing logic are
available.
Timing while getting into the vehicle
The roof lights s witch on according to the following mode s:
❍ for ar
ound 10 s econds when the front door s are un-
locked;
❍ for about 3 minutes when one of the side doors is
opened;
❍ for about 10 seconds when the door s are clos ed.
The timed period is interrupted when the ignition i s turned
to “MAR”. Timing while getting out of the vehicle
After removing the key
from the ignition, the roof light s
s witch on according to the following mode s:
❍ within 2 minutes of the engine being switched off for
a period of about 10 seconds ;
❍ when one of the side doors is opened for a period of
about 3 minute s;
❍ when one of the door s i s clos ed for a period of about
10 seconds .
❍ if the fuel cut off s witch operates, they remain on for
about 15 minute s, then they s witch off automatically .
Door locking s witches the lights off immediately (unless
the fuel cut-off s witch is operating).
fig. 38L0E0025m
001-154 Delta GB 2ed 27/01/14 10.46 Pagina 76
Page 143 of 291

KNOWING YOUR CAR141
1
❍Ultras ound source (e.g. pneumatic brakes of trucks or
air drill s) nearby could negatively influence the sens or
performance.
❍ Sens ors may detect a non-exi stent obs tacle (echo in-
terference) due to mechanical interference, for exam-
ple while wa shing the car, rain, s trong wind, hail.
❍ The sens ors might not detect objects of a particular
s hape or made from particular material s (very thin
poles , trailer beams , panels, nets, bushes, parking de-
terrents , rubbish bins, motor vehicles , etc.). Always take
great care, checking that the car and it s path are ef-
fectively compatible with the parking area identified by
the system.
❍ The us e of (one or more) ty res or rims of a different s ize
to thos e pr
es ent when the vehicle wa s purchas ed could
affect the operation of the system.
❍ If the batter y i s dis connected or very run down, before
the Magic Parking system is available it is necessary
to drive a few hundred metre s, not in a straight line,
to initiali se the system.
❍ If a trailer is fitted (with the plug correctly inserted) the
Magic Parking system will automaticall y be dis abled.
❍ If the Magic Parking system is in “search in progress”
mode, the system could incorrectl y identify a parking
s pace and carry out the manoeuvre (e.g. by a junction,
carriage track, roads crossing the direction of travel,
etc.) ❍
In the ca se of parking manoeuvres on roads on a gra-
dient, the performance of the system could be inferior
and it may deactivate.
❍ If a parking manoeuvr
e is being carried out between
two vehicles parked on the pavement, the Magic Park-
ing system may cause the vehicle to mount the pave-
ment.
❍ Some manoeuvres at very tight bend s may not be car-
ried out.
❍ Take great care to ens ure that conditions do not change
during the parking manoeuvre (e.g. if there are pers ons
and/or animals in the parking area, moving vehicle s,
etc.) and intervene immediatel y if necessary .
❍ During parking manoeuvres , pay s pecial attention to
vehicles approaching from the oppo site direction. Al-
ways follow the Highway Code.
001-154 Delta GB 2ed 27/01/14 10.47 Pagina 141
Page 213 of 291

IN AN EMERGENCY
211
4
REPLACING A BULBGENERAL INSTRUCTIONS
❍Before changing a bulb, check the contacts for oxida-
tion;
❍burnt-out bulbs must be replaced by others of the same
type and power;
❍always check the direction of the beam after chang-
ing a headlight bulb, for safety reasons;
❍when a light is not working, check that the corre-
sponding fuse is intact before changing the bulb. For
the location of fuses, refer to the “Replacing fuses”
paragraph in this chapter.
IMPORTANT The headlight inner surface might be slight-
ly misted: this does not indicate a fault, it is a natural phe-
nomenon due to low temperature and the air humidity lev-
el. Misting will disappear rap
idly when the headlights are
turned on. The presence of drops inside the headlights in-
dicates infiltration of water. Contact a Lancia Dealership.
Modifications or repairs to the electric sys-
tem that are not carried out properly or do
not take the system technical specifications
into account can cause malfunctions leading to the
risk of fire. Halogen bulbs contain gas under pressure, if
they break glass fragments may be thrown
around.
When handling halogen bulbs just touch the
metal part. If the transparent bulb is touched
with the fingers, its lighting intensity is re-
duced and life of the bulb may be compromised. In
the event of accidental contact, wipe the bulb with
a cloth moistened with alcohol and leave it to dry.Where possible, it is advisable to have bulbs
changed at a Lancia Dealership. Proper op-
eration and direction of the external lights
are essential for driving in safety and comply with
law.
195-232 Delta GB 1ed 02/09/13 09.35 Pagina 211
Page 216 of 291

214
IN AN EMERGENCY
REPLACING AN EXTERIOR BULBFRONT LIGHT CLUSTERS fig. 15
These contain the bulbs for the dipped beam headlights,
main beam headlights and direction indicators. The bulbs
are arranged as follows:
A.Main beam headlights:
B.Dipped beam headlights;
C.Direction indicators.DIPPED BEAM HEADLIGHTS
With incandescent bulbs
To change the bulb, proceed as follows:
❍remove the protective cover B - fig. 15;
❍release the bulb holder clip A - fig. 16;
❍disconnect the electrical connector B;
❍remove the bulb C and replace it;
❍fit the new bulb, ensuring that the outl
ine of the met-
al part coincides with the splining on the curve of the
headlight. Then reconnect the electrical connector B
and reattach the bulb holder clip A;
❍refit the protective cover B - fig. 15.
fig. 15
L0E0154m
fig. 16
L0E0155m
195-232 Delta GB 1ed 02/09/13 09.35 Pagina 214
Page 217 of 291

IN AN EMERGENCY
215
4
With gas discharge bulbs (Xenon)
(for versions/markets, where provided)
MAIN BEAM HEADLIGHTS
With incandescent bulbs
To change the bulb, proceed as follows:
❍remove the protective cover A - fig. 15;
❍release the bulb holder clip A - fig. 17;
❍disconnect the electrical connector B;
❍remove the bulb C and replace it;
❍fit the new bulb, ensuring that the outline of the met-
al part coincides with the splining on the curve of the
headlight. Then reconnect the electrical connector B
and reattach the bulb holder clip A;
❍refit the protective cover A - fig. 15.
fig. 17
L0E0156m
Due to the high power supply voltage, gas
discharge bulbs (Xenon) should only be re-
placed by specialised personnel: danger of
death! Contact a Lancia Dealership.
With gas discharge bulbs (Xenon)
(for versions/markets, where provided)
Due to the high power supply voltage, gas
discharge bulbs (Xenon) should only be re-
placed by specialised personnel: danger of
death! Contact a Lancia Dealership.
195-232 Delta GB 1ed 02/09/13 09.35 Pagina 215
Page 229 of 291

IN AN EMERGENCY
227
4
F12
F12
F13
F13
F31
F33
F34
F35
F36
F37
F38
F39
F40
F41
7.5
15
7.5
15
5
20
20
5
20
7,5
10
10
30
7.5
39
39
39
39
39
39
39
39
39
39
39
39
39
39
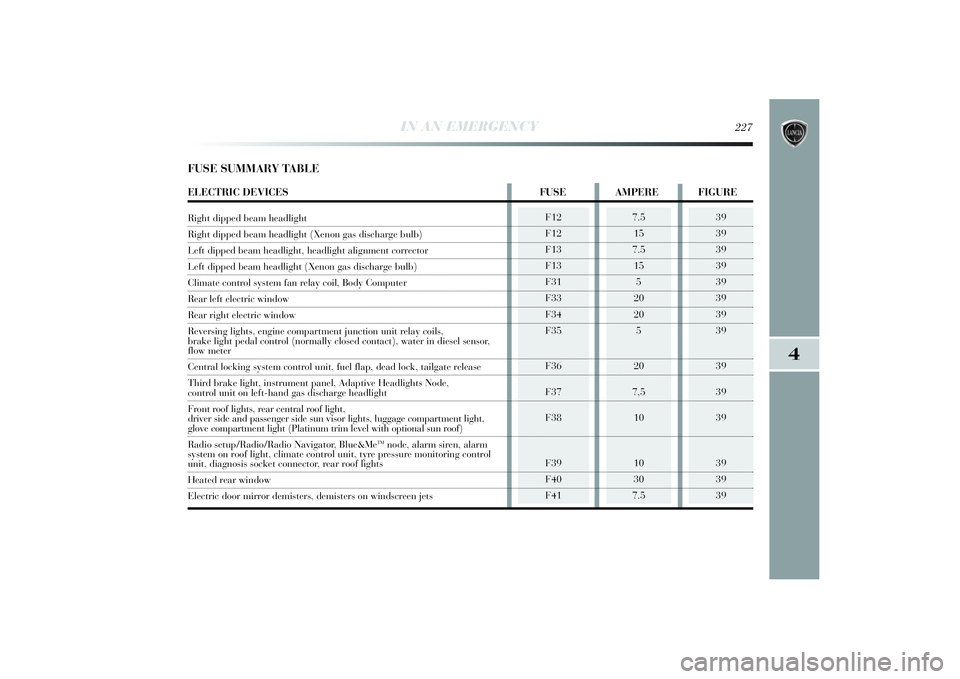
FUSE SUMMARY TABLEELECTRIC DEVICES FUSE AMPERE FIGURERight dipped beam headlight Right dipped beam headlight (Xenon gas discharge bulb) Left dipped beam headlight, headlight alignment correctorLeft dipped beam headlight (Xenon gas discharge bulb) Climate control system fan relay coil, Body ComputerRear left electric windowRear right electric window
Reversing lights, engine compartment junction unit relay coils,
brake light pedal control (normally closed contact), water in diesel sensor, flow meter Central locking system control unit, fuel flap, dead lock, tailgate release
Third brake light, instrument panel, Adaptive Headlights Node, control unit on left-hand gas discharge headlight
Front roof lights, rear central roof light,
driver side and passenger side sun visor lights, luggage compartment light, glove compartment light (Platinum trim level with optional sun roof)
Radio setup/Radio/Radio Navigator, Blue&Me
TMnode, alarm siren, alarm
system on roof light, climate control unit, tyre pressure monitoring control
unit, diagnosis socket connector, rear roof lightsHeated rear windowElectric door mirror demisters, demisters on windscreen jets
195-232 Delta GB 1ed 02/09/13 09.35 Pagina 227