boot Lancia Musa 2010 Owner handbook (in English)
[x] Cancel search | Manufacturer: LANCIA, Model Year: 2010, Model line: Musa, Model: Lancia Musa 2010Pages: 218, PDF Size: 3.71 MB
Page 119 of 218
118
WARNING
LIGHTS AND
MESSAGES
IN AN
EMERGENCY
MAINTENANCE
AND CARE
TECHNICAL
SPECIFICA-
TIONS
INDEX
DASHBOARD
AND
CONTROLS
SAFETY
STARTING
AND DRIVING
CONTAINING
RUNNING COSTS
Here are some suggestions which may
help you to keep the running costs of
your vehicle down and lower the
amount of toxic emissions released
into the atmosphere.
GENERAL CONSIDERATIONS
Car maintenance
Have checks and adjustments carried
out in accordance with the “Service
schedule”.
Ty r e s
Check tyre pressure regularly at least
once every four weeks: excessively low
pressure will increase consumption
because rolling resistance will be
higher.
Unnecessary loads
Do not travel with an overloaded
boot. The weight of the car (especially
when driving in town) and its trim
greatly affects consumption and sta-
bility.Roof rack/ski rack
Remove the roof rack or the ski rack
from the roof after use. These acces-
sories decrease aerodynamic penetra-
tion of the car and have a negative ef-
fect on consumption. It is better to use
a trailer to transport particularly
bulky objects.
Electric devices
Use electric devices only for the
amount of time needed. Rear heated
window, additional headlights, wind-
screen wipers and heater fan need a
considerable amount of energy, there-
fore increasing the requirement of
current increases fuel consumption
(up to +25% in the urban cycle).
Climate control
The climate control system requires
higher fuel consumption (up to +20%
in average): use the air vents when the
external temperature allows to.
Spoilers
The use of non-certified aerodynamic
items may adversely affect air drag
and fuel consumption levels.DRIVING STYLE
Starting
Do not warm the engine up with the
car standing: the engine warms up
very slowly in these conditions, in-
creasing consumption and emissions.
It is advisable to start off immediately
and slowly keeping the engine speed
down: the engine will warm up much
faster this way.
Unnecessary actions
Avoid revving up when starting at
traffic lights or before stopping the
engine. The latter action, like dou-
bling the clutch, is unnecessary and
causes increase of consumption and
pollution.
Gear selection
Use a higher gear as soon as traffic
and road conditions allow. Using a
low gear for faster acceleration will in-
crease consumption.
In the same way improper use of a
high gear increases consumption,
emissions an engine wear.
Page 139 of 218
138
WARNING
LIGHTS AND
MESSAGES
MAINTENANCE
AND CARE
TECHNICAL
SPECIFICA-
TIONS
INDEX
DASHBOARD
AND
CONTROLS
SAFETY
STARTING
AND DRIVING
IN AN
EMERGENCY
BUMP STARTING
Never bump start the engine by push-
ing, towing or driving downhill. This
could cause a flow of fuel into the cat-
alytic converter and damage it beyond
repair.
IMPORTANT Remember that the
brake servo and the electric power
steering system are not activated un-
til the engine is started, a greater ef-
fort will therefore be required to press
the brake pedal or turn the steering
wheel.
Indicate that the car is
standing according to the
laws in force: emergency lights, re-
fracting warning triangle, etc. Pas-
sengers should leave the car, partic-
ularly if it is very loaded, and wait
for the wheel to be changed away
from on-coming traffic. Arrange
wedges or other suitable material
under the wheels to block the car on
slopes or rough roads.
WARNINGAutomatic FIX & GO
QUICK TYRE
REPAIR KIT
(for versions/markets, where provided)
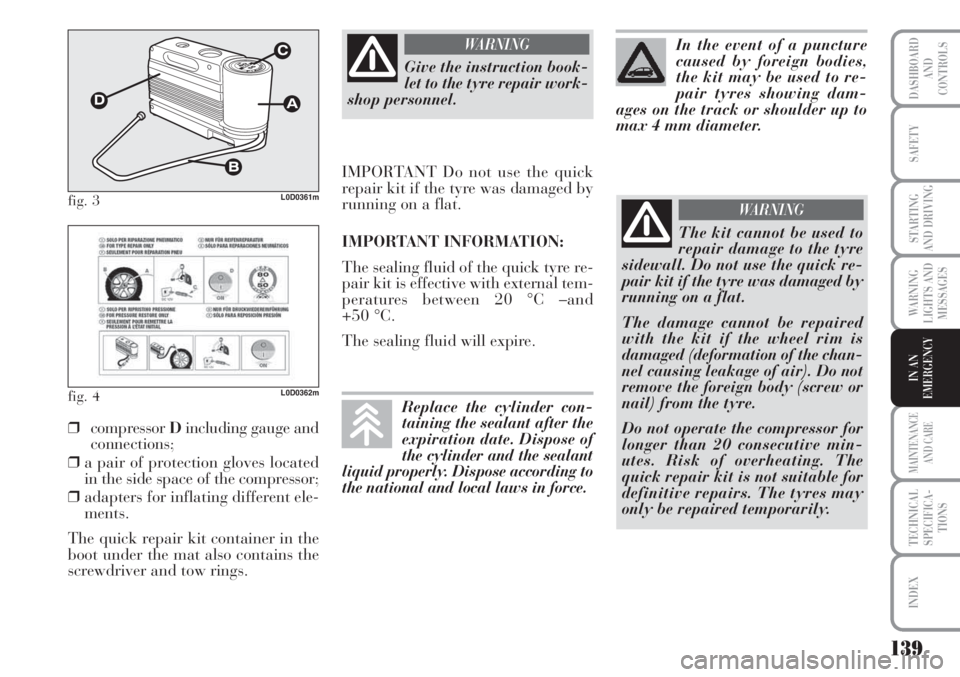
The automatic Fix & Go quick tyre
repair kit fig. 3is placed in the boot.
The kit includes:
❒bottleAcontaining sealer and fit-
ted with:
– filling pipe B;
– an adhesive label Cwith the
message “max. 80 km/h” to be
apply in a position clearly visi-
ble by the driver (on the dash-
board) after repairing the tyre;
❒instruction brochure (see fig. 4), to
be used for prompt and proper use
of the quick repair kit and to be
then handed to the personnel
charged with handling the treated
tyre;
Page 140 of 218
139
WARNING
LIGHTS AND
MESSAGES
MAINTENANCE
AND CARE
TECHNICAL
SPECIFICA-
TIONS
INDEX
DASHBOARD
AND
CONTROLS
SAFETY
STARTING
AND DRIVING
IN AN
EMERGENCY
fig. 3L0D0361m
fig. 4L0D0362m
❒compressor Dincluding gauge and
connections;
❒a pair of protection gloves located
in the side space of the compressor;
❒adapters for inflating different ele-
ments.
The quick repair kit container in the
boot under the mat also contains the
screwdriver and tow rings.
Give the instruction book-
let to the tyre repair work-
shop personnel.
WARNING
IMPORTANT Do not use the quick
repair kit if the tyre was damaged by
running on a flat.
IMPORTANT INFORMATION:
The sealing fluid of the quick tyre re-
pair kit is effective with external tem-
peratures between 20 °C –and
+50 °C.
The sealing fluid will expire.
The kit cannot be used to
repair damage to the tyre
sidewall. Do not use the quick re-
pair kit if the tyre was damaged by
running on a flat.
The damage cannot be repaired
with the kit if the wheel rim is
damaged (deformation of the chan-
nel causing leakage of air). Do not
remove the foreign body (screw or
nail) from the tyre.
Do not operate the compressor for
longer than 20 consecutive min-
utes. Risk of overheating. The
quick repair kit is not suitable for
definitive repairs. The tyres may
only be repaired temporarily.
WARNING
In the event of a puncture
caused by foreign bodies,
the kit may be used to re-
pair tyres showing dam-
ages on the track or shoulder up to
max 4 mm diameter.
Replace the cylinder con-
taining the sealant after the
expiration date. Dispose of
the cylinder and the sealant
liquid properly. Dispose according to
the national and local laws in force.
Page 145 of 218
144
WARNING
LIGHTS AND
MESSAGES
MAINTENANCE
AND CARE
TECHNICAL
SPECIFICA-
TIONS
INDEX
DASHBOARD
AND
CONTROLS
SAFETY
STARTING
AND DRIVING
IN AN
EMERGENCY
Incorrect wheel cup as-
sembly may cause it to
come off when the car is travelling.
Never tamper with the inflation
valve. Never introduce tools of any
kind between rim and tyre. Check
tyre and space saver spare wheel
pressure regularly referring to the
values shown in the “Technical
Specifications” chapter.
WARNINGImportant notes:
❒the jack cannot be repaired: replace
with an original spare part if dam-
aged;
❒no tool other than its cranking de-
vice may be fitted on the jack.
To change a wheel proceed as follows:
❒stop the car in a position so that it
is not a danger for on-coming traf-
fic and where you can replace the
wheel safely. The ground must be
flat and compact;
❒turn the engine off and pull up the
handbrake.
❒engage first gear or reverse;
❒lift the boot mat;
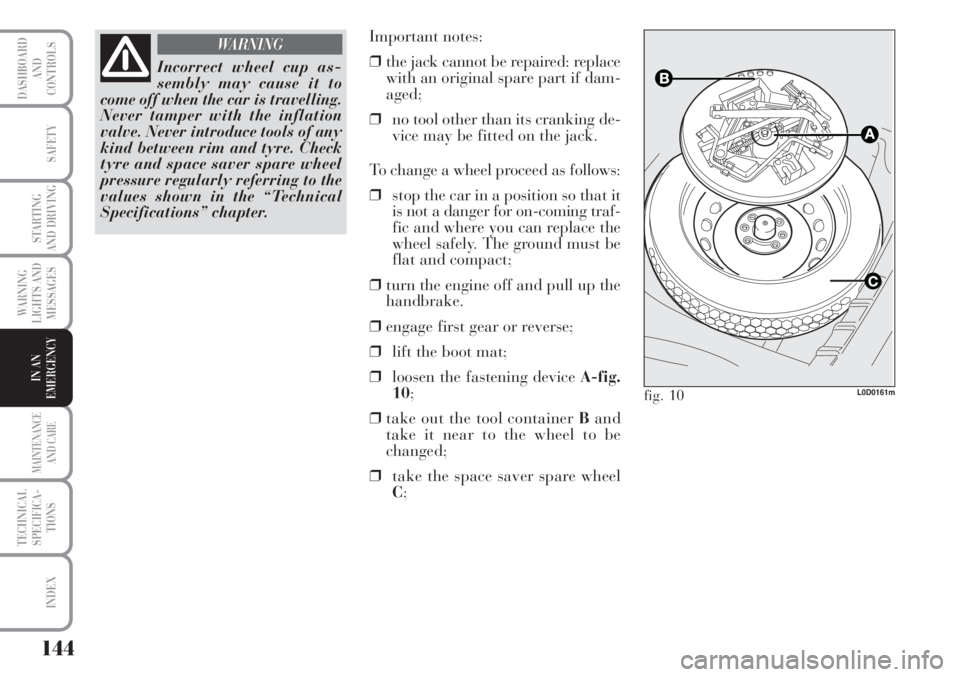
❒loosen the fastening device A-fig.
10;
❒take out the tool container Band
take it near to the wheel to be
changed;
❒take the space saver spare wheel
C;
L0D0161mfig. 10
Page 148 of 218
147
WARNING
LIGHTS AND
MESSAGES
MAINTENANCE
AND CARE
TECHNICAL
SPECIFICA-
TIONS
INDEX
DASHBOARD
AND
CONTROLS
SAFETY
STARTING
AND DRIVING
IN AN
EMERGENCY
Versions with alloy rims
❒Check that the hub contact sur-
faces are clean;
❒fit the normal wheel centring it on
the pins, lead in the fastening
screws and tighten them using the
wrench provided;
❒lower the car and remove the jack;
❒using the wrench provided, fully
tighten the bolts in the sequence
shown in fig. 15.
❒snap fit the wheel cup on the hub.When you have finished
❒stow the spare wheel in the space
provided in the boot;
❒fit the jack partially open in its
box forcing it lightly to prevent it
from vibrating when travelling;
❒put the tools back into their places
in the container;
❒arrange the container and tools in
the spare wheel and secure the fas-
tening device;
❒rearrange the preformed boot
cover correctly. WHEN NEEDING
TO CHANGE A
BULB
GENERAL INSTRUCTIONS
❒When a bulb is not working, check
that the corresponding fuse is in-
tact before replacing it: refer to the
“If a fuse blows” paragraph in this
chapter for fuse location.
❒before changing a bulb check the
contacts for oxidation;
❒burnt bulbs must be replaced by
others of the same type and power;
❒always check the height of the
headlight beam after changing a
bulb.
Halogen lamps must be
handled holding the metal-
lic part only. Touching the
transparent part of the bulb
with your fingers may reduce the in-
tensity of the emitted light and even
compromise duration of the lamp it-
self.
Page 150 of 218
149
WARNING
LIGHTS AND
MESSAGES
MAINTENANCE
AND CARE
TECHNICAL
SPECIFICA-
TIONS
INDEX
DASHBOARD
AND
CONTROLS
SAFETY
STARTING
AND DRIVING
IN AN
EMERGENCY
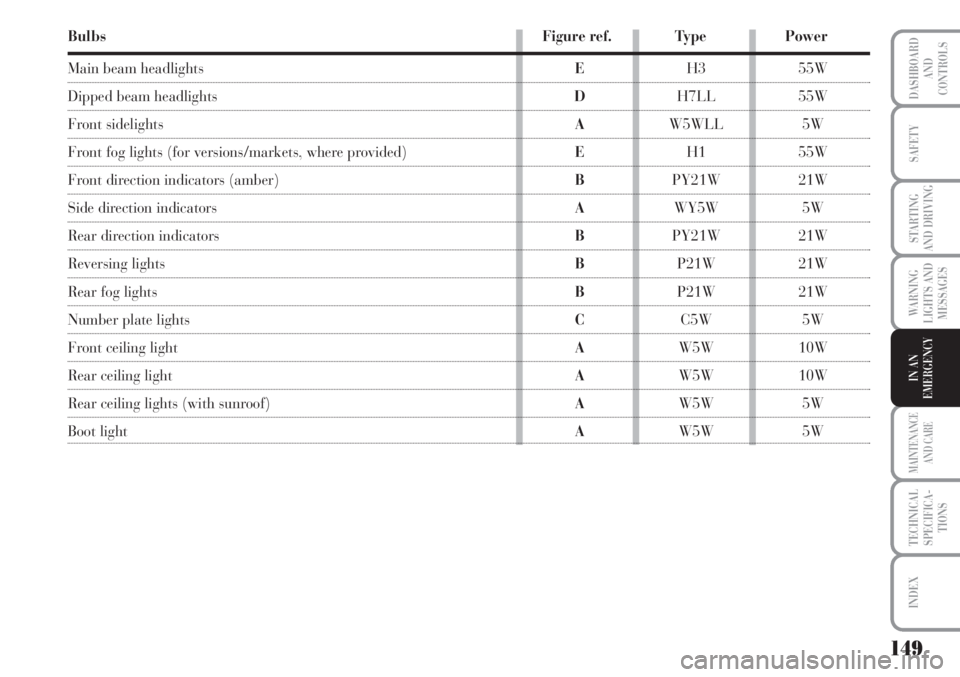
Bulbs Figure ref. Type Power
Main beam headlightsEH3 55W
Dipped beam headlights DH7LL 55W
Front sidelights AW5WLL 5W
Front fog lights (for versions/markets, where provided)EH1 55W
Front direction indicators (amber)BPY21W 21W
Side direction indicators AWY5W 5W
Rear direction indicators BPY21W 21W
Reversing lights BP21W 21W
Rear fog lights BP21W 21W
Number plate lights CC5W 5W
Front ceiling light AW5W 10W
Rear ceiling lightAW5W 10W
Rear ceiling lights (with sunroof)AW5W 5W
Boot light AW5W 5W
Page 157 of 218
156
WARNING
LIGHTS AND
MESSAGES
MAINTENANCE
AND CARE
TECHNICAL
SPECIFICA-
TIONS
INDEX
DASHBOARD
AND
CONTROLS
SAFETY
STARTING
AND DRIVING
IN AN
EMERGENCY
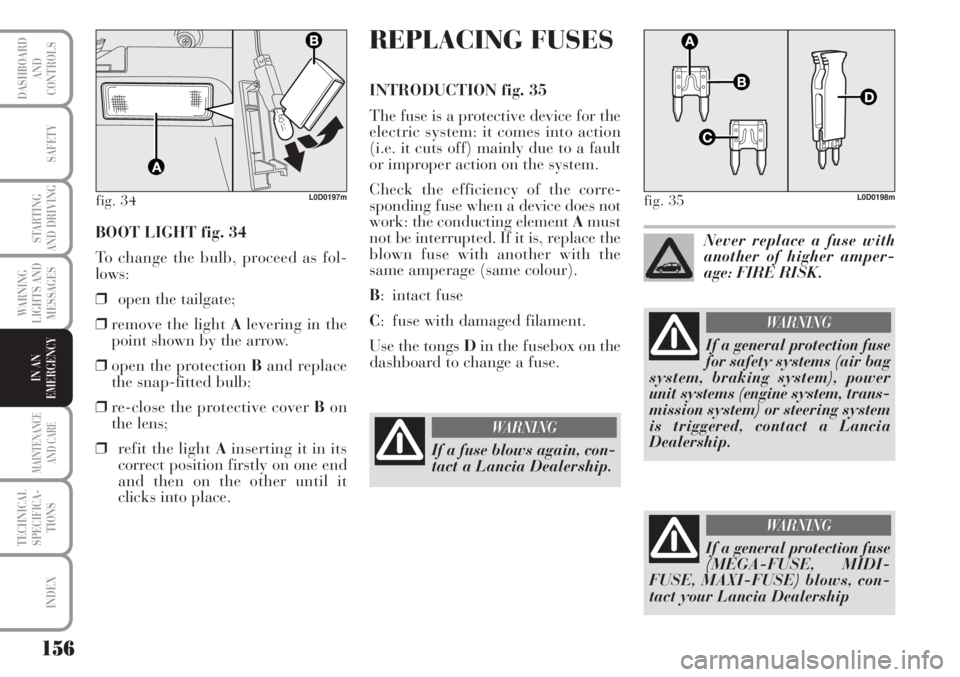
BOOT LIGHT fig. 34
To change the bulb, proceed as fol-
lows:
❒open the tailgate;
❒remove the light Alevering in the
point shown by the arrow.
❒open the protection Band replace
the snap-fitted bulb;
❒re-close the protective cover Bon
the lens;
❒refit the light Ainserting it in its
correct position firstly on one end
and then on the other until it
clicks into place.
fig. 34L0D0197m
REPLACING FUSES
INTRODUCTION fig. 35
The fuse is a protective device for the
electric system: it comes into action
(i.e. it cuts off) mainly due to a fault
or improper action on the system.
Check the efficiency of the corre-
sponding fuse when a device does not
work: the conducting element Amust
not be interrupted. If it is, replace the
blown fuse with another with the
same amperage (same colour).
B: intact fuse
C: fuse with damaged filament.
Use the tongs Din the fusebox on the
dashboard to change a fuse.
fig. 35L0D0198m
If a fuse blows again, con-
tact a Lancia Dealership.
WARNING
Never replace a fuse with
another of higher amper-
age: FIRE RISK.
If a general protection fuse
(MEGA-FUSE, MIDI-
FUSE, MAXI-FUSE) blows, con-
tact your Lancia Dealership
WARNING
If a general protection fuse
for safety systems (air bag
system, braking system), power
unit systems (engine system, trans-
mission system) or steering system
is triggered, contact a Lancia
Dealership.
WARNING
Page 160 of 218
159
WARNING
LIGHTS AND
MESSAGES
MAINTENANCE
AND CARE
TECHNICAL
SPECIFICA-
TIONS
INDEX
DASHBOARD
AND
CONTROLS
SAFETY
STARTING
AND DRIVING
IN AN
EMERGENCY
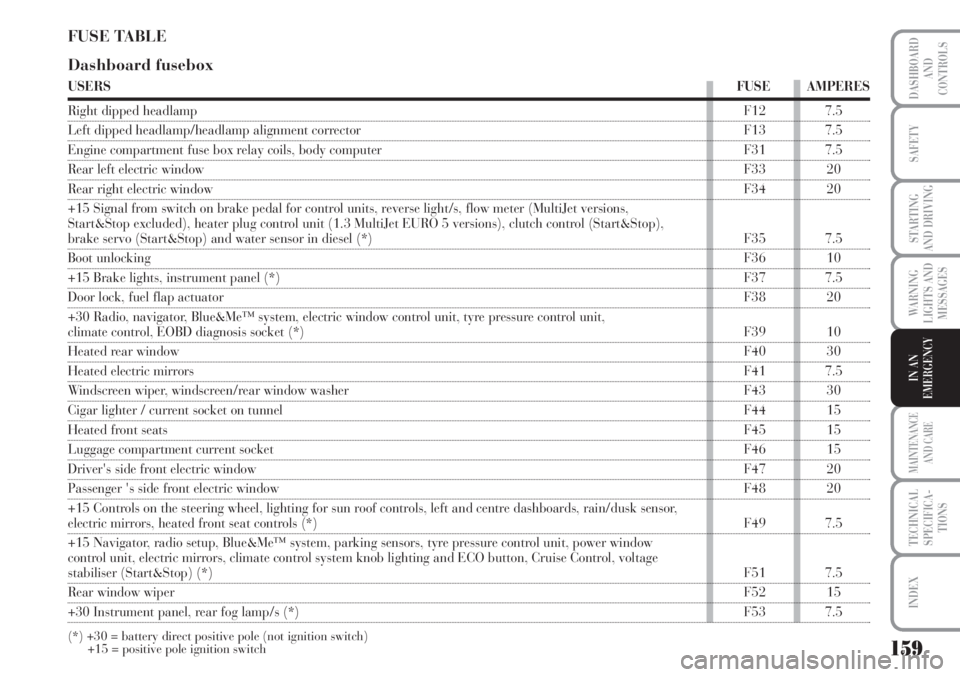
FUSE TABLE
Dashboard fusebox
USERSFUSE AMPERES
Right dipped headlampF12 7.5
Left dipped headlamp/headlamp alignment corrector F13 7.5
Engine compartment fuse box relay coils, body computer F31 7.5
Rear left electric windowF33 20
Rear right electric windowF34 20
+15 Signal from switch on brake pedal for control units, reverse light/s, flow meter (MultiJet versions,
Start&Stop excluded), heater plug control unit (1.3 MultiJet EURO 5 versions), clutch control (Start&Stop),
brake servo (Start&Stop) and water sensor in diesel (*) F35 7.5
Boot unlocking F36 10
+15 Brake lights, instrument panel (*)F37 7.5
Door lock, fuel flap actuatorF38 20
+30 Radio, navigator, Blue&Me™ system, electric window control unit, tyre pressure control unit,
climate control, EOBD diagnosis socket (*)F39 10
Heated rear window F40 30
Heated electric mirrorsF41 7.5
Windscreen wiper, windscreen/rear window washer F43 30
Cigar lighter / current socket on tunnelF44 15
Heated front seatsF45 15
Luggage compartment current socketF46 15
Driver's side front electric windowF47 20
Passenger 's side front electric windowF48 20
+15 Controls on the steering wheel, lighting for sun roof controls, left and centre dashboards, rain/dusk sensor,
electric mirrors, heated front seat controls (*)F49 7.5
+15 Navigator, radio setup, Blue&Me™ system, parking sensors, tyre pressure control unit, power window
control unit, electric mirrors, climate control system knob lighting and ECO button, Cruise Control, voltage
stabiliser (Start&Stop) (*)F51 7.5
Rear window wiperF52 15
+30 Instrument panel, rear fog lamp/s (*)F53 7.5
(*) +30 = battery direct positive pole (not ignition switch)
+15 = positive pole ignition switch
Page 168 of 218
167
WARNING
LIGHTS AND
MESSAGES
TECHNICAL
SPECIFICA-
TIONS
INDEX
DASHBOARD
AND
CONTROLS
SAFETY
STARTING
AND DRIVING
IN AN
EMERGENCY
MAINTENANCE
AND CARE
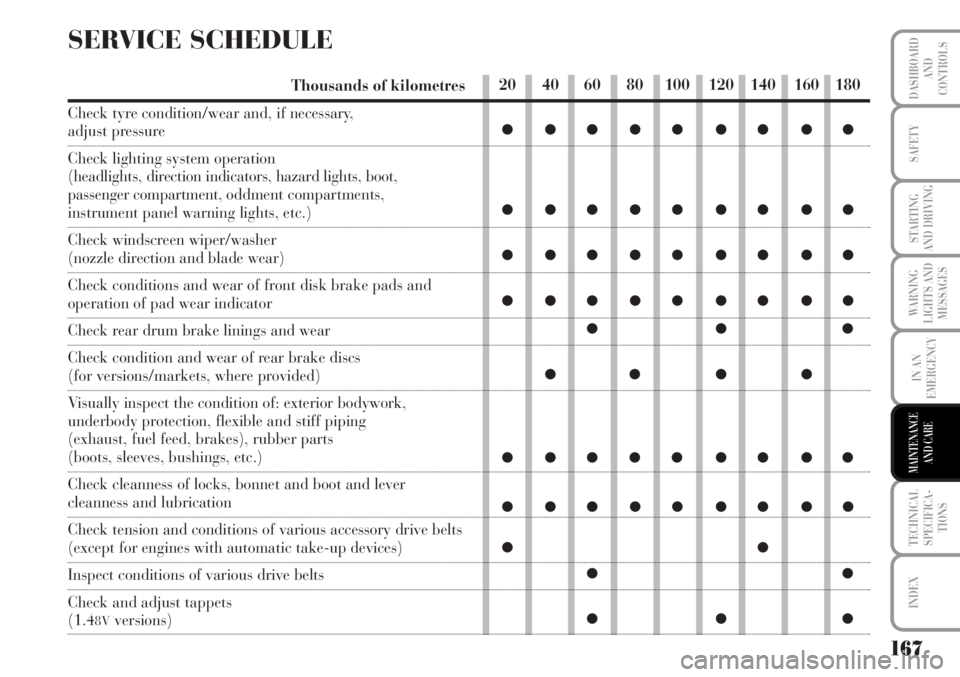
SERVICE SCHEDULE
Thousands of kilometres
Check tyre condition/wear and, if necessary,
adjust pressure
Check lighting system operation
(headlights, direction indicators, hazard lights, boot,
passenger compartment, oddment compartments,
instrument panel warning lights, etc.)
Check windscreen wiper/washer
(nozzle direction and blade wear)
Check conditions and wear of front disk brake pads and
operation of pad wear indicator
Check rear drum brake linings and wear
Check condition and wear of rear brake discs
(for versions/markets, where provided)
Visually inspect the condition of: exterior bodywork,
underbody protection, flexible and stiff piping
(exhaust, fuel feed, brakes), rubber parts
(boots, sleeves, bushings, etc.)
Check cleanness of locks, bonnet and boot and lever
cleanness and lubrication
Check tension and conditions of various accessory drive belts
(except for engines with automatic take-up devices)
Inspect conditions of various drive belts
Check and adjust tappets
(1.48Vversions)
20 40 60 80 100 120 140 160 180
●●●●● ●●●●
●●●●● ●●●●
●●●●● ●●●●
●●●●● ●●●●
●●●
●● ● ●
●●●●● ●●●●
●●●●● ●●●●
●●
●●
●●●
Page 170 of 218
169
WARNING
LIGHTS AND
MESSAGES
TECHNICAL
SPECIFICA-
TIONS
INDEX
DASHBOARD
AND
CONTROLS
SAFETY
STARTING
AND DRIVING
IN AN
EMERGENCY
MAINTENANCE
AND CARE
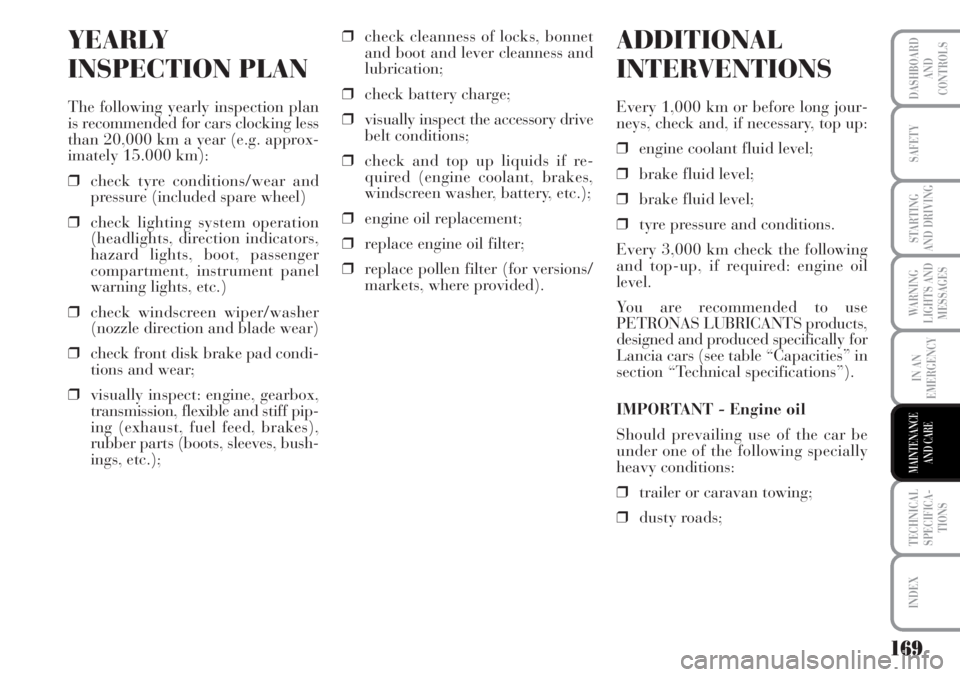
YEARLY
INSPECTION PLAN
The following yearly inspection plan
is recommended for cars clocking less
than 20,000 km a year (e.g. approx-
imately 15.000 km):
❒check tyre conditions/wear and
pressure (included spare wheel)
❒check lighting system operation
(headlights, direction indicators,
hazard lights, boot, passenger
compartment, instrument panel
warning lights, etc.)
❒check windscreen wiper/washer
(nozzle direction and blade wear)
❒check front disk brake pad condi-
tions and wear;
❒visually inspect: engine, gearbox,
transmission, flexible and stiff pip-
ing (exhaust, fuel feed, brakes),
rubber parts (boots, sleeves, bush-
ings, etc.);❒check cleanness of locks, bonnet
and boot and lever cleanness and
lubrication;
❒check battery charge;
❒visually inspect the accessory drive
belt conditions;
❒check and top up liquids if re-
quired (engine coolant, brakes,
windscreen washer, battery, etc.);
❒engine oil replacement;
❒replace engine oil filter;
❒replace pollen filter (for versions/
markets, where provided).
ADDITIONAL
INTERVENTIONS
Every 1,000 km or before long jour-
neys, check and, if necessary, top up:
❒engine coolant fluid level;
❒brake fluid level;
❒brake fluid level;
❒tyre pressure and conditions.
Every 3,000 km check the following
and top-up, if required: engine oil
level.
You are recommended to use
PETRONAS LUBRICANTS products,
designed and produced specifically for
Lancia cars (see table “Capacities” in
section “Technical specifications”).
IMPORTANT - Engine oil
Should prevailing use of the car be
under one of the following specially
heavy conditions:
❒trailer or caravan towing;
❒dusty roads;