clock Lancia Thema 2014 Owner handbook (in English)
[x] Cancel search | Manufacturer: LANCIA, Model Year: 2014, Model line: Thema, Model: Lancia Thema 2014Pages: 332, PDF Size: 3.46 MB
Page 118 of 332
NOTE: Your vehicle may be
equipped with an Active Hood Sys-
tem. Refer to “Occupant Re-
straints” in “Things To Know Be-
fore Starting Your Vehicle” for
further information.
CAUTION!
To prevent possible damage, do not
slam the hood to close it. Lower the
hood until it is open approximately
15 cm, and then drop it. This
should secure both latches. Never
drive your vehicle unless the hood is
fully closed, with both latches en-
gaged.
WARNING!
Be sure the hood is fully latched
before driving your vehicle. If the
hood is not fully latched, it could
open when the vehicle is in motion
and block your vision. Failure to
follow this warning could result in
serious injury or death.
LIGHTS
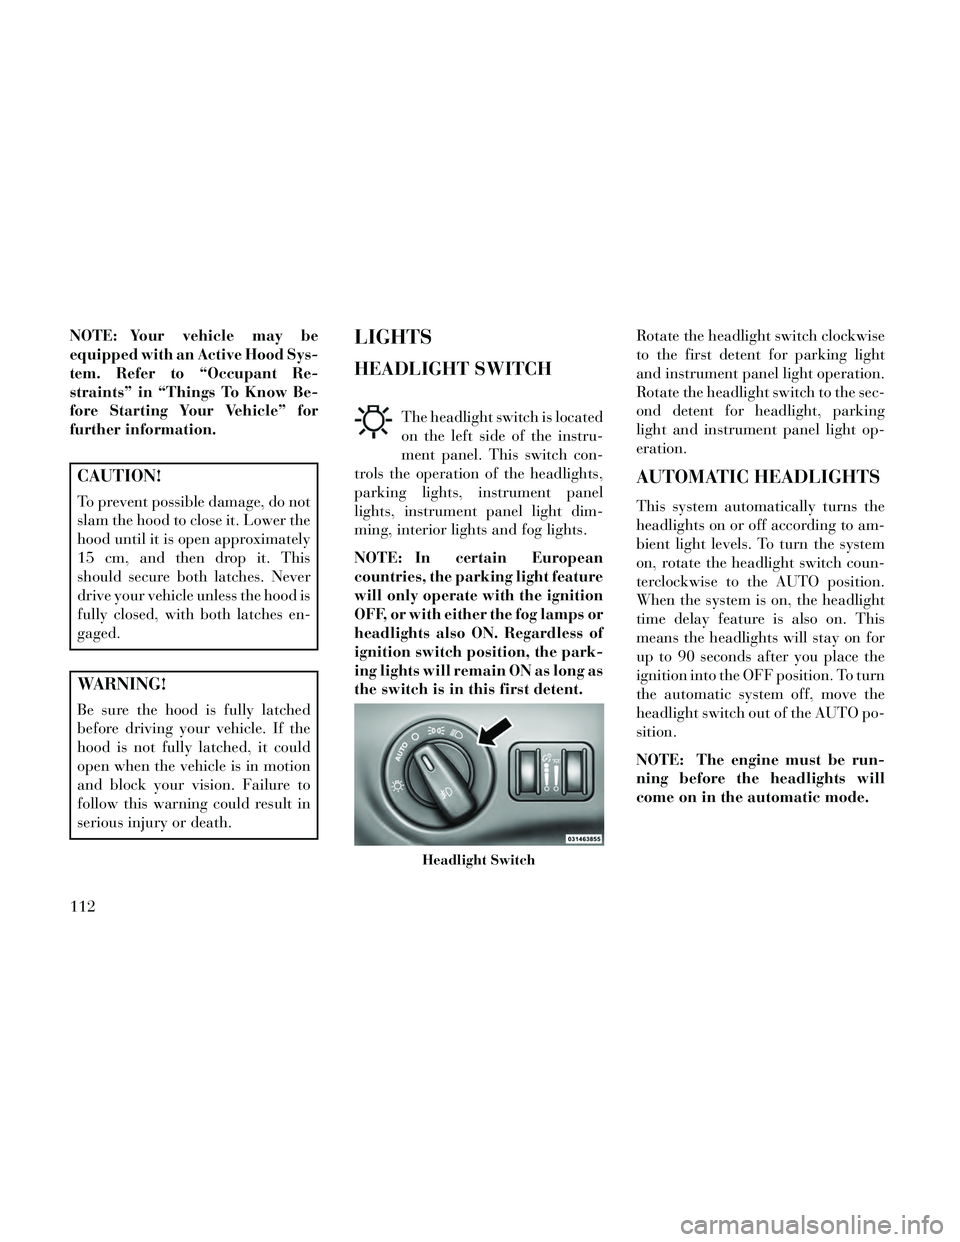
HEADLIGHT SWITCH
The headlight switch is located
on the left side of the instru-
ment panel. This switch con-
trols the operation of the headlights,
parking lights, instrument panel
lights, instrument panel light dim-
ming, interior lights and fog lights.
NOTE: In certain European
countries, the parking light feature
will only operate with the ignition
OFF, or with either the fog lamps or
headlights also ON. Regardless of
ignition switch position, the park-
ing lights will remain ON as long as
the switch is in this first detent. Rotate the headlight switch clockwise
to the first detent for parking light
and instrument panel light operation.
Rotate the headlight switch to the sec-
ond detent for headlight, parking
light and instrument panel light op-
eration.
AUTOMATIC HEADLIGHTS
This system automatically turns the
headlights on or off according to am-
bient light levels. To turn the system
on, rotate the headlight switch coun-
terclockwise to the AUTO position.
When the system is on, the headlight
time delay feature is also on. This
means the headlights will stay on for
up to 90 seconds after you place the
ignition into the OFF position. To turn
the automatic system off, move the
headlight switch out of the AUTO po-
sition.
NOTE: The engine must be run-
ning before the headlights will
come on in the automatic mode.
Headlight Switch
112
Page 162 of 332
VEHICLE INFO (CUSTOMER INFORMATIONFEATURES) (for versions/markets, where
provided) .............................174
MESSAGES # ..........................174
TURN MENU OFF .......................174
Uconnect® SETTINGS .....................174
HARD-KEYS ..........................175
SOFT-KEYS ...........................175
CUSTOMER PROGRAMMABLE FEATURES — Uconnect® 8.4 SETTINGS ................175
SOUND SYSTEMS ........................183
NAVIGATION SYSTEM (for versions/markets, where provided) .........................183
SETTING THE ANALOG CLOCK .............184
iPod®/USB/MP3 CONTROL (for vehicles/markets, where provided) .........................184
HARMAN KARDON® Logic7® HIGH PERFORMANCE MULTICHANNEL SURROUND
SOUND SYSTEM WITH DRIVER-SELECTABLE
SURROUND (DSS) (for versions/markets, where
required) ...............................184
STEERING WHEEL AUDIO CONTROLS .......185
RADIO OPERATION .....................185
CDPLAYER...........................185
CD/DVD DISC MAINTENANCE ..............186
RADIO OPERATION AND MOBILE PHONES . . . .186
CLIMATE CONTROLS .....................186
156
Page 164 of 332
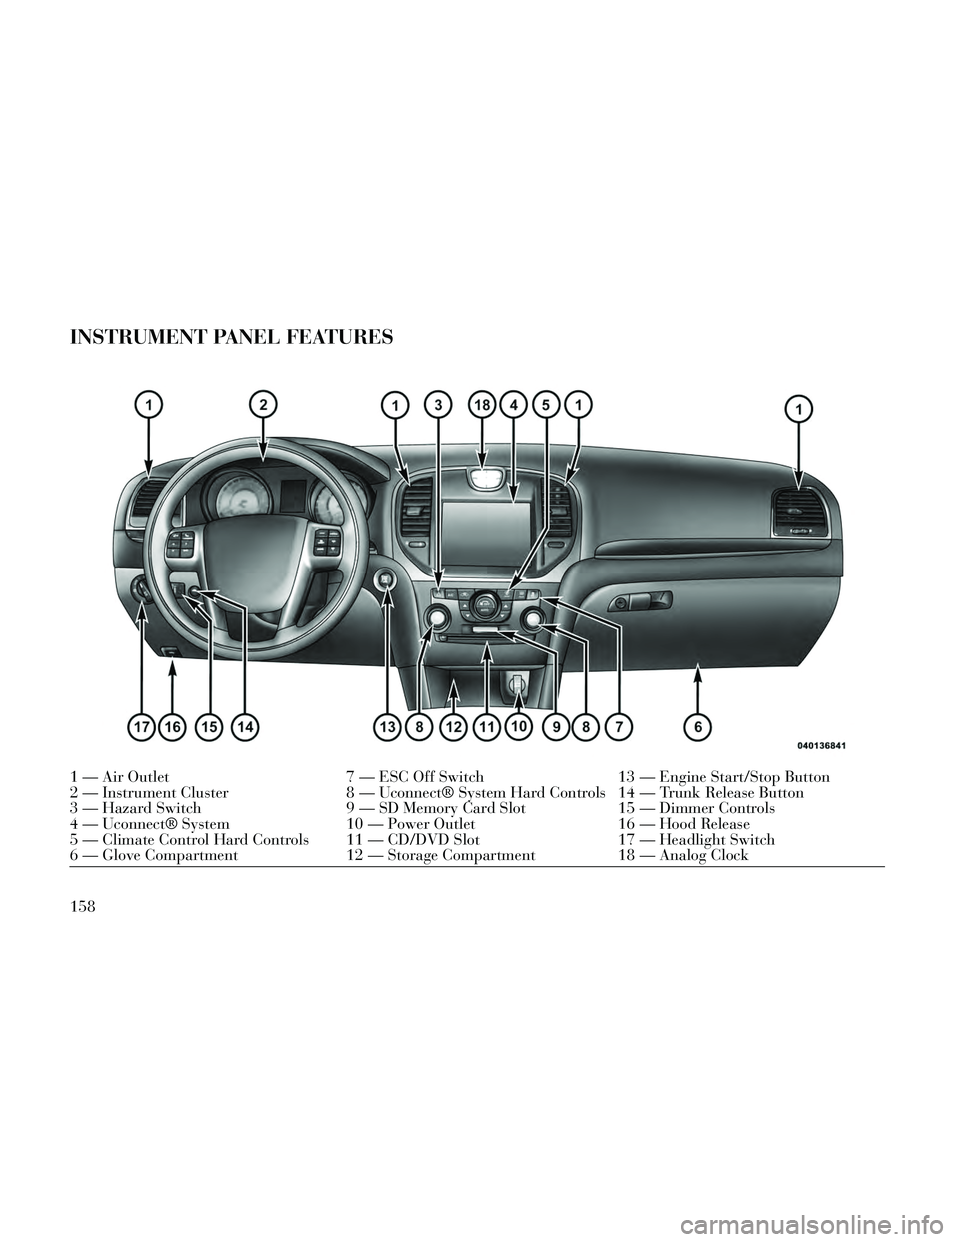
INSTRUMENT PANEL FEATURES
1 — Air Outlet7 — ESC Off Switch13 — Engine Start/Stop Button
2 — Instrument Cluster 8 — Uconnect® System Hard Controls 14 — Trunk Release Button
3 — Hazard Switch 9 — SD Memory Card Slot15 — Dimmer Controls
4 — Uconnect® System 10 — Power Outlet16 — Hood Release
5 — Climate Control Hard Controls 11 — CD/DVD Slot 17 — Headlight Switch
6 — Glove Compartment 12 — Storage Compartment18 — Analog Clock
158
Page 181 of 332
HARD-KEYS
Hard-Keys are located below the
Uconnect® system in the center of the
instrument panel. In addition, there is
a Scroll/Enter control knob located on
the right side of the Climate Controls
in the center of the instrument panel.
Turn the control knob to scroll
through menus and change settings
(i.e., 30, 60, 90), press the center of
the control knob one or more times to
select or change a setting (i.e., ON,
OFF).
SOFT-KEYS
Soft-Keys are accessible on the
Uconnect® touchscreen.
CUSTOMER
PROGRAMMABLE
FEATURES — Uconnect®
8.4 SETTINGS
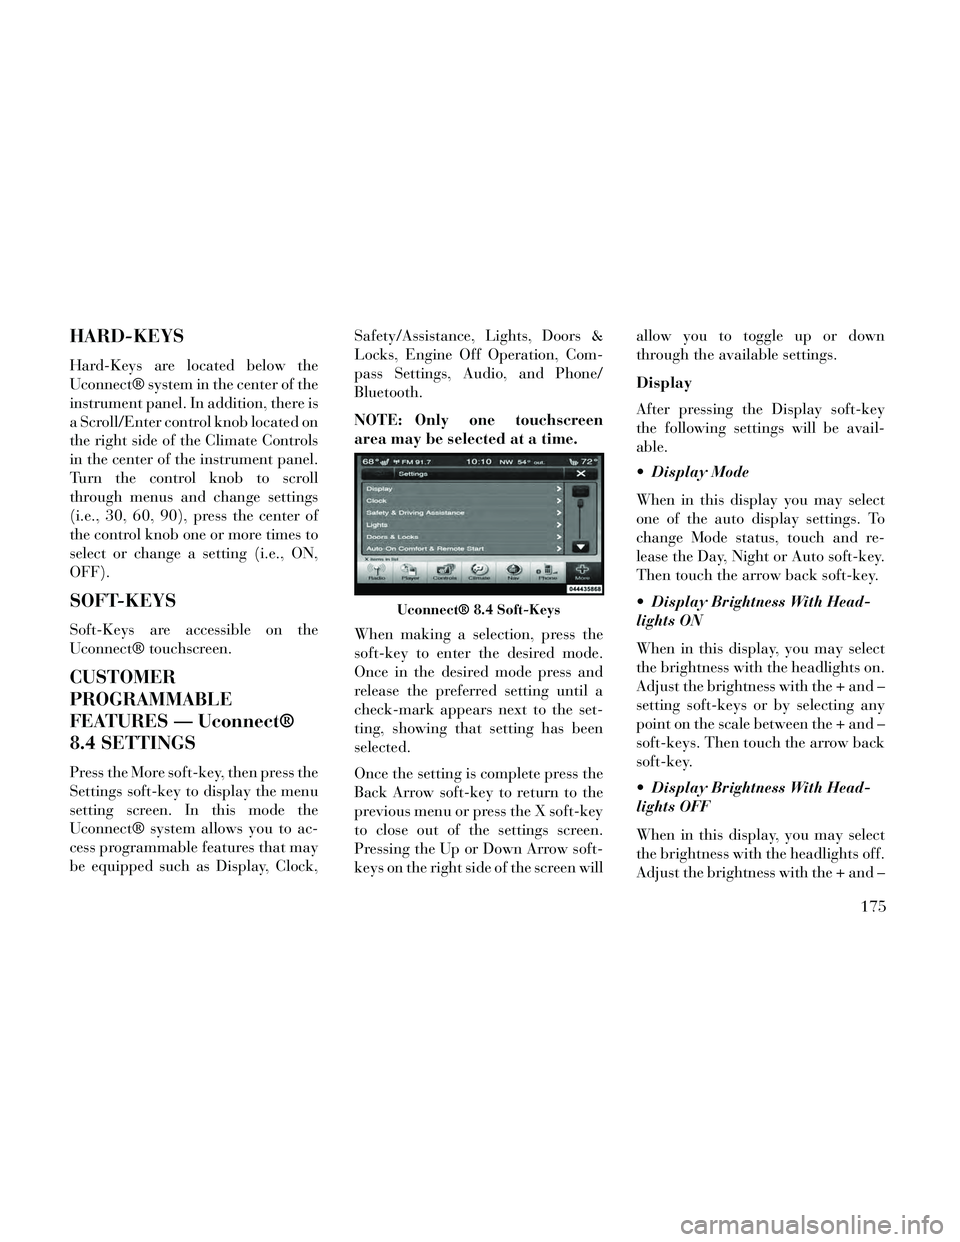
Press the More soft-key, then press the
Settings soft-key to display the menu
setting screen. In this mode the
Uconnect® system allows you to ac-
cess programmable features that may
be equipped such as Display, Clock,Safety/Assistance, Lights, Doors &
Locks, Engine Off Operation, Com-
pass Settings, Audio, and Phone/
Bluetooth.
NOTE: Only one touchscreen
area may be selected at a time.
When making a selection, press the
soft-key to enter the desired mode.
Once in the desired mode press and
release the preferred setting until a
check-mark appears next to the set-
ting, showing that setting has been
selected.
Once the setting is complete press the
Back Arrow soft-key to return to the
previous menu or press the X soft-key
to close out of the settings screen.
Pressing the Up or Down Arrow soft-
keys on the right side of the screen willallow you to toggle up or down
through the available settings.
Display
After pressing the Display soft-key
the following settings will be avail-
able.
Display Mode
When in this display you may select
one of the auto display settings. To
change Mode status, touch and re-
lease the Day, Night or Auto soft-key.
Then touch the arrow back soft-key.
Display Brightness With Head-
lights ON
When in this display, you may select
the brightness with the headlights on.
Adjust the brightness with the + and –
setting soft-keys or by selecting any
point on the scale between the + and –
soft-keys. Then touch the arrow back
soft-key.
Display Brightness With Head-
lights OFF
When in this display, you may select
the brightness with the headlights off.
Adjust the brightness with the + and –
Uconnect® 8.4 Soft-Keys
175
Page 182 of 332
setting soft-keys or by selecting any
point on the scale between the + and –
soft-keys. Then touch the arrow back
soft-key.
Language
Press the Language soft-key to
change this display. When in this dis-
play you may select a different lan-
guage for all display nomenclature,
including the trip functions and the
navigation system (for versions/
markets, where provided). Press the
German, French, Spanish, Italian,
Dutch or English button to select the
language preferred followed by press-
ing the arrow back soft-key. Then, as
you continue, the information will
display in the selected language.
Units
When in this display, you may select
to have the EVIC, odometer, and
navigation system (for versions/
markets, where provided) changed
between US and Metric units of mea-
sure. Touch US or Metric until a
check-mark appears next to the set-
ting, showing that setting has beenselected. Touch the back arrow soft-
key to return to the previous menu.
Voice Response Length
When in this display, you may change
the Voice Response Length settings.
To change the Voice Response Length,
touch the Brief or Detailed soft-key
until a check-mark appears next to
the setting, showing that setting has
been selected. Touch the back arrow
soft-key to return to the previous
menu.
Touchscreen Beep
When in this display, you may turn on
or shut off the sound heard when a
touch screen button (soft-key) is
pressed. Touch the Touchscreen Beep
soft-key until a check-mark appears
next to the setting, showing that set-
ting has been selected. Touch the back
arrow soft-key to return to the previ-
ous menu.
Navigation Turn-By-Turn In
Cluster (for versions/markets,
where provided)
When this feature is selected, the
turn-by-turn directions will appear inthe display as the vehicle approaches
a designated turn within a pro-
grammed route. To make your selec-
tion, touch the Navigation Turn-By-
Turn In Cluster soft-key, until a
check-mark appears next to the set-
ting, showing that setting has been
selected. Touch the back arrow soft-
key to return to the previous menu.
Fuel Saver Display In Cluster
The “ECO” message is located in the
instrument cluster display, this mes-
sage can be turned on or off. To make
your selection, touch the Fuel Saver
Display soft-key, until a check-mark
appears next to the setting, showing
that setting has been selected. Touch
the back arrow soft-key to return to
the previous menu.
Clock
After pressing the Clock soft-key the
following settings will be available.
Sync Time With GPS (for
versions/markets, where provided)
When in this display, you may auto-
matically have the radio set the time.
To change the Sync Time setting
176
Page 183 of 332
touch the Sync with GPS Time soft-
key until a check-mark appears next
to the setting, showing that setting has
been selected. Touch the back arrow
soft-key to return to the previous
menu.
Set Time Hours
When in this display, you may adjust
the hours. The Sync with GPS Time
soft-key must be unchecked. To make
your selection touch the + or - soft-
keys to adjust the hours up or down.
Touch the back arrow soft-key to re-
turn to the previous menu or touch the
X soft-key to close out of the settings
screen.
Set Time Minutes
When in this display, you may adjust
the minutes. The Sync with GPS Time
soft-key must be unchecked. To make
your selection touch the + or - soft-
keys to adjust the minutes up or
down. Touch the back arrow soft-key
to return to the previous menu or
touch the X soft-key to close out of the
settings screen. Time Format
When in this display, you may select
the time format display setting. Touch
the Time Format soft-key until a
check-mark appears next to the 12hrs
or 24hrs setting, showing that setting
has been selected. Touch the back ar-
row soft-key to return to the previous
menu.
Show Time In Status Bar
When in this display, you may turn on
or shut off the digital clock in the
status bar. To change the Show Time
Status setting touch the Show Time in
Status Bar soft-key until a check-
mark appears next to setting, showing
that setting has been selected. Touch
the back arrow soft-key to return to
the previous menu.
Safety / Assistance
After pressing the Safety / Assistance
soft-key the following settings will be
available.
Front Collision Sensitivity (for
versions/markets, where provided)
The Front Collision Warning (FCW)
feature can be can be set to Far, set to
Near or turned Off. The default status
of FCW is the Far setting. This means
the system will warn you of a possible
collision with the vehicle in front of
you when you are farther away. This
gives you the most reaction time. To
change the setting for more dynamic
driving, select the Near setting. This
warns you of a possible collision when
you are much closer to the vehicle in
front of you. This allows for a more
dynamic driving experience. To
change the FCW status, touch and
release the OFF, Near or Far button.
Then touch the arrow back soft-key.
For further information, refer to
“Adaptive Cruise Control (ACC)” in
“Understanding The Features Of
Your Vehicle”.
Park Assist
The Rear Park Assist system will scan
for objects behind the vehicle when
the transmission shift lever is in RE-
VERSE and the vehicle speed is less
177
Page 190 of 332
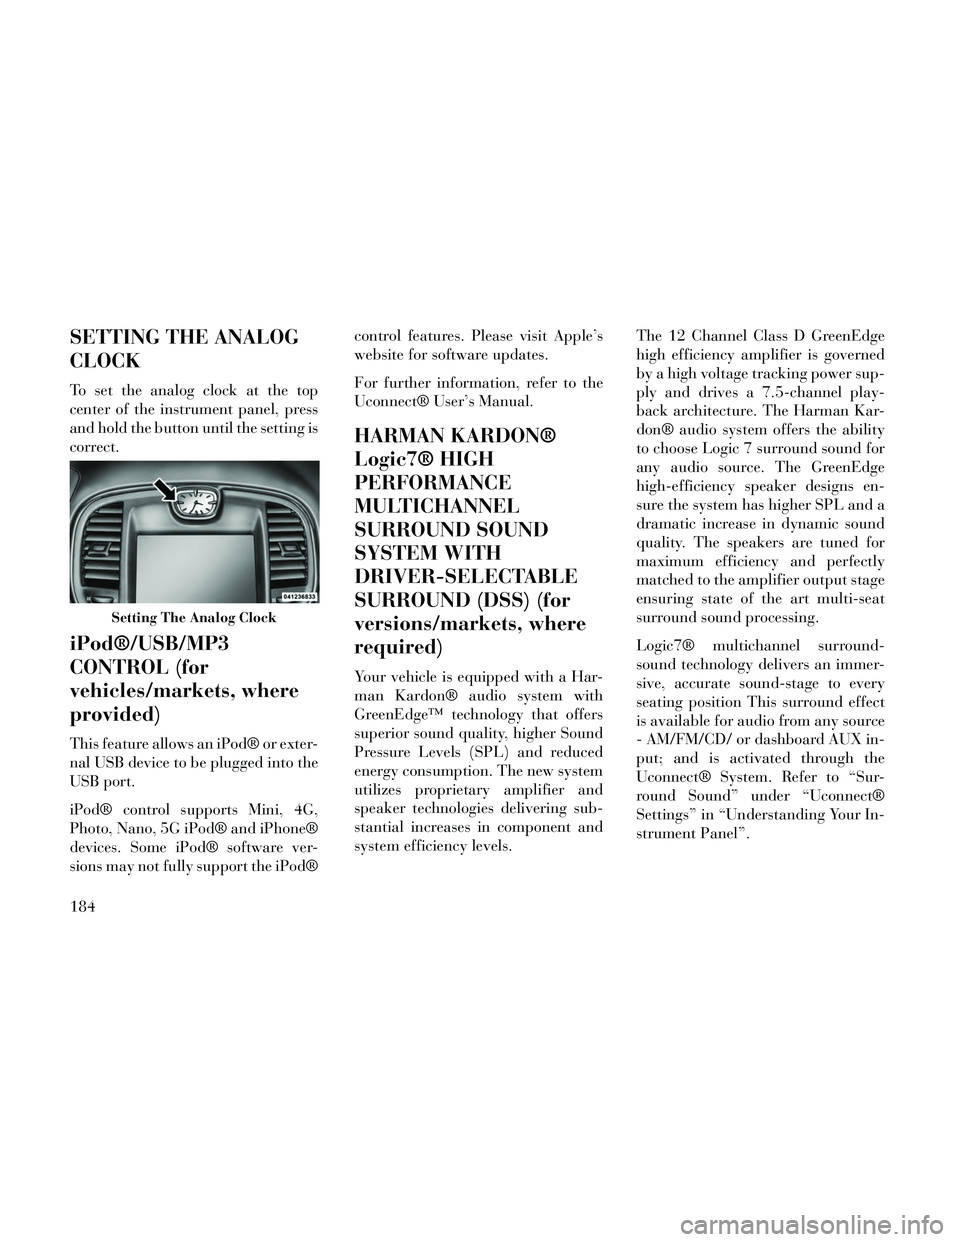
SETTING THE ANALOG
CLOCK
To set the analog clock at the top
center of the instrument panel, press
and hold the button until the setting is
correct.
iPod®/USB/MP3
CONTROL (for
vehicles/markets, where
provided)
This feature allows an iPod® or exter-
nal USB device to be plugged into the
USB port.
iPod® control supports Mini, 4G,
Photo, Nano, 5G iPod® and iPhone®
devices. Some iPod® software ver-
sions may not fully support the iPod®control features. Please visit Apple’s
website for software updates.
For further information, refer to the
Uconnect® User’s Manual.
HARMAN KARDON®
Logic7® HIGH
PERFORMANCE
MULTICHANNEL
SURROUND SOUND
SYSTEM WITH
DRIVER-SELECTABLE
SURROUND (DSS) (for
versions/markets, where
required)
Your vehicle is equipped with a Har-
man Kardon® audio system with
GreenEdge™ technology that offers
superior sound quality, higher Sound
Pressure Levels (SPL) and reduced
energy consumption. The new system
utilizes proprietary amplifier and
speaker technologies delivering sub-
stantial increases in component and
system efficiency levels.
The 12 Channel Class D GreenEdge
high efficiency amplifier is governed
by a high voltage tracking power sup-
ply and drives a 7.5-channel play-
back architecture. The Harman Kar-
don® audio system offers the ability
to choose Logic 7 surround sound for
any audio source. The GreenEdge
high-efficiency speaker designs en-
sure the system has higher SPL and a
dramatic increase in dynamic sound
quality. The speakers are tuned for
maximum efficiency and perfectly
matched to the amplifier output stage
ensuring state of the art multi-seat
surround sound processing.
Logic7® multichannel surround-
sound technology delivers an immer-
sive, accurate sound-stage to every
seating position This surround effect
is available for audio from any source
- AM/FM/CD/ or dashboard AUX in-
put; and is activated through the
Uconnect® System. Refer to “Sur-
round Sound” under “Uconnect®
Settings” in “Understanding Your In-
strument Panel”.
Setting The Analog Clock
184
Page 191 of 332
Selecting “Audio Surround” through
the DSS modes activates the Harman
Kardon® Logic7® multichannel
surround-sound technology in your
vehicle. The “Video Surround” mode
is described under Driver-Selectable
Surround (DSS). The Video Surround
Mode will only be available for video
media sources (DVDs, Video CDs, or
other video media supported by the
radio). Some audio will sound better
in DSS modes, others in Stereo mode.
When in “Audio Surround” mode,
balance is set automatically. Fader
control is available in surround mode
but should be set to the center position
for optimal surround performance.
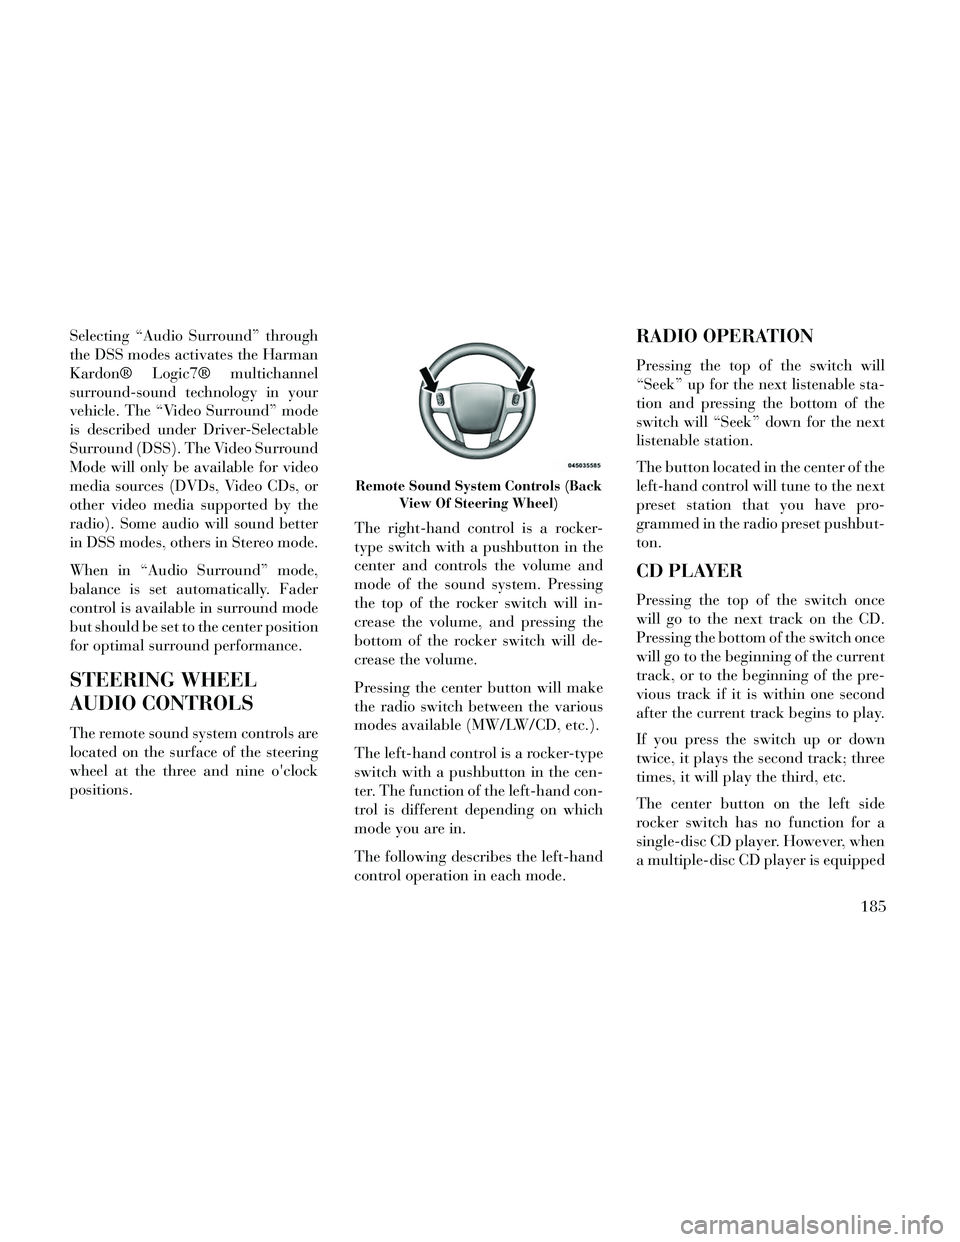
STEERING WHEEL
AUDIO CONTROLS
The remote sound system controls are
located on the surface of the steering
wheel at the three and nine o'clock
positions.The right-hand control is a rocker-
type switch with a pushbutton in the
center and controls the volume and
mode of the sound system. Pressing
the top of the rocker switch will in-
crease the volume, and pressing the
bottom of the rocker switch will de-
crease the volume.
Pressing the center button will make
the radio switch between the various
modes available (MW/LW/CD, etc.).
The left-hand control is a rocker-type
switch with a pushbutton in the cen-
ter. The function of the left-hand con-
trol is different depending on which
mode you are in.
The following describes the left-hand
control operation in each mode.
RADIO OPERATION
Pressing the top of the switch will
“Seek” up for the next listenable sta-
tion and pressing the bottom of the
switch will “Seek” down for the next
listenable station.
The button located in the center of the
left-hand control will tune to the next
preset station that you have pro-
grammed in the radio preset pushbut-
ton.
CD PLAYER
Pressing the top of the switch once
will go to the next track on the CD.
Pressing the bottom of the switch once
will go to the beginning of the current
track, or to the beginning of the pre-
vious track if it is within one second
after the current track begins to play.
If you press the switch up or down
twice, it plays the second track; three
times, it will play the third, etc.
The center button on the left side
rocker switch has no function for a
single-disc CD player. However, when
a multiple-disc CD player is equipped
Remote Sound System Controls (Back
View Of Steering Wheel)
185
Page 193 of 332
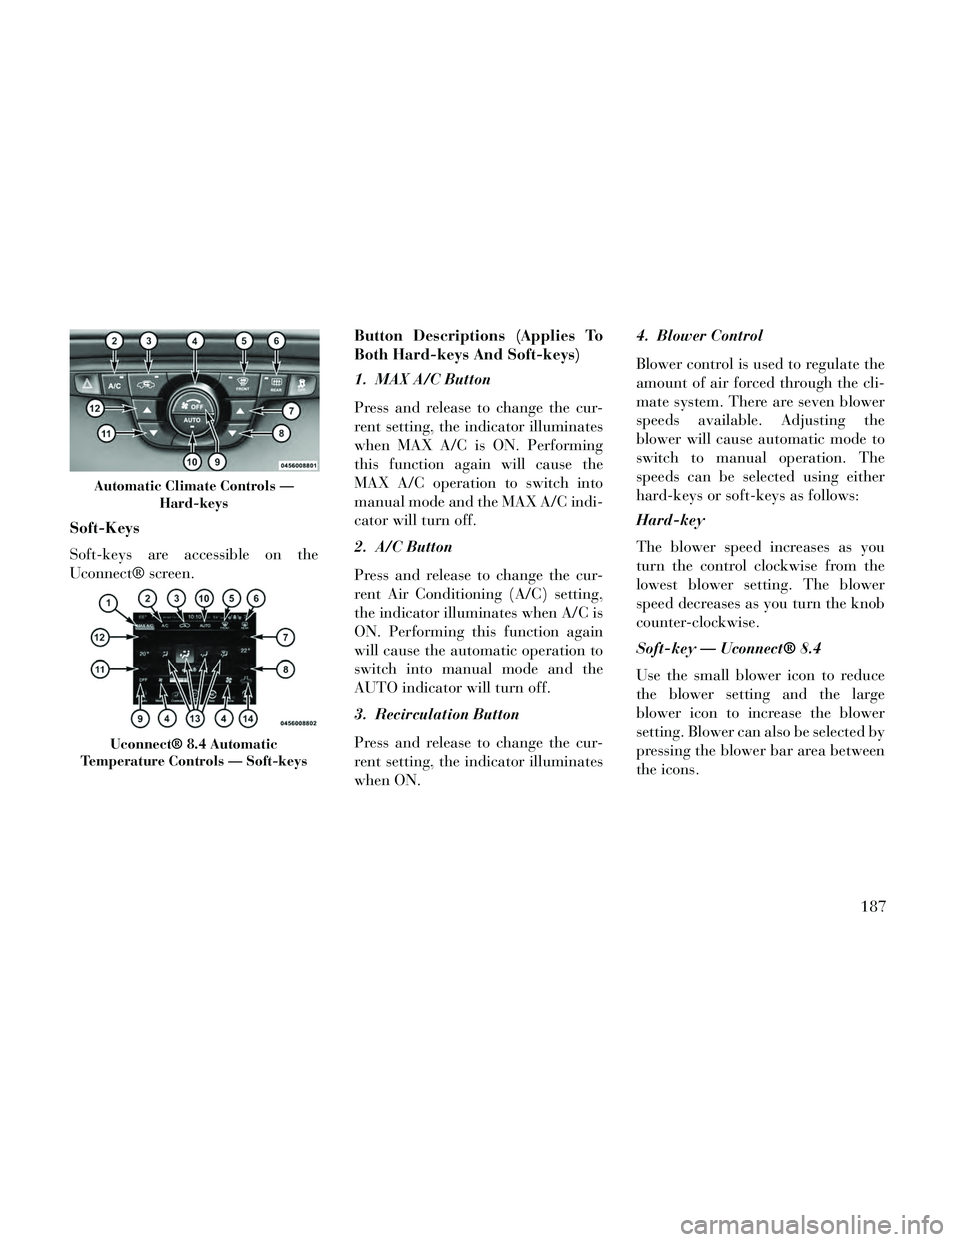
Soft-Keys
Soft-keys are accessible on the
Uconnect® screen.Button Descriptions (Applies To
Both Hard-keys And Soft-keys)
1. MAX A/C Button
Press and release to change the cur-
rent setting, the indicator illuminates
when MAX A/C is ON. Performing
this function again will cause the
MAX A/C operation to switch into
manual mode and the MAX A/C indi-
cator will turn off.
2. A/C Button
Press and release to change the cur-
rent Air Conditioning (A/C) setting,
the indicator illuminates when A/C is
ON. Performing this function again
will cause the automatic operation to
switch into manual mode and the
AUTO indicator will turn off.
3. Recirculation Button
Press and release to change the cur-
rent setting, the indicator illuminates
when ON.4. Blower Control
Blower control is used to regulate the
amount of air forced through the cli-
mate system. There are seven blower
speeds available. Adjusting the
blower will cause automatic mode to
switch to manual operation. The
speeds can be selected using either
hard-keys or soft-keys as follows:
Hard-key
The blower speed increases as you
turn the control clockwise from the
lowest blower setting. The blower
speed decreases as you turn the knob
counter-clockwise.
Soft-key — Uconnect® 8.4
Use the small blower icon to reduce
the blower setting and the large
blower icon to increase the blower
setting. Blower can also be selected by
pressing the blower bar area between
the icons.
Automatic Climate Controls —
Hard-keys
Uconnect® 8.4 Automatic
Temperature Controls — Soft-keys
187
Page 300 of 332
Cavity Cartridge Fuse Mini-Fuse Description
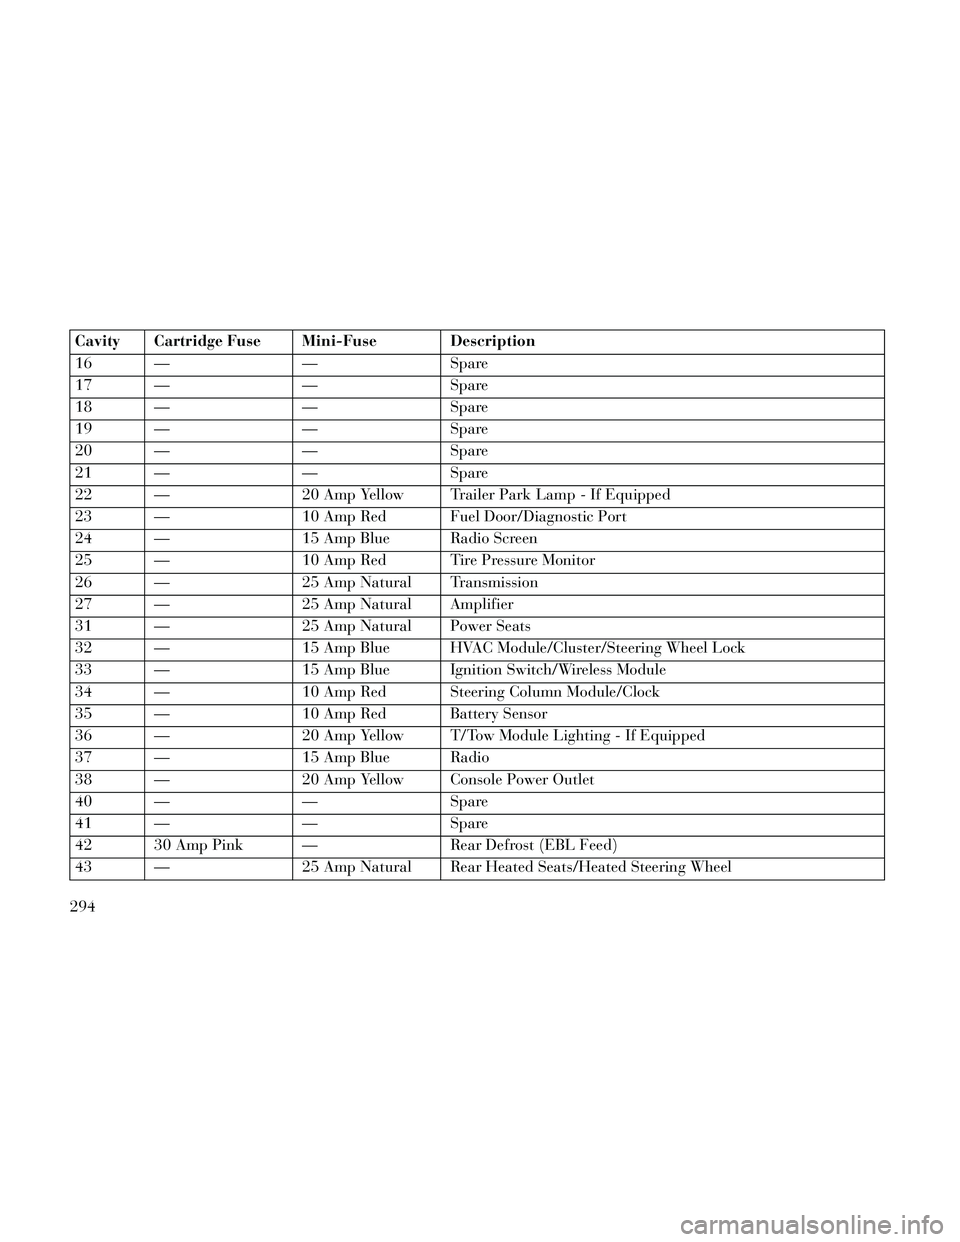
16 — — Spare
17 — — Spare
18 — — Spare
19 — — Spare
20 — — Spare
21 — — Spare
22 — 20 Amp Yellow Trailer Park Lamp - If Equipped
23 — 10 Amp Red Fuel Door/Diagnostic Port
24 — 15 Amp Blue Radio Screen
25 — 10 Amp Red Tire Pressure Monitor
26 — 25 Amp Natural Transmission
27 — 25 Amp Natural Amplifier
31 — 25 Amp Natural Power Seats
32 — 15 Amp Blue HVAC Module/Cluster/Steering Wheel Lock
33 — 15 Amp Blue Ignition Switch/Wireless Module
34 — 10 Amp Red Steering Column Module/Clock
35 — 10 Amp Red Battery Sensor
36 — 20 Amp Yellow T/Tow Module Lighting - If Equipped
37 — 15 Amp Blue Radio
38 — 20 Amp Yellow Console Power Outlet
40 — — Spare
41 — — Spare
42 30 Amp Pink — Rear Defrost (EBL Feed)
43 — 25 Amp Natural Rear Heated Seats/Heated Steering Wheel
294