keyless entry Lancia Thema 2014 Owner handbook (in English)
[x] Cancel search | Manufacturer: LANCIA, Model Year: 2014, Model line: Thema, Model: Lancia Thema 2014Pages: 332, PDF Size: 3.46 MB
Page 34 of 332
With the ignition in the ON/RUN po-
sition, the Trunk Open symbol will
display in the instrument cluster indi-
cating that the trunk is open. The
odometer display will reappear once
the trunk is closed.
With the ignition in the OFF position,
the Trunk Open symbol will display
until the trunk is closed.
Refer to “Keyless Enter-N-Go™” in
“Things To Know Before Starting
Your Vehicle” for more information
on trunk operation with the Passive
Entry feature.TRUNK SAFETY
WARNING
WARNING!
Do not allow children to have ac-
cess to the trunk, either by climbing
into the trunk from outside, or
through the inside of the vehicle.
Always close the trunk lid when
your vehicle is unattended. Once in
the trunk, young children may not
be able to escape, even if they en-
tered through the rear seat. If
trapped in the trunk, children can
die from suffocation or heat stroke.
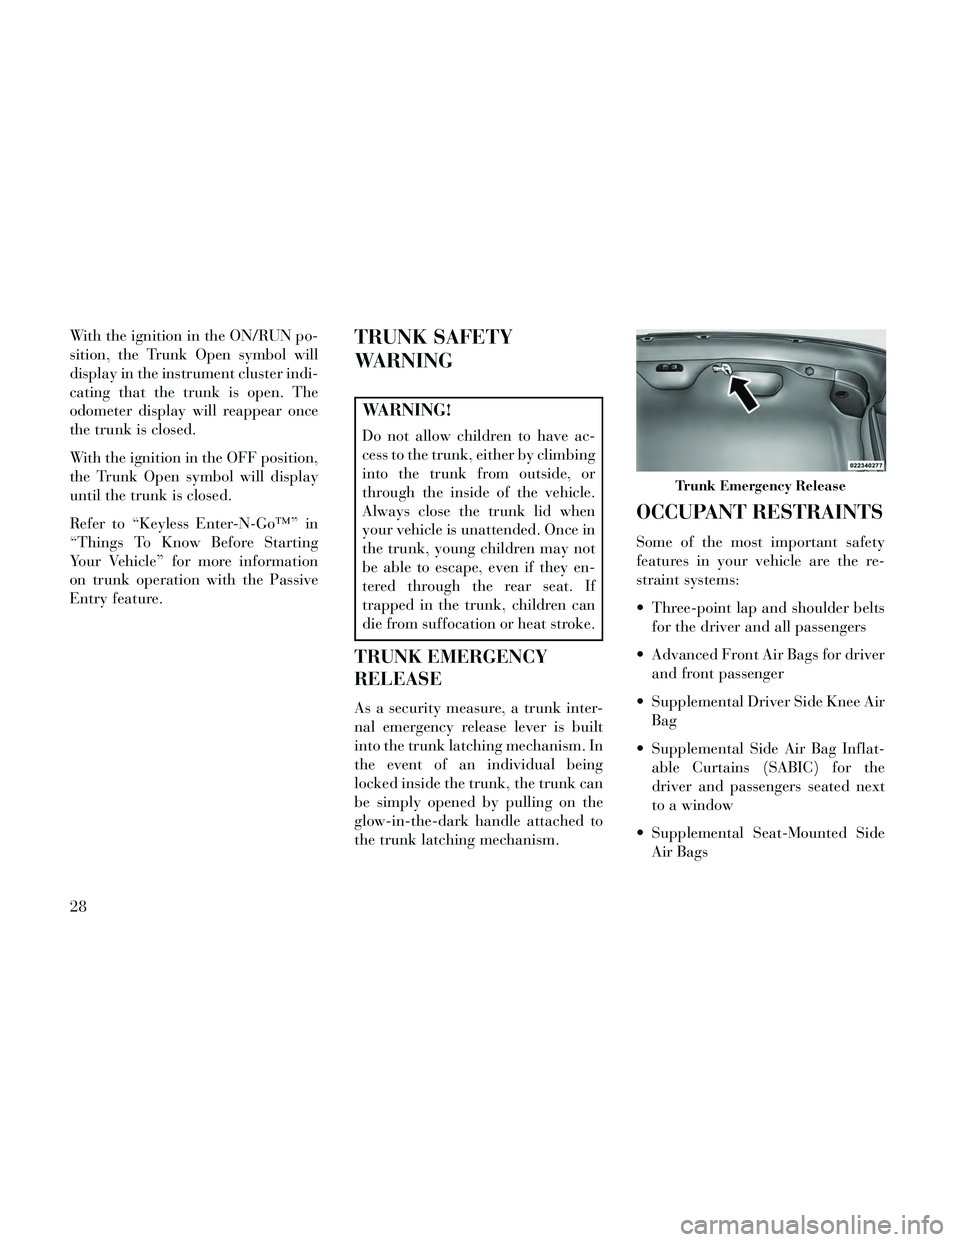
TRUNK EMERGENCY
RELEASE
As a security measure, a trunk inter-
nal emergency release lever is built
into the trunk latching mechanism. In
the event of an individual being
locked inside the trunk, the trunk can
be simply opened by pulling on the
glow-in-the-dark handle attached to
the trunk latching mechanism.
OCCUPANT RESTRAINTS
Some of the most important safety
features in your vehicle are the re-
straint systems:
Three-point lap and shoulder beltsfor the driver and all passengers
Advanced Front Air Bags for driver and front passenger
Supplemental Driver Side Knee Air Bag
Supplemental Side Air Bag Inflat- able Curtains (SABIC) for the
driver and passengers seated next
to a window
Supplemental Seat-Mounted Side Air Bags
Trunk Emergency Release
28
Page 71 of 332
LINKING AND UNLINKING THE REMOTEKEYLESS ENTRY TRANSMITTER TO
MEMORY .............................110
MEMORY POSITION RECALL .............110
EASY ENTRY/EXIT SEAT (Available With Memory Seat Only) .....................111
TO OPEN AND CLOSE THE HOOD ............111
LIGHTS ................................112
HEADLIGHT SWITCH ...................112
AUTOMATIC HEADLIGHTS ..............112
HEADLIGHTS ON WITH WIPERS (Available With Automatic Headlights Only) ...........113
HEADLIGHT TIME DELAY ...............113
AUTOMATIC HIGH BEAM (for versions/ markets, where provided) ................113
DAYTIME RUNNING LIGHTS (for versions/ markets, where provided) .................114
ADAPTIVE BI-XENON HIGH INTENSITY DISCHARGE HEADLIGHTS ...............114
LIGHTS-ON REMINDER .................114
FOG LIGHTS ..........................115
MULTIFUNCTION LEVER ................115
TURN SIGNALS ........................115
LANE CHANGE ASSIST ..................115
HIGH/LOW BEAM SWITCH ..............116
FLASH-TO-PASS.......................116
COURTESY LIGHTS ....................116
FRONT MAP/READING LIGHTS ...........116
65
Page 77 of 332
mirror housing and approach lighting
located within mirror glass contain
five LEDs.
Three of the LEDs are turn signal
indicators, which flash with the corre-
sponding turn signal lights in the
front and rear of the vehicle. Turning
on the Hazard Warning flashers will
also activate these LEDs.
The other two LEDs supply illumi-
nated entry lighting, which turns on
in both mirrors when you use the Re-
mote Keyless Entry (RKE) transmit-
ter or open any door. These LEDs
shine outward to illuminate the front
and rear door handles. They also
shine downward to illuminate the
area in front of the doors.
The Illuminated Entry lighting fades
to off after about 30 seconds or it will
fade to off immediately once the igni-
tion is placed into the RUN position.
NOTE: The approach lighting
will not function when the shift
lever is moved out of the PARK
position.TILT MIRRORS IN
REVERSE (for
versions/markets, where
provided)
Tilt Mirrors in Reverse provides auto-
matic outside mirror positioning
which will aid the driver’s view of the
ground rearward of the front doors.
The outside mirrors will move slightly
downward from the present position
when the vehicle is shifted into RE-
VERSE. The outside mirrors will then
return to the original position when
the vehicle is shifted out of the RE-
VERSE position. Each stored
memory setting will have an associ-
ated Tilt Mirrors in Reverse position.
NOTE:
The Tilt Mirrors in Reverse fea-ture is not turned on when deliv-
ered from the factory. The Tilt
Mirrors in Reverse feature can
be turned on and off using the
Uconnect® System. Refer to “Uconnect® Settings” in
“Understanding Your Instru-
ment Panel” for further
information.POWER MIRRORS
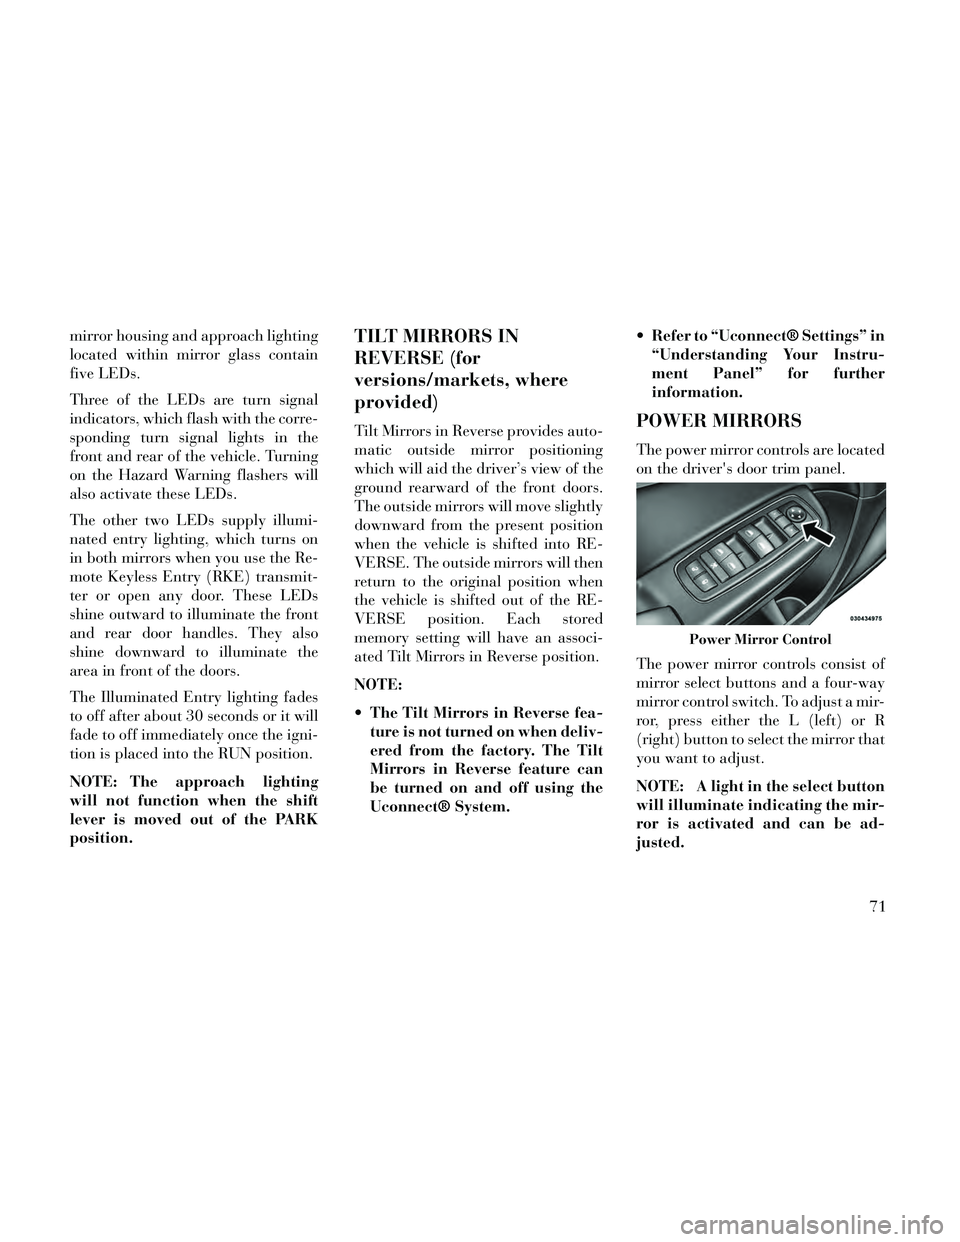
The power mirror controls are located
on the driver's door trim panel.
The power mirror controls consist of
mirror select buttons and a four-way
mirror control switch. To adjust a mir-
ror, press either the L (left) or R
(right) button to select the mirror that
you want to adjust.
NOTE: A light in the select button
will illuminate indicating the mir-
ror is activated and can be ad-
justed.
Power Mirror Control
71
Page 115 of 332
WARNING!
Be certain that the seatback issecurely locked into position. If
the seatback is not securely
locked into position, the seat will
not provide the proper stability
for child seats and/or passengers.
An improperly latched seat could
cause serious injury.
The cargo area in the rear of the vehicle (with the rear seatbacks
in the locked-up or folded down
position) should not be used as a
play area by children when the
vehicle is in motion. They could
be seriously injured in a collision.
Children should be seated and us-
ing the proper restraint system.
DRIVER MEMORY SEAT
(for versions/markets,
where provided)
This feature allows the driver to store
up to two different memory profiles
for easy recall through a memory
switch. Each memory profile contains
desired position settings for the driver seat, side mirrors, adjustable pedals
(for versions/markets, where pro-
vided), and power tilt and telescopic
steering column (for versions/
markets, where provided) and a set of
desired radio station presets. Your Re-
mote Keyless Entry (RKE) transmit-
ter can also be programmed to recall
the same positions when the UN-
LOCK button is pressed.
NOTE:
Only one RKE transmitter can
be linked to each of the memory
positions.
Passive Entry door handles can- not be linked to the memory
function. Use either the memory
recall switch or the RKE trans-
mitter (if linked to the memory
feature) to recall memory posi-
tions 1 or 2.
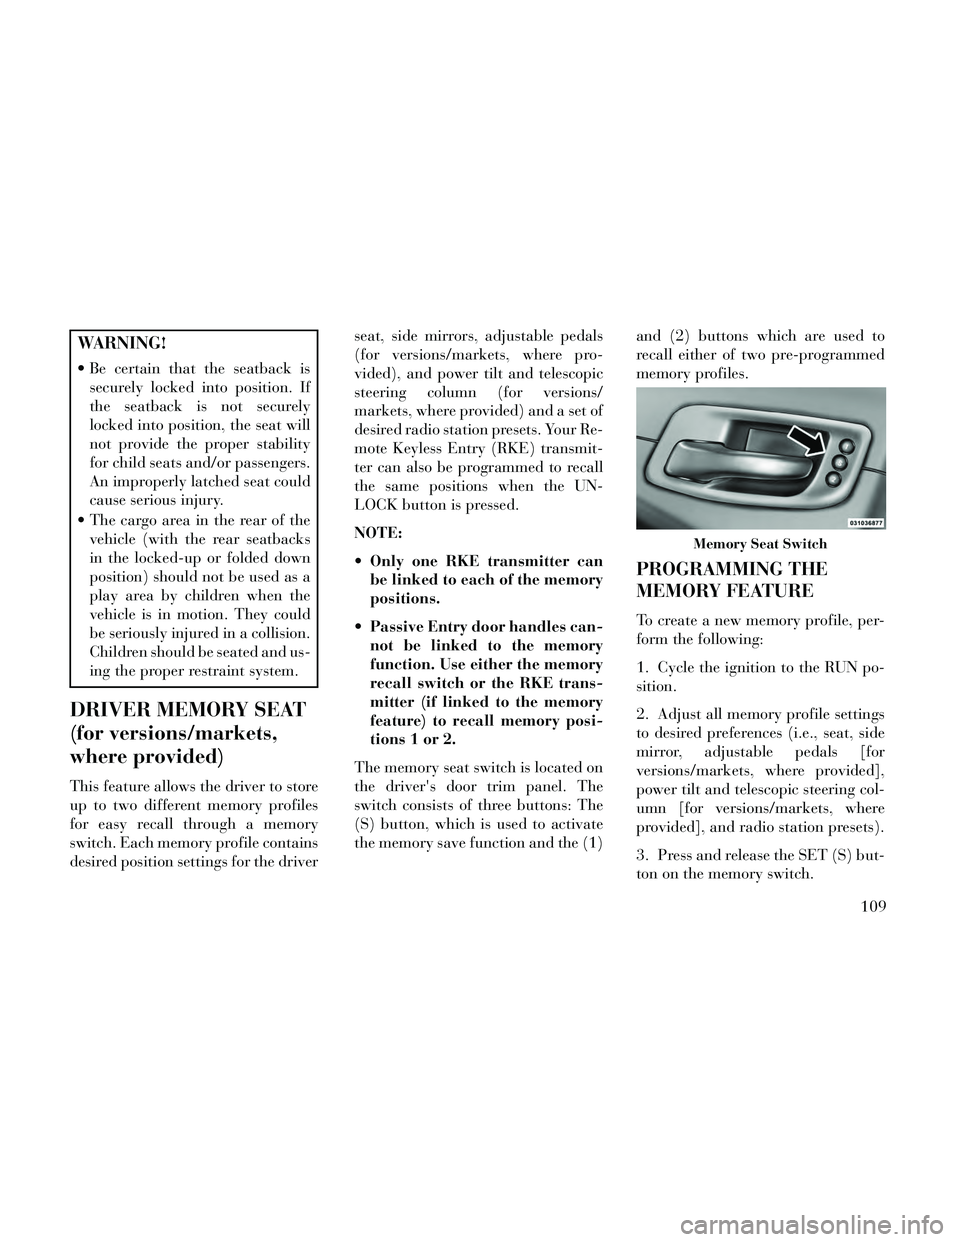
The memory seat switch is located on
the driver's door trim panel. The
switch consists of three buttons: The
(S) button, which is used to activate
the memory save function and the (1) and (2) buttons which are used to
recall either of two pre-programmed
memory profiles.
PROGRAMMING THE
MEMORY FEATURE
To create a new memory profile, per-
form the following:
1. Cycle the ignition to the RUN po-
sition.
2. Adjust all memory profile settings
to desired preferences (i.e., seat, side
mirror, adjustable pedals [for
versions/markets, where provided],
power tilt and telescopic steering col-
umn [for versions/markets, where
provided], and radio station presets).
3. Press and release the SET (S) but-
ton on the memory switch.
Memory Seat Switch
109
Page 116 of 332
4. Within five seconds, press and re-
lease the MEMORY button 1 or 2. The
Electronic Vehicle Information Center
will display which memory position
has been set.
NOTE:
Memory profiles can be set with-out the vehicle in PARK, but the
vehicle must be in PARK to re-
call a memory profile.
The Recall Memory with Remote Key Unlock feature can be
turned on and off using the
Uconnect® System, refer to
“Uconnect® Settings” in “Un-
derstanding Your Instrument
Panel” for further information.
LINKING AND UNLINKING
THE REMOTE KEYLESS
ENTRY TRANSMITTER TO
MEMORY
Your RKE transmitters can be pro-
grammed to recall one of two pre-
programmed memory profiles by
pressing the UNLOCK button on the
RKE transmitter. NOTE: Before programming your
RKE transmitters you must select
the “Memory To FOB” feature
through the Uconnect® system
screen. Refer to “Customer- Pro-
grammable Features —
Uconnect® Access 8.4 Settings ” in
“Understanding Your Instrument
Panel” for further information.
To program your RKE transmitters,
perform the following:
1. Cycle the ignition to the OFF posi-
tion.
2. Select desired memory profile (1)
or (2).
3. Once the profile has been recalled,
press and release the SET (S) button
on the memory switch, then press and
release button (1) or (2) accordingly.
“Memory Profile Set” (1 or 2) will
display in the instrument cluster on
vehicles equipped with the EVIC.
4. Press and release the LOCK but-
ton on the RKE transmitter within 10
seconds.
NOTE: Your RKE transmitters
can be unlinked to your memory
settings by pressing the SET (S)
button followed by the UNLOCK
button on the RKE transmitter in
Step 4 above.
MEMORY POSITION
RECALL
NOTE: The vehicle must be in
PARK to recall memory positions.
If a recall is attempted when the
vehicle is not in PARK, a message
will display in the EVIC.
To recall the memory settings for
driver, press MEMORY button num-
ber (1) on the driver's door or the
UNLOCK button on the RKE trans-
mitter linked to memory position 1.
To recall the memory setting for
driver, press MEMORY button num-
ber (2) on the driver's door or the
UNLOCK button on the RKE trans-
mitter linked to memory position 2.
A recall can be cancelled by pressing
any of the MEMORY buttons (S, 1, or
2) on the driver's door during a recall.
When a recall is cancelled, the driver
110
Page 127 of 332

power tilt/telescoping steering col-
umn switch is located below the mul-
tifunction lever on the steering col-
umn.
To tilt the steering column, move the
switch up or down as desired. To
lengthen or shorten the steering col-
umn, pull the switch toward you or
push the switch away from you as
desired.
NOTE:
For vehicles equipped with
Driver Memory Seat, you can use
your Remote Keyless Entry (RKE)
transmitter or the memory switch
on the driver's door trim panel to
return the tilt/telescopic steering
column to pre-programmed posi-
tions. Refer to “Driver Memory
Seat” in this section.
WARNING!
Do not adjust the steering column
while driving. Adjusting the steer-
ing column while driving or driving
with the steering column unlocked,
could cause the driver to lose con-
trol of the vehicle. Failure to follow
this warning may result in serious
injury or death.
HEATED STEERING
WHEEL (for
versions/markets, where
provided)
The steering wheel contains a heating
element that helps warm your hands
in cold weather. The heated steering
wheel has only one temperature set-
ting. Once the heated steering wheel
has been turned on it will operate for
approximately 80 minutes before au-
tomatically shutting off. The heated
steering wheel can shut off early or
may not turn on when the steering
wheel is already warm. The heated steering wheel can be
turned on and off using the
Uconnect® System.
Touch the “Controls” soft-key then
touch the “Heated Steering Wheel”
soft-key to turn on the heated steering
wheel. Press the “Heated Steering
Wheel” soft-key a second time to turn
the heated steering wheel off.
Power Tilt/Telescoping Steering
Switch
Controls Soft-Key
Heated Steering Wheel Soft-Key
121
Page 129 of 332

NOTE: For vehicles equipped
with Driver Memory Seat, you can
use your Remote Keyless Entry
(RKE) transmitter or the memory
switch on the driver's door trim
panel to return the adjustable ped-
als to pre-programmed positions.
Refer to “Driver Memory Seat” in
“Understanding The Features Of
Your Vehicle” for further informa-
tion.
CAUTION!
Do not place any article under the
adjustable pedals or impede its
ability to move as it may cause
damage to the pedal controls. Pedal
travel may become limited if move-
ment is stopped by an obstruction
in the adjustable pedal's path.
WARNING!
Do not adjust the pedals while the
vehicle is moving. You could lose
control and have an accident. Al-
ways adjust the pedals while the
vehicle is parked.
ELECTRONIC SPEED
CONTROL
When engaged, the Electronic Speed
Control takes over accelerator opera-
tions at speeds greater than 40 km/h.
NOTE: In order to ensure proper
operation, the Electronic Speed
Control System has been designed
to shut down if multiple Speed
Control functions are operated at
the same time. If this occurs, the
Electronic Speed Control System
can be reactivated by pushing the
Electronic Speed Control ON/OFF
button and resetting the desired
vehicle set speed.
TO ACTIVATE
Push the ON/OFF button. The Cruise
Indicator Light in the Electronic Ve-
hicle Information Center (EVIC) will
illuminate. To turn the system off,
push the ON/OFF button a second
time. The Cruise Indicator Light will
turn off. The system should be turned
off when not in use.
WARNING!
Leaving the Electronic Speed Con-
trol system on when not in use is
dangerous. You could accidentally
set the system or cause it to go
faster than you want. You could
lose control and have an accident.
Always leave the system OFF when
you are not using it.
TO SET A DESIRED SPEED
Turn the Electronic Speed Control
ON. When the vehicle has reached the
desired speed, press the SET (-) but-
ton and release. Release the accelera-
tor and the vehicle will operate at the
selected speed.
Electronic Speed Control Buttons
1 — ON/OFF 2 — RES +
4 — CANCEL 3 — SET -123
Page 185 of 332
Rain Sensing Auto Wipers (for
versions/markets, where provided)
When this feature is selected, the sys-
tem will automatically activate the
windshield wipers if it senses moisture
on the windshield. To make your se-
lection, touch the Rain Sensing soft-
key, until a check-mark appears next
to setting, showing that setting has
been selected. Touch the back arrow
soft-key to return to the previous
menu.
Hill Start Assist
When this feature is selected, the Hill
Start Assist (HSA) system is active.
Refer to “Electronic Brake Control
System” in “Starting And Operating”
for system function and operating in-
formation. To make your selection,
touch the Hill Start Assist soft-key,
until a check-mark appears next to
setting, showing that setting has been
selected. Touch the back arrow soft-
key to return to the previous menu.
Lights
After pressing the Lights soft-key the
following settings will be available. Headlight Off Delay
When this feature is selected, the
driver can choose to have the head-
lights remain on for 0, 30, 60, or 90
seconds when exiting the vehicle. To
change the Headlight Off Delay status
touch the 0, 30, 60 or 90 soft-key.
Then touch the arrow back soft-key.
Headlight Illumination On Ap-
proach
When this feature is selected, the
headlights will activate and remain on
for 0, 30, 60, or 90 seconds when the
doors are unlocked with the Remote
Keyless Entry (RKE) transmitter. To
change the Illuminated Approach sta-
tus, touch the + or - soft-key to select
your desired time interval. Touch the
back arrow soft-key to return to the
previous menu.
Headlights With Wipers (for
versions/markets, where provided)
When this feature is selected, and the
headlight switch is in the AUTO posi-
tion, the headlights will turn on ap-
proximately 10 seconds after the wip-
ers are turned on. The headlights willalso turn off when the wipers are
turned off if they were turned on by
this feature. To make your selection,
touch the Headlights With Wipers
soft-key, until a check-mark appears
next to setting, showing that setting
has been selected. Touch the back ar-
row soft-key to return to the previous
menu.
Auto Dim High Beams “Smart-
Beam™” (for versions/markets,
where provided)
When this feature is selected, the high
beam headlights will deactivate auto-
matically under certain conditions. To
make your selection, touch the Auto
High Beams soft-key, until a check-
mark appears next to setting, showing
that setting has been selected. Touch
the back arrow soft-key to return to
the previous menu. Refer to “Lights/
SmartBeam™ (for versions/markets,
where provided)” in “Understanding
The Features Of Your Vehicle” for
further information.
179
Page 186 of 332
Daytime Running Lights (for
versions/markets, where provided)
When this feature is selected, the
headlights will turn on whenever the
engine is running. To make your se-
lection, touch the Daytime Running
Lights soft-key, until a check-mark
appears next to setting, showing that
setting has been selected. Touch the
back arrow soft-key to return to the
previous menu.
Steering Directed Lights (for
versions/markets, where provided)
When this feature is selected, the
headlights turn relative to a change in
direction of the steering wheel. To
make your selection, touch the Steer-
ing Directed Lights soft-key, until a
check-mark appears next to setting,
showing that setting has been se-
lected. Touch the back arrow soft-key
to return to the previous menu.
Headlight Dipped Beam (Traffic
Changeover) (for versions/markets,
where provided)
Low beam headlights have more con-
trol of upward light and direct most oftheir light downward and either to the
left for right hand drive countries or to
the right for left hand drive countries
to provide safe forward visibility
without excessive glare.
Doors & Locks
After pressing the Doors & Locks soft-
key the following settings will be
available.
Auto Lock
When this feature is selected, all doors
will lock automatically when the ve-
hicle reaches a speed of 24 km/h. To
make your selection, touch the Auto
Lock soft-key, until a check-mark ap-
pears next to setting, showing that
setting has been selected. Touch the
back arrow soft-key to return to the
previous menu.
Auto Unlock On Exit
When this feature is selected, all doors
will unlock when the vehicle is
stopped and the transmission is in the
PARK or NEUTRAL position and the
driver's door is opened. To make your
selection, touch the Auto Unlock On
Exit soft-key, until a check-mark ap-
pears next to setting, showing that
setting has been selected. Touch the
back arrow soft-key to return to the
previous menu.
1st Press Of Key Fob Unlocks
When 1st Press Of Key Fob Unlocks is
selected, only the driver's door will
unlock on the first press of the Remote
Keyless Entry (RKE) transmitter UN-
LOCK button. When 1st Press Of Key
Fob Unlocks is selected, you must
press the RKE transmitter UNLOCK
button twice to unlock the passenger's
doors. When Unlock All Doors On 1st
Press is selected, all of the doors will
unlock on the first press of the RKE
transmitter UNLOCK button.
NOTE: If the vehicle is pro-
grammed 1st Press Of Key Fob Un-
locks, all doors will unlock no
matter which Passive Entry
equipped door handle is grasped.
If 1st Press Of Key Fob Unlocks is
programmed, only the driver’s
door will unlock when the driver’s
door is grasped. With Passive En-
try, if 1st Press Of Key Fob Unlocks
180
Page 187 of 332
is programmed touching the
handle more than once will only
result in the driver’s door opening.
If driver door first is selected, once
the driver door is opened, the inte-
rior door lock/unlock switch can
be used to unlock all doors (or use
RKE transmitter).
Passive Entry
This feature allows you to lock and
unlock the vehicle’s door(s) without
having to press the Remote Keyless
Entry (RKE) transmitter lock or un-
lock buttons. To make your selection,
touch the Passive Entry soft-key, until
a check-mark appears next to setting,
showing that setting has been selected.
Touch the back arrow soft-key to re-
turn to the previous menu. Refer to
“Keyless Enter-N-Go” in “Things To
Know Before Starting Your Vehicle”.
Personal Settings Linked To FOB
(for versions/markets, where pro-
vided)
This feature provides automatic
driver seat positioning to enhance
driver mobility when entering and ex-
iting the vehicle. To make your selec-
tion, touch the Personal SettingsLinked To FOB soft-key, until a
check-mark appears next to setting,
showing that setting has been se-
lected. Touch the back arrow soft-key
to return to the previous menu.
NOTE: The seat will return to the
memorized seat location (if Recall
Memory with Remote Key Unlock
is set to ON) when the Remote Key-
less Entry (RKE) transmitter is
used to unlock the door. Refer to
“Driver Memory Seat” in “Under-
standing The Features Of Your Ve-
hicle” for further information.
Engine Off Options
After pressing the Engine Off Options
soft-key the following settings will be
available.
Easy Exit Seat (for versions/
markets, where provided)
This feature provides automatic
driver seat positioning to enhance
driver mobility when entering and ex-
iting the vehicle. To make your selec-
tion, touch the Easy Exit Seats soft-
key, until a check-mark appears next
to setting, showing that setting has
been selected. Touch the back arrow
soft-key to return to the previous
menu.
Engine Off Power Delay (for
versions/markets, where provided)
When this feature is selected, the
power window switches, radio,
Uconnect® phone system (for
versions/markets, where provided),
DVD video system (for versions/
markets, where provided), power
sunroof (for versions/markets, where
provided), and power outlets will re-
main active for up to 10 minutes after
the ignition is cycled to OFF. Opening
either front door will cancel this fea-
ture. To change the Engine Off Power
Delay status touch the 0 seconds, 45
seconds, 5 minutes or 10 minutes
soft-key. Then touch the arrow back
soft-key.
Headlight Off Delay
When this feature is selected, the
driver can choose to have the head-
lights remain on for 0, 30, 60, or 90
seconds when exiting the vehicle. To
change the Headlight Off Delay status
touch the + or - soft-key to select your
181