radio Lancia Thema 2014 Owner handbook (in English)
[x] Cancel search | Manufacturer: LANCIA, Model Year: 2014, Model line: Thema, Model: Lancia Thema 2014Pages: 332, PDF Size: 3.46 MB
Page 19 of 332
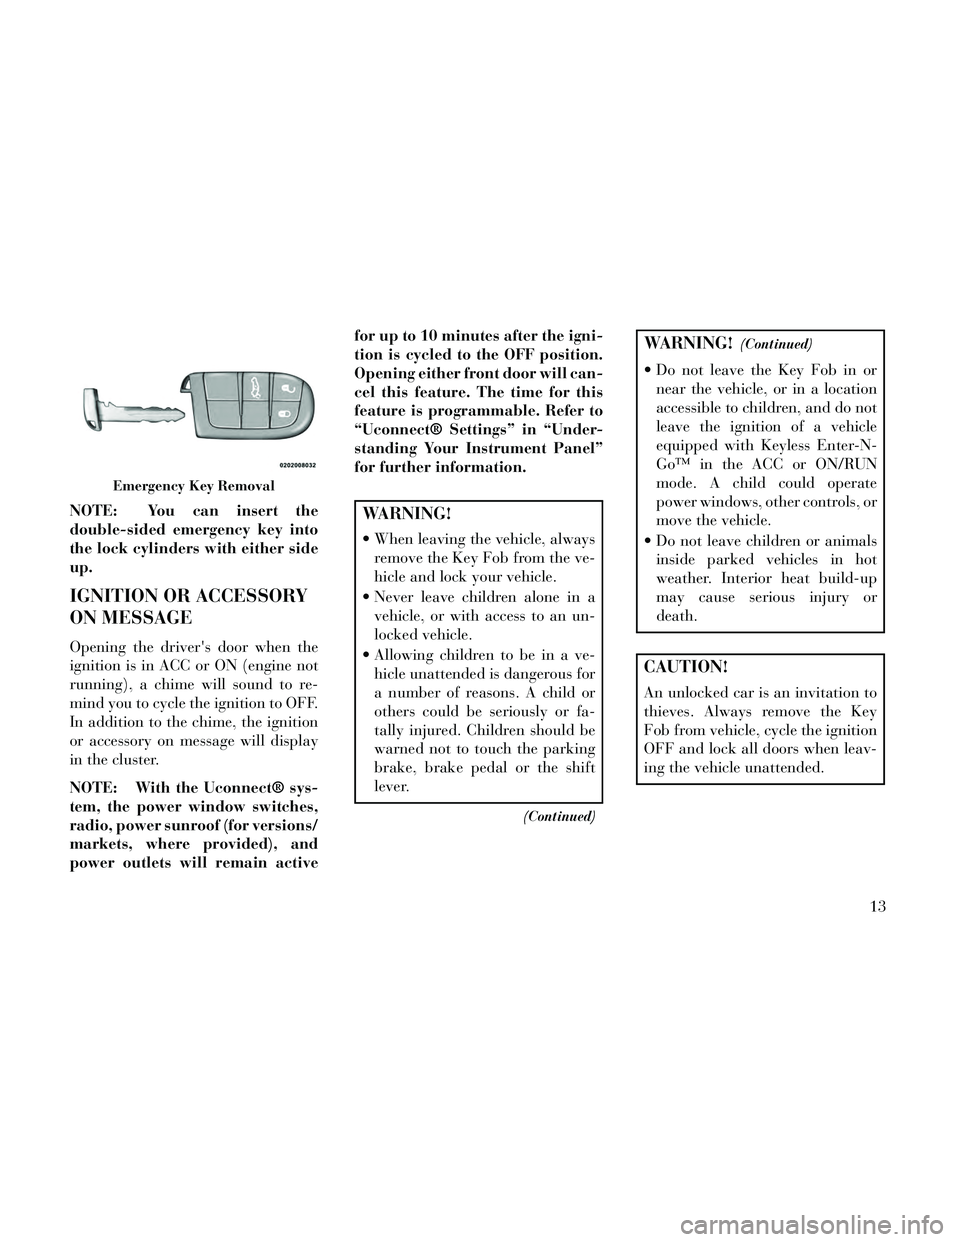
NOTE: You can insert the
double-sided emergency key into
the lock cylinders with either side
up.
IGNITION OR ACCESSORY
ON MESSAGE
Opening the driver's door when the
ignition is in ACC or ON (engine not
running), a chime will sound to re-
mind you to cycle the ignition to OFF.
In addition to the chime, the ignition
or accessory on message will display
in the cluster.
NOTE: With the Uconnect® sys-
tem, the power window switches,
radio, power sunroof (for versions/
markets, where provided), and
power outlets will remain activefor up to 10 minutes after the igni-
tion is cycled to the OFF position.
Opening either front door will can-
cel this feature. The time for this
feature is programmable. Refer to
“Uconnect® Settings” in “Under-
standing Your Instrument Panel”
for further information.
WARNING!
When leaving the vehicle, always
remove the Key Fob from the ve-
hicle and lock your vehicle.
Never leave children alone in a vehicle, or with access to an un-
locked vehicle.
Allowing children to be in a ve- hicle unattended is dangerous for
a number of reasons. A child or
others could be seriously or fa-
tally injured. Children should be
warned not to touch the parking
brake, brake pedal or the shift
lever.
(Continued)
WARNING!(Continued)
Do not leave the Key Fob in ornear the vehicle, or in a location
accessible to children, and do not
leave the ignition of a vehicle
equipped with Keyless Enter-N-
Go™ in the ACC or ON/RUN
mode. A child could operate
power windows, other controls, or
move the vehicle.
Do not leave children or animals inside parked vehicles in hot
weather. Interior heat build-up
may cause serious injury or
death.
CAUTION!
An unlocked car is an invitation to
thieves. Always remove the Key
Fob from vehicle, cycle the ignition
OFF and lock all doors when leav-
ing the vehicle unattended.
Emergency Key Removal
13
Page 26 of 332

2. Insert the tip of the emergency key
or a #2 flat blade screwdriver into the
slot and gently pry the two halves of
the RKE transmitter apart. Make sure
not to damage the seal during re-
moval.
3. Remove the battery by turning the
back cover over (battery facing down-
ward) and tapping it lightly on a solid
surface such as a table or similar, then
replace the battery. When replacing
the battery, match the + sign on the
battery to the + sign on the inside of
the battery clip, located on the back
cover. Avoid touching the new battery
with your fingers. Skin oils may cause
battery deterioration. If you touch a
battery, clean it with rubbing alcohol.4. To assemble the RKE transmitter
case, snap the two halves together.
GENERAL INFORMATION
Transmitter and receivers operate on
a carrier frequency of 433.92 MHz as
required by EEC regulations. These
devices must be certified to conform
to specific regulations in each indi-
vidual country. Two sets of regula-
tions are involved: ETS (European
Telecommunication Standard) 300–
220, which most countries use, and
German BZT federal regulation
225Z125, which is based on ETC
300–220 but has additional unique
requirements. Other defined require-
ments are noted in ANNEX VI of
COMMISSION DIRECTIVE 95/56/
EC. Operation is subject to the follow-
ing conditions:
This device may not cause harmful
interference.
This device must accept any inter- ference received, including interfer-
ence that may cause undesired op-
eration. If your RKE transmitter fails to oper-
ate from a normal distance, check for
these two conditions:
1. A weak battery in the RKE trans-
mitter. The expected life of the battery
is a minimum of three years.
2. Closeness to a radio transmitter
such as a radio station tower, airport
transmitter, and some mobile or CB
radios.
DOOR LOCKS
MANUAL DOOR LOCKS
To lock each door, push the door lock
knob on each door trim panel down-
ward. To unlock the front doors, pull
the inside door handle to the first de-
tent. To unlock the rear doors, pull the
door lock knob on the door trim panel
upward.
Separating The RKE Transmitter
Case
20
Page 80 of 332

The BSM system notifies the driver of
objects in the detection zones by illu-
minating the BSM warning light lo-
cated in the outside mirrors in addi-
tion to sounding an audible (chime)
alert and reducing the radio volume.
Refer to “Modes Of Operation” for
further information.
The BSM system monitors the detec-
tion zone from three different entry
points (side, rear, front) while driving
to see if an alert is necessary. The BSM
system will issue an alert during these
types of zone entries.Entering From The Side
Vehicles that move into your adjacent
lanes from either side of the vehicle.
Entering From The Rear
Vehicles that come up from behind
your vehicle on either side and enter
the rear detection zone with a relative
speed of less than 48 km/h.
Overtaking Traffic
If you pass another vehicle slowly
with a relative speed of less than
24 km/h and the vehicle remains in
the blind spot for approximately 1.5
seconds, the warning light will be il-
luminated. If the difference in speed
between the two vehicles is greater
than 24 km/h, the warning light will
not illuminate.
The BSM system is designed not to
issue an alert on stationary objects
such as guardrails, posts, walls, foli-
age, berms, etc. However, occasion-
ally the system may alert on such ob-
jects. This is normal operation and
your vehicle does not require service.
Sensor Location (Driver Side Shown)
Side Monitoring
Rear Monitoring
Overtaking/Approaching
74
Page 82 of 332

NOTE: In a parking lot situation,
oncoming vehicles can be ob-
scured by vehicles parked on ei-
ther side. If the sensors are
blocked by other structures or ve-
hicles, the system will not be able
to alert the driver.
When RCP is on and the vehicle is in
REVERSE, the driver is alerted using
both the visual and audible alarms,
including reducing the radio volume.
WARNING!
RCP is not a Back Up Aid system. It
is intended to be used to help a
driver detect an oncoming vehicle
in a parking lot situation. Drivers
must be careful when backing up,
even when using RCP. Always
check carefully behind your ve-
hicle, look behind you, and be sure
to check for pedestrians, animals,
other vehicles, obstructions, and
blind spots before backing up. Fail-
ure to do so can result in serious
injury or death.
MODES OF OPERATION
Modes Of Operation With EVIC
Three selectable modes of operation
are available in the Electronic Vehicle
Information Center (EVIC). Refer to
“Electronic Vehicle Information Cen-
ter (EVIC)/Personal Settings
(Customer-Programmable Features)”
in “Understanding Your Instrument
Panel” for further information.
Modes Of Operation With
Uconnect® System — (for
versions/markets, where pro-
vided)
Three selectable modes of operation
are available in the Uconnect® sys-
tem screen. Refer to “Customer- Pro-
grammable Features — Uconnect®
Access settings ” in “Understanding
Your Instrument Panel” for further
information.
Blind Spot Alert
When operating in Blind Spot Alert
mode, the BSM system will provide a
visual alert in the appropriate sideview mirror based on a detected ob-
ject. However, when the system is op-
erating in RCP, the system will re-
spond with both visual and audible
alerts when a detected object is pres-
ent. Whenever an audible alert is re-
quested, the radio volume is reduced.
Blind Spot Alert Lights/Chime
When operating in Blind Spot Alert
Lights/Chime mode, the BSM system
will provide a visual alert in the ap-
propriate side view mirror based on a
detected object. If the turn signal is
then activated, and it corresponds to
an alert present on that side of the
vehicle, an audible chime will also be
sounded. Whenever a turn signal and
detected object are present on the
same side at the same time, both the
visual and audio alerts will be issued.
In addition to the audible alert, the
radio (if on) volume will be reduced.
NOTE:
Whenever an audible alert is re-
quested by the BSM system, the
radio volume is reduced.
76
Page 83 of 332

If the hazard flashers are on, thesystem will request the appro-
priate visual alert only.
When the system is in RCP, the system
shall respond with both visual and
audible alerts when a detected object
is present. Whenever an audible alert
is requested, the radio volume is re-
duced. Turn/hazard signal status is
ignored; the RCP state always re-
quests the audible chime.
Blind Spot Alert Off (Lights Only)
When the BSM system is turned off,
there will be no visual or audible
alerts from either the BSM or RCP
systems.
NOTE: The BSM system will store
the current operating mode when
the vehicle is shut off. Each time
the vehicle is started, the previ-
ously stored mode will be recalled
and used.Uconnect® PHONE
(8.4/8.4N)
Uconnect® 8.4/8.4 NAV
Uconnect® Phone is a voice-
activated, hands-free, in-vehicle com-
munications system. Uconnect®
Phone allows you to dial a phone
number with your mobile phone.
Uconnect® Phone supports the fol-
lowing features:
NOTE: Your phone must be ca-
pable of SMS messaging via
Bluetooth® for messaging features
to work properly.
Your mobile phone’s audio is trans-
mitted through your vehicle’s audio
system; the system will automatically
mute your radio when using the
Uconnect® Phone.
Uconnect® Phone allows you to
transfer calls between the system and
your mobile phone as you enter or exit
your vehicle and enables you to mute
the system's microphone for private
conversation.
WARNING!
Any voice commanded system
should be used only in safe driving
conditions following all applicable
laws, including laws regarding
phone use. Your attention should be
focused on safely operating the ve-
hicle. Failure to do so may result in
an accident causing serious injury
or death.
The Uconnect® Phone is driven
through your Bluetooth® “Hands-
Free Profile” mobile phone.
Uconnect® features Bluetooth® tech-
nology - the global standard that en-
ables different electronic devices to
connect to each other without wires or
a docking station, so Uconnect®
Phone works no matter where you
stow your mobile phone (be it your
purse, pocket, or briefcase), as long as
your phone is turned on and has been
paired to the vehicle's Uconnect®
Phone. The Uconnect® Phone allows
up to ten mobile phones or audio de-
vices to be linked to the system. Only
one linked (or paired) mobile phone
and one audio device can be used with
the system at a time. 77
Page 84 of 332
Uconnect® Phone ButtonThe Uconnect® Phone
Button is used to get into
the phone mode and make
calls, show recent, incom-
ing, outgoing calls, view phonebook
etc., When you press the button you
will hear a BEEP. The beep is your
signal to give a command.
Uconnect® Voice Command Button
The Uconnect® Voice Com-
mand
Button is only
used for “barge in” and
when you are already in a
call and you want to send Tones or
make another call.
The
button is also used to access
the Voice Commands for the
Uconnect® Voice Command features
if your vehicle is equipped. Please see
the Uconnect® Voice Command sec-
tion for direction on how to use the
button.
The Uconnect® Phone is fully inte-
grated with the vehicle's audio sys-
tem. The volume of the Uconnect®
Phone can be adjusted either from the radio volume control knob or from the
steering wheel radio control (right
switch), if so equipped.
Voice Activated Features:
Hands Free dialing via Voice (“Call
John Smiths Mobile” or, “Dial 151-
1234 -5555”).
Hands Free text to speech listening of your incoming SMS messages.
Hands Free text messaging (“Send a message to John Smith Mobile”).
Redialing last dialed numbers (“Redial”).
Calling Back the last incoming call number (“Call Back”).
View Call logs on screen (“Show incoming calls,” “Show Outgoing
calls,” “Show missed Calls,” “Show
Recent Calls”).
Searching Contacts phone number (“Search for John Smith Mobile”). Screen Activated Features:
Dialing via Keypad using touch-
screen.
Viewing and Calling contacts from Phonebooks displayed on the
touchscreen.
Setting Favorite Contact Phone numbers so the are easily accessible
on the Main Phone screen.
Viewing and Calling contacts from Recent Call logs.
Reviewing your recent Incoming SMS.
Sending a text message via the touchscreen.
Listen to Music on your Bluetooth® Device via the touchscreen.
Pairing up to 10 phones/audio de- vices for easy access to connect to
them quickly.
78
Page 86 of 332
Help Command
If you need assistance at any prompt,
or if you want to know your options at
any prompt, say “Help” following the
beep.
To activate the Uconnect® Phone
from idle, simply press the
button
on your steering wheel and say a com-
mand or say “help.” All Uconnect®
Phone sessions begin with a press of
the
button on the radio control
head.
Cancel Command
At any prompt, after the beep, you
can say “Cancel” and you will be re-
turned to the main menu.
You can also press the
orbut-
ton on your steering wheel when the
system is listening for a command and
be returned to the main or previous
menu. Pair (Link) Uconnect® Phone To
A Mobile Phone
To begin using your Uconnect®
Phone, you must pair your compat-
ible Bluetooth® enabled mobile
phone.
To complete the pairing process, you
will need to reference your mobile
phone Owner's Manual. The
Uconnect® website may also provide
detailed instructions for pairing.
NOTE:
You must have Bluetooth® en-
abled on your phone to complete
this procedure.
The vehicle must be in PARK.
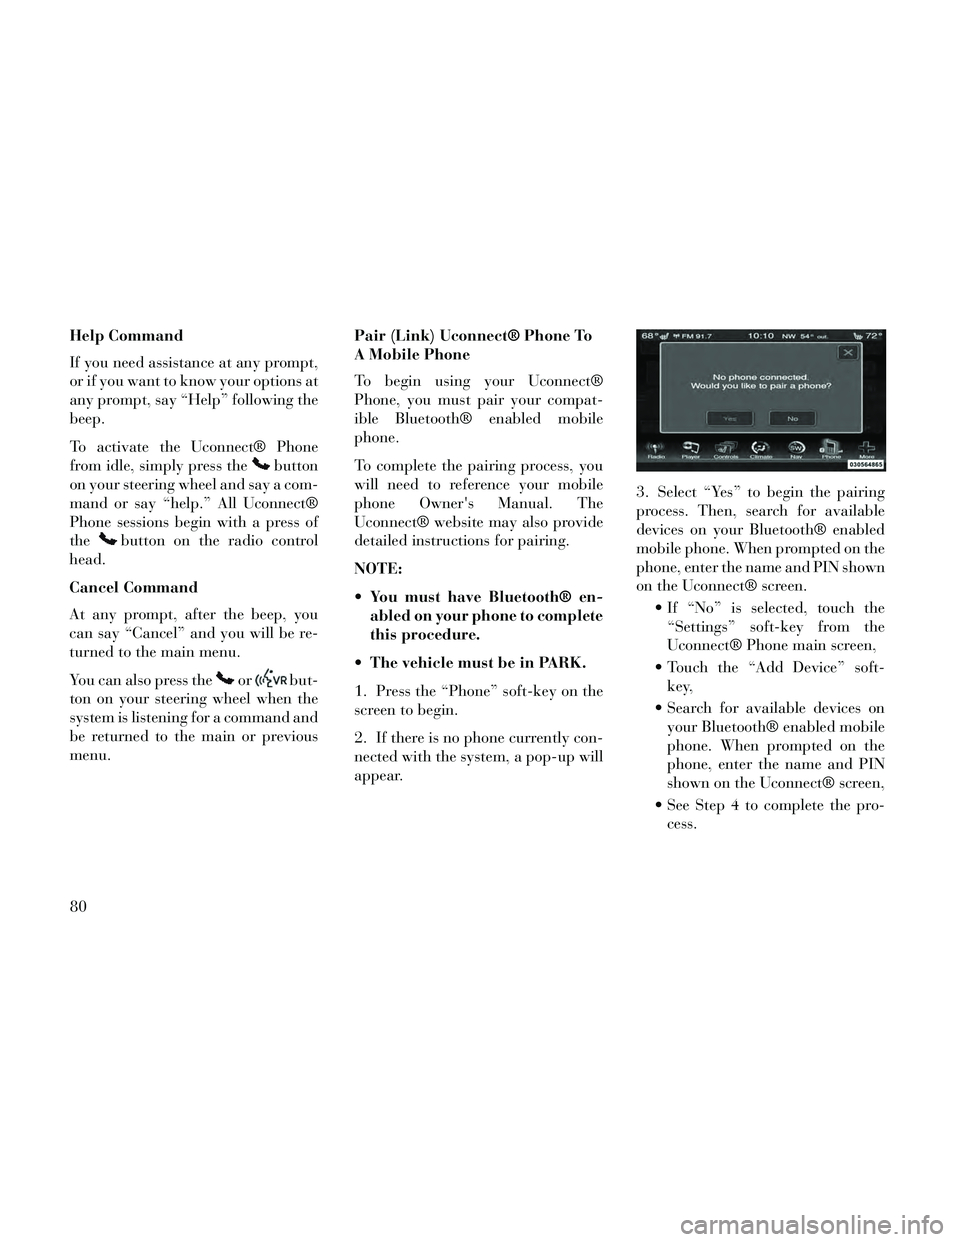
1. Press the “Phone” soft-key on the
screen to begin.
2. If there is no phone currently con-
nected with the system, a pop-up will
appear. 3. Select “Yes” to begin the pairing
process. Then, search for available
devices on your Bluetooth® enabled
mobile phone. When prompted on the
phone, enter the name and PIN shown
on the Uconnect® screen.
If “No” is selected, touch the“Settings” soft-key from the
Uconnect® Phone main screen,
Touch the “Add Device” soft- key,
Search for available devices on your Bluetooth® enabled mobile
phone. When prompted on the
phone, enter the name and PIN
shown on the Uconnect® screen,
See Step 4 to complete the pro- cess.
80
Page 87 of 332
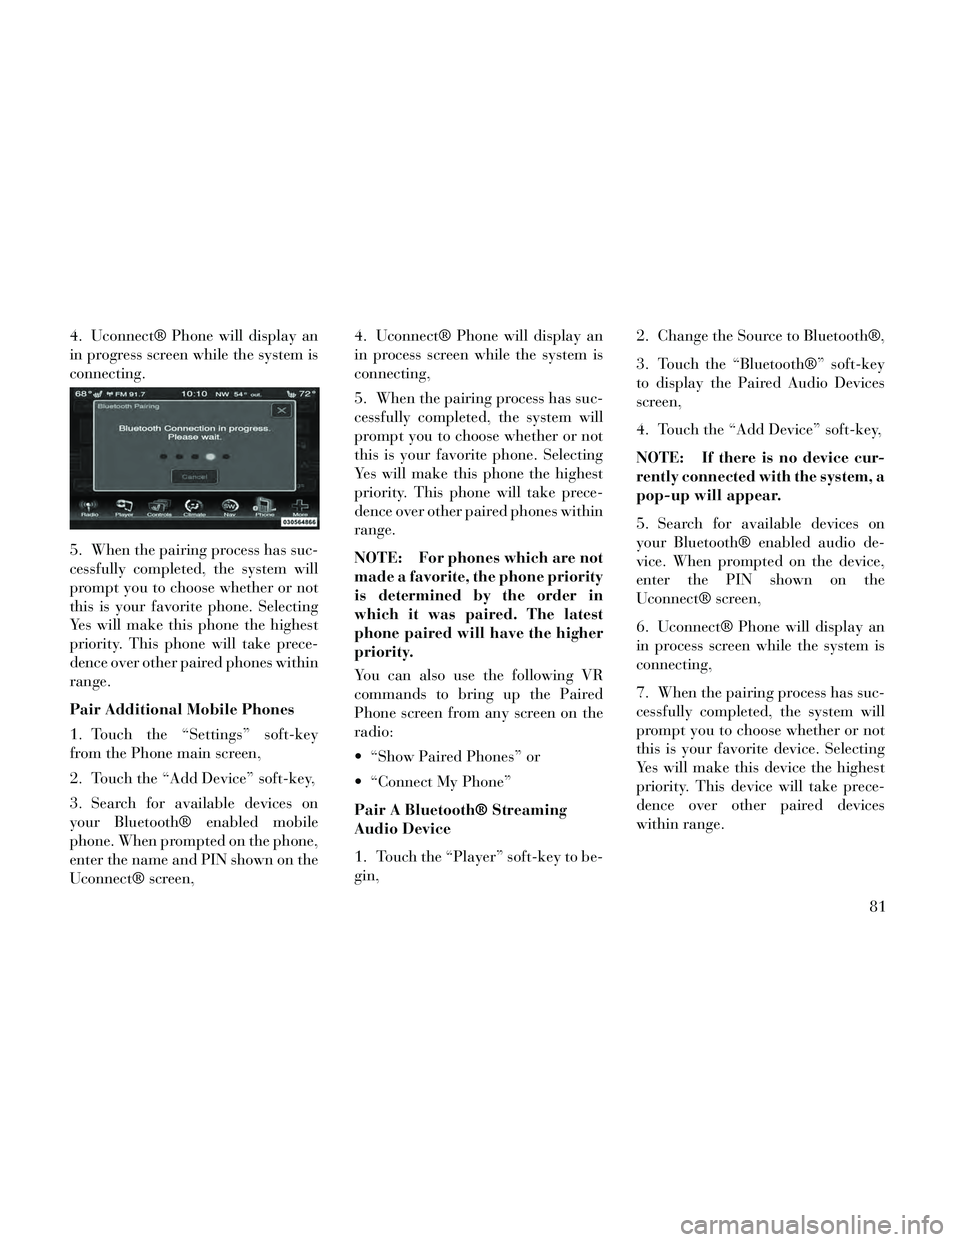
4. Uconnect® Phone will display an
in progress screen while the system is
connecting.
5. When the pairing process has suc-
cessfully completed, the system will
prompt you to choose whether or not
this is your favorite phone. Selecting
Yes will make this phone the highest
priority. This phone will take prece-
dence over other paired phones within
range.
Pair Additional Mobile Phones
1. Touch the “Settings” soft-key
from the Phone main screen,
2. Touch the “Add Device” soft-key,
3. Search for available devices on
your Bluetooth® enabled mobile
phone. When prompted on the phone,
enter the name and PIN shown on the
Uconnect® screen,4. Uconnect® Phone will display an
in process screen while the system is
connecting,
5. When the pairing process has suc-
cessfully completed, the system will
prompt you to choose whether or not
this is your favorite phone. Selecting
Yes will make this phone the highest
priority. This phone will take prece-
dence over other paired phones within
range.
NOTE: For phones which are not
made a favorite, the phone priority
is determined by the order in
which it was paired. The latest
phone paired will have the higher
priority.
You can also use the following VR
commands to bring up the Paired
Phone screen from any screen on the
radio:
“Show Paired Phones” or
“Connect My Phone”
Pair A Bluetooth® Streaming
Audio Device
1. Touch the “Player” soft-key to be-
gin,
2. Change the Source to Bluetooth®,
3. Touch the “Bluetooth®” soft-key
to display the Paired Audio Devices
screen,
4. Touch the “Add Device” soft-key,
NOTE: If there is no device cur-
rently connected with the system, a
pop-up will appear.
5. Search for available devices on
your Bluetooth® enabled audio de-
vice. When prompted on the device,
enter the PIN shown on the
Uconnect® screen,
6. Uconnect® Phone will display an
in process screen while the system is
connecting,
7. When the pairing process has suc-
cessfully completed, the system will
prompt you to choose whether or not
this is your favorite device. Selecting
Yes will make this device the highest
priority. This device will take prece-
dence over other paired devices
within range.
81
Page 101 of 332
GENERAL INFORMATION
This device complies with Part 15 of
the FCC rules and RSS 210 of Indus-
try Canada. Operation is subject to
the following conditions:
Changes or modifications not ex-pressly approved by the party re-
sponsible for compliance could void
the user's authority to operate the
equipment.
This device may not cause harmful interference.
This device must accept any inter- ference received, including interfer-
ence that may cause undesired op-
eration.
VOICE COMMAND
Uconnect® 8.4/8.4 Nav
The Uconnect® Voice Com-
mand system allows you to
control your AM, FM radio,
disc player, SD Card or
USB/iPod. NOTE: Take care to speak into
the Voice Command system as
calmly and normally as possible.
The ability of the Voice Command
system to recognize user voice
commands may be negatively af-
fected by rapid speaking or a
raised voice level.
WARNING!
Any voice commanded system
should be used only in safe driving
conditions following all applicable
laws, including laws regarding
phone use. Your attention should be
focused on safely operating the ve-
hicle. Failure to do so may result in
an accident causing serious injury
or death.
When you press the Uconnect® Voice
Command
button, you will hear
a beep. The beep is your signal to give
a command.
If no command is spoken the system
will say one of two responses:
I didn't understand
I didn't get that, etc., If a command is not spoken a second
time, the system will respond with an
error and give some direction as what
can be said based on the context you
are in. After three consecutive failures
of a spoken command the VR session
with end.
Pressing the Uconnect® Voice Com-
mand
button while the system is
speaking is known as “barging in.”
The system will be interrupted, and
after the beep, you can say a com-
mand. This will become helpful once
you start to learn the options.
NOTE: At any time, you can say
the words “Cancel” or “Help”.
These commands are universal and
can be used from any menu. All other
commands can be used depending
upon the active application.
When using this system, you should
speak clearly and at a normal speak-
ing volume.
The system will best recognize your
speech if the windows are closed, and
the heater/air conditioning fan is set
to low.
95
Page 102 of 332
At any point, if the system does not
recognize one of your commands, you
will be prompted to repeat it.
To hear available commands, press
the Uconnect® Voice Command
button and say “Help”. You will
hear available commands for the
screen displayed.
Natural Speech
Natural speech allows the user to
speak commands in phrases or com-
plete sentences. The system filters out
certain non-word utterances and
sounds such as “ah” and “eh”. The
system handles fill-in words such as “I
would like to”. The system handles multiple inputs in
the same phrase or sentence such as
“make a phone call” and “to Kelly
Smith”. For multiple inputs in the
same phrase or sentence, the system
identifies the topic or context and pro-
vides the associated follow-up prompt
such as “Who do you want to call?” in
the case where a phone call was re-
quested but the specific name was not
recognized.
The system utilizes continuous dialog;
when the system requires more infor-
mation from the user it will ask a
question to which the user can re-
spond without pressing the
Uconnect® Voice Command
button.
UCONNECT® VOICE
COMMANDS
The Uconnect® Voice Command sys-
tem understands two types of com-
mands. Universal commands are
available at all times. Local com-
mands are available if the supported
radio mode is active.
Start a dialogue by pressing the
Uconnect® Voice Command
button.
96