ESP Lancia Thesis 2006 Owner handbook (in English)
[x] Cancel search | Manufacturer: LANCIA, Model Year: 2006, Model line: Thesis, Model: Lancia Thesis 2006Pages: 386, PDF Size: 8.69 MB
Page 54 of 386
53
REQUEST FOR ADDITIONAL
CID DEVICES
The Keyless System receiver can
recognize up to 4 CID devices.
If you have requested additional
CID devices, remember that the pro-
gramming operation must be carried
out simultaneously for all the CID
devices.
Therefore, should a new CID
device be necessary for whatever
reason, go to your Lancia
Dealership, bringing with you all
the keys and CID devices in your
possession, the CODE card, your ID
card and the documents that certify
car possession.MINISTERIAL HOMOLOGATION
In the respect of the legislation in
force in each country in the matter
of radio-frequency devices, please
note that for markets where trans-
mitter marking is requested, the
homologation number is printed on
the CID device.
The code marking may also be
printed on the CID and/ or the
receiver for versions/markets where
this is required.Used batteries pollute
the environment. Dispose
of them in the special
containers as specified by current
legislation. Keep batteries away
from open flames and high tem-
peratures. Keep away from chil-
dren.
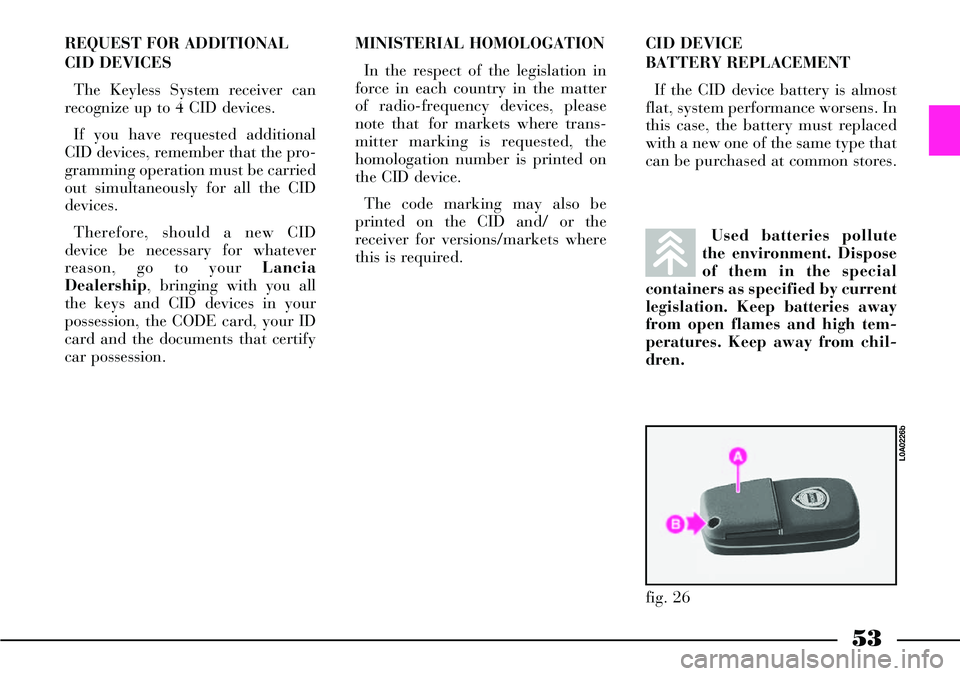
fig. 26
L0A0226b
CID DEVICE
BATTERY REPLACEMENT
If the CID device battery is almost
flat, system performance worsens. In
this case, the battery must replaced
with a new one of the same type that
can be purchased at common stores.
Page 58 of 386

57
OPENING/CLOSING FROM
THE INSIDE
To open the door even when the
lock is locked, pull handle A(fig. 35
front doors -fig. 36 rear doors) set in
the upper part of the panel.
Next to each door handle are two
buttons that actuate lock
locking/unlocking:
– B button for unlocking;
– Cbutton for locking.
The red/green leds A(fig. 33 front
doors –fig. 34 rear doors) indicate
the locking/unlocking condition.
The leds come on with red light for
about 3 seconds after door locking
and with green light after unlocking.
By pulling the internal handle of
the driver’s door, all the doors or
only the driver’s door will be simul-
taneously unlocked, depending on
the setting selected on the CON-
NECT. By pulling the internal han-
dle of any other door, all the doors
are simultaneously unlocked.
fig. 36
L0A0052b
With the dead lock
device on, pressing the
external handle button of
one of the doors while unlocking
the doors by the remote control
could cause the disconnection of
the internal handle of the
involved door thus making
impossible to open that door
from the inside. To restore regu-
lar operation, just press the
remote control central door
unlocking button or button B (fig.
36) on the door panel.A led is located near each door
handle to make it easy to find the
handle in the dark. The leds light up
for about 2 minutes after turning the
ignition key to STOPor until a door
is opened.
Door open indication
The driver is informed that one or
several doors are not closed correct-
ly by the lighting of the correspond-
ing symbols on the instrument dis-
play, together with the messages
“DOOR OPEN” or “DOORS
OPEN”.
Page 60 of 386
59
AUTOCLOSE FUNCTION
(AUTOMATIC LOCKING
WITH KEYLESS SYSTEM
RECOGNITION SYSTEM)
On versions equipped with Keyless
System, the “Autoclose” function
can be actuated/deactivated through
the CONNECT settings. This func-
tion makes it possible to automati-
cally lock the boot and doors when
the CID device is taken away from
the car.
When leaving the car, if one or
more doors are not closed correctly,
the car will remain open and a fur-
ther beep will sound to indicate that
the locks have not been locked.
The “Autoclose” functions actuates
neither the alarm system nor the
door deadlock device (refer to the
contents of the relevant paragraph).
In any case, these functions can be
actuated by means of the remote
control.LOCK RELEASE IN CASE OF
ACCIDENT
In case of collision with actuation
of the inertia switch, the door locks
are automatically released to allows
rescuers to get access to the passen-
ger compartment.In any case, door open-
ing from the outside
depends on the door con-
ditions after the collision:
deformed doors cannot very often
be opened even if the lock is
released. In such a case, try to
open the other doors.
INITIALISING THE DOOR
LOCKING CONTROL UNIT
Whenever the battery is electrically
connected again or it is reloaded
after being completely flat or after
replacing one of the protection fuses,
to restore the correct operation of
the door locking, of air conditioning
and of ESP system, it is necessary to
perform the initialisation operations
contained in the paragraph “If bat-
tery is to be disconnected” in the
chapter “In an emergency”. The external mechanical
connections are active
only when the doors are
unlocked.
In the event that the driver has
actuated central locking from the
inside and, after a collision, the
inertia switch has not actuated
the automatic door unlocking
function due to the loss of or
damage to the battery, access to
the passenger compartment will
not be possible from the outside.
Page 63 of 386
62
Control C (fig. 40)
5- Lumbar support increase
6- Lumbar support decrease
Control C (fig. 44)
9- Lumbar support increase
10- Lumbar support decrease
11- Vertical support increase
12- Vertical support decrease.
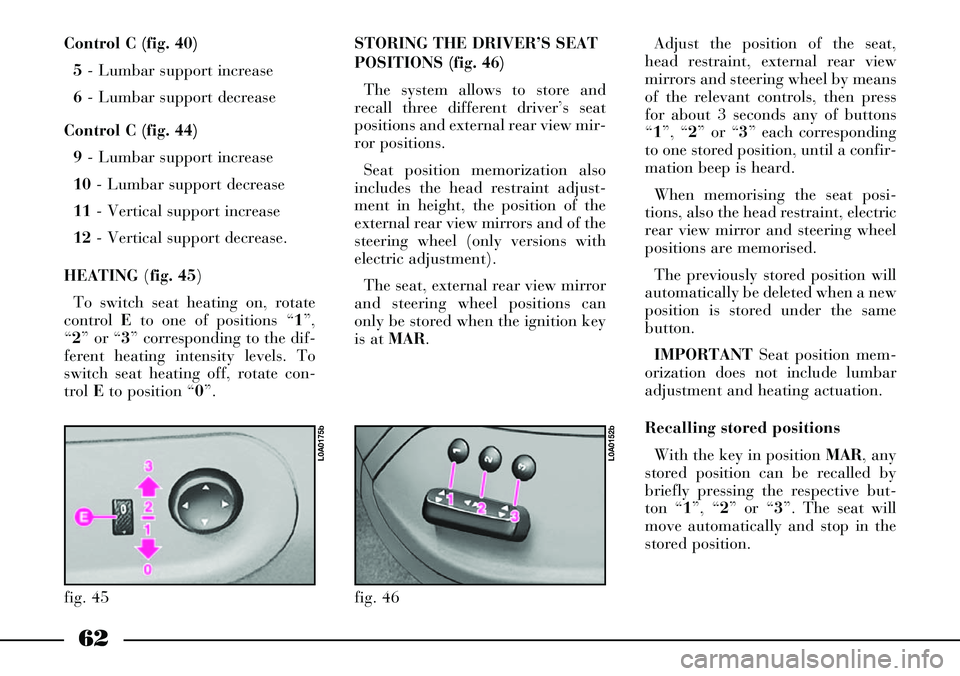
HEATING (fig. 45)
To switch seat heating on, rotate
control Eto one of positions “1”,
“2” or “3” corresponding to the dif-
ferent heating intensity levels. To
switch seat heating off, rotate con-
trol Eto position “0”.
fig. 45
L0A0175b
STORING THE DRIVER’S SEAT
POSITIONS (fig. 46)
The system allows to store and
recall three different driver’s seat
positions and external rear view mir-
ror positions.
Seat position memorization also
includes the head restraint adjust-
ment in height, the position of the
external rear view mirrors and of the
steering wheel (only versions with
electric adjustment).
The seat, external rear view mirror
and steering wheel positions can
only be stored when the ignition key
is at MAR.Adjust the position of the seat,
head restraint, external rear view
mirrors and steering wheel by means
of the relevant controls, then press
for about 3 seconds any of buttons
“1”, “2” or “3” each corresponding
to one stored position, until a confir-
mation beep is heard.
When memorising the seat posi-
tions, also the head restraint, electric
rear view mirror and steering wheel
positions are memorised.
The previously stored position will
automatically be deleted when a new
position is stored under the same
button.
IMPORTANTSeat position mem-
orization does not include lumbar
adjustment and heating actuation.
Recalling stored positions
With the key in position MAR, any
stored position can be recalled by
briefly pressing the respective but-
ton “1”, “2” or “3”. The seat will
move automatically and stop in the
stored position.
fig. 46
L0A0152b
Page 64 of 386
63
Stored position are recalled only if
the required position is different
from the current one and is not pos-
sible when the car speed exceeds 10
km/h.
Seats can be moved only when the
ignition key is at MARand, for
about 1 minute, also after removing
the key or turning it to STOP: dur-
ing this time, the external rear view
mirrors will not move, but when the
car is started again, they will be
automatically realigned together
with the seat position (see paragraph
“Automatic realignment of external
rear view mirrors”).
If stored seat position recalling is
still in course after this time has
elapsed, recalling will be concluded
in any case.If the engine is started during the
recalling stage, seat moving will be
stopped; once this stage is over the
seat will return automatically to the
stored position.
IMPORTANTPressing any of
memorisation or adjustment buttons
during the recalling stage, causes the
immediate stop of the seat (antipan-
ic mode).
Storing the “parking” position of
the external rear view mirror on
passenger side
You can achieve better visibility
during manoeuvres in reverse gear
(for instance, when parking the car)
by adjusting the external passenger
rear view mirror to a different posi-
tion from the one normally used.
This position can be stored by the
driver.To store the position proceed as
follows:
– with the car stopped and the igni-
tion key at MAR, engage the reverse
gear;
– adjust the position of the external
passenger rear view mirror by means
of the respective controls so as to
obtain the optimum position for the
parking manoeuvre;
– press down for at least 3 seconds
any of buttons “1”, “2” or “3” (fig.
46) used to store/recall the seat posi-
tion;
– together with the “parking” posi-
tion of the external passenger side
rear view mirror, also the seat posi-
tion, the driver rear view mirror
position and the driving position of
the external passenger side rear view
mirror are stored.
A sound signal warns the driver
that the mirror position has been
stored.
Page 65 of 386
64
fig. 47
L0A0310b
Recalling the “parking” position
of the external rear view mirror
on passenger side
To automatically recall the “park-
ing” position of the external passen-
ger rear view mirror, proceed as fol-
lows:
– with the car stopped and the igni-
tion key at MAR, engage the reverse
gear; the mirror will be automatical-
ly brought back to the previously
stored position .
If no “parking” position has been
stored, when engaging reverse the
passenger mirror slightly lowers
than normally to a preset position to
facilitate the driver during parking.
The rear view mirror will automat-
ically return to its initial position
after about 10 seconds from reverse
gear disengagement, or immediately
after exceeding a speed of 10 km/h
with forward gear. IMPORTANTThe “parking” posi-
tion memorisation and recall can
only be performed with ignition key
at MAR.
Automatic realignment
of external rear view mirrors
Every time the ignition key is
turned to MAR, the external rear
view mirrors automatically return to
the latest position reached and/or
recalled before removing the key.
This enables rear view mirror
alignment if, when the car is parked,
one of the rear view mirror has been
manually and/or accidentally
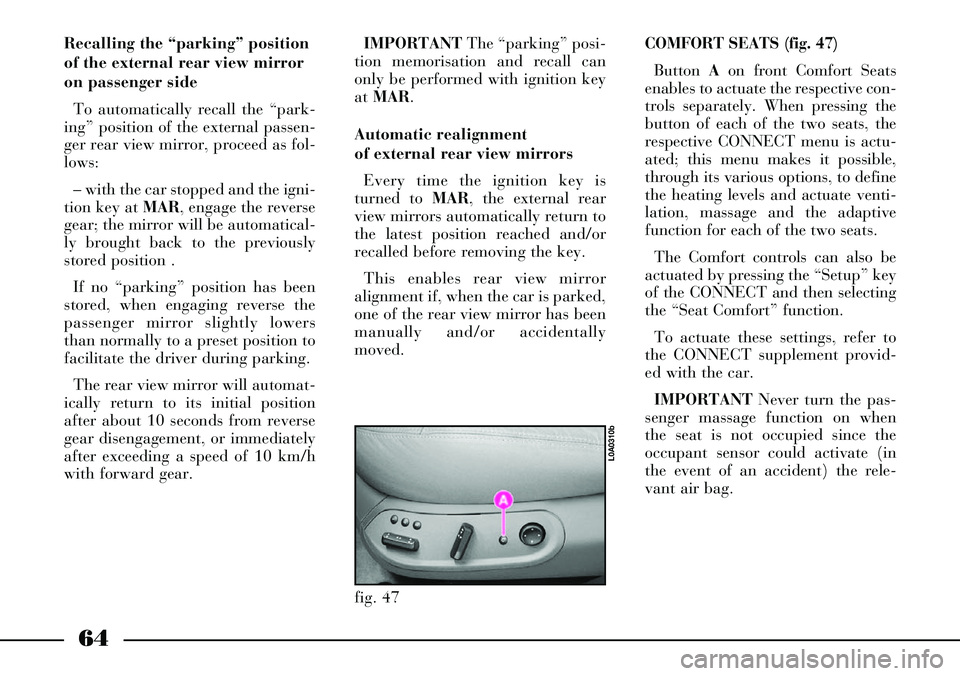
moved.COMFORT SEATS (fig. 47)
Button Aon front Comfort Seats
enables to actuate the respective con-
trols separately. When pressing the
button of each of the two seats, the
respective CONNECT menu is actu-
ated; this menu makes it possible,
through its various options, to define
the heating levels and actuate venti-
lation, massage and the adaptive
function for each of the two seats.
The Comfort controls can also be
actuated by pressing the “Setup” key
of the CONNECT and then selecting
the “Seat Comfort” function.
To actuate these settings, refer to
the CONNECT supplement provid-
ed with the car.
IMPORTANTNever turn the pas-
senger massage function on when
the seat is not occupied since the
occupant sensor could activate (in
the event of an accident) the rele-
vant air bag.
Page 68 of 386
67
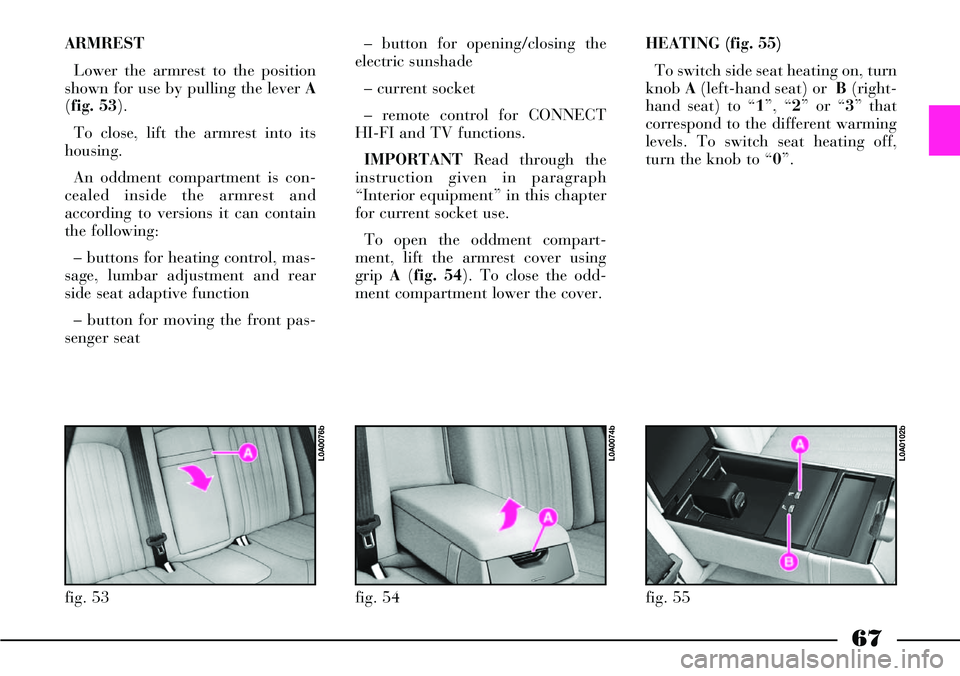
ARMREST
Lower the armrest to the position
shown for use by pulling the lever A
(fig. 53).
To close, lift the armrest into its
housing.
An oddment compartment is con-
cealed inside the armrest and
according to versions it can contain
the following:
– buttons for heating control, mas-
sage, lumbar adjustment and rear
side seat adaptive function
– button for moving the front pas-
senger seat– button for opening/closing the
electric sunshade
– current socket
– remote control for CONNECT
HI-FI and TV functions.
IMPORTANTRead through the
instruction given in paragraph
“Interior equipment” in this chapter
for current socket use.
To open the oddment compart-
ment, lift the armrest cover using
grip A(fig. 54). To close the odd-
ment compartment lower the cover. HEATING (fig. 55)
To switch side seat heating on, turn
knob A(left-hand seat) or B(right-
hand seat) to “1”, “2” or “3” that
correspond to the different warming
levels. To switch seat heating off,
turn the knob to “0”.
fig. 53
L0A0076b
fig. 54
L0A0074b
fig. 55
L0A0102b
Page 72 of 386
71
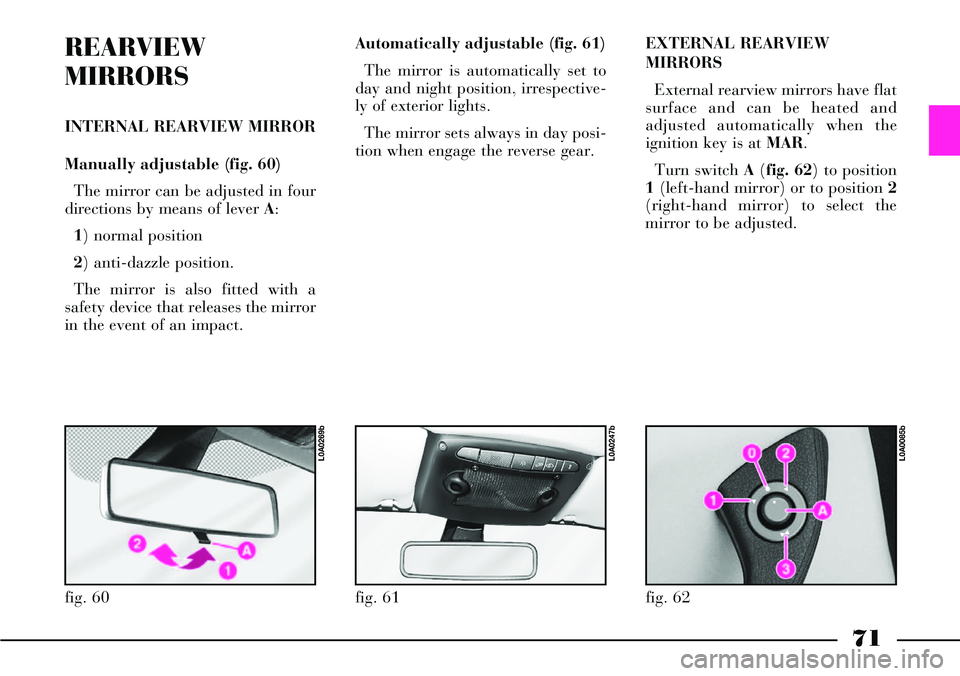
Automatically adjustable (fig. 61)
The mirror is automatically set to
day and night position, irrespective-
ly of exterior lights.
The mirror sets always in day posi-
tion when engage the reverse gear.EXTERNAL REARVIEW
MIRRORS
External rearview mirrors have flat
surface and can be heated and
adjusted automatically when the
ignition key is at MAR.
Turn switch A(fig. 62) to position
1(left-hand mirror) or to position 2
(right-hand mirror) to select the
mirror to be adjusted.
fig. 61
L0A0247b
fig. 62
L0A0085b
REARVIEW
MIRRORS
INTERNAL REARVIEW MIRROR
Manually adjustable (fig. 60)
The mirror can be adjusted in four
directions by means of lever A:
1) normal position
2) anti-dazzle position.
The mirror is also fitted with a
safety device that releases the mirror
in the event of an impact.
fig. 60
L0A0269b
Page 76 of 386
75
Pressing briefly the button the win-
dow “jerks”, whereas a prolonged
pressing makes the window opening
or closing in “automatic and continu-
ous” mode. When pressing again the
button the window stops in the
required position.
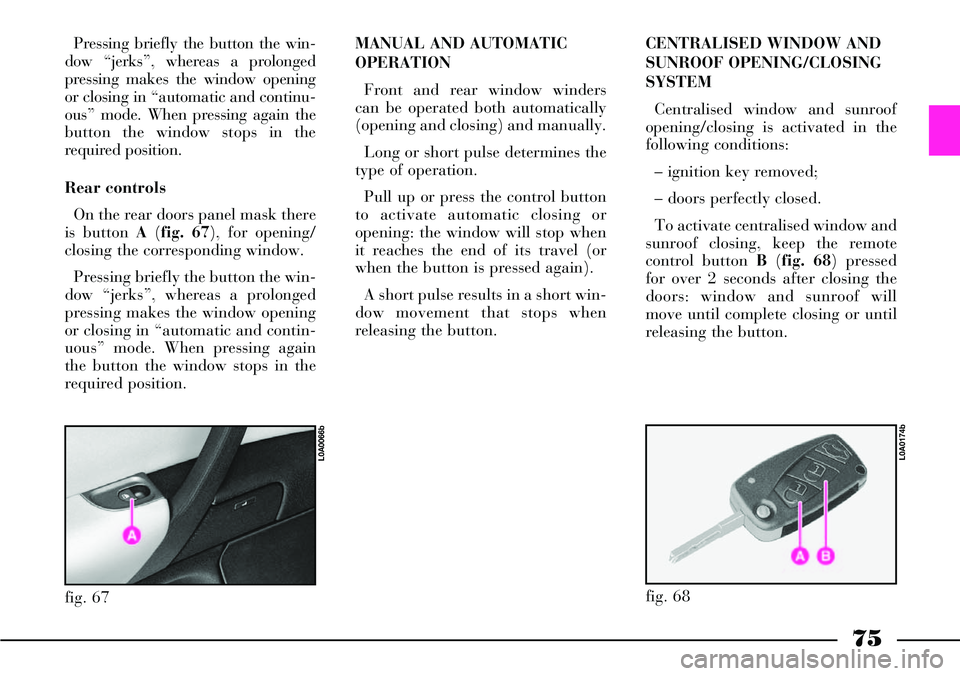
Rear controls
On the rear doors panel mask there
is button A (fig. 67), for opening/
closing the corresponding window.
Pressing briefly the button the win-
dow “jerks”, whereas a prolonged
pressing makes the window opening
or closing in “automatic and contin-
uous” mode. When pressing again
the button the window stops in the
required position.MANUAL AND AUTOMATIC
OPERATION
Front and rear window winders
can be operated both automatically
(opening and closing) and manually.
Long or short pulse determines the
type of operation.
Pull up or press the control button
to activate automatic closing or
opening: the window will stop when
it reaches the end of its travel (or
when the button is pressed again).
A short pulse results in a short win-
dow movement that stops when
releasing the button.CENTRALISED WINDOW AND
SUNROOF OPENING/CLOSING
SYSTEM
Centralised window and sunroof
opening/closing is activated in the
following conditions:
– ignition key removed;
– doors perfectly closed.
To activate centralised window and
sunroof closing, keep the remote
control button B(fig. 68) pressed
for over 2 seconds after closing the
doors: window and sunroof will
move until complete closing or until
releasing the button.
fig. 67
L0A0066b
fig. 68
L0A0174b
Page 82 of 386
81
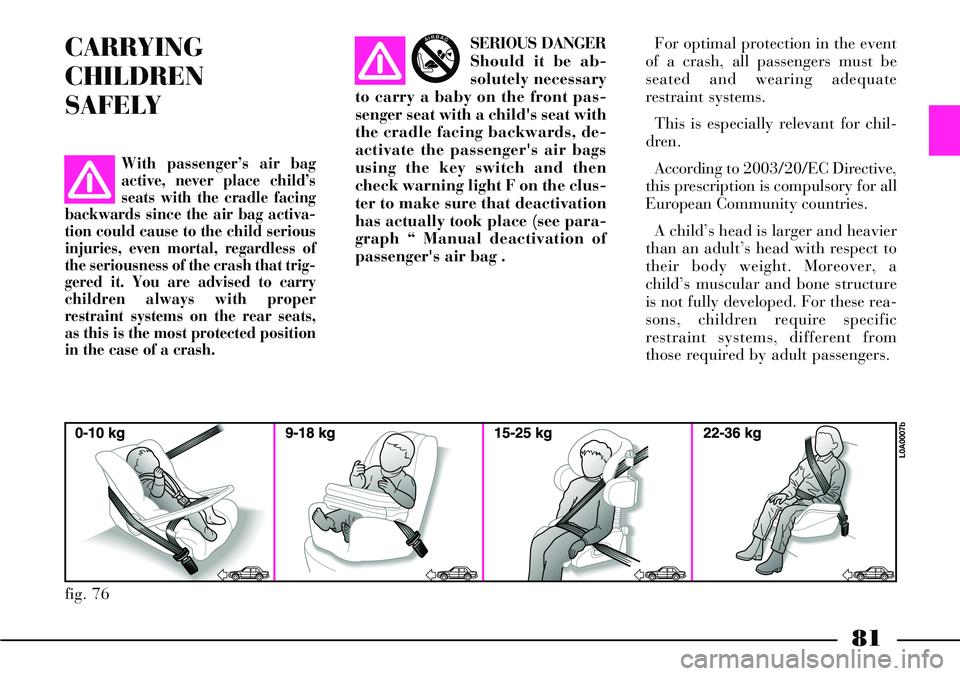
CARRYING
CHILDREN
SAFELYSERIOUS DANGER
Should it be ab-
solutely necessary
to carry a baby on the front pas-
senger seat with a child's seat with
the cradle facing backwards, de-
activate the passenger's air bags
using the key switch and then
check warning light F on the clus-
ter to make sure that deactivation
has actually took place (see para-
graph “ Manual deactivation of
passenger's air bag .For optimal protection in the event
of a crash, all passengers must be
seated and wearing adequate
restraint systems.
This is especially relevant for chil-
dren.
According to 2003/20/EC Directive,
this prescription is compulsory for all
European Community countries.
A child’s head is larger and heavier
than an adult’s head with respect to
their body weight. Moreover, a
child’s muscular and bone structure
is not fully developed. For these rea-
sons, children require specific
restraint systems, different from
those required by adult passengers.
fig. 76
L0A0007b
With passenger’s air bag
active, never place child’s
seats with the cradle facing
backwards since the air bag activa-
tion could cause to the child serious
injuries, even mortal, regardless of
the seriousness of the crash that trig-
gered it. You are advised to carry
children always with proper
restraint systems on the rear seats,
as this is the most protected position
in the case of a crash.
AIRBAG