ESP Lancia Thesis 2006 Owner handbook (in English)
[x] Cancel search | Manufacturer: LANCIA, Model Year: 2006, Model line: Thesis, Model: Lancia Thesis 2006Pages: 386, PDF Size: 8.69 MB
Page 207 of 386

206
The driver will be warned by a spe-
cial display message when the system
is deactivated because the lens is
dirty.In this case, clean the sensor protec-
tion lens, shown in fig. 150with a wet
cloth; do not use dry, rough or hard
cloths. Should the dirty lens message
stay on after cleaning, contact a Lan-
cia Dealership.
If the Radar Cruise Con-
trol went off due to exces-
sive lens dirt, when
restarting the car a few km shall
be covered before switching the
system on again in order to let the
system check if previous condi-
tions (causing Radar Cruise Con-
trol turn off) have been removed.The sensor is built into
the front bumper: impacts
can therefore damage it.
IMPORTANTFailure to one of the
safety systems connected to the Radar
Cruise Control (ABS or ESP system)
will cause Radar Cruise Control fail-
ure indication.
The Radar Cruise Control
should be switched on
only when road and traffic
conditions allow the driver to drive
safely, that is, when the road is
straight and the surface is not slip-
pery, when the car is driven on a
freeway or motorway, and when
traffic flows smoothly. Do not use
the device when driving in urban
areas or when traffic is heavy.
fig. 154
L0A0330b
Page 208 of 386

207
Do not use the Radar
Cruise Control under poor
visibility conditions (e.g.:
fog, heavy rain, snow, etc.), since
the system performance could be
badly affected.
IMPORTANTAs you approach a
bend, it may be necessary to reduce
the stored speed or switch the system
off by pressing the brake pedal.
The brake pedal is oper-
ated by the Radar Cruise
Control system: do not po-
sition your foot under the brake
pedal.IMPORTANTThe Radar Cruise
Control can only be switched on when
the car speed ranges from 30 and 160
km/h. The Radar Cruise Control is
automatically switched off when any
of the ABS, ASR, MSR and ESP sys-
tems comes into operation. Moreover,
it is switched off when engaging re-
verse gear, neutral or the electronic
parking brake (EPB).
IMPORTANTThe Radar Cruise
Control cannot be activated when the
driver has switched the ASR system
off.In the device is faulty or
does not work, turn ring A
to OFF and contact a Lan-
cia Dealership
IMPORTANTRing Acan be con-
stantly left in a position other than
OFFwithout damaging the Radar
Cruise Control. The device should
however be switched off when not in
use by turning ring Ato OFFto pre-
vent storing speeds accidentally.
Page 209 of 386

PARKING SENSOR
The parking sensor provides dis-
tance information to the driver when
the car moves near obstacles placed
in front of and behind it.
The information on the presence
and distance of obstacles is sent to
the driver by means of sound sig-
nals, the frequency of which
depends on the obstacle distance.
By integrating the direct visual
information with the sound signal
emitted by the system, the driver can
therefore avoid possible collisions.
208
The responsibility for
parking manoeuvres and
other dangerous manoeu-
vres always rests with the driver.
When performing such manoeu-
vres, always make sure that no
persons or animals stand in the
area where the car is to be
parked. The parking assist sys-
tem should be considered as an
aid to the driver; in any case,
greatest attention must be paid
when performing dangerous
manoeuvres, even at low speed.
The system front and rear sensors
are activated automatically when
engaging reverse with the ignition
key at MAR. Disengaging the
reverse gear will turn the rear sen-
sors off; front sensors will stay on
until 15 km/h speed is exceeded to
allow concluding the parking
manoeuvre.Front sensors can be switched on
by pressing button A(fig. 155)
placed on the central console in
front of the gear lever; when the
front sensors are on, warning light
Blights up on the button. To
switch the sensors off, press button
Aagain.
When the sensors are on, the sys-
tem starts sending out sound sig-
nals from the front or rear buzzers
as soon as an obstacle is detected;
the signal frequency increases as
the obstacle gets nearer. When the
obstacle is at a distance of less than
30 cm, a continuous sound is emit-
ted. Depending on the position of
the obstacle (in front or behind),
the sound will be emitted from the
corresponding buzzer (front or
rear). The sound signal will imme-
diately stop if the distance from the
obstacles increases. The tone cycle
remains the same if the distance
measured by the central sensors
does not change; however, if this
condition occurs with side sensors,
the signal will be interrupted after
about 3 seconds, to avoid, for
instance, sending out signals in
case of parking manoeuvres along
walls.
fig. 155
L0A0016b
Page 212 of 386

211
Obstacles placed in side areas are
detected at a distance of less than
0.6 m.
Rear sensors are automatically
switched on by removing the trailer
cable plug.FAULT INDICATIONS
The system control unit checks all
the system components every time
the ignition key is turned to MAR.
Then, the sensors and their respec-
tive electrical connections are con-
stantly monitored during system
operation.
Parking assist system faults are sig-
nalled by the lighting of symbol t
on the multifunction display, togeth-
er with message “PARKING SEN-
SOR FAULT”.
In case of fault signals, stop the
car, shut the engine off, then try to
clean the sensors, making sure that
you are not close to ultrasound-
emitting sources (e.g. truck air
brakes or pneumatic hammers). If
the cause of the operation anomaly
has been remedied, the system fully
resumes its functions and the fault
symbol on the multifunction display
goes out, together with its respective
warning message. Rear sensors are auto-
matically switched off
when the trailer’s electric
cable plug is inserted into the car
tow hitch socket.TOWING A TRAILER
Page 214 of 386

213
To switch the courtesy lights on
and off, press the respective buttons
B. The courtesy lights will automat-
ically go out after about 15 minutes
after shutting the engine off (by
turning the key to STOP).
The central ceiling light will switch
on automatically, together with the
rear ceiling light, when a door is
opened. The ceiling lights will go out
after about 3 minutes if one or sever-
al doors remain open or if the doors
are closed beforehand, after about 10
seconds after the last door has been
closed or at doors locking.
If a door is left open, the ceiling
lights will automatically go out
after about 3 minutes. To switch
them on again, it is enough to open
and close a door.
Ceiling lights come on (for about 10
seconds) when removing the ignition
key (knob to STOPon cars fitted
with Keyless System) and operating
the central door opening with the
remote control.
In case of collision with actuation
of the inertial switch, the ceiling
lights will automatically light up for
about 15 minutes.REAR CEILING LIGHT
(fig. 160)
This ceiling light includes a central
light and two courtesy lights.
The central light will switch on and
off gradually, together with the front
ceiling light.
To switch the central light on man-
ually, press button A; to switch it
off, press the same button again.
To switch the courtesy lights on
and off, press the respective buttons
B. The courtesy lights will automat-
ically go out after about 15 minutes
after the engine has been shut off
(by turning the key to STOP).DOOR PUDDLE LIGHTS
(fig. 161)
A light is provided in the lower part
of the door panel, to illuminate the
area through which passengers get
into and out of the car.
This light will automatically light
up when the door is opened, regard-
less of the ignition key position.
With the door open, the light stays
on for about 3 minutes, then it goes
off automatically.
fig. 160
L0A0279b
fig. 161
L0A0214b
Page 222 of 386

221
INSTALLATION OF ELECTRIC/
ELECTRONIC DEVICES
Electric/electronic devices installed
after buying the car or in aftermarket
shall bear the and marking:
Fiat Auto S.p.A. authorizes the in-
stallation of transceivers provided that
installation is carried out at a special-
ized shop, workmanlike performed
and in compliance with manufac-
turer's specifications.
IMPORTANTInstallation of devices
resulting in modifications of car char-
acteristics may cause driving license
seizing by traffic agents and also the
lapse of the warranty as concerns de-
fects due to the abovementioned mod-
ification or traceable back to it di-
rectly or indirectly.
Fiat Auto S.p.A. declines all respon-
sibility for damages caused by the in-
stallation of non-genuine accessories
or not recommended by Fiat Auto
S.p.A. and installed not in compliance
with the specified requirements. ACCESSORIES PURCHASED BY
THE USER
If after buying the car, you decide
to install electrical accessories that
require a permanent power supply
(e.g. satellite antitheft device), or
any other accessory that burden the
electric supply, contact your Lancia
Dealershipwhose qualified person-
nel, besides suggesting the most suit-
able devices belonging to the
Lineaccessori Lancia, will also eval-
uate the total electrical absorption,
checking whether the car’s electric
system is able to withstand the
required load or whether it must be
integrated with a more powerful
battery.
fig. 182
L0A0147b
fig. 183
L0A0222b
Before actuating the
sunshade, make sure that
no object is placed on the
rear parcel shelf.
MAP POCKETS (fig. 182)
(where provided)
Paper pockets are located on the
back of the front seats.
HANDLES (fig. 183)
They are placed just next to the
doors.
Each rear handle includes a clothes
hook A.
Page 225 of 386

224
After battery disconnec-
tion or fuse interruption,
the anti-trap system must
be initialized again as follows:
1) turn selector A clockwise and
fully to its stop, to position 3 cor-
responding to maximum pivoting
(fig. 184)
2) keep selector A depressed
until the sunroof jolts along to the
maximum pivoting position
3) release the selector after the
sunroof has stopped for at least 2
seconds
4) press, within 5 seconds, the
selector again and keep it
depressed
5) the sunroof will start moving
within 5 further seconds and will
perform a complete opening and
closing cycle, after which it will
stop in the closed position
6) release the selector after the
sunroof has stopped for at least 2
seconds.The system is thus initialized
and resumes its normal opera-
tion. If this does not occur, con-
tact your Lancia Dealership.
If the operation is interrupted
before it is completed, repeat the
procedure from the start.Regularly check that the
water draining holes A
(fig. 187 set at the corners
of the sunroof housing, are not
obstructed.
fig. 187
L0A0283b
Page 227 of 386

226
SOLAR CELLS
The upper part of the sunroof
incorporates 21 solar cells that pro-
duce a maximum power of 24 W to
feed the climate control system fan,
when the car is parked with the sun-
roof closed or in pivoting position.
Fan actuation is automatic and air
distribution corresponds to the latest
setting made before switching the
car off.
This function is useful especially on
summer days, since it greatly
reduces the temperature inside the
passenger compartment as well as
the duration of the cooling cycle
after car start-up, thus avoiding the
accumulation of warm air in the air-
conditioning unit lines.
In winter, the ventilation function
reduces dampness inside the passen-
ger compartment.EMERGENCY MANOEUVRE
In case the electric actuation device
fails to operate, the sunroof can be
actuated manually, proceeding as
follows:
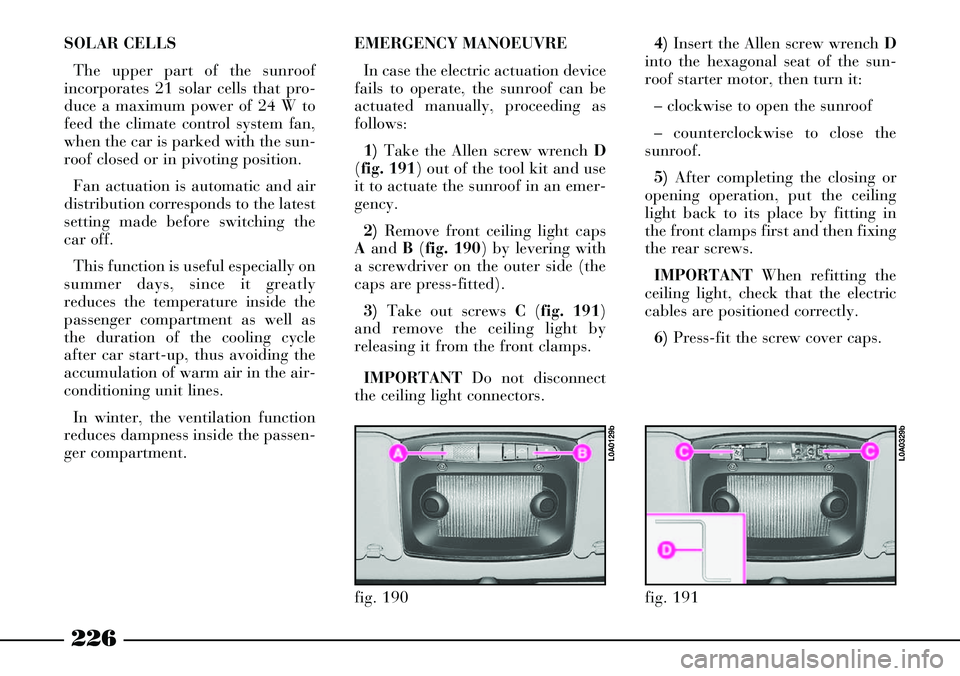
1)Take the Allen screw wrench D
(fig. 191) out of the tool kit and use
it to actuate the sunroof in an emer-
gency.
2)Remove front ceiling light caps
Aand B(fig. 190) by levering with
a screwdriver on the outer side (the
caps are press-fitted).
3)Take out screws C(fig. 191)
and remove the ceiling light by
releasing it from the front clamps.
IMPORTANTDo not disconnect
the ceiling light connectors.4)Insert the Allen screw wrench D
into the hexagonal seat of the sun-
roof starter motor, then turn it:
– clockwise to open the sunroof
– counterclockwise to close the
sunroof.
5)After completing the closing or
opening operation, put the ceiling
light back to its place by fitting in
the front clamps first and then fixing
the rear screws.
IMPORTANTWhen refitting the
ceiling light, check that the electric
cables are positioned correctly.
6)Press-fit the screw cover caps.
fig. 190
L0A0129b
fig. 191
L0A0329b
Page 252 of 386

251
HOW TO START PETROL
VERSIONS
IMPORTANTNever press the
accelerator before the engine has
started.
1) Ensure that the electric parking
brake is on (instrument panel warn-
ing light xon).
2) Ensure that electrical systems
and devices, especially high absorp-
tion ones (e.g. heated rear window),
are off.
3) On versions with manual gear-
box, set the gear lever to neutral and
press the clutch pedal fully down to
avoid the starter dragging the gears.4) On versions with electronic
automatic gearbox, ensure that the
selector is at Pand keep the brake
pedal pressed.
5) Turn the ignition key to AVV
and release it as soon as the engine
starts.
6) If the engine fails to start, return
the key to STOPand repeat the pro-
cedure.
IMPORTANTIf the engine does
not start at the first attempt, do not
keep turning the ignition key to
avoid damaging the catalyst.
Contact a Lancia Dealership.HOW TO START JTD VERSIONS
1) Ensure that the electric parking
brake is on (instrument panel warn-
ing light xon).
2) Put the gear lever to neutral.
3) Turn the ignition key to MAR.
4) Wait until the mwarning light
is off: the hotter the engine is, the
quicker this will happen.
When the engine is particularly hot
the warning light may come on so
quickly that it is impossible to notice
it.
5)Press the clutch pedal down to
the floor.
6) Turn the ignition key to AVV
immediately after the mwarning
light goes out. If you wait too long,
you will lose the benefit of the work
done by the glow plugs.
Page 258 of 386

257
– Keep a greater safety distance
from the cars in front of you than
during daylight hours: it is hard to
judge how fast other cars are going
when all you can see are their lights.
– Only use main beam headlights
when you are driving outside town
and when you are sure they do not
annoy other drivers.
– Dip your headlights as soon as
you see cars coming in the other
direction and pass them with the
headlights dipped.
– Keep all lights clean.
– Be careful of animals crossing the
road when driving in the country.
DRIVING IN THE RAIN
Rain and wet road surfaces spell
danger.
All manoeuvres are more difficult
on a wet road because the grip of the
wheels on the tarmac is greatly
reduced. This is why braking dis-
tances are much longer and road-
holding is lower.Here is some advice for driving in
the rain:
– Reduce speed and maintain a
greater safety distance from the cars
in front.
– If it is raining particularly heavi-
ly, visibility is also reduced. In these
cases, switch on the dipped head-
lights even if it is still daylight so you
can be seen more easily.
– Do not drive through puddles at
speed and hold on tightly to the
wheel if you do: a puddle taken at
high speed might cause you to lose
control of the car (“aquaplaning”).
– Move the ventilation controls to
the position for demisting the win-
dows (see the section “Getting to
know your car”), so to avoid visibil-
ity problems.
– Periodically check the condition
of the windscreen wiper blades. – Do not drive too many hours at a
time but stop at intervals to stretch
your legs and recoup your energy.
– Make sure the air in the car is
being changed continuously.
– Never coast downhill (i.e.: with
the engine off): if you do, you lose
the aid of engine braking and power
brakes so that braking requires
greater effort.
DRIVING AT NIGHT
There are the main rules to follow
when you are driving at night.
– Drive especially carefully: it is
harder to drive at night.
– Slow down especially if the road
is not lit.
– At the first signs of sleepiness,
stop: continuing would be a risk for
yourself and everybody else. Only
start driving again when you have
had enough rest.