reset Lancia Thesis 2006 Owner handbook (in English)
[x] Cancel search | Manufacturer: LANCIA, Model Year: 2006, Model line: Thesis, Model: Lancia Thesis 2006Pages: 386, PDF Size: 8.69 MB
Page 116 of 386

INSTRUMENT
PANEL WARNING
LIGHTS AND
MESSAGES
On the instrument panel are set the
main warning lights. Certain warn-
ing lights with the relevant warning
messages are present also on the
instrument panel multifunction dis-
play.
Many indications/info are displayed
with a symbol only on the multifunc-
tion display with the corresponding
warnings for the driver.
IMPORTANTIndications may
vary according to the car version.GENERAL NOTES
Failure indications shown on the
multifunction display together with
buzzer sounding and warning light
(if any), are accompanied by spe-
cific warning messages(e.g. “GO
TO DEALER”, “SWITCH OFF
ENGINE”, etc.). These indications
are conciseand cautionaryand are
aimed to suggest the prompt action
the driver must adopt when a car
malfunctioning appears. These indi-
cations, however, shall not be con-
sidered as exhaustive and/or as an
alternative to the specifications con-
tained in this Owner Handbook,
which shall always be read through
carefully and thoroughly. In case of
failure indication always refer to
the specifications contained in
this chapter.Failure indications displayed on
the multifunction display are divid-
ed into two categories: very serious
failures and serious failures. The
message and the warning indication
corresponding to very serious fail-
ures are displayed alternately for
few seconds. This “cycle” is repeat-
ed indefinitely and it stops any pre-
vious indication on the display. It is
displayed every time the ignition key
is turned to MAR, until the cause of
malfunctioning is removed. To stop
this “cycle”, briefly press (less than
two seconds) the trip meter reset
button. In this case the failure sym-
bol stays on the display in the cen-
tral area until the cause of malfunc-
tioning is removed.
115
Page 117 of 386

116
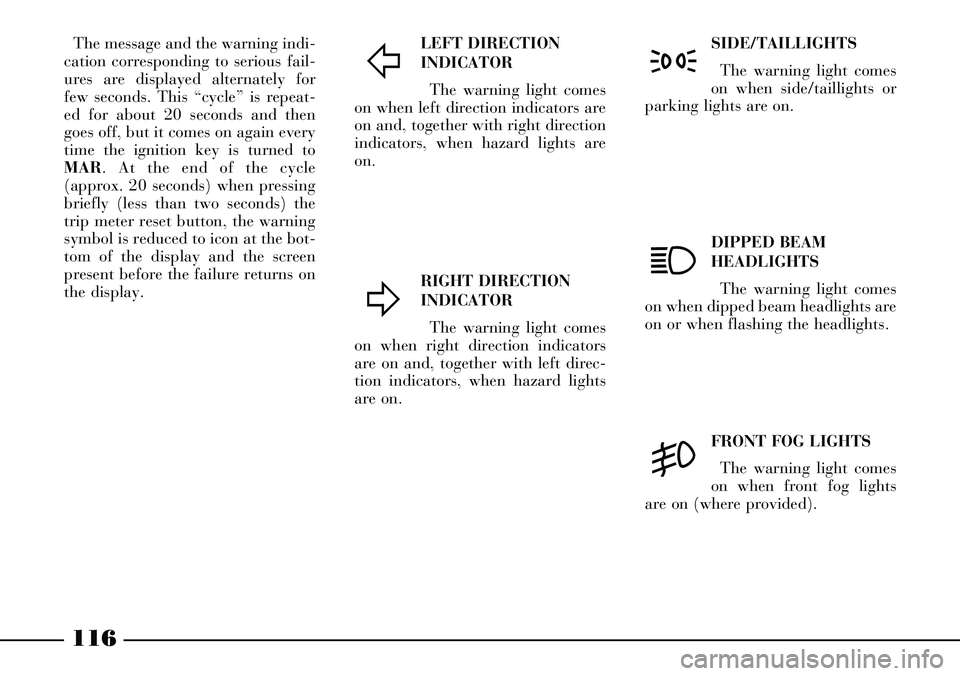
LEFT DIRECTION
INDICATOR
The warning light comes
on when left direction indicators are
on and, together with right direction
indicators, when hazard lights are
on.
RIGHT DIRECTION
INDICATOR
The warning light comes
on when right direction indicators
are on and, together with left direc-
tion indicators, when hazard lights
are on.SIDE/TAILLIGHTS
The warning light comes
on when side/taillights or
parking lights are on.
DIPPED BEAM
HEADLIGHTS
The warning light comes
on when dipped beam headlights are
on or when flashing the headlights.
FRONT FOG LIGHTS
The warning light comes
on when front fog lights
are on (where provided).
Ÿ
∆
3
1
5
The message and the warning indi-
cation corresponding to serious fail-
ures are displayed alternately for
few seconds. This “cycle” is repeat-
ed for about 20 seconds and then
goes off, but it comes on again every
time the ignition key is turned to
MAR. At the end of the cycle
(approx. 20 seconds) when pressing
briefly (less than two seconds) the
trip meter reset button, the warning
symbol is reduced to icon at the bot-
tom of the display and the screen
present before the failure returns on
the display.
Page 127 of 386

126
Glow plugs (JTD versions)
Warning light/symbol
m
èm
Message
–
PLUG PREHEATING
FAULT
GO TO DEALERMeaning of the message
Symbol is displayed
when glow plugs
are working. Symbol goes off
when glow plugs reach
the preset temperature.
When outside temperature is high
symbol displaying can be unper-
ceivable
Plug preheating system
faultRemarks / Action
Start engine
as soon as symbol
goes off
Contact a Lancia
Dealership
Fuel level
Warning light/symbol
K
Message
REFUEL Meaning of the message
Low fuel in the tank.
This message is displayed
when about 10 litres
fuel are left in the tank Remarks
Top up fuel
as soon as possible
IMPORTANTDo not travel with
the fuel tank almost empty: the
gaps in fuel delivery could damage
the catalyst
Page 148 of 386

147
IMPORTANTDuring air distribu-
tion automatic management, all the
air distribution button leds are off.
User can select manually any distri-
bution, and only in this case, the
concerned button led will be lit.
The manual settings have priority
over the automatic settings until the
user returns the system to automatic
control.
Manual setting of a function does
not compromise automatic control
of the other functions.
The amount of air let into the pas-
senger compartment does not
depend on the car speed. It is in fact
adjusted by an electronically con-
trolled fan.
The temperature of the air let into
the passenger compartment is
always controlled automatically
(unless the system is off), according
to the temperatures set on the dri-
ver’s and front/rear passenger’s dis-
plays.The following parameters and
functions can be adjusted manually:
– air temperature on driver/pas-
senger side (front/rear);
– fan speed (continuous variation);
– air distribution in seven positions
(driver/passengers);
– diffused air distribution;
– compressor activation;
– priority of one-zone/two-zone
distribution (front/back);
– rapid defrosting/demisting func-
tion;
– air recirculation;
– automatic/manual system con-
trol;
– heated rear window;
– system off;
– activation of back control panel.
The defrosting/demisting function
includes a set of operations enabling
to defrost/demist rapidly both the
windscreen and the heated rear win-
dow.At each turning off, the system
after storing control and function
conditions, sets up the open recircu-
lation, thus creating the necessary
conditions for operation at first
speed of climate control system fan
at parking, fed by solar cell operated
sunroof (where provided).
IMPORTANTBest operation of
climate control system fan at park-
ing, fed by solar cell operated sun-
roof (where provided), is obtained
by closing completely the windows
and sunroof. Furthermore, to check
operation at first speed of climate
control system fan when the car is
parked, disengage air vents and set
air distribution from central dash-
board vents only before leaving the
car.
When turning on, the system
restores the conditions memorized
before turning off, except for the
rapid defrosting/demisting function
which is reset.
Page 153 of 386

152
CONTROLS
Knobs for adjusting air tempera-
ture (2, 8 fig. 121 - 1 fig. 122)
Turn the knobs towards the right
or towards the left to raise or lower
the air temperature required respec-
tively in the front left-hand area
(knob 2 fig. 121) and in the front
right-hand area (knob 8 fig. 121) or
back area (knob 1 fig. 122) of the
passenger compartment.
Since the system controls three
areas of the passenger compartment,
the driver and the front/back-seat
passengers can select different tem-
perature values with a maximum
difference accepted by the system of
7 °
C.
Temperature control in the front
passenger area and in the back pas-
senger area is alternated; when the
button led REARis off, control of
front passenger side is on, but when
button REARis pressed (button led
on) the back control panel is activat-
ed. The set temperatures are shown on
the displays set near the respective
knobs.
Press button 16(MONO - fig. 121)
to automatically align the
(front/back) passenger temperature
to the temperature on driver’s side.
Consequently the temperature in the
two areas can be set simply by turn-
ing the knob on the driver side 2
(fig. 121). This function is provided
to facilitate adjusting the temperature
in the passenger compartment when
only the driver is present. The sepa-
rate operation of the set temperatures
and air distribution is automatically
reset when knobs 8 (fig. 121) or 1
(fig. 122) are turned or button 16
(MONO - fig. 121) is pressed again,
when the button led is turned on.
Turn the knobs fully to the right or
to the left to the end positions HIor
LO, to obtain maximum heating or
cooling, respectively:– HIfunction (maximum heating):
this is switched on by turning the
temperature knob to the right
beyond the maximum value (32 °C).
It can be independently switched on
from driver’s side or from
(front/back) passenger’s side or
from both sides (also by selecting the
MONOfunction).
This function can be switched on to
speed up heating in the passenger
compartment by exploiting the sys-
tem potential to the maximum. The
function employs the maximum
coolant temperature while the air
distribution and fan speed are set by
the system according to environ-
mental conditions. In particular, if
the coolant temperature is not suffi-
cient, the function does not switch
the fan on at top speed to limit let-
ting into air which is not adequately
warm.
All the manually settings can be
adjusted when the function is on.
Page 159 of 386

158
IMPORTANTAir at a temperature
lower than that of the outside air
cannot be let in to the passenger
compartment when the compressor
is off. Furthermore, in particular
environmental conditions, the win-
dows could mist up fast because the
air is no longer dehumidified.
The setting will be stored when the
engine is stopped. Either press √
button again or press the AUTObut-
ton to reset automatic control of the
compressor (in the latter case, the
manual settings will be cancelled).
The led on the √button will go out. IMPORTANTThe air recircula-
tion function will allow, according to
the system operation (i.e. heating or
cooling) to reach the required condi-
tions faster. We recommend not
turning on this function on rainy
and/or cold days as this will consid-
erably increase window misting,
especially if the climate control sys-
tem is off.
In particular climate
conditions (e.g. low out-
side temperature or high
humidity) and with the inside air
recirculation automatic control
on, windows could start misting
up. In this case, press the air
recirculation button and set it to
forced open position (both button
leds off), and increase air flow to
the windscreen, if required.Climate control system
compressor off button (7 fig. 121)
Press the √button, when the but-
ton led is on, to switch the air condi-
tioner compressor off. The led will
go off. By pressing again the button
when the led is off, the system auto-
matic control of the compressor acti-
vation is restored; this situation is
indicated by button led lighting up.
When the air conditioner compres-
sor is off, if the system is no longer
able to keep the requested tempera-
ture, the message FULL AUTOon
the display turns off and the system
deactivates air recirculation to pre-
vent window misting up. Instead, if
the system is still able to maintain
the requested temperature, the mes-
sage FULLon the display will stay
on.
Page 160 of 386

159
The air let into the passenger com-
partment cannot be cooled when the
compressor is off. Consequently:
– if the outside temperature is
lower than the set temperature, the
system works normally and can
reach and maintain the set tempera-
ture also when the compressor is off;
– if the outside temperature is
higher than the set temperature, the
system cannot reach the required
temperature. This will be signalled
by flashing the external temperature
value on the display.
When the compressor is off, it is
possible to reset manually the fan
speed; on the contrary, when the
compressor is on and the engine is
running, manual ventilation cannot
be lower than the bar indicated on
the display. Button for fast windscreen
demisting/defrosting (15 fig. 121)
Press this button: the climate con-
trol system will automatically switch
on all the functions required for fast
windscreen and side window demist-
ing/defrosting, that is:
– climate control system compres-
sor on;
– air recirculation off (if on);
– maximum air temperature (HI)
on both displays;
– fan speed according to engine
coolant temperature in order to limit
letting cold air into the passenger
compartment for demisting the win-
dows;
– air flow directed to the wind-
screen and front side window vents;
– heated rear window, external
rearview mirror and windscreen noz-
zle resistances on.The fast windscreen demisting/
defrosting function stays on for
approx. 3 minutes after the engine
coolant temperature exceeds 50 °C
(petrol versions) or 35 °C (diesel
versions).
When the fast demisting/defrosting
function is on, the led on the related
button and that on the heated rear
window button are lighted, while
both leds on the air recirculation
button and that on button √turn
off. Message FULL AUTOon the
display will turn off.
Only the fan speed can be adjusted
and the heated rear window can be
switched off when the fast demist-
ing/defrosting function is on.
Press the fast demisting/defrosting
button again or air recirculation
button or compressor off button to
switch the fast demisting/defrosting
function off and reset the previous
system operation conditions as well
as the last set function.
Page 169 of 386

168
- the led comes on for about 2 sec-
onds = the signal has been received
correctly and the heater has been de-
activated
- the led flashes for about 2 seconds
= the signal has not been received.
In the latter case you are advised to
move before trying to deactivate it by
pressing again the OFFbutton.Checking and replacing the
batteries
To check the battery charge, press
ONor OFF: if after about 5 seconds
led Bcomes on with orange colour it
means that the batteries are nearly
down and that they shall be replaced.
The batteries must be replaced with
new ones of the same type, available
at the usual sellers.
Replacing the batteries
Keep the ONand OFFbuttons
pressed for about 10 seconds, until led
Bturns off, to reset the 30 minutes
standard operation length.
Switching the heater off
To turn the heater off, press the re-
mote control button OFFfor 1 or 2
seconds, while keeping the antenna in
vertical position; the positive or un-
successful deactivation is indicate by
the remote control red led Bin the fol-
lowing way:Used batteries pollute the
environment. Dispose of
them in the special con-
tainers as specified by current leg-
islation. Keep batteries away from
open flames and high tempera-
tures. Keep away from children.
Number of flashes of led B
1
2
3
4
5
6Heater activation length
10 minutes
20 minutes
30 minutes
40 minutes
50 minutes
60 minutes
Page 174 of 386

173
If, after an accident, you
can smell petrol or see
that the fuel feed system is
leaking, do not reset the switches
to avoid the risk of fire.Mechanical connections
of outside handles are
active only if the doors
are locked. In case the driver has
activated the central door locking
from the inside and, after an
accident, the inertial switch was
not able to activate the automatic
door unlocking as a result of bat-
tery loss or damage, it will not be
possible to reach the passenger
compartment from the outside.Anyway, door opening
from the outside depends
on their conditions after
the accident: if a door is distorted
it might be impossible to open it
even if it is unlocked. In this case
try to open the other car doors.
Before resetting the fuel
cut-off switch, carefully
check for any fuel leaks or
damages to the car electric devices
(e.g.: headlights).
fig. 129
L0A0273b
If, after an accident, you cannot see
any fuel leaks or damages to the car
electric devices (e.g.: headlights) and
the car is in a fit state to continue its
journey, reset the fuel cut-off switch
and the circuit breaker according to
the following instructions.
Door unlocking in case of
accident
In case of accident with activation of
the inertial switch as a consequence,
door locks are automatically unlocked
to let rescuers reach the passenger
compartment from the outside.Resetting the fuel cut-off switch
(fig. 129)
fig. 130
L0A0030b
Page 175 of 386

174
Lift cover Aset at the driver's left
and press button Bto reset the fuel
cut-off switch.
Resetting the circuit breaker
Before resetting the cir-
cuit breaker, carefully
check for any fuel leaks or
damages to the car electric devices
(e.g.: headlights).Circuit breaker is located on the left
side of the boot, inside a box directly
set and connected to the battery pos-
itive terminal.
To reach the circuit breaker:
1) Open the tailgate.
2) Loosen knob A(fig. 130) and re-
move the battery cover B.
3) Press tabs A(fig. 131) and re-
move cover B.
4) Press button A(fig. 132) to reset
the circuit breaker.Initialising the control units of
the door locks, air conditioner
and ESP system
After resetting the circuit breaker, to
restore correct door locking, air con-
ditioning and ESP system, perform
the following operations:
1) Close the doors and the tailgate,
fit the key into the lock of one of the
front doors and perform a door cen-
tralised opening/closing cycle.
2) Start the engine and turn on the
compressor of the conditioner, setting
a lower temperature value than that
of the environment and check
whether the led on the disconnection
push button of the conditioner com-
pressor òis lit.
3) Turn the steering wheel one
fourth turn at least (the car can be at
standstill but the engine shall be run-
ning) and start running the car for a
few metres in a straight line until the
ESP warning light
áis off.
fig. 131
L0A0031b
fig. 132
L0A0347b