warning light Lancia Thesis 2006 Owner handbook (in English)
[x] Cancel search | Manufacturer: LANCIA, Model Year: 2006, Model line: Thesis, Model: Lancia Thesis 2006Pages: 386, PDF Size: 8.69 MB
Page 264 of 386

263
Ignoring the above rules
may lead to fire. When functioning nor-
mally, the catalytic con-
verter reaches high tem-
peratures. For this reason, do not
park the car over inflammable
material (grass, dry leaves, pine
needles, etc.): fire hazard.
Do not allow anything to
be sprayed onto the cat-
alytic converter, lambda
sensor and exhaust pipe. Do not install other heat
shields and do not remove
those already fitted to the
catalytic converter and exhaust
pipe. Never run the engine with the
spark plugs disconnected even for
testing purposes. Do not warm up
the engine by letting it idle for a
while before moving off unless the
outside temperature is very low and,
even in this case, only do so for less
than 30 seconds.
If you have trouble starting, do not
keep turning the ignition key for
long periods. Be especially careful to
avoid bump starting the car by
pushing, towing or rolling downhill:
these are all manoeuvres that can
damage the catalytic exhaust sys-
tem. Use an auxiliary battery for
start-ups only.
If the engine begins to “lose its
smoothness” when travelling, con-
tinue your journey but reduce the
demands you are making on the
engine and have the car seen at a
Lancia Dealershipas soon as you
can.
When the instrument panel fuel
reserve warning light comes on, fill
up as soon as possible. A low level of
fuel can cause an uneven supply of
fuel to the engine with the inevitable
increase in the temperature of the
exhaust gas and serious damages to
the catalytic converter.
Page 272 of 386

271
EMERGENCY
START-UP
If the Lancia CODE system cannot
deactivate the engine immobilising
system, symbols Yand Uwill
remain lit on the multifunction dis-
play together with messages
“ELECTRONIC KEY NOT
RECOGNISED” and “ENGINE
CONTROL SYSTEM FAULT”, and
the engine will not start. Follow the
emergency start-up procedure to
start the engine.
Read the whole procedure care-
fully before trying to carry it out.
If you make a mistake in the emer-
gency procedure you must turn the
ignition key back to STOP and
repeat the whole operation from the
beginning (step 1).
1) Read the five-digit electronic
code on the CODE card.
2) Turn the ignition key to MAR.3) Press and hold down the accel-
erator pedal. The warning light U
on the instrument panel will light up
for about 8 seconds, and then go
out. At this point release the acceler-
ator pedal and get ready to count the
flashes of the warning light U.
4) Count the number of flashes
that corresponds to the first figure of
the code on the CODE card, then
press the accelerator pedal and keep
it down until the Uwarning light
comes on for four seconds and then
goes out. Release the accelerator
pedal.
5) The Uwarning light will start
flashing again: after it has flashed
the number of times that corre-
sponds to the second figure on the
CODE card, press the accelerator
pedal to the floor and keep it there.
6) Do the same for the remaining
digits on the CODE card.7) Once the final figure has been
entered, keep the accelerator pedal
pressed. The Uwarning light will
light up for 4 seconds and then go
out. Release the accelerator pedal.
8) The Uwarning light will flash
rapidly for about 4 seconds to indi-
cate that the operation has been
completed correctly.
9) Start the engine by turning the
ignition key from MARto AVV
(without turning it to STOP).
If, however, warning light Ustays
on, turn the ignition key to STOP
and repeat the procedure from step
1).
IMPORTANTAfter an emergency
start, you should contact a Lancia
Dealershipimmediately as you will
have to repeat the procedure
described each time you want to
start the engine.
IN AN EMERGENCY
Page 304 of 386

303
DISCONNECTING THE
UNLOADED BATTERY
Should the discharged battery be
disconnected (to have it charged
again or to replace it) perform the fol-
lowing operations in the given order:
1) To open the boot from the out-
side, fully turn the key anticlockwise
in the lock (fig. 81), and at the same
time slightly press the lower edge of
the number plate holder to reduce op-
eration effort.
2) Remove the cover and disconnect
the battery terminals.
3) Fully charge the battery again or
replace it.4) Connect battery terminals and re-
assemble cover.
5) Depress push button A(fig. 81)
to restore normal lock operation.
6) Close boot normally without
slamming it down: lock electric servo
control will fully lock it.
7) Perform the initialisation proce-
dure of the door lock, air conditioner
and ESP system control units, here-
after described.INITIALISING THE CONTROL
UNITS OF THE DOOR LOCKS,
AIR CONDITIONER AND ESP
SYSTEM
Whenever the battery is connected
electrically or protection fuses are re-
placed, to restore correct door locking,
air conditioning and ESP system, per-
form the following operations (after
connection is performed or after re-
placing one of the fuses):
1) Enter key into the lock of one of
the front doors and perform a door
centralised opening/closing cycle.
2) Start the engine and turn on the
compressor of the conditioner, setting
a lower temperature value than that
of the environment and check
whether the led on the disconnection
push button of the conditioner com-
pressor òis lit.
3) Start running the car and drive it
for a few meters in a straight line (ac-
celerating), until the ESP warning
light is off
á. It is not possible to close
the boot when battery is
discharged or discon-
nected for the purpose of being re-
placed/ charged again: do not try
to close the boot by slamming it
down. The boot remains anyhow
hooked on and it must be re-
opened by turning the key in the
lock.
Page 314 of 386

313
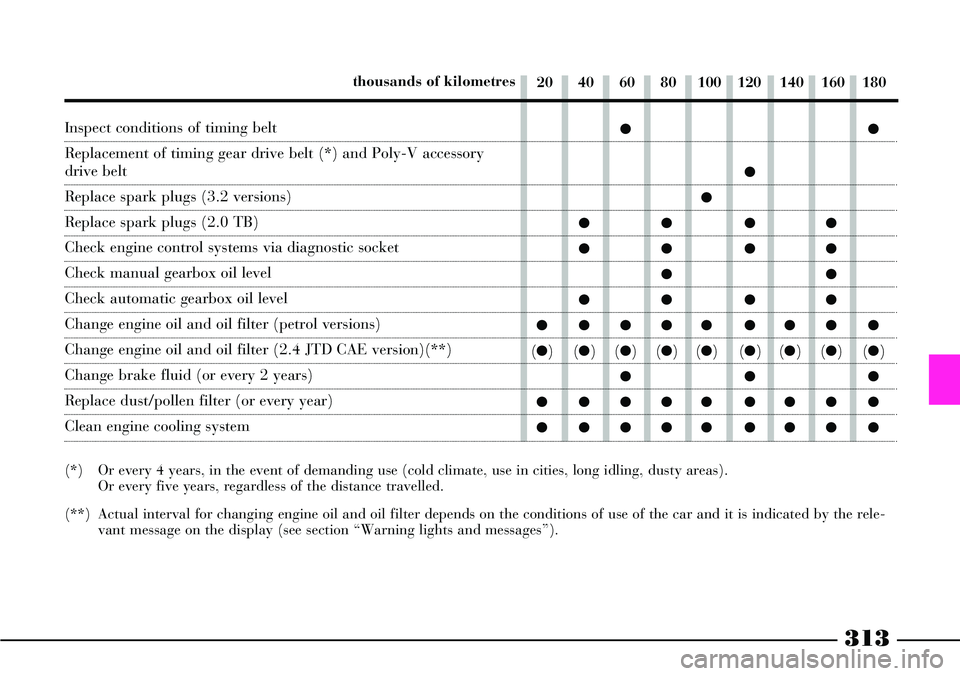
Inspect conditions of timing belt
Replacement of timing gear drive belt (*) and Poly-V accessory
drive belt
Replace spark plugs (3.2 versions)
Replace spark plugs (2.0 TB)
Check engine control systems via diagnostic socket
Check manual gearbox oil level
Check automatic gearbox oil level
Change engine oil and oil filter (petrol versions)
Change engine oil and oil filter (2.4 JTD CAE version)(**)
Change brake fluid (or every 2 years)
Replace dust/pollen filter (or every year)
Clean engine cooling system
(*) Or every 4 years, in the event of demanding use (cold climate, use in cities, long idling, dusty areas).
Or every five years, regardless of the distance travelled.
(**) Actual interval for changing engine oil and oil filter depends on the conditions of use of the car and it is indicated by the rele-
vant message on the display (see section “Warning lights and messages”).20 40 60 80 100 120 140 160 180 thousands of kilometres
çç
ç
ç
çç çç
çç çç
çç
çç çç
ççççç çççç
(ç)(ç)(ç)(ç)(ç)(ç)(ç)(ç)(ç)
ççç
ççççç çççç
ççççç çççç
Page 326 of 386

325
AIR CLEANER
The air cleaner is connected to the
air temperature and intake sensors
which send the electrical signals
required for the correct operation of
the injection and ignition system to
the control unit.
Consequently, the cleaner must
always be in perfect conditions to
ensure correct operation of the
engine and in order to contain con-
sumption and exhaust emissions.Replace the air cleaner
more frequently than
shown in the Service
Schedule if the car is used on
dusty roads.
The cleaner can be dam-
aged if it is cleaned and
consequently the engine
can be damaged.
DIESEL FILTER
(JTD versions)
DRAINING THE
CONDENSE
The presence of water in
the fuel feed circuit can
severely damage the
injection system and make the
engine misfire. Go to a Lancia
Dealership as soon as possible
when the cwarning light comes
on together with message
“WATER IN DIESEL FILTER” on
the multifunction display to have
the bleeding operation carried
out.
The air cleaner replace-
ment procedure is pro-
vided for indicative pur-
poses only. Have the operation
carried out at a Lancia
Dealership. Car safety can be
compromised if the cleaner
replacement procedure herein
described is not carried out cor-
rectly.
Page 377 of 386

376
Lambda sensors ................... 6
Lancia CODE (system) .......... 26
- CODE Card ...................... 28
Levels (check) ........................ 317
- brake and hydraulic
clutch fluid ....................... 323
- engine coolant.................... 321
- engine oil .......................... 320
- power steering fluid .......... 322
- windscreen/rear window
and headlight washer
fluid ................................... 324
Light switch and
steering column stalks ......... 97
Load limiting devices ............. 79
Lubricants .............................. 364
Luggage net (boot) ................. 231
Main beam headlights
- control .............................. 100
- to flash the lights .............. 100Manual gearbox ..................... 179
- technical specifications ...... 348
Model plate ............................ 341
MSR system ........................... 192
Multifunction display ............. 110
Number plate lights
- bulb replacement .............. 287
Oddment compartment ........ 216
Oddment compartment
on the dashboard ................. 218
Outside mirror lights
- bulb replacement .............. 291
Paper pockets ....................... 221
Parking ................................... 254
Parking lights ......................... 97
Parking sensor ....................... 208
- failure indication .............. 211
- general warnings................ 212
- sensors .............................. 209- towing a trailer .................. 211
Performance ........................... 358
Power socket
- in the boot ........................ 234
- in the rear armrest ............. 220
Power steering fluid ............... 322
Pretensioners (seat belts) ........ 78
Radar Cruise Control ............ 197
- controls ............................. 198
- failure indication .............. 207
- general .............................. 197
Rain sensor ............................ 102
Rear armrest compartment...... 219
Rear ceiling light .................... 213
- bulb replacement .............. 288
Rear door safety lock ............. 58
Rear fog lights
- bulb replacement .............. 286
- control .............................. 171
Rear seats ............................... 66
- armrests ............................. 67
Page 380 of 386

379
- maintenance ....................... 331
- pressure (important) .......... 331
- winter tyres ........................ 267
Useful accessories ................... 270
Volumetric protection ............ 41
Warning lights and messages. 115
Weights .................................... 360
Wheel geometry ........................ 358
Wheels
- changing a wheel ............... 275
- important ........................... 332
- inflation pressure ................ 354
- pressure (important) .......... 331
- technical specifications ....... 354
- wheel geometry ................... 358
Windscreen/rear window and
headlight washer fluid ........... 324
Windscreen washer
- control ................................ 101- fluid ................................... 324
Windscreen washer blades
- maintenance ....................... 333
Windscreen wiper
- blade maintenance ............. 333
- control ................................ 101
Windscreen wiper spray nozzles
(maintenance) .............. 334-335