engine Lancia Voyager 2012 Owner handbook (in English)
[x] Cancel search | Manufacturer: LANCIA, Model Year: 2012, Model line: Voyager, Model: Lancia Voyager 2012Pages: 344, PDF Size: 3.95 MB
Page 5 of 344
Dear Customer,
Thank you for choosing Lancia and congratulations on your choice of a Lancia Voyager.
We have written this handbook to help you get to know all your car and use it in the best possible way.
You should read it right through before taking to the road for the first time.
You will find information, tips and important warnings regarding the driving of your car to help you get the most from the
technological features of your Lancia.
The enclosed warranty booklet lists the services that Lancia offers to its customers:
the Warranty Certificate with terms and conditions for maintaining its validity
the range of additional services available to Lancia customers.
Enjoy the read. Happy motoring!
This Owner Handbook describes all versions of the Lancia Voyager;
please consider only the information relevant to your version, engine and configuration.
Page 10 of 344
INTRODUCTION
Congratulations on selecting your
new LANCIA vehicle. Be assured that
it represents precision workmanship,
distinctive styling, and high quality -
all essentials that are traditional to
our vehicles.
Before you start to drive this vehicle,
read this Owner's Manual and all the
supplements. Be sure you are familiar
with all vehicle controls, particularly
those used for braking, steering, and
transmission shifting. Learn how your
vehicle handles on different road sur-
faces. Your driving skills will improve
with experience, but as in driving any
vehicle, take it easy as you begin. Al-
ways observe local laws wherever you
drive.
NOTE:
After reviewing the owner infor-
mation, it should be stored in the
vehicle for convenient referencing
and remain with the vehicle when
sold.Failure to operate this vehicle cor-
rectly may result in loss of control or a
collision.
Operating this vehicle at excessive
speeds or while intoxicated may result
in loss of control, collision with other
vehicles or objects, going off the road,
or overturning; any of which may lead
to serious injury or death. Also, failure
to use seat belts subjects the driver
and passengers to a greater risk of
injury or death.
To keep your vehicle running at its
best, have your vehicle serviced at
recommended intervals by an autho-
rized dealer who has the qualified per-
sonnel, special tools, and equipment
to perform all service.
The manufacturer and its distributors
are vitally interested in your complete
satisfaction with this vehicle. If you
encounter a service or warranty prob-
lem, which is not resolved to your
satisfaction, discuss the matter with
your dealer's management.
Your authorized dealer will be happy
to assist you with any questions about
your vehicle.
IMPORTANT NOTICE
ALL MATERIAL CONTAINED IN
THIS PUBLICATION IS BASED ON
THE LATEST INFORMATION
AVAILABLE AT TIME OF PUBLI-
CATION APPROVAL. THE RIGHT
IS RESERVED TO PUBLISH REVI-
SIONS AT ANY TIME.
This Owner's Manual has been pre-
pared with the assistance of service
and engineering specialists to ac-
quaint you with the operation and
maintenance of your new vehicle. It is
supplemented by a Warranty Infor-
mation Booklet and various
customer-oriented documents. You
are urged to read these publications
carefully. Following the instructions
and recommendations in this Owner's
Manual will help assure safe and en-
joyable operation of your vehicle.
4
Page 17 of 344

AUTOMATIC LOCKING RETRACTOR MODE(ALR) . . . . . . . . . . . . . . . . . . . . . . . . . . . . . . . . 38
ENERGY MANAGEMENT FEATURE . . . . . . . . 39
SEAT BELT PRETENSIONERS . . . . . . . . . . . . . 39
SUPPLEMENTAL ACTIVE HEAD RESTRAINTS (AHR) . . . . . . . . . . . . . . . . . . . . 40
ACTIVE HOOD SYSTEM . . . . . . . . . . . . . . . . . 41
ENHANCED SEAT BELT USE REMINDER SYSTEM (BeltAlert®) . . . . . . . . . . . . . . . . . . . . 43
SEAT BELTS AND PREGNANT WOMEN . . . . . 44
SUPPLEMENTAL RESTRAINT SYSTEM (SRS) — AIR BAGS . . . . . . . . . . . . . . . . . . . . . 44
AIR BAG SYSTEM COMPONENTS . . . . . . . . . . 45
ADVANCED FRONT AIR BAG FEATURES . . . . 45
AIR BAG DEPLOYMENT SENSORS AND CONTROLS . . . . . . . . . . . . . . . . . . . . . . . . . . . 48
EVENT DATA RECORDER (EDR) . . . . . . . . . . . 52
CHILD RESTRAINTS . . . . . . . . . . . . . . . . . . . . 53
ENGINE BREAK-IN RECOMMENDATIONS . . . . . 62 Additional Requirements For Diesel Engine(for versions/markets, where provided) . . . . . . 63
SAFETY TIPS . . . . . . . . . . . . . . . . . . . . . . . . . . . 63
11
Page 20 of 344
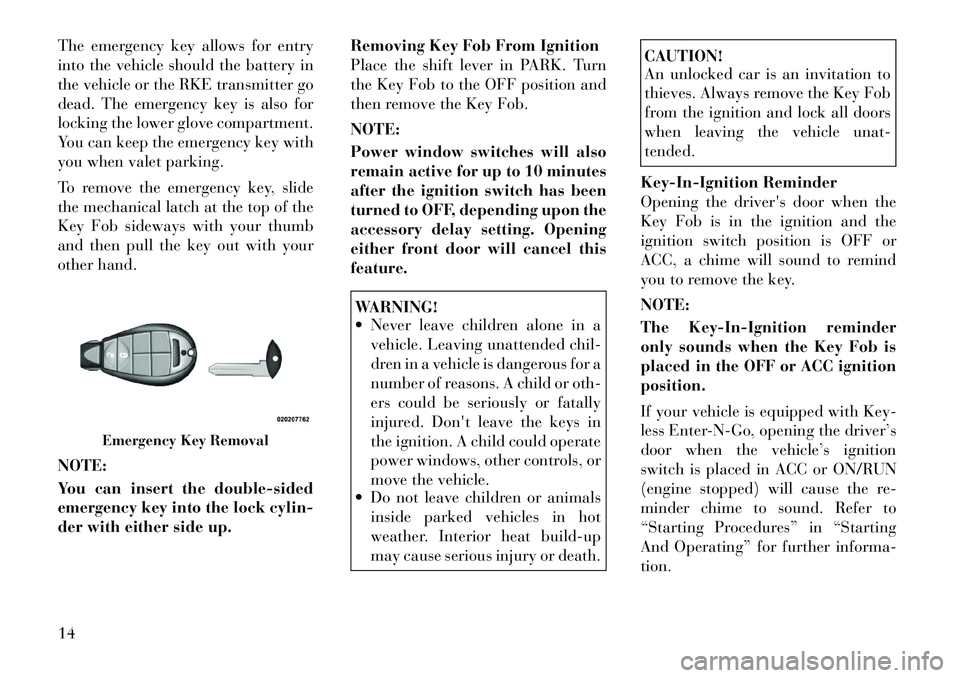
The emergency key allows for entry
into the vehicle should the battery in
the vehicle or the RKE transmitter go
dead. The emergency key is also for
locking the lower glove compartment.
You can keep the emergency key with
you when valet parking.
To remove the emergency key, slide
the mechanical latch at the top of the
Key Fob sideways with your thumb
and then pull the key out with your
other hand.
NOTE:
You can insert the double-sided
emergency key into the lock cylin-
der with either side up.Removing Key Fob From Ignition
Place the shift lever in PARK. Turn
the Key Fob to the OFF position and
then remove the Key Fob.
NOTE:
Power window switches will also
remain active for up to 10 minutes
after the ignition switch has been
turned to OFF, depending upon the
accessory delay setting. Opening
either front door will cancel this
feature.
WARNING!
Never leave children alone in a
vehicle. Leaving unattended chil-
dren in a vehicle is dangerous for a
number of reasons. A child or oth-
ers could be seriously or fatally
injured. Don't leave the keys in
the ignition. A child could operate
power windows, other controls, or
move the vehicle.
Do not leave children or animals
inside parked vehicles in hot
weather. Interior heat build-up
may cause serious injury or death.
CAUTION!
An unlocked car is an invitation to
thieves. Always remove the Key Fob
from the ignition and lock all doors
when leaving the vehicle unat-
tended.
Key-In-Ignition Reminder
Opening the driver's door when the
Key Fob is in the ignition and the
ignition switch position is OFF or
ACC, a chime will sound to remind
you to remove the key.
NOTE:
The Key-In-Ignition reminder
only sounds when the Key Fob is
placed in the OFF or ACC ignition
position.
If your vehicle is equipped with Key-
less Enter-N-Go, opening the driver’s
door when the vehicle’s ignition
switch is placed in ACC or ON/RUN
(engine stopped) will cause the re-
minder chime to sound. Refer to
“Starting Procedures” in “Starting
And Operating” for further informa-
tion.
Emergency Key Removal
14
Page 21 of 344
STEERING WHEEL
LOCK (for versions/
markets, where provided)
Your vehicle may be equipped with a
passive electronic steering wheel lock.
This lock prevents steering the vehicle
without the ignition key. The steering
wheel lock has six positions (one every
60 degrees). If the steering wheel is
moved to one of these six position with
the key in the off positions, the steer-
ing wheel will lock.
To Manually Lock The
Steering Wheel
With the engine running, rotate the
steering wheel one-half revolution,
turn off the engine and remove the
key. Turn the steering wheel slightly
in either direction until the lock en-
gages.
To Release The Steering
Wheel Lock
Cycle the ignition and start the en-
gine.
NOTE:
If you turned the wheel to the right
to engage the lock, you must turnthe wheel slightly to the right to
disengage it. If you turned the
wheel to the left to engage the lock,
turn the wheel slightly to the left to
disengage it.
SENTRY KEY®
The Sentry Key® Immobilizer system
prevents unauthorized vehicle opera-
tion by disabling the engine. The sys-
tem does not need to be armed or
activated. Operation is automatic, re-
gardless of whether the vehicle is
locked or unlocked.
The system uses a Key Fob with Re-
mote Keyless Entry (RKE) transmit-
ter, a Keyless Ignition Node (KIN) and
a RF receiver to prevent unauthorized
vehicle operation. Therefore, only
Key Fobs that are programmed to the
vehicle can be used to start and oper-
ate the vehicle.
After cycling the ignition to the ON/
RUN position, the Vehicle Security
Light will turn on for three seconds
for a bulb check. If the light remains
on after the bulb check, it indicates
that there is a problem with the elec-
tronics. In addition, if the light begins
to flash after the bulb check, it indi-
cates that someone used an invalid
Key Fob to start the engine. Either of
these conditions will result in the en-
gine being shut off after two seconds.
If the Vehicle Security Light turns on
during normal vehicle operation (ve-
hicle running for longer than 10 sec-
onds), it indicates that there is a fault
in the electronics. Should this occur,
have the vehicle serviced as soon as
possible by an authorized dealer.
CAUTION!
The Sentry Key® Immobilizer sys-
tem is not compatible with some
after-market remote starting sys-
tems. Use of these systems may re-
sult in vehicle starting problems and
loss of security protection.
All of the Key Fobs provided with
your new vehicle have been pro-
grammed to the vehicle electronics.
REPLACEMENT KEYS
NOTE:
Only Key Fobs that are pro-
grammed to the vehicle electronics
can be used to start and operate 15
Page 36 of 344
until it is fully open and then
press the switch again.
If the power sliding door en- counters multiple obstructions
within the same cycle, the sys-
tem will automatically stop, the
power sliding door motor will
make a clicking sound until the
door has no further movement.
This clicking sound can be
stopped by pulling the inside or
outside handle. If this condition
occurs, no damage is done to the
power sliding door motor. The
power sliding door must be
opened or closed manually.WARNING!
You, or others, could be injured if
caught in the path of the sliding
door. Make sure the door path is
clear before closing the door.
Power Sliding Side Door Open
Flash
The left and right exterior hazard
lights will flash for 12 seconds when
either sliding door is opened. This will alert other drivers in the area that
passenger(s) could be entering or ex-
iting the vehicle.
The Sliding Side Door Open Flash can
be enabled or disabled by performing
the following procedure:
1. Place the Key Fob in the ignition
switch.
2. Cycle the ignition switch from ON/
RUN to OFF five times ending in the
ON/RUN position
(do not start the
engine).
3. Within 10 seconds of the final
cycle, press the HAZARD switch ON.
4. A single chime will sound to signify
that you have successfully completed
the programming.
You can turn the feature back on by
repeating the previous procedure.
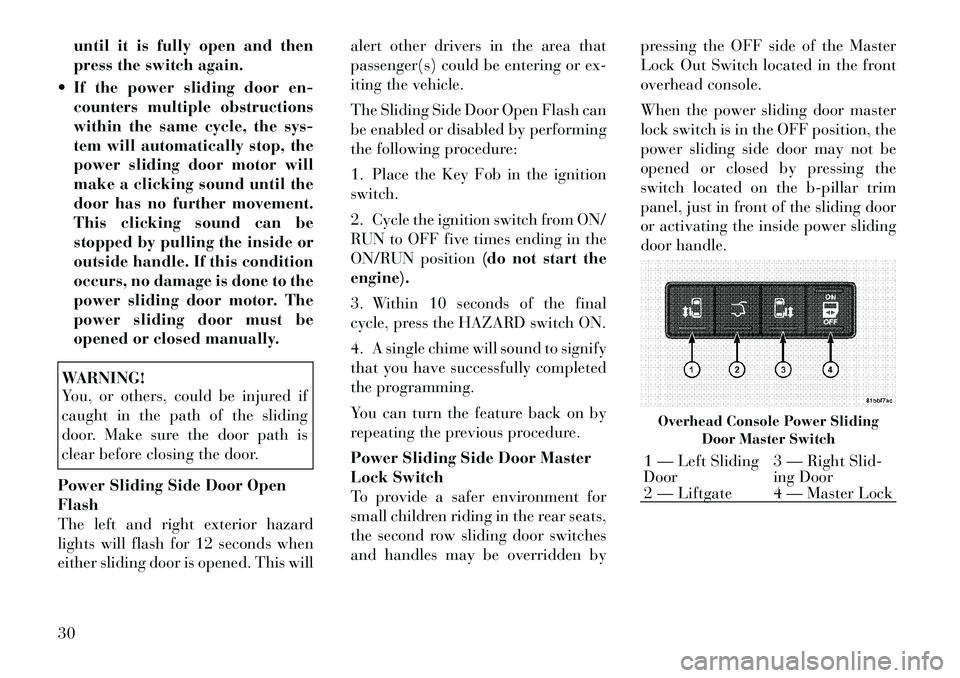
Power Sliding Side Door Master
Lock Switch
To provide a safer environment for
small children riding in the rear seats,
the second row sliding door switches
and handles may be overridden by pressing the OFF side of the Master
Lock Out Switch located in the front
overhead console.
When the power sliding door master
lock switch is in the OFF position, the
power sliding side door may not be
opened or closed by pressing the
switch located on the b-pillar trim
panel, just in front of the sliding door
or activating the inside power sliding
door handle.
Overhead Console Power Sliding
Door Master Switch1 — Left Sliding
Door 3 — Right Slid-
ing Door
2 — Liftgate 4 — Master Lock
30
Page 56 of 344
occupant and the door. The SAB fully
inflate in about 10 milliseconds. The
side air bag moves at a very high
speed and with such a high force that
it could injure you if you are not
seated properly, or if items are posi-
tioned in the area where the side air
bag inflates. This especially applies to
children.
Supplemental Side Air Bag
Inflatable Curtain (SABIC)
Inflator Units
During collisions where the impact is
confined to a particular area of the
side of the vehicle, the ORC may de-
ploy the SABIC air bags, depending
on the severity and type of collision. In
these events, the ORC will deploy the
SABIC only on the impact side of the
vehicle.
A quantity of non-toxic gas is gener-
ated to inflate the side curtain air bag.
The inflating side curtain air bag
pushes the outside edge of the head-
liner out of the way and covers the
window. The air bag inflates in about
30 milliseconds (about one-quarter of
the time that it takes to blink your
eyes) with enough force to injure youif you are not belted and seated prop-
erly, or if items are positioned in the
area where the side curtain air bag
inflates. This especially applies to
children. The side curtain air bag is
only about 9 cm thick when it is in-
flated.
Because air bag sensors estimate de-
celeration over time, vehicle speed
and damage are not good indicators of
whether or not an air bag should have
deployed.
NOTE:
In a rollover the pretensioners
and/or SAB and SABIC air bags
may deploy on both sides of the
vehicle.
Front And Side Impact Sensors
In front and side impacts, impact sen-
sors can aid the ORC in determining
appropriate response to impact
events.
Enhanced Accident Response
System
In the event of an impact causing air
bag deployment, if the communica-
tion network remains intact, and the
power remains intact, depending on
the nature of the event the ORC will
determine whether to have the En-
hanced Accident Response System
perform the following functions:
Cut off fuel to the engine.
Flash hazard lights as long as the
battery has power or until the igni-
tion key is turned off.
Turn on the interior lights, which remain on as long as the battery has
power or until the ignition key is
removed.
Unlock the doors automatically.
In order to reset the Enhanced Acci-
dent Response System functions after
an event, the ignition switch must be
changed from IGN ON to IGN OFF.
If A Deployment Occurs
The Advanced Front Air Bags are de-
signed to deflate immediately after
deployment.
NOTE:
Front and/or side air bags will not
deploy in all collisions. This does
not mean something is wrong with
the air bag system.
50
Page 58 of 344

WARNING!(Continued)
Do not attempt to modify any part
of your air bag system. The air
bag may inflate accidentally or
may not function properly if
modifications are made. Take
your vehicle to an authorized
dealer for any air bag system ser-
vice. If your seat including your
trim cover and cushion needs to
be serviced in any way (including
removal or loosening/tightening
of seat attachment bolts), take the
vehicle to your authorized dealer.
Only manufacturer approved seat
accessories may be used. If it is
necessary to modify the air bag
system for persons with disabili-
ties, contact your authorized
dealer.
Air Bag Warning Light You will want to have the
air bags ready to inflate for
your protection in a colli-
sion. The Air Bag Warning
Light monitors the internal circuits
and interconnecting wiring associated
with air bag system electrical compo- nents. While the air bag system is
designed to be maintenance free, if
any of the following occurs, have an
authorized dealer service the air bag
system immediately.
The Air Bag Warning Light does
not come on during the four to eight
seconds when the ignition switch is
first turned to the ON/RUN posi-
tion.
The Air Bag Warning Light remains on after the four to eight-second
interval.
The Air Bag Warning Light comes on intermittently or remains on
while driving.
NOTE:
If the speedometer, tachometer, or
any engine related gauges are not
working, the Occupant Restraint
Controller (ORC) may also be dis-
abled. The air bags may not be
ready to inflate for your protec-
tion. Promptly check the fuse
block for blown fuses. Refer to the
label located on the inside of the
fuse block cover for the proper air bag fuses. See your authorized
dealer if the fuse is good.
EVENT DATA RECORDER
(EDR)
This vehicle is equipped with an event
data recorder (EDR). The main pur-
pose of an EDR is to record, in certain
crash or near crash-like situations,
such as an air bag deployment or hit-
ting a road obstacle, data that will
assist in understanding how a vehi-
cle’s systems performed. The EDR is
designed to record data related to ve-
hicle dynamics and safety systems for
a short period of time, typically
30 seconds or less. The EDR in this
vehicle is designed to record such data
as:
How various systems in your ve-
hicle were operating;
Whether or not the driver and pas- senger safety belts were buckled/
fastened;
How far (if at all) the driver was depressing the accelerator and/or
brake pedal; and,
How fast the vehicle was traveling.52
Page 68 of 344

Installing The Child Restraint
System
We urge you to carefully follow the
directions of the manufacturer when
installing your child restraint. Many,
but not all, restraint systems will be
equipped with separate straps on each
side, with each having a hook or con-
nector, and a means for adjusting the
tension in the strap. Forward-facing
toddler restraints and some rearward-
facing infant restraints will also be
equipped with a tether strap, a hook
and means for adjusting the tension in
the strap. Not all child restraint sys-
tems will be installed as described
here. Again, carefully follow the in-
stallation instructions that are pro-
vided with the child restraint system.
In general, you will first loosen the
child seat adjusters on the lower
straps and tether straps so that you
can more easily attach the hook or
connector to the lower anchorages
and tether anchorages. Then tighten
all three straps as you push the child
restraint rearward and downward
into the seat.Not all child restraint systems will be
installed as we have described here.
Again, carefully follow the instruc-
tions that come with the child re-
straint system.
WARNING!
Improper installation of a child re-
straint to the ISOFIX anchorages
can lead to failure of an infant or
child restraint. The child could be
badly injured or killed. Follow the
manufacturer's directions exactly
when installing an infant or child
restraint.
Transporting Pets
Air Bags deploying in the front seat
could harm your pet. An unrestrained
pet could be thrown about and possi-
bly injured, or injure a passenger dur-
ing panic braking or in a collision.
Pets should be restrained in the rear
seat in pet harnesses or pet carriers
that are secured by seat belts. ENGINE BREAK-IN
RECOMMENDATIONS
A long break-in period is not required
for the engine and drivetrain (trans-
mission and axle) in your vehicle.
Drive moderately during the first
500 km. After the initial 100 km,
speeds up to 80 or 90 km/h are desir-
able.
While cruising, brief full-throttle ac-
celeration within the limits of local
traffic laws contributes to a good
break-in. Wide-open throttle accel-
eration in low gear can be detrimental
and should be avoided.
The engine oil installed in the engine
at the factory is a high-quality energy
conserving type lubricant. Oil
changes should be consistent with an-
ticipated climate conditions under
which vehicle operations will occur.
For the recommended viscosity and
quality grades, refer to “Maintenance
Procedures” in “Maintaining Your Ve-
hicle”. NON-DETERGENT OR
STRAIGHT MINERAL OILS MUST
NEVER BE USED.
62
Page 69 of 344

A new engine may consume some oil
during its first few thousand kilome-
ters of operation. This should be con-
sidered a normal part of the break-in
and not interpreted as an indication of
difficulty.
Additional Requirements
For Diesel Engine (for
versions/markets, where
provided)
During the first 1500 km avoid heavy
loads, e.g. driving at full throttle. Do
not exceed 2/3 of the maximum per-
missible engine speed for each gear.
Change gear in good time. Do not shift
down a gear manually in order to
brake.
SAFETY TIPS
Transporting Passengers
NEVER TRANSPORT PASSEN-
GERS IN THE CARGO AREA.
WARNING!
Do not leave children or animalsinside parked vehicles in hot
weather. Interior heat build-up
may cause serious injury or death.
It is extremely dangerous to ride in
a cargo area, inside or outside of a
vehicle. In a collision, people rid-
ing in these areas are more likely
to be seriously injured or killed.
Do not allow people to ride in any
area of your vehicle that is not
equipped with seats and seat
belts.
Be sure everyone in your vehicle is
in a seat and using a seat belt
properly.
Exhaust GasWARNING!
Exhaust gases can injure or kill.
They contain carbon monoxide
(CO), which is colorless and odor-
less. Breathing it can make you un-
conscious and can eventually poison
you. To avoid breathing (CO), fol-
low these safety tips: (Continued)
WARNING!(Continued)
Do not run the engine in a closed
garage or in confined areas any
longer than needed to move your
vehicle in or out of the area.
If you are required to drive with
the trunk/liftgate open, make sure
that all windows are closed and
the climate control BLOWER
switch is set at high speed. DO
NOT use the recirculation mode.
If it is necessary to sit in a parked
vehicle with the engine running,
adjust your heating or cooling
controls to force outside air into
the vehicle. Set the blower at high
speed.
The best protection against carbon
monoxide entry into the vehicle body
is a properly maintained engine ex-
haust system.
Whenever a change is noticed in the
sound of the exhaust system, when
exhaust fumes can be detected inside
the vehicle, or when the underside or
rear of the vehicle is damaged, have a
competent mechanic inspect the com-
plete exhaust system and adjacent
63