radio controls Lancia Voyager 2012 Owner handbook (in English)
[x] Cancel search | Manufacturer: LANCIA, Model Year: 2012, Model line: Voyager, Model: Lancia Voyager 2012Pages: 344, PDF Size: 3.95 MB
Page 88 of 344
Astronomy Zone — System
Temporarily Unavailable
When the vehicle enters this zone the
blind spot system will become tempo-
rarily unavailable and the EVIC will
display the message “ Blind spot sys-
tem unavailable-Astronomy zone”.
The side mirrors LED’s will be lit up
and stay lit until the vehicle exits the
zone.
UCONNECT™ PHONE
(for versions/markets,
where provided)
NOTE:
For Uconnect™ Phone with Navi-
gation or Multimedia radio, refer
to the Navigation or Multimedia
radio's User's Manual (separate
booklet) Uconnect™ Phone sec-
tion.
Uconnect™ Phone is a voice-
activated, hands-free, in-vehicle com-
munications system. Uconnect™
Phone allows you to dial a phone
number with your mobile phone* us-
ing simple voice commands (e.g.,
“Call”…“Jim”… “Work” or“Dial”…“151-1234 -5555”). Your
mobile phone's audio is transmitted
through your vehicle's audio system;
the system will automatically mute
your radio when using the
Uconnect™ Phone.
Uconnect™ Phone allows you to
transfer calls between the Uconnect™
Phone and your mobile phone as you
enter or exit your vehicle and enables
you to mute the Uconnect™ Phone's
microphone for private conversation.
The Uconnect™ Phone is driven
through your Bluetooth® “Hands-
Free profile” mobile phone.
Uconnect™ Phone features
Bluetooth® technology - the global
standard that enables different elec-
tronic devices to connect to each other
without wires or a docking station, so
Uconnect™ Phone works no matter
where you stow your mobile phone
(be it your purse, pocket, or brief-
case), as long as your phone is turned
on and has been paired to the vehicle's
Uconnect™ Phone. The Uconnect™
Phone allows up to seven mobile
phones to be linked to the system.
Only one linked (or paired) mobilephone can be used with the
Uconnect™ Phone at a time. The
Uconnect™ Phone is available in
English, Dutch, French, German,
Italian or Spanish languages (as
equipped).
WARNING!
Any voice commanded system
should be used only in safe driving
conditions following local laws and
phone use. All attention should be
kept on the roadway ahead. Failure
to do so may result in a collision
causing serious injury or death.
Uconnect™ Phone Button The radio or steering wheel
controls (for versions/
markets, where provided)
will contain the two control
buttons (Uconnect™ Phone
but-
ton and Voice Commandbut-
ton) that will enable you to access the
system. When you press the button
you will hear the word Uconnect™
followed by a BEEP. The beep is your
signal to give a command.
82
Page 165 of 344
Listen To An Audio Source On Channel 2While A Video Is Playing On Channel 1 . . . . . 192
Dual Video Screen . . . . . . . . . . . . . . . . . . . . . 193
Play A DVD Using The Touch-Screen Radio . . . . . . . . . . . . . . . . . . . . . . . . . . . . . . . 193
Play A DVD Using The VES™ Player (for versions/markets, where provided) . . . . . . . . 194
Listen To An Audio Source While A Video Is Playing . . . . . . . . . . . . . . . . . . . . . . . . . . . . . 195
Third Row Swivel Screen (for versions/ markets, where provided) . . . . . . . . . . . . . . . 196
Important Notes For Dual Video Screen System . . . . . . . . . . . . . . . . . . . . . . . . . . . . . . 196
Remote Control . . . . . . . . . . . . . . . . . . . . . . . 196
Remote Control Storage . . . . . . . . . . . . . . . . . 198
Locking The Remote Control . . . . . . . . . . . . . 198
Replacing The Remote Control Batteries . . . . 198
Headphones Operation . . . . . . . . . . . . . . . . . 198
Controls . . . . . . . . . . . . . . . . . . . . . . . . . . . . . 199
Replacing The Headphone Batteries . . . . . . . 199
Unwired® Stereo Headphone Lifetime Limited Warranty . . . . . . . . . . . . . . . . . . . . . 200
System Information . . . . . . . . . . . . . . . . . . . . 200
STEERING WHEEL AUDIO CONTROLS (for versions/markets, where provided) . . . . . . . . . . 207
Radio Operation . . . . . . . . . . . . . . . . . . . . . . 208
159
Page 166 of 344

CD Player . . . . . . . . . . . . . . . . . . . . . . . . . . . 208
CD/DVD DISC MAINTENANCE . . . . . . . . . . . . . 208
RADIO OPERATION AND MOBILE PHONES . . . 208
CLIMATE CONTROLS . . . . . . . . . . . . . . . . . . . . 209 MANUAL HEATING AND AIRCONDITIONING SYSTEM (for
versions/markets, where provided) . . . . . . . . 209
REAR MANUAL CLIMATE CONTROL (for versions/markets, where provided) . . . . . . . . 212
AUTOMATIC TEMPERATURE CONTROL (ATC) (for versions/markets, where
provided) . . . . . . . . . . . . . . . . . . . . . . . . . . . . 213
SUMMER OPERATION . . . . . . . . . . . . . . . . . 220
WINTER OPERATION . . . . . . . . . . . . . . . . . . 220
VACATION/STORAGE . . . . . . . . . . . . . . . . . . 220
WINDOW FOGGING . . . . . . . . . . . . . . . . . . . 220
OUTSIDE AIR INTAKE . . . . . . . . . . . . . . . . . 220
OPERATING TIPS . . . . . . . . . . . . . . . . . . . . . 220
A/C AIR FILTER . . . . . . . . . . . . . . . . . . . . . . 220
160
Page 167 of 344

INSTRUMENT PANEL FEATURES1 — Air Vents5 — Analog Clock9 — DVD (for versions/
markets, where provided) 13 — Ignition Switch
2 — Instrument Cluster 6 — Upper Glove
Compartment10 — Storage Bin
14 — Hood Release
3 — Shift Lever 7 — Lower Glove
Compartment11 — Cup Holders
15 — Dimmer Switch
4 — Radio 8 — Climate Controls 12 — Switch Bank 16 — Headlight Switch
161
Page 198 of 344
Turn on the VES™ player (forversions/markets, where provided
on Dual Screen System) by pushing
the Power button, located on the far
left, or by pressing the button on
the Remote Control.
When the Video Screen(s) are open and a DVD is inserted into the
VES™ player, the screen(s) turn(s)
on automatically, the headphone
transmitters turn on and playback
begins.
For Dual Video Screen System, Channel 1 on the Remote Control
and Headphones refers to Screen 1
(second row) and Channel 2 on the
Remote Control and Headphones
refers to Screen 2 (third row). Refer
to the Dual Video Screen section for
more information.
Play Video Games
Connect the video game console to the
Auxiliary RCA input jacks (1 set or 2
depending on vehicle) located on the
back of the center console or on left
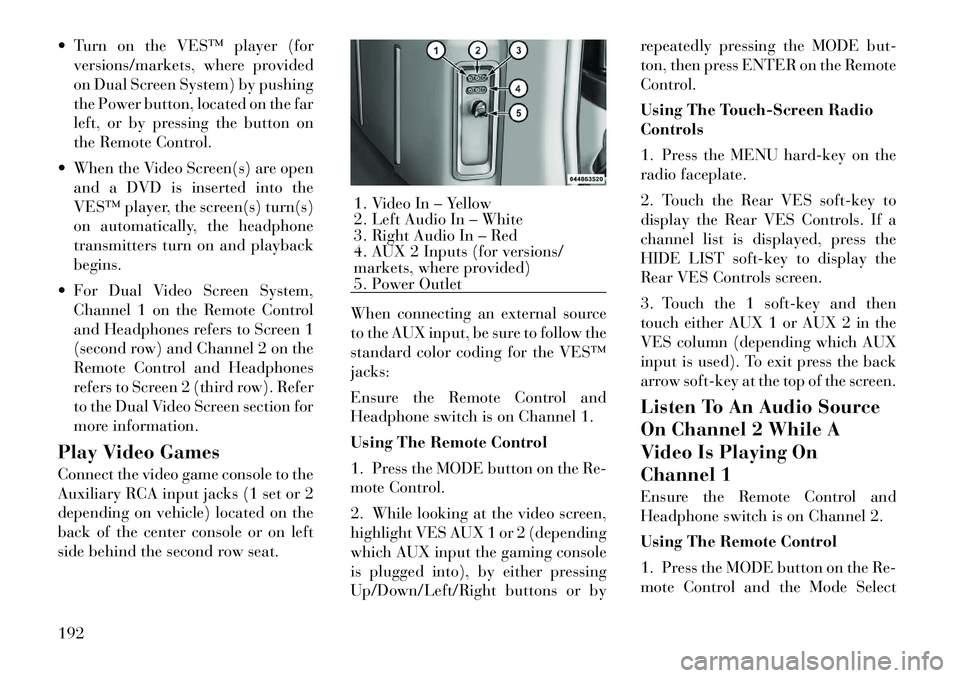
side behind the second row seat. When connecting an external source
to the AUX input, be sure to follow the
standard color coding for the VES™
jacks:
Ensure the Remote Control and
Headphone switch is on Channel 1.
Using The Remote Control
1. Press the MODE button on the Re-
mote Control.
2. While looking at the video screen,
highlight VES AUX 1 or 2 (depending
which AUX input the gaming console
is plugged into), by either pressing
Up/Down/Left/Right buttons or byrepeatedly pressing the MODE but-
ton, then press ENTER on the Remote
Control.
Using The Touch-Screen Radio
Controls
1. Press the MENU hard-key on the
radio faceplate.
2. Touch the Rear VES soft-key to
display the Rear VES Controls. If a
channel list is displayed, press the
HIDE LIST soft-key to display the
Rear VES Controls screen.
3. Touch the 1 soft-key and then
touch either AUX 1 or AUX 2 in the
VES column (depending which AUX
input is used). To exit press the back
arrow soft-key at the top of the screen.
Listen To An Audio Source
On Channel 2 While A
Video Is Playing On
Channel 1
Ensure the Remote Control and
Headphone switch is on Channel 2.
Using The Remote Control
1. Press the MODE button on the Re-
mote Control and the Mode Select
1. Video In – Yellow
2. Left Audio In – White
3. Right Audio In – Red
4. AUX 2 Inputs (for versions/
markets, where provided)
5. Power Outlet
192
Page 199 of 344
Screen will display, unless a video is
playing then only a small banner will
appear on the bottom of the screen.
2. While looking at the video screen,
either press Up/Down/Left/Right on
the Remote Control to highlight the
desired audio source or repeatedly
press the MODE button on the remote
until the desired audio source appears
on the screen.
Using The Touch-Screen Radio
Controls
1. Press the MENU hard-key on the
radio faceplate.
2. Touch the Rear VES soft-key to
display the Rear VES Controls. If a
channel list is displayed, press the
HIDE LIST soft-key to display the
Rear VES Controls screen.
3. To listen to an audio source on
Channel 2 while a video is playing on
Channel 1, touch the 2 soft-key and
choose an audio source. To exit touch
the back arrow soft-key at the top left
of the left screen.Dual Video Screen
NOTE:
Typically there are two different
ways to operate the features of the
Video Entertainment System
(VES)™.
The Remote Control
The Touch-Screen Radio (for
versions/markets, where pro-
vided)
Play A DVD Using The
Touch-Screen Radio
1. Press the OPEN/CLOSE or LOAD
hard-key on the radio faceplate
(Touch-Screen).
2. Insert the DVD with the label fac-
ing up. The radio automatically se-
lects the appropriate mode after the
disc is recognized and displays the
menu screen or starts playing the first
track.
3. To watch a DVD on Screen 1 for
second row passengers, ensure the Re-
mote Control and Headphone switch
is on Channel 1. 4. To watch a DVD on Screen 2 for
third row passengers, ensure the Re-
mote Control and Headphone switch
is on Channel 2.
Using The Remote Control
1. Press the MODE button on the Re-
mote Control.
2. While looking at Screen 1 or 2,
highlight DISC by either pressing Up/
Down/Left/Right buttons or by re-
peatedly pressing the MODE button,
then press ENTER.
NOTE:
Channel/Screen 1 select mode
information is shown on the left
side of the screen.
Channel/Screen 2 select mode information is shown on the
right side of the screen.
The VES™ will retain the last setting when turned off.
Using The Touch-Screen Radio
Controls
1. Press the MENU hard-key on the
radio faceplate.
193
Page 200 of 344
2. Touch the Rear VES soft-key to
display the Rear VES Controls. If a
channel list is displayed, press the
HIDE LIST soft-key to display the
Rear VES Controls screen.
3. Touch the 1 or 2 soft-key based on
the channel you want to change and
then the DISC soft-key in the MEDIA
column. To exit touch the back arrow
at the top left of the screen.
NOTE:
To view a DVD on the radiopress the RADIO/MEDIA hard-
key, on the radio faceplate, then
touch the DISC tab soft-key and
then the VIEW VIDEO soft-key.
Viewing a DVD on the Touch- Screen radio screen is not avail-
able in all states/provinces, and
the vehicle must be stopped, and
the shift lever must be in the
PARK position for vehicles with
automatic transmission. In ve-
hicles with manual transmission
the parking brake must be en-
gaged. Touching the screen on a Touch-
Screen radio while a DVD is
playing brings up basic remote
control functions for DVD play
such as scene selection, Play,
Pause, FF, RW, and Stop. Press-
ing the X in the upper corner
will turn off the remote control
screen functions.
Play A DVD Using The
VES™ Player (for
versions/markets, where
provided)
1. Insert the DVD with the label fac-
ing up. The VES™ player automati-
cally selects the appropriate mode af-
ter the disc is recognized and starts
playing the DVD.
NOTE:
The VES™ player has basic DVD
control function such as Menu,
Play, Pause, FF, RW and Stop
2. To watch a DVD on Screen 1 for
second row passengers, ensure the Re-
mote Control and Headphone switch
is on Channel 1. 3. To watch a DVD on Screen 2 for
third row passengers, ensure the Re-
mote Control and Headphone switch
is on Channel 2.
Using The Remote Control
1. Press the MODE button on the Re-
mote Control.
2. While looking at Screen 1 or 2,
highlight VES DISC by either press-
ing Up/Down/Left/Right buttons or
by repeatedly pressing the MODE
button, then press ENTER on the Re-
mote Control.
NOTE:
Channel/Screen 1 select mode
information is shown on the left
side of the screen.
Channel/Screen 2 select mode information is shown on the
right side of the screen.
The VES™ will retain the last setting when turned off.
Using The Touch-Screen Radio
Controls
1. Press the MENU hard-key on the
radio faceplate.
194
Page 201 of 344
2. Touch the Rear VES soft-key to
display the Rear VES Controls. If a
channel list is displayed, touch the
HIDE LIST soft-key to display the
Rear VES Controls screen.
3. Touch the 1 or 2 soft-key and then
the DISC soft-key in the VES column.
To exit touch the back arrow soft-key
at the top left of the screen.
NOTE:
To view a DVD on the radiopress the RADIO/MEDIA hard-
key, on the radio faceplate, then
touch the DISC tab soft-key and
then the VIEW VIDEO soft-key.
Viewing a DVD on the Touch- Screen radio screen is not avail-
able in all states/provinces, and
the vehicle must be stopped, and
the shift lever must be in the
PARK position for vehicles with
automatic transmission. In ve-
hicles with manual transmission
the parking brake must be en-
gaged. Listen To An Audio Source
While A Video Is Playing
Ensure the Remote Control and
Headphone switch are on the same
channel. If watching a video on
Screen 1 (second row), then Channel
2 could be used for audio. If watching
a video on Screen 2 (third row), then
Channel 1 could be used for audio.
Using The Remote Control
1. Press the MODE button on the Re-
mote Control and either the Mode Se-
lect Screen will display or a small
banner will appear at the bottom of
the screen.
2. To listen to an audio source on
Channel 1 or 2, either press Up/
Down/Left/Right on the Remote Con-
trol to highlight the desired audio
source or press the MODE button re-
peatedly until the desired audio
source appears on the screen.
Using The Touch Screen Radio
Controls
1. Press the MENU hard-key on the
radio faceplate.
2. Touch the Rear VES soft-key to
display the Rear VES Controls. If a
channel list is displayed, touch the
HIDE LIST soft-key to display the
Rear VES Controls screen.
3. To listen to an audio source on
Channel 1 while a video is playing on
Channel/Screen 2, touch the 1 soft-
key and choose an audio source. To
listen to an audio source on Channel 2
while a video is playing on Channel/
Screen 1, touch the 2 soft-key and
choose an audio source. To exit touch
the back arrow soft-key at the top left
of the screen.
195
Page 202 of 344
Third Row Swivel Screen
(for versions/markets,
where provided)
The third row screen or Screen 2has the ability to lower and swivel
to face forward.
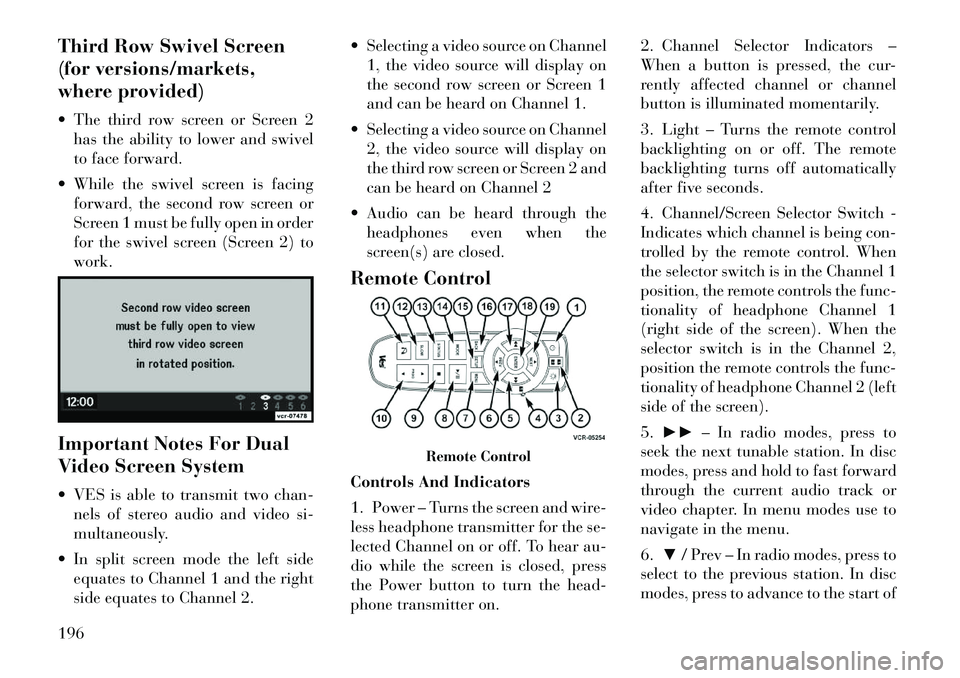
While the swivel screen is facing forward, the second row screen or
Screen 1 must be fully open in order
for the swivel screen (Screen 2) to
work.
Important Notes For Dual
Video Screen System
VES is able to transmit two chan- nels of stereo audio and video si-
multaneously.
In split screen mode the left side equates to Channel 1 and the right
side equates to Channel 2. Selecting a video source on Channel
1, the video source will display on
the second row screen or Screen 1
and can be heard on Channel 1.
Selecting a video source on Channel 2, the video source will display on
the third row screen or Screen 2 and
can be heard on Channel 2
Audio can be heard through the headphones even when the
screen(s) are closed.
Remote Control
Controls And Indicators
1. Power – Turns the screen and wire-
less headphone transmitter for the se-
lected Channel on or off. To hear au-
dio while the screen is closed, press
the Power button to turn the head-
phone transmitter on. 2. Channel Selector Indicators –
When a button is pressed, the cur-
rently affected channel or channel
button is illuminated momentarily.
3. Light – Turns the remote control
backlighting on or off. The remote
backlighting turns off automatically
after five seconds.
4. Channel/Screen Selector Switch -
Indicates which channel is being con-
trolled by the remote control. When
the selector switch is in the Channel 1
position, the remote controls the func-
tionality of headphone Channel 1
(right side of the screen). When the
selector switch is in the Channel 2,
position the remote controls the func-
tionality of headphone Channel 2 (left
side of the screen).
5.
►► – In radio modes, press to
seek the next tunable station. In disc
modes, press and hold to fast forward
through the current audio track or
video chapter. In menu modes use to
navigate in the menu.
6. ▼/ Prev – In radio modes, press to
select to the previous station. In disc
modes, press to advance to the start of
Remote Control
196
Page 207 of 344
priority over the VES™ or all radio
modes (FM, AM, and SAT). The
VES™ has the ability to switch tuner
(AM/FM), SEEK, SCAN, TUNE, and
recall presets in radio modes as long
as it is not in shared mode.
When in shared disc mode both the
radio and the VES™ have control of
the video functions. The VES™ has
the ability to control the following
video modes:
1. CD: Ability to Fast Forward, Re-
wind, Scan, and Track Up/Down.
2. CD Changer (in radio): Ability to
Disk Up/Down and program all listed
CD controls (Fast Forward, Rewind,
Scan, and Track Up/Down).
The VES™ can even control radio
modes or video modes while the radio
is turned off. The VES™ can access
the radio modes or disc modes by
navigating to those modes on the
VES™ and activating a radio mode or
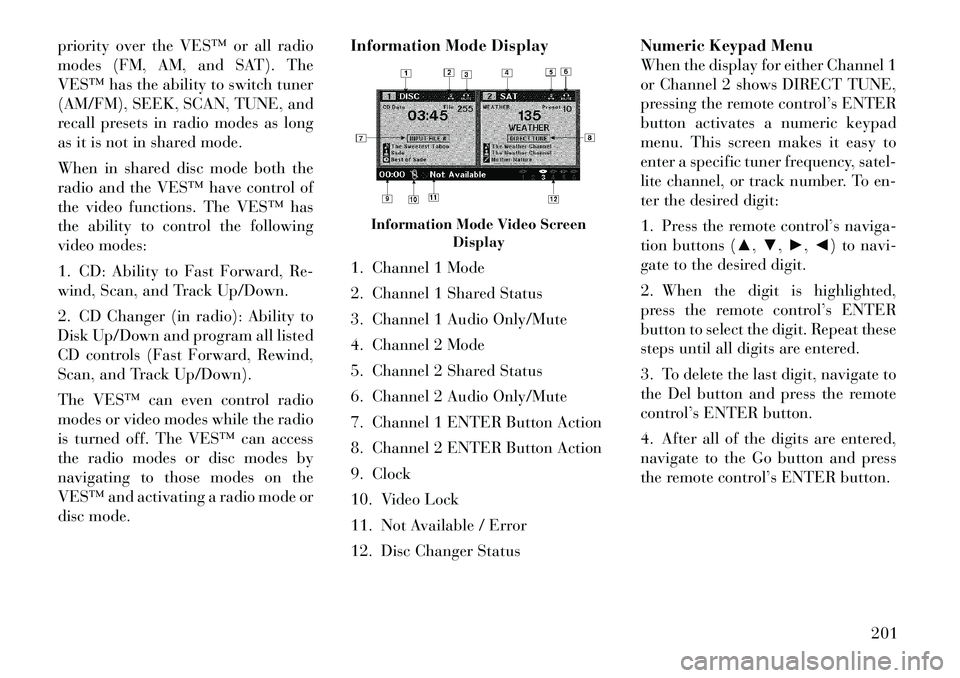
disc mode.Information Mode Display
1. Channel 1 Mode
2. Channel 1 Shared Status
3. Channel 1 Audio Only/Mute
4. Channel 2 Mode
5. Channel 2 Shared Status
6. Channel 2 Audio Only/Mute
7. Channel 1 ENTER Button Action
8. Channel 2 ENTER Button Action
9. Clock
10. Video Lock
11. Not Available / Error
12. Disc Changer StatusNumeric Keypad Menu
When the display for either Channel 1
or Channel 2 shows DIRECT TUNE,
pressing the remote control’s ENTER
button activates a numeric keypad
menu. This screen makes it easy to
enter a specific tuner frequency, satel-
lite channel, or track number. To en-
ter the desired digit:
1. Press the remote control’s naviga-
tion buttons (▲,
▼,►,◄) to navi-
gate to the desired digit.
2. When the digit is highlighted,
press the remote control’s ENTER
button to select the digit. Repeat these
steps until all digits are entered.
3. To delete the last digit, navigate to
the Del button and press the remote
control’s ENTER button.
4. After all of the digits are entered,
navigate to the Go button and press
the remote control’s ENTER button.
Information Mode Video Screen Display
201