buttons Lancia Voyager 2012 Owner handbook (in English)
[x] Cancel search | Manufacturer: LANCIA, Model Year: 2012, Model line: Voyager, Model: Lancia Voyager 2012Pages: 344, PDF Size: 3.95 MB
Page 24 of 344
will sound. If this occurs, disarm the
Vehicle Security Alarm.
If the Vehicle Security Alarm is armed
and the battery becomes discon-
nected, the Vehicle Security Alarm
will remain armed when the battery is
reconnected; the exterior lights will
flash, the horn will sound. If this oc-
curs, disarm the Vehicle Security
Alarm.
ILLUMINATED ENTRY
(for versions/markets,
where provided)
The courtesy lights will turn on when
you use the Remote Keyless Entry
(RKE) transmitter to unlock the
doors or open any door.
This feature also turns on the ap-
proach lighting in the outside mirrors
(for versions/markets, where pro-
vided). Refer to “Mirrors” in “Under-
standing The Features Of Your Ve-
hicle” for further information.
The lights will fade to off after ap-
proximately 30 seconds, or they willimmediately fade to off once the igni-
tion switch is turned to ON/RUN from
the OFF position.
NOTE:
The front courtesy overhead
console and door courtesy lights
will not turn off if the dimmer
control is in the “Dome ON” po-
sition (extreme top position).
The illuminated entry system will not operate if the dimmer
control is in the “dome defeat”
position (extreme bottom posi-
tion).
REMOTE KEYLESS
ENTRY (RKE) (for
versions/markets, where
provided)
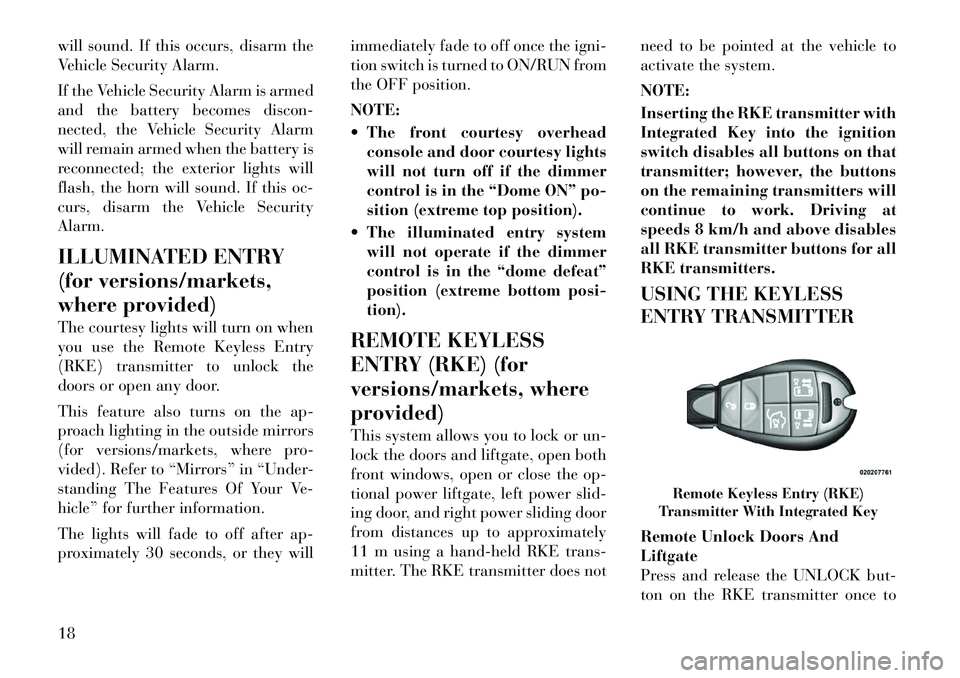
This system allows you to lock or un-
lock the doors and liftgate, open both
front windows, open or close the op-
tional power liftgate, left power slid-
ing door, and right power sliding door
from distances up to approximately
11 m using a hand-held RKE trans-
mitter. The RKE transmitter does not need to be pointed at the vehicle to
activate the system.
NOTE:
Inserting the RKE transmitter with
Integrated Key into the ignition
switch disables all buttons on that
transmitter; however, the buttons
on the remaining transmitters will
continue to work. Driving at
speeds 8 km/h and above disables
all RKE transmitter buttons for all
RKE transmitters.
USING THE KEYLESS
ENTRY TRANSMITTER
Remote Unlock Doors And
Liftgate
Press and release the UNLOCK but-
ton on the RKE transmitter once to
Remote Keyless Entry (RKE)
Transmitter With Integrated Key
18
Page 25 of 344
unlock the driver's side or twice to
unlock all doors and liftgate. This will
also turn on the Illuminated Entry
system.
Remote Lock Doors And Liftgate
Press and release the lock button on
the RKE transmitter to Lock Doors
And Liftgate.
Remote Key Unlock on First Press
This feature lets you program the sys-
tem to unlock either the driver's side,
or all doors, on the first press of the
UNLOCK button on the RKE trans-
mitter.
For vehicles equipped with an Elec-tronic Vehicle Information Center
(EVIC), refer to “Electronic Vehicle
Information Center (EVIC)/
Personal Settings (Customer-
Programmable Features)” in “Un-
derstanding Your Instrument
Panel” for further information.
For vehicles not equipped with the EVIC, the Remote Unlock feature
can be enabled or disabled by per-
forming the following steps:
1. Perform this operation while
standing outside the vehicle. 2. Press and hold the LOCK button
on a programmed RKE transmitter
for at least 4 seconds, but no longer
than 10 seconds. Then, press and hold
the UNLOCK button while still hold-
ing the LOCK button.
3. Release both buttons at the same
time.
4. Test the feature while outside of
the vehicle by pressing the LOCK/
UNLOCK buttons on the RKE trans-
mitter with the ignition switch in the
OFF position and the Key Fob re-
moved.
5. Repeat these steps if you want to
return this feature to its previous set-
ting.
NOTE:
Pressing the LOCK button on the
RKE transmitter while you are in-
side the vehicle will activate the
Vehicle Security Alarm. Opening a
door with the Vehicle Security
Alarm activated will cause the
alarm to sound. Press the UN-
LOCK button to deactivate the Ve-
hicle Security Alarm.
Power Open/Close Power Liftgate
(for versions/markets, where
provided)
Press the LIFTGATE button twice on
the RKE transmitter within five sec-
onds to Open/Close the Power Lift-
gate. The liftgate will beep for three
seconds and then open/close. If the
button is pushed while the liftgate is
being power closed, the liftgate will
reverse to the full open position.
The power liftgate may also be
opened and closed by pressing the
LIFTGATE button located on the
overhead console.
For versions/markets, where pro-
vided with a rear interior switch on
the left rear pillar, pushing this switch
once will close the liftgate only. The
liftgate cannot be opened from this
switch.
If the vehicle is locked and Vehicle
Security Alarm is armed, using RKE
transmitter to open the power liftgate
does not unlock the vehicle or disarm
the Vehicle Security Alarm.
19
Page 26 of 344
Power Open/Close Left Power
Sliding Door (for versions/
markets, where provided)
Press the LEFT Power Sliding Door
button twice on the RKE transmitter
within five seconds to Power Open/
Close the Left Power Sliding Door. If
the button on the RKE transmitter is
pushed while the door is being power-
closed, the door will reverse to the full
open position.
If the vehicle is locked and the Vehicle
Security Alarm is armed, pressing the
LEFT Power Sliding Door button
twice unlocks the power sliding door
and disarms Vehicle Security Alarm.
Power Open/Close Right Power
Sliding Door (for versions/
markets, where provided)
Press the RIGHT Power Sliding Door
button twice on the RKE transmitter
within five seconds to Power Open/
Close the Right Power Sliding Door. If
the button on the RKE transmitter is
pushed while the door is being power-
closed, the door will reverse to the full
open position.If the vehicle is locked and the Vehicle
Security Alarm is armed, pressing the
RIGHT Power Sliding Door button
twice unlocks the power sliding door
and disarms Vehicle Security Alarm.
Turn Off Flash Lights With RKE
Lock (for versions/markets,
where provided)
This feature will cause the turn signal
lights to flash when the doors are
locked or unlocked with the RKE
transmitter. This feature can be
turned on or turned off. To change the
current setting, proceed as follows:
For vehicles equipped with the
EVIC, refer to “Electronic Vehicle
Information Center (EVIC)/
Personal Settings (Customer-
Programmable Features)” in “Un-
derstanding Your Instrument
Panel” for further information.
For vehicles not equipped with the EVIC, perform the following steps:
1. Perform this operation while
standing outside the vehicle.
2. Press and hold the UNLOCK but-
ton on a programmed RKE transmit-
ter for at least 4 seconds, but no lon- ger than 10 seconds. Then, press and
hold the LOCK button while still
holding the UNLOCK button.
3. Release both buttons at the same
time.
4. Test the feature while outside of
the vehicle by pressing the LOCK/
UNLOCK buttons on the RKE trans-
mitter with the ignition switch in the
OFF position and the Key Fob re-
moved.
5. Repeat these steps if you want to
return this feature to its previous set-
ting.
NOTE:
Pressing the LOCK button on the
RKE transmitter while you are in
the vehicle will activate the Vehicle
Security Alarm. Opening a door
with the Vehicle Security Alarm
activated will cause the alarm to
sound. Press the UNLOCK button
to deactivate the Vehicle Security
Alarm.
20
Page 30 of 344
KEYLESS ENTER-N-GO
The Passive Entry system is an en-
hancement to the vehicle’s Remote
Keyless Entry (RKE) system and a
feature of Keyless Enter-N-Go. This
feature allows you to lock and unlock
the vehicle’s door(s) without having
to press the RKE transmitter lock or
unlock buttons.
NOTE:
Passive Entry may be pro-grammed ON/OFF; refer to
“Electronic Vehicle Information
Center (EVIC)/Personal Settings
(Customer-Programmable Fea-
tures)” in “Understanding Your
Instrument Panel” for further
information.
If a Passive Entry door handle has not been used for an ex-
tended period of time, the Pas-
sive Entry feature for the handle
may time out. Pulling the deac-
tivated front door handle will
reactivate the door handle's
Passive Entry feature. If wearing gloves on your hands,
or if it has been raining on the
Passive Entry door handle, the
unlock sensitivity can be af-
fected, resulting in a slower re-
sponse time.
If you unlock the doors using the Passive Entry door handles, but
do NOT pull the handle, the
doors will automatically lock af-
ter 60 seconds.
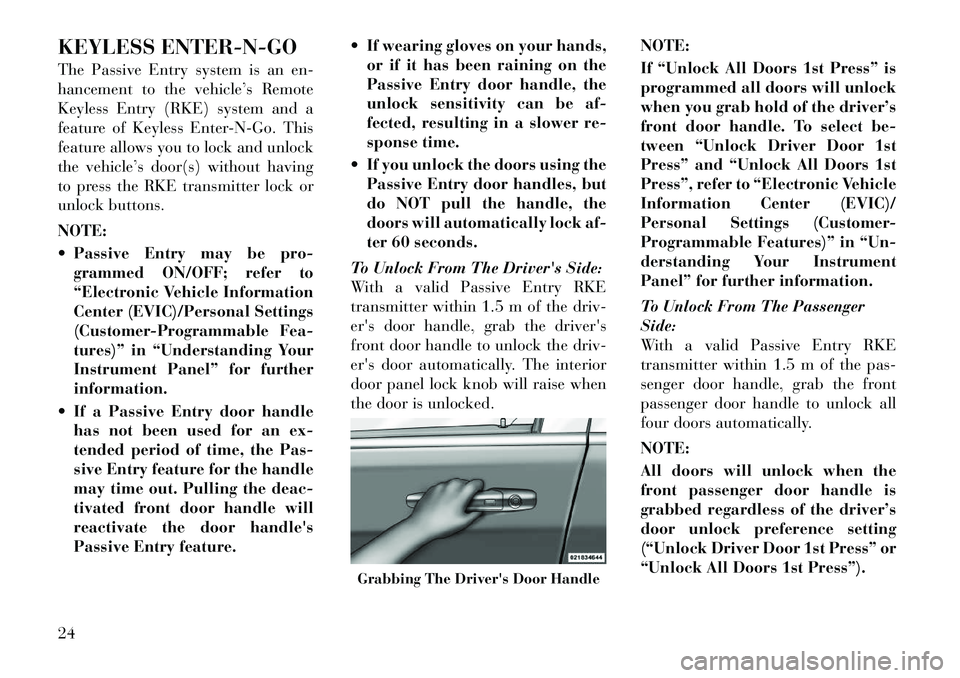
To Unlock From The Driver's Side:
With a valid Passive Entry RKE
transmitter within 1.5 m of the driv-
er's door handle, grab the driver's
front door handle to unlock the driv-
er's door automatically. The interior
door panel lock knob will raise when
the door is unlocked. NOTE:
If “Unlock All Doors 1st Press” is
programmed all doors will unlock
when you grab hold of the driver’s
front door handle. To select be-
tween “Unlock Driver Door 1st
Press” and “Unlock All Doors 1st
Press”, refer to “Electronic Vehicle
Information Center (EVIC)/
Personal Settings (Customer-
Programmable Features)” in “Un-
derstanding Your Instrument
Panel” for further information.
To Unlock From The Passenger
Side:
With a valid Passive Entry RKE
transmitter within 1.5 m of the pas-
senger door handle, grab the front
passenger door handle to unlock all
four doors automatically.
NOTE:
All doors will unlock when the
front passenger door handle is
grabbed regardless of the driver’s
door unlock preference setting
(“Unlock Driver Door 1st Press” or
“Unlock All Doors 1st Press”).
Grabbing The Driver's Door Handle
24
Page 31 of 344
To Enter The Liftgate
With a valid Passive Entry RKE
transmitter within 1.5 m of the lift-
gate, cycle the handle to open the
liftgate and pull the liftgate open with
one fluid motion.
NOTE:
If “Unlock All Doors 1st Press” is
programmed in EVIC, all doors
will unlock when you the liftgate
handle. If "Unlock Driver Door 1st
press" is programmed in EVIC, the
liftgate will unlock when you cycle
the liftgate handle. For further in-
formation, refer to “Electronic Ve-
hicle Information Center (EVIC)/
Personal Settings (Customer-
Programmable Features)” in
“Understanding Your Instrument
Panel”. All doors will remain
locked when the liftgate release
handle is pressed regardless of the
driver’s door unlock preference
setting (“Unlock Driver Door 1st
Press” or “Unlock All Doors 1st
Press”).Preventing Inadvertent Locking Of
Passive Entry RKE Transmitter In
Vehicle
To minimize the possibility of unin-
tentionally locking a Passive Entry
RKE transmitter inside your vehicle,
the Passive Entry system is equipped
with an automatic door unlock fea-
ture which will function if there is no
Key Fob present in the ignition.
If one of the vehicle doors is open and
the door panel switch is used to lock
the vehicle, once all open doors have
been closed the vehicle checks the in-
side and outside of the vehicle for any
valid Passive Entry RKE transmitters.
If one of the vehicle's Passive Entry
RKE transmitters is detected inside
the vehicle, and no other valid Passive
Entry RKE transmitters are detected
outside the vehicle, the Passive Entry
System automatically unlocks all ve-
hicle doors and chirps the horn three
times (on the third attempt ALL
doors will lock and the Passive Entry
RKE transmitter can be locked in the
vehicle).To Lock The Vehicle’s Doors
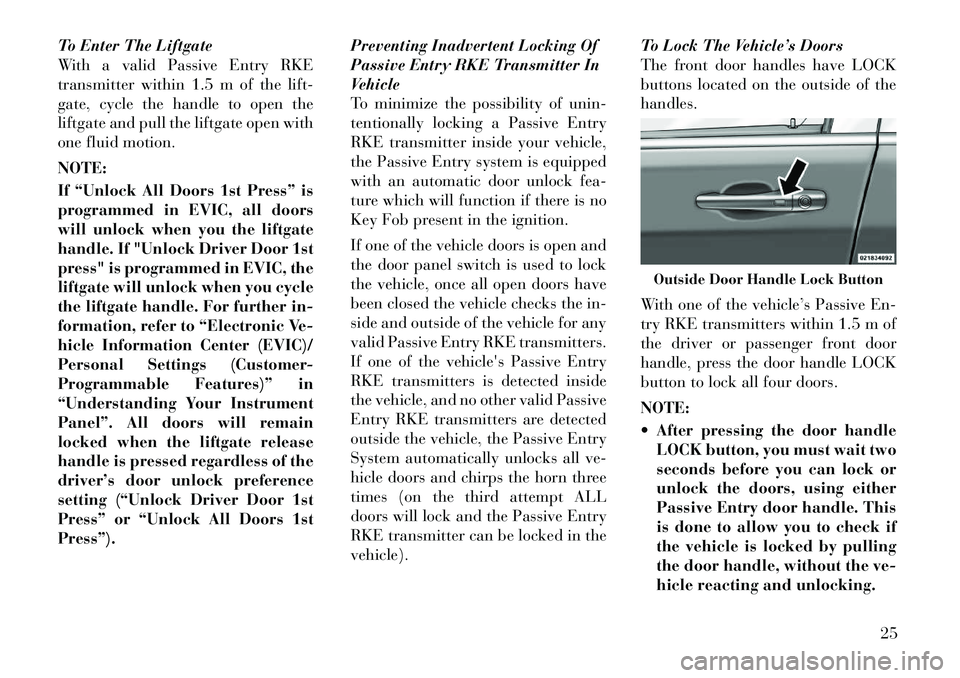
The front door handles have LOCK
buttons located on the outside of the
handles.
With one of the vehicle’s Passive En-
try RKE transmitters within 1.5 m of
the driver or passenger front door
handle, press the door handle LOCK
button to lock all four doors.
NOTE:
After pressing the door handle
LOCK button, you must wait two
seconds before you can lock or
unlock the doors, using either
Passive Entry door handle. This
is done to allow you to check if
the vehicle is locked by pulling
the door handle, without the ve-
hicle reacting and unlocking.
Outside Door Handle Lock Button
25
Page 35 of 344

the sliding door is fully closed
prior to opening the fuel door.
POWER SLIDING SIDE
DOOR (for versions/
markets, where provided)The power sliding door may
be opened or closed manu-
ally or by using the buttons
on the RKE transmitter,
overhead console switch, or rear door
switch. Pulling the inside or outside
power sliding door handle will also
power open or close the power sliding
door.
NOTE:
Pulling the outside power sliding
door handle a second time while
the sliding door is power opening
or power closing will allow the
sliding door to be opened or closed
manually.
Press the button on the RKE trans-
mitter twice within five seconds to
open a power sliding door. When the
door is fully open, pressing the button
twice within five seconds a second
time will close the door. There are power sliding side door
switches located on the b-pillar trim
panel, just in front of the power slid-
ing door for the rear seat passengers
and in the overhead console for the
driver and passengers. Pressing the
switch once will open the power slid-
ing door. If the switch is pressed while
the door is under a power cycle, the
door will reverse direction.
NOTE:
The power sliding side door must
be unlocked before the power slid-
ing door switches will operate.
If the inside or outside door handles
are used while the power sliding side
door is activated, the power sliding
door feature will be canceled and will
go into manual mode.
To avoid unintentional operation of
the power sliding doors from the rear
seats, press the power sliding door
master lock button, located in the
overhead console, to disable the
switches and handles for the rear seat
passengers.
NOTE:
The power sliding side door
switches will not open the power
sliding door if the shift lever is in
gear or the vehicle speed is
above 0 km/h. To close the
power sliding door with the shift
lever in gear and vehicle speed
at 0 km/h, the brake must be
pressed.
If anything obstructs the power sliding side door while it is clos-
ing or opening, the door will au-
tomatically reverse to the closed
or open position, provided it
meets sufficient resistance.
If the power sliding side door is not in the full open or close po-
sition, it will fully open when a
power sliding door switch is
pressed. To close the door, wait
Power Sliding Door Switch
29
Page 39 of 344

When the RKE transmitter button is
pressed and the Flash Lights feature
is enabled, the tail lights will flash and
several audible beeps will occur to
signal that the liftgate is opening or
closing.WARNING!
During power operation, personal
injury or cargo damage may occur.
Ensure the liftgate travel path is
clear. Make sure the liftgate is closed
and latched before driving away.
NOTE:
If anything obstructs the power liftgate while it is closing or
opening, the liftgate will auto-
matically reverse to the closed or open position, provided it meets
sufficient resistance.
There are also pinch sensors at- tached to the side of the liftgate
opening. Light pressure any-
where along these strips will
cause the liftgate to return to the
open position.
During power operation, whether liftgate is fully open or
fully closed, the liftgate chime
will beep several times indicat-
ing power operation is in prog-
ress.
The power liftgate must be in the full open or close positions for
any of the buttons to operate. If
the liftgate is not in the full open
or close positions, it must be
opened or closed manually.
If the liftgate release button is activated while the power lift-
gate is closing, the liftgate will
reverse to the full open position.
The power liftgate buttons will not operate if the shift lever is in
gear or the vehicle speed is
above 0 km/h. The power liftgate will not oper-
ate in temperatures below �24°C
or temperatures above 62°C. Be
sure to remove any buildup of
snow or ice from the liftgate be-
fore pressing any of the power
liftgate buttons.
If the power liftgate encounters multiple obstructions within the
same cycle, the system will auto-
matically stop and must be
opened or closed manually.
WARNING!
Driving with the liftgate open canallow poisonous exhaust gases
into your vehicle. You and your
passengers could be injured by
these fumes. Keep the liftgate
closed when you are operating the
vehicle.
If you are required to drive with
the liftgate open, make sure that
all windows are closed, and the
climate control blower switch is
set at high speed. Do not use the
recirculation mode.
Rear Power Liftgate Switch
33
Page 44 of 344

3. Slide the latch plate upward over
the folded webbing. The folded web-
bing must enter the slot at the top of
the latch plate.
4. Continue to slide the latch plate up
until it clears the folded webbing.
Adjustable Upper Shoulder Belt
Anchorage
In the front seats and the second row
outboard seats, the shoulder belt an-
chorage can be adjusted upward or
downward to help position the belt
away from your neck. The upper an-
chorage can be adjusted upward by
pushing anywhere on the anchorage.
To move the anchorage downward,
squeeze the actuation buttons while
simultaneously pushing down on the
anchorage assembly.
As a guide, if you are shorter than
average you will prefer a lower posi-
tion, and if you are taller than average
you will prefer a higher position.
When you release the anchorage, try
to move it up or down to make sure
that it is locked in position.SEAT BELTS IN
PASSENGER SEATING
POSITIONS
The seat belts in the passenger seating
positions are equipped with Auto-
matic Locking Retractors (ALR)
which are used to secure a child re-
straint system. For additional infor-
mation, refer to “Installing Child Re-
straints Using The Vehicle Seat Belt”
under the “Child Restraints” section.
The chart below defines the type of
feature for each seating position.
Driver Center Passen-
ger
First
Row N/A N/A ALR
Second Row ALR N/A ALR
Third Row ALR Cinch ALR
N/A — Not Applicable
ALR — Automatic Locking Retrac- tor
If the passenger seating position is
equipped with an ALR and is being
used for normal usage: Only pull the belt webbing out far
enough to comfortably wrap around
the occupant's mid-section so as to
not activate the ALR. If the ALR is
activated, you will hear a ratcheting
sound as the belt retracts. Allow the
webbing to retract completely in this
case and then carefully pull out only
the amount of webbing necessary to
comfortably wrap around the occu-
pant's mid-section. Slide the latch
plate into the buckle until you hear a
"click."
AUTOMATIC LOCKING
RETRACTOR MODE (ALR)
In this mode, the shoulder belt is au-
tomatically pre-locked. The belt will
still retract to remove any slack in the
shoulder belt. The Automatic Locking
Mode is available on all passenger-
seating positions with a combination
lap/shoulder belt. Use the Automatic
Locking Mode anytime a child safety
seat is installed in a seating position
that has a belt with this feature. Chil-
dren 12 years old and under should
always be properly restrained in the
rear seat.
38
Page 82 of 344

DRIVER'S AUTOMATIC
DIMMING MIRROR (for
versions/markets, where
provided)
The driver's outside mirror will auto-
matically adjust for glare from ve-
hicles behind you. This feature is con-
trolled by the inside automatic
dimming mirror and can be turned on
or off by pressing the button at the
base of the inside mirror. The mirror
will automatically adjust for head-
light glare when the inside mirror ad-
justs.
OUTSIDE MIRROR
FOLDING FEATURE
All outside mirrors are hinged and
may be moved either forward or rear-
ward to resist damage. The hinges
have three detent positions: full for-
ward, full rearward and normal.POWER MIRRORS (for
versions/markets, where
provided)
The power mirror controls are located
on the driver's door trim panel.
The power mirror controls consist of
mirror select buttons and a four-way
mirror control switch. To adjust a mir-
ror, press either the L (left) or R
(right) to select button the mirror that
you want to adjust.
NOTE:
A light in the selected button will
illuminate indicating the mirror is
activated and can be adjusted.
Using the mirror control switch, press
on any of the four arrows for the di-
rection that you want the mirror to
move.
Driver's side power mirror preselected
positions can be controlled by the op-
tional Driver Memory Seat Feature.
Refer to “Driver Memory Seat” in
“Understanding the Features Of Your
Vehicle” for further information.
HEATED MIRRORS (for
versions/markets, where
provided)
These mirrors are heated to
melt frost or ice. This feature is
activated whenever you turn
on the rear window defroster. Refer to
“Rear Window Features” in “Under-
standing the Features of Your Ve-
hicle” for further information.
Power Mirror Controls
76
Page 88 of 344
Astronomy Zone — System
Temporarily Unavailable
When the vehicle enters this zone the
blind spot system will become tempo-
rarily unavailable and the EVIC will
display the message “ Blind spot sys-
tem unavailable-Astronomy zone”.
The side mirrors LED’s will be lit up
and stay lit until the vehicle exits the
zone.
UCONNECT™ PHONE
(for versions/markets,
where provided)
NOTE:
For Uconnect™ Phone with Navi-
gation or Multimedia radio, refer
to the Navigation or Multimedia
radio's User's Manual (separate
booklet) Uconnect™ Phone sec-
tion.
Uconnect™ Phone is a voice-
activated, hands-free, in-vehicle com-
munications system. Uconnect™
Phone allows you to dial a phone
number with your mobile phone* us-
ing simple voice commands (e.g.,
“Call”…“Jim”… “Work” or“Dial”…“151-1234 -5555”). Your
mobile phone's audio is transmitted
through your vehicle's audio system;
the system will automatically mute
your radio when using the
Uconnect™ Phone.
Uconnect™ Phone allows you to
transfer calls between the Uconnect™
Phone and your mobile phone as you
enter or exit your vehicle and enables
you to mute the Uconnect™ Phone's
microphone for private conversation.
The Uconnect™ Phone is driven
through your Bluetooth® “Hands-
Free profile” mobile phone.
Uconnect™ Phone features
Bluetooth® technology - the global
standard that enables different elec-
tronic devices to connect to each other
without wires or a docking station, so
Uconnect™ Phone works no matter
where you stow your mobile phone
(be it your purse, pocket, or brief-
case), as long as your phone is turned
on and has been paired to the vehicle's
Uconnect™ Phone. The Uconnect™
Phone allows up to seven mobile
phones to be linked to the system.
Only one linked (or paired) mobilephone can be used with the
Uconnect™ Phone at a time. The
Uconnect™ Phone is available in
English, Dutch, French, German,
Italian or Spanish languages (as
equipped).
WARNING!
Any voice commanded system
should be used only in safe driving
conditions following local laws and
phone use. All attention should be
kept on the roadway ahead. Failure
to do so may result in a collision
causing serious injury or death.
Uconnect™ Phone Button The radio or steering wheel
controls (for versions/
markets, where provided)
will contain the two control
buttons (Uconnect™ Phone
but-
ton and Voice Commandbut-
ton) that will enable you to access the
system. When you press the button
you will hear the word Uconnect™
followed by a BEEP. The beep is your
signal to give a command.
82