ESP Lancia Voyager 2014 Owner handbook (in English)
[x] Cancel search | Manufacturer: LANCIA, Model Year: 2014, Model line: Voyager, Model: Lancia Voyager 2014Pages: 364, PDF Size: 3.49 MB
Page 119 of 364
POWER LUMBAR (for
versions/markets, where
provided)
Vehicles equipped with power driver
or passenger seats may be also be
equipped with power lumbar. The
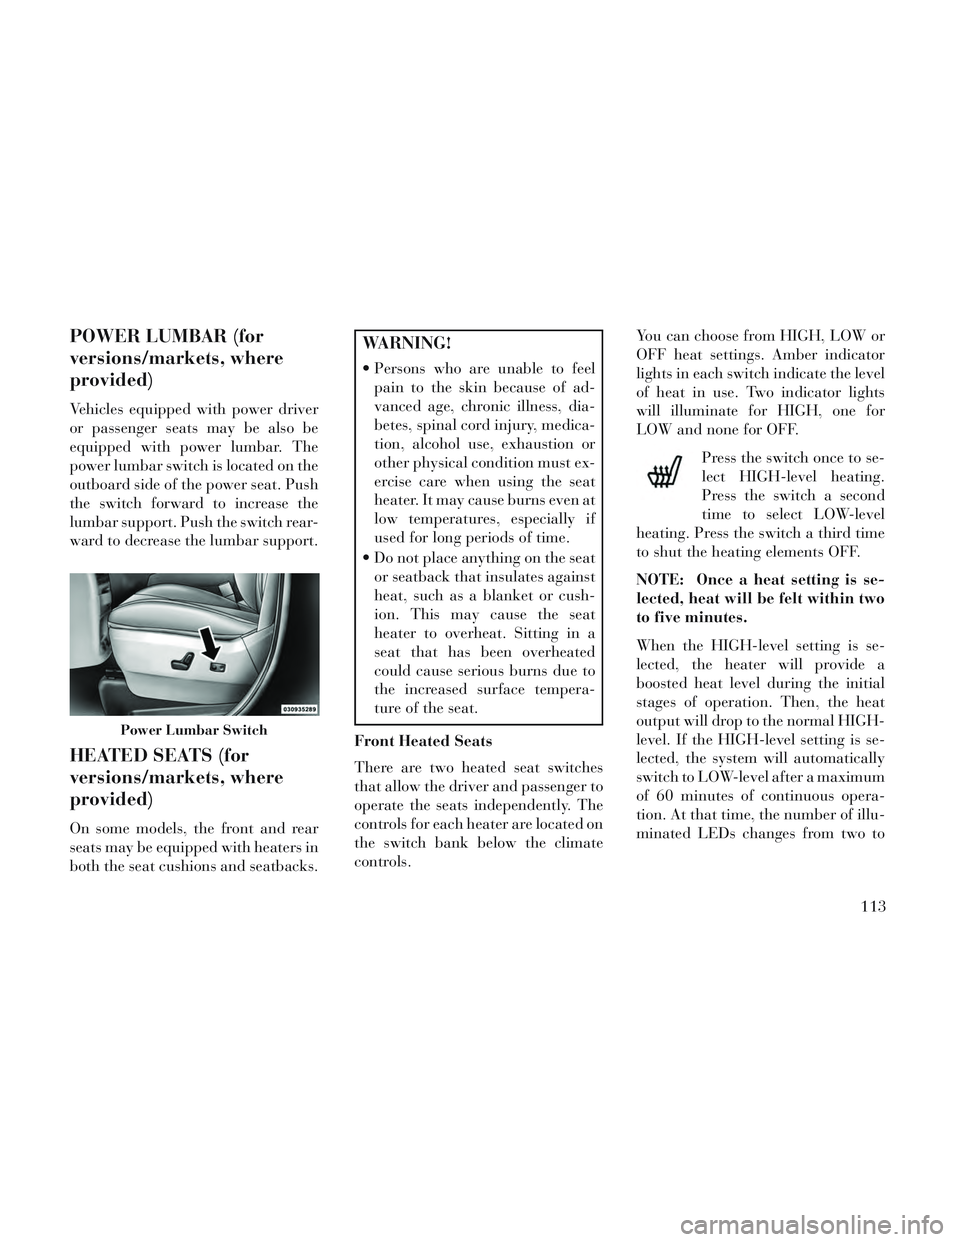
power lumbar switch is located on the
outboard side of the power seat. Push
the switch forward to increase the
lumbar support. Push the switch rear-
ward to decrease the lumbar support.
HEATED SEATS (for
versions/markets, where
provided)
On some models, the front and rear
seats may be equipped with heaters in
both the seat cushions and seatbacks.
WARNING!
Persons who are unable to feelpain to the skin because of ad-
vanced age, chronic illness, dia-
betes, spinal cord injury, medica-
tion, alcohol use, exhaustion or
other physical condition must ex-
ercise care when using the seat
heater. It may cause burns even at
low temperatures, especially if
used for long periods of time.
Do not place anything on the seat or seatback that insulates against
heat, such as a blanket or cush-
ion. This may cause the seat
heater to overheat. Sitting in a
seat that has been overheated
could cause serious burns due to
the increased surface tempera-
ture of the seat.
Front Heated Seats
There are two heated seat switches
that allow the driver and passenger to
operate the seats independently. The
controls for each heater are located on
the switch bank below the climate
controls. You can choose from HIGH, LOW or
OFF heat settings. Amber indicator
lights in each switch indicate the level
of heat in use. Two indicator lights
will illuminate for HIGH, one for
LOW and none for OFF.
Press the switch once to se-
lect HIGH-level heating.
Press the switch a second
time to select LOW-level
heating. Press the switch a third time
to shut the heating elements OFF.
NOTE: Once a heat setting is se-
lected, heat will be felt within two
to five minutes.
When the HIGH-level setting is se-
lected, the heater will provide a
boosted heat level during the initial
stages of operation. Then, the heat
output will drop to the normal HIGH-
level. If the HIGH-level setting is se-
lected, the system will automatically
switch to LOW-level after a maximum
of 60 minutes of continuous opera-
tion. At that time, the number of illu-
minated LEDs changes from two to
Power Lumbar Switch
113
Page 135 of 364

INTERIOR LIGHTING
Interior lights are turned on when a
door or liftgate is opened, the Remote
Keyless Entry (RKE) transmitter is
activated, or when the dimmer con-
trol is moved to the extreme top.
The interior lights will automatically
turn off in approximately 10 minutes
for the first activation and 90 seconds
every activation thereafter until the
engine is started, if one of the follow-
ing occur:
1. A door, sliding door or the liftgate
is left open
2. Any overhead reading light is left
on
NOTE: The key must be out of the
ignition switch or the ignition
switch must be in the OFF position
for this feature to operate.
Halo Lights (for versions/markets,
where provided)
Halo lights are strategically placed
soft lighting that help to illuminatespecific areas to aid the occupants in
locating specific features while driv-
ing at night.
The Halo control switch is located to
the right of the dimmer switch.
To activate the Halo lights,
rotate the Halo switch con-
trol upward or downward
to increase or decrease the
lighting.
PARKING LIGHTS
Turn the headlight switch
knob to the first detent to turn
the parking lights on. This also turns
on all instrument panel lighting.
HEADLIGHTS
Turn the headlight switch
knob to the second detent to
turn the headlights and
parking lights on. This also
turns on all instrument panel lighting.
To change the brightness of the in-
strument panel lights, rotate the dim-
mer control up or down.
AUTOMATIC HEADLIGHTS
(for versions/markets,
where provided)
This system automatically turns your
headlights on or off based on ambient
light levels. To turn the system on,
turn the headlight switch to the ex-
treme counterclockwise position
aligning the indicator with AUTO on
the headlight switch. When the sys-
tem is on, the Headlight Time Delay
feature is also on. This means your
headlights will stay on for up to 90
seconds after you turn the ignition
switch OFF. To turn the Automatic
System off, turn the headlight switch
clockwise to the O (Off) position.
Halo Control Switch
129
Page 138 of 364

from low beams to high beams. Pull-
ing back to the neutral position re-
turns the headlights to the low beam
operation.
FLASH-TO-PASS
You can signal another vehicle with
your headlights by lightly pulling the
multifunction lever toward you. This
will turn on the high beam headlights
until the lever is released.
AUTOMATIC HIGH BEAM
(for versions/markets,
where provided)
The Automatic High Beam system
provides increased forward lighting at
night by automating high beam con-
trol through the use of a digital cam-
era mounted on the inside rearview
mirror. This camera detects vehicle
specific light and automatically
switches from high beams to low
beams until the approaching vehicle
is out of view.
NOTE: Broken, muddy or ob-
structed headlights and taillights
of vehicles in the field of view willcause headlights to remain on lon-
ger (closer to the vehicle). Also,
dirt, film and other obstructions
on the windshield or camera lens
will cause the system to function
improperly.
To Activate
1. Select “Automatic High Beams —
ON” through the EVIC. Refer to
“Electronic Vehicle Information Cen-
ter (EVIC)/Customer-Programmable
Features” in “Understanding Your In-
strument Panel” for further informa-
tion.
2. Rotate the headlight switch coun-
terclockwise to the AUTO (A) posi-
tion.
3. Push the multifunction lever away
from you to switch the headlights to
the high beam position. Refer to
“Multifunction Lever” in this section
for further information.
NOTE: This system will not acti-
vate until the vehicle is at, or
above, 40 km/h.
HEADLIGHT LEVELING
SYSTEM (for versions/
markets, where provided)
Your vehicle may be
equipped with a headlight
leveling system. This sys-
tem allows the driver to
maintain proper headlight beam posi-
tion with the road surface regardless
of vehicle load. The control switch is
located on the instrument panel next
to the dimmer control.
To operate, rotate the control switch
until the appropriate number, which
corresponds to the load listed on the
chart, aligns with the indicator line on
the switch.
0 Driver only, or driver and
front passenger.
1 Driver, plus an evenly distrib-
uted load in the luggage com- partment. The total weight of the driver and load does not exceed the maximum load capacity of the vehicle.
132
Page 140 of 364

18 second between cycles (first de-
tent), to a cycle every one second
(fifth detent).
NOTE: If the vehicle is moving
less than 16 km/h, delay times will
be doubled.
REAR WIPER AND
WASHER
Rotating the rotary ring to the first
detent activates the rear intermittent
wipers. To activate the washers, rotate
the rotary ring fully forward and the
washers will spray until the ring is
released, and then resume the inter-
mittent interval.
NOTE: Rear window wipers
function in the intermittent wiper
speed only.
WARNING!
Sudden loss of visibility through
the windshield could lead to a col-
lision. You might not see other ve-
hicles or other obstacles. To avoid
sudden icing of the windshield dur-
ing freezing weather, warm the
windshield with defroster before
and during windshield washer use.
RAIN SENSING WIPERS
(for versions/markets,
where provided)
This feature senses moisture on the
windshield and automatically acti-
vates the wipers for the driver. This
feature is especially useful for road
splash or overspray from the wind-
shield washers of the vehicle ahead.
Rotate the end of the multifunction
lever to one of the five intermittent
wiper sensitivity settings to activate
this feature.
The sensitivity of the system is adjust-
able from the multifunction lever.
Wiper sensitivity position 3 has been
calibrated for best overall wiping sen-
sitivity. If the operator desires morewiping sensitivity, they may select
sensitivity positions 4 or 5. If the op-
erator desires less wiping sensitivity,
they may select sensitivity positions 2
or 1. Place the multifunction lever in
the OFF position when not using the
system.
NOTE:
The Rain Sensing feature will
not operate when the wiper
speed is in the low or high posi-
tion.
The Rain Sensing feature may not function properly when ice
or dried saltwater is present on
the windshield.
Use of products containing wax or silicone may reduce rain sen-
sor performance.
The Rain Sensing feature can be turned on and off through the
EVIC (for versions/markets,
where provided). Refer to “Elec-
tronic Vehicle Information Cen-
ter (EVIC)/Personal Settings
134
Page 148 of 364
could provide a false indication
that an obstacle is behind the
fascia/bumper.
Ensure that the ParkSense® sys- tem is turned off if objects such
as bicycle carriers, trailer
hitches, etc. are placed within 30
cm from the rear fascia/ bum-
per. Failure to do so can result in
the system misinterpreting a
close object as a sensor problem,
causing the “PARKSENSE UN-
AVAILABLE SERVICE RE-
QUIRED” message to be dis-
played in the EVIC.
On vehicles equipped with a tailgate, ParkSense® should be
disabled when the tailgate is in
the lowered or open position
and the vehicle is in REVERSE.
A lowered tailgate could provide
a false indication that an ob-
stacle is behind the vehicle.CAUTION!
ParkSense® is only a parking aidand it is unable to recognize every
obstacle, including small ob-
stacles. Parking curbs might be
temporarily detected or not de-
tected at all. Obstacles located
above or below the sensors will
not be detected when they are in
close proximity.
The vehicle must be driven slowly when using ParkSense® in order
to be able to stop in time when an
obstacle is detected. It is recom-
mended that the driver looks over
his/her shoulder when using
ParkSense®.
WARNING!
Drivers must be careful whenbacking up even when using
ParkSense®. Always check care-
fully behind your vehicle, look
behind you, and be sure to check
for pedestrians, animals, other
vehicles, obstructions, and blind
spots before backing up. You are
responsible for safety and must
continue to pay attention to your
surroundings. Failure to do so can
result in serious injury or death.
(Continued)
142
Page 150 of 364
WARNING!
Drivers must be careful when back-
ing up even when using the
ParkView® Rear Back Up Camera.
Always check carefully behind your
vehicle, and be sure to check for
pedestrians, animals, other ve-
hicles, obstructions, or blind spots
before backing up. You are respon-
sible for the safety of your sur-
roundings and must continue to
pay attention while backing up.
Failure to do so can result in serious
injury or death.
CAUTION!
To avoid vehicle damage,ParkView® should only be used
as a parking aid. The camera is
unable to view every obstacle or
object in your drive path.
(Continued)
CAUTION!(Continued)
To avoid vehicle damage, the ve-
hicle must be driven slowly when
using ParkView® to be able to stop
in time when an obstacle is seen. It
is recommended that the driver
look frequently over his/her shoul-
der when using ParkView®.
NOTE: If snow, ice, mud, or any
foreign substance builds up on the
camera lens, clean the lens, rinse
with water, and dry with a soft
cloth. Do not cover the lens.
TURNING PARKVIEW® ON
OR OFF — WITH
NAVIGATION/
MULTIMEDIA RADIO
1. Press the “menu” hard-key.
2. Select “system setup” soft-key.
3. Press the “camera setup” soft-key.
4. Enable or disable the rear camera
feature by selecting “enable rear cam-
era in reverse” soft-key.
5. Press the “save” soft-key.
TURNING PARKVIEW® ON
OR OFF — WITHOUT
NAVIGATION/
MULTIMEDIA RADIO
1. Press the “menu” hard-key.
2. Select “system setup” soft-key.
3. Enable or disable the rear camera
feature by selecting “enable rear cam-
era in reverse” soft-key.
OVERHEAD CONSOLES
FRONT OVERHEAD
CONSOLE
Two versions of the overhead console
are available. The base front overhead
console model featured fixed incan-
descent courtesy/reading lights, flip-
down sunglass storage and conversa-
tion mirror. The premium front
overhead console model features a
LED focused light that illuminates
the instrument panel cupholders, two
swiveling LED lights, flip-down sun-
glass storage, conversation mirror,
optional power sliding door switches
and an optional power liftgate switch.
144
Page 169 of 364

CAUTION!
Check deployed crossbars fre-quently and retighten thumb
screws as necessary.
To avoid damage to the roof rack and vehicle, do not exceed the
maximum roof rack load capacity
of 68 kg. Always distribute heavy
loads as evenly as possible and
secure the load appropriately.
To prevent damage to the roof of your vehicle, DO NOT carry any
loads on the roof rack without the
crossbars deployed.
(Continued)
CAUTION!(Continued)
The load should be secured andplaced on top of the crossbars, not
directly on the roof. If it is neces-
sary to place the load on the roof,
place a blanket or other protec-
tive layer between the load and
the roof surface.
Long loads which extend over the windshield, such as wood panels
or surfboards, or loads with large
frontal area should be secured to
both the front and rear of the
vehicle.
Travel at reduced speeds and turn corners carefully when carrying
large or heavy loads on the roof
rack. Wind forces, due to natural
causes or nearby truck traffic,
can add sudden upward lift to a
load. This is especially true on
large flat loads and may result in
damage to the cargo or your ve-
hicle.
WARNING!
Cargo must be securely tied before
driving your vehicle. Improperly
secured loads can fly off the vehicle,
particularly at high speeds, result-
ing in personal injury or property
damage. Follow the roof rack cau-
tions when carrying cargo on your
roof rack.
HEADLIGHT WASHER
(for versions/markets,
where provided)
The multifunction lever operates the
headlight washers when the ignition
switch is in the ON position and the
headlights are turned on. The multi-
function lever is located on the left
side of the steering column.
To use the headlight washers, push
the multifunction lever inward (to-
ward the steering column) to the sec-
ond detent and release it. The head-
light washers will spray a timed high-
pressure spray of washer fluid onto
each headlight lens. In addition, the
Rail Tie Loops
163
Page 180 of 364
that illuminates a low tire pressure
telltale when one or more of your tires
is significantly under-inflated. Ac-
cordingly, when the low tire pressure
telltale illuminates, you should stop
and check your tires as soon as pos-
sible, and inflate them to the proper
pressure. Driving on a significantly
under-inflated tire causes the tire to
overheat and can lead to tire failure.
Under-inflation also reduces fuel effi-
ciency and tire tread life, and may
affect the vehicle’s handling and stop-
ping ability.
Please note that the TPMS is not a
substitute for proper tire mainte-
nance, and it is the driver’s responsi-
bility to maintain correct tire pres-
sure, even if under-inflation has not
reached the level to trigger illumina-
tion of the TPMS low tire pressure
telltale.
Your vehicle has also been equipped
with a TPMS malfunction indicator to
indicate when the system is not oper-
ating properly. The TPMS malfunc-
tion indicator is combined with the
low tire pressure telltale. When thesystem detects a malfunction, the tell-
tale will flash for approximately one
minute and then remain continuously
illuminated. This sequence will con-
tinue upon subsequent vehicle start-
ups as long as the malfunction exists.
When the malfunction indicator is il-
luminated, the system may not be
able to detect or signal low tire pres-
sure as intended. TPMS malfunctions
may occur for a variety of reasons,
including the installation of replace-
ment or alternate tires or wheels on
the vehicle that prevent the TPMS
from functioning properly. Always
check the TPMS malfunction telltale
after replacing one or more tires or
wheels on your vehicle, to ensure that
the replacement or alternate tires and
wheels allow the TPMS to continue to
function properly.CAUTION!
The TPMS has been optimized for
the original equipment tires and
wheels. TPMS pressures and warn-
ing have been established for the
tire size equipped on your vehicle.
Undesirable system operation or
sensor damage may result when us-
ing replacement equipment that is
not of the same size, type, and/or
style. Aftermarket wheels can cause
sensor damage. Do not use tire seal-
ant from a can or balance beads if
your vehicle is equipped with a
TPMS, as damage to the sensors
may result.
9. Malfunction Indicator Light
(MIL) The Malfunction Indicator
Light (MIL) is part of an on-
board diagnostic system,
called OBD, that monitors engine and
automatic transmission control sys-
tems. The light will illuminate when
the key is in the ON/RUN position,
before engine start. If the bulb does
174
Page 195 of 364
CUSTOMER-
PROGRAMMABLE
FEATURES (SYSTEM
SETUP)
Personal Settings allows you to set
and recall features when the transmis-
sion is in PARK. If the transmission is
out of PARK or the vehicle begins
moving, a warning messageSYSTEM
SETUP NOT AVAILABLE VE-
HICLE NOT IN PARK displays when
you try to select “System Setup” from
the main menu.
Press and release the UP or DOWN
button until "System Setup" is high-
lighted in the main menu of the EVIC.
Then press the SELECT button to
enter the System Setup sub-menu.
Press and release the UP or DOWN
button to select a feature form the
following choices:
Language
When in this display you may select
one of five languages for all display
nomenclature, including the trip
functions and the navigation system (for versions/markets, where pro-
vided). Press the UP or DOWN button
while in this display and scroll
through the language choices. Press
the SELECT button to select English,
Spanish (Español), French (Fran-
çais), etc. Then, as you continue, the
information will display in the se-
lected language.
Nav–Turn By Turn (for
versions/markets, where
provided)
When this feature is selected, the
navigation system utilizes voice com-
mands, guiding through the drive
route, mile by mile, turn-by-turn un-
til the final destination is reached. To
make your selection, press and release
the SELECT button until a check-
mark appears next to the feature
showing the system has been acti-
vated or the check-mark is removed
showing the system has been deacti-
vated.
Enable/Disable the Rear Park
Assist System (for versions/
markets, where provided)
The Rear Park Assist system will scan
for objects behind the vehicle when
the transmission is in the REVERSE
position and the vehicle speed is less
than 18 km/h. The system can be
enabled with Sound Only, Sound and
Display, or turned OFF through the
EVIC. To make your selection, press
and release the SELECT button until
a check-mark appears next to the fea-
ture showing the system has been ac-
tivated or the check-mark is removed
showing the system has been deacti-
vated. Refer to “Rear Park Assist Sys-
tem” in “Understanding The Features
Of Your Vehicle” for system function
and operating information.
Auto Unlock Doors
When ON is selected, all doors will
unlock when the vehicle is stopped
and the transmission is in the PARK
or NEUTRAL position and the driv-
er's door is opened. To make your
189
Page 201 of 364
mode. In Play mode, the following
buttons on the radio faceplate may be
used to control the iPod® or external
USB device and display data:
Use the TUNE control knob to se-lect the next or previous track.
Turning it clockwise (forward) by one click, while playing a
track, skips to the next track or
press the VR button and say
"Next Track".
Turning it counterclockwise (backward) by one click, will
jump to the previous track in the
list or press the VR button and
say "Previous Track"
Jump backward in the current track by pressing and holding the
<< RW button. Holding the << RW
button long enough will jump to the
beginning of the current track.
Jump forward in the current track by pressing and holding the FF>>
button. A single press backward <<
RWor
forward FF>> will jump backward
or forward respectively, for five sec-
onds.
Use the << SEEKandSEEK>>
buttons to jump to the previous or
next track. Pressing the SEEK>>
button during play mode will jump
to the next track in the list, or press
the VR button and say "Next or
Previous Track".
While a track is playing, press the INFO button to see the associated
metadata (artist, track title, album,
etc.) for that track. Pressing the
INFO button again jumps to the
next screen of data for that track.
Once all screens have been viewed,
the last INFObutton press will go
back to the play mode screen on the
radio.
Pressing the REPEATbutton will
change the audio device mode to
repeat the current playing track or
press the VR button and say "Re-
peat ON" or "Repeat Off". Press the
SCANbutton to use
iPod®/USB/MP3 device scan
mode, which will play the first 10
seconds of each track in the current
list and then forward to the next
song. To stop SCAN mode and start
playing the desired track, when it is
playing the track, press the SCAN
button again. During Scan mode,
pressing the << SEEKand
SEEK>> buttons will select the
previous and next tracks.
RND button (available on sales
code RES radio only): Pressing this
button toggles between Shuffle ON
and Shuffle OFF modes for the
iPod® or external USB device, or
press the VR button and say
"Shuffle ON" or "Shuffle Off". If
the RND icon is showing on the
radio display, then the shuffle mode
is ON.
LIST OR BROWSE MODE
During Play mode, pressing any of the
buttons described below, will bring up
List mode. List mode enables scroll-
ing through the list of menus and
tracks on the audio device.
195