display Lancia Voyager 2014 Owner handbook (in English)
[x] Cancel search | Manufacturer: LANCIA, Model Year: 2014, Model line: Voyager, Model: Lancia Voyager 2014Pages: 364, PDF Size: 3.49 MB
Page 227 of 364
3. When the system is set up for your
comfort level, it is not necessary to
change the settings. You will experi-
ence the greatest efficiency by simply
allowing the system to function auto-
matically.
NOTE:
It is not necessary to move thetemperature settings for cold or
hot vehicles. The system auto-
matically adjusts the tempera-
ture, mode and fan speed to pro-
vide comfort as quickly as
possible.
The temperature can be dis- played in English or Metric units
by selecting the “Display Units
of Measure in” customer-
programmable feature. Refer to
the “Electronic Vehicle Informa-
tion Center (EVIC) — Customer-
Programmable Features” in this
Section.
To provide you with maximum com-
fort in the automatic mode, during
cold start-ups, the blower fan will re-
main on low until the engine warms
up. The fan will engage immediately if the Defrost mode is selected, or by
changing the front blower knob set-
ting.
Manual Operation Override
This system offers a full complement
of manual override features. The
AUTO symbol in the front ATC dis-
play will be turned off when the sys-
tem is being used in the manual mode.
NOTE: If not operating in AUTO
mode, the system will not auto-
matically sense the presence of fog,
mist or ice on the windshield. DE-
FROST mode must be manually
selected to clear the windshield
and side glass.
Air Conditioning (A/C)
The Air Conditioning (A/C) button
allows the operator to manually acti-
vate or deactivate the air conditioning
system. When in A/C mode and the
ATC is set to a cool temperature, de-
humidified air flows through the air
outlets. If Economy mode is desired,
press the A/C button to turn off the
A/C mode in the ATC display and
deactivate the A/C system.
NOTE:
If the system is in Mix, Floor or
Defrost Mode, the A/C can be
turned off, but the A/C system
shall remain active to prevent
fogging of the windows.
If fog or mist appears on the windshield or side glass, select
Defrost mode and increase
blower speed.
Recirculation Control
When outside air contains
smoke, odors, or high hu-
midity, or if rapid cooling is
desired, you may wish to
recirculate interior air by pressing the
Recirculation control button. Recir-
culation mode should only be used
temporarily. A LED will illuminate on
the Recirculation control button when
Recirculation mode is selected. Push
the button a second time to turn off
the Recirculation mode LED and al-
low outside air into the vehicle.
221
Page 228 of 364
Controlling The Rear Climate
Controls From The Front ATC
Panel
The Three-Zone ATC system allows
for adjustment of the rear climate
controls from the front ATC panel.
To change the rear system settings:
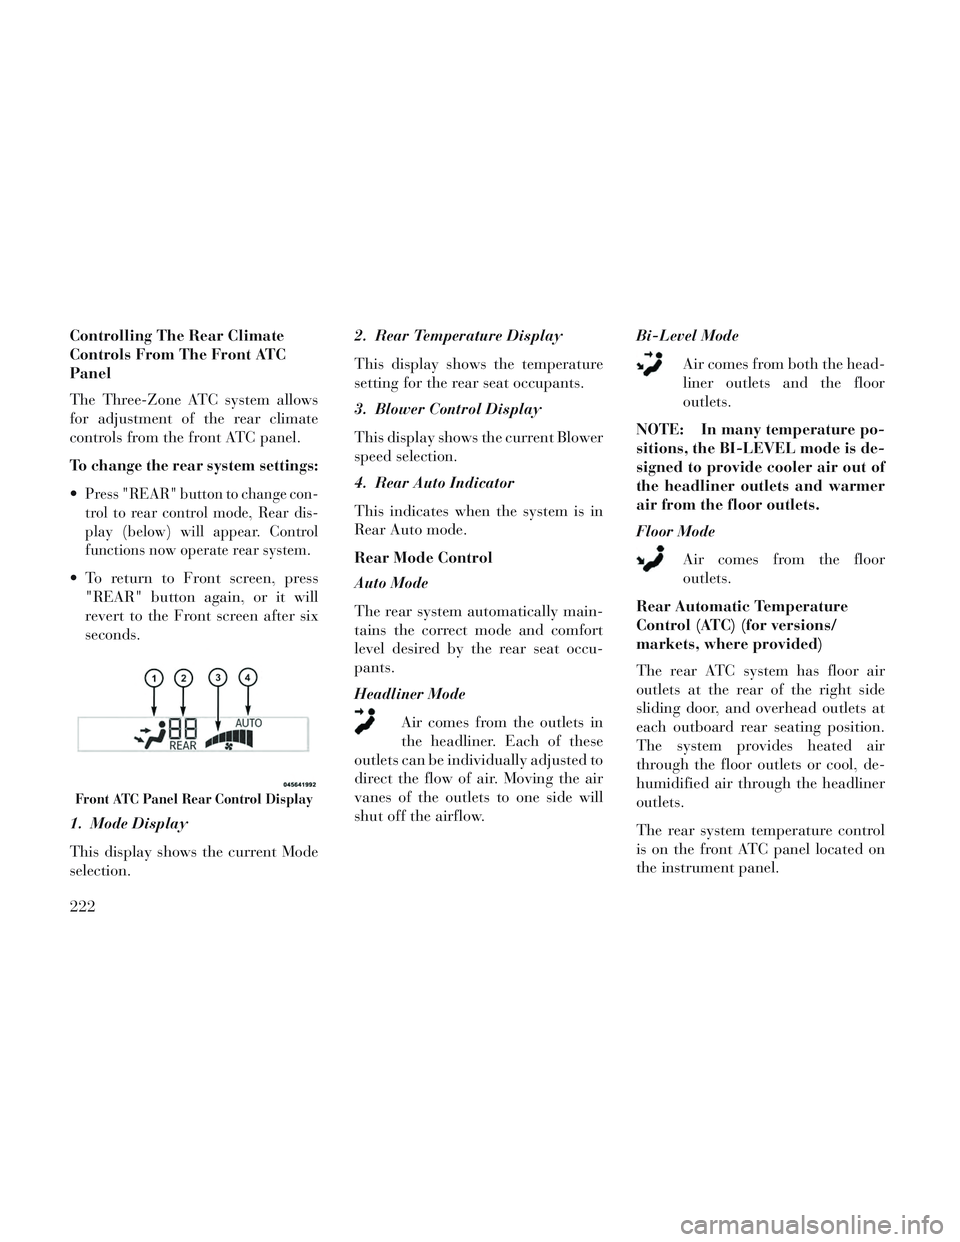
Press "REAR" button to change con-
trol to rear control mode, Rear dis-
play (below) will appear. Control
functions now operate rear system.
To return to Front screen, press"REAR" button again, or it will
revert to the Front screen after six
seconds.
1. Mode Display
This display shows the current Mode
selection. 2. Rear Temperature Display
This display shows the temperature
setting for the rear seat occupants.
3. Blower Control Display
This display shows the current Blower
speed selection.
4. Rear Auto Indicator
This indicates when the system is in
Rear Auto mode.
Rear Mode Control
Auto Mode
The rear system automatically main-
tains the correct mode and comfort
level desired by the rear seat occu-
pants.
Headliner Mode
Air comes from the outlets in
the headliner. Each of these
outlets can be individually adjusted to
direct the flow of air. Moving the air
vanes of the outlets to one side will
shut off the airflow. Bi-Level Mode
Air comes from both the head-
liner outlets and the floor
outlets.
NOTE: In many temperature po-
sitions, the BI-LEVEL mode is de-
signed to provide cooler air out of
the headliner outlets and warmer
air from the floor outlets.
Floor Mode Air comes from the floor
outlets.
Rear Automatic Temperature
Control (ATC) (for versions/
markets, where provided)
The rear ATC system has floor air
outlets at the rear of the right side
sliding door, and overhead outlets at
each outboard rear seating position.
The system provides heated air
through the floor outlets or cool, de-
humidified air through the headliner
outlets.
The rear system temperature control
is on the front ATC panel located on
the instrument panel.
Front ATC Panel Rear Control Display
222
Page 229 of 364
Pressing the Rear Temperature Lock
button on the front ATC panel, illumi-
nates a lock symbol in the rear dis-
play. The rear temperature and air
source are controlled from the front
ATC panel.
Rear second row occupants can only
adjust the rear ATC control when the
Rear Temperature Lock button is
turned off.
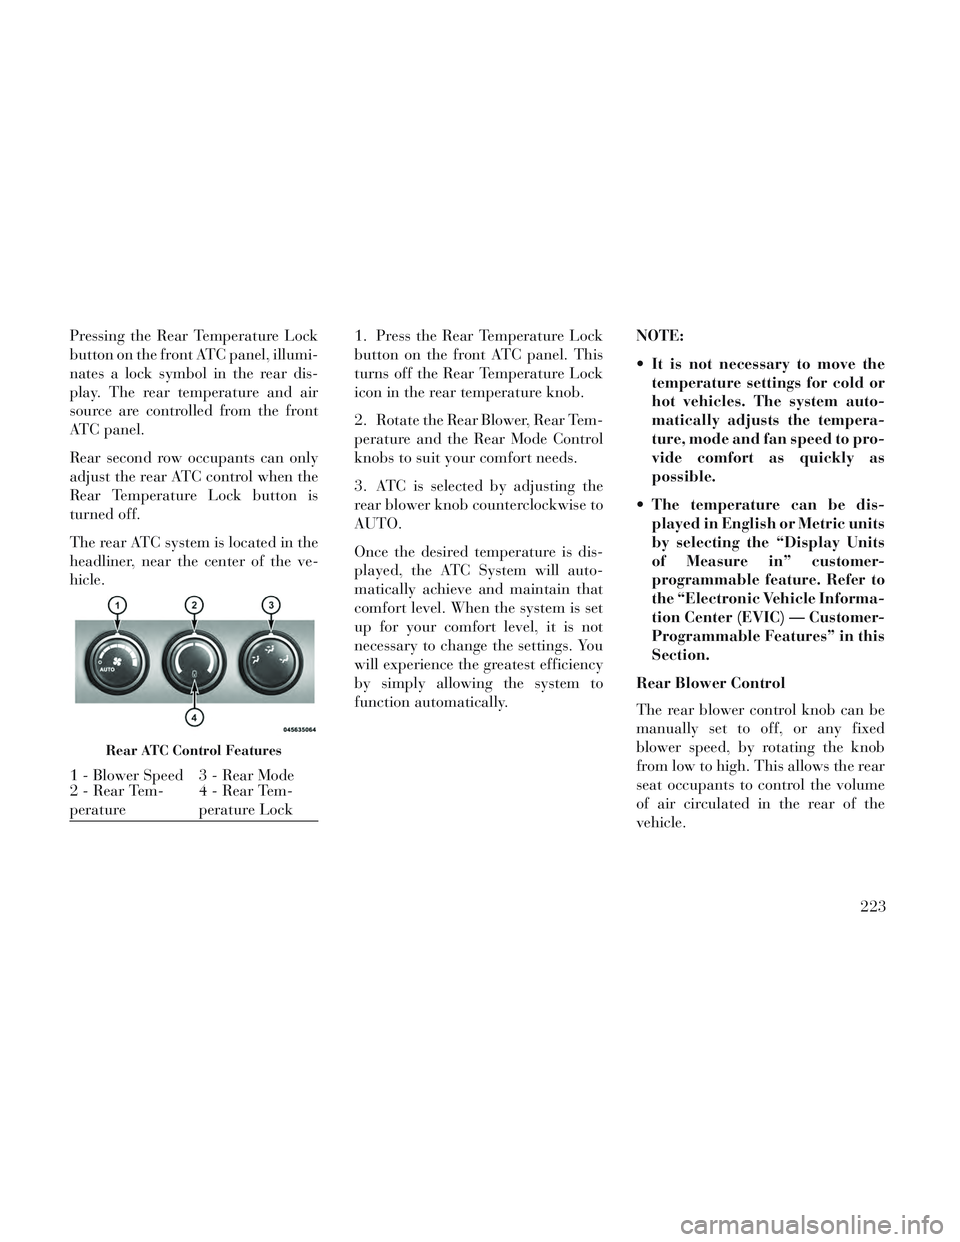
The rear ATC system is located in the
headliner, near the center of the ve-
hicle.1. Press the Rear Temperature Lock
button on the front ATC panel. This
turns off the Rear Temperature Lock
icon in the rear temperature knob.
2. Rotate the Rear Blower, Rear Tem-
perature and the Rear Mode Control
knobs to suit your comfort needs.
3. ATC is selected by adjusting the
rear blower knob counterclockwise to
AUTO.
Once the desired temperature is dis-
played, the ATC System will auto-
matically achieve and maintain that
comfort level. When the system is set
up for your comfort level, it is not
necessary to change the settings. You
will experience the greatest efficiency
by simply allowing the system to
function automatically.NOTE:
It is not necessary to move the
temperature settings for cold or
hot vehicles. The system auto-
matically adjusts the tempera-
ture, mode and fan speed to pro-
vide comfort as quickly as
possible.
The temperature can be dis- played in English or Metric units
by selecting the “Display Units
of Measure in” customer-
programmable feature. Refer to
the “Electronic Vehicle Informa-
tion Center (EVIC) — Customer-
Programmable Features” in this
Section.
Rear Blower Control
The rear blower control knob can be
manually set to off, or any fixed
blower speed, by rotating the knob
from low to high. This allows the rear
seat occupants to control the volume
of air circulated in the rear of the
vehicle.
Rear ATC Control Features
1 - Blower Speed 3 - Rear Mode
2 - Rear Tem-
perature 4 - Rear Tem-
perature Lock
223
Page 230 of 364
CAUTION!
Interior air enters the Rear Auto-
matic Temperature Control System
through an intake grille, located in
the right side trim panel behind the
third row seats. The rear outlets are
located in the right side trim panel
of the 3rd Row seat. Do not block or
place objects directly in front of the
inlet grille or heater outlets. The
electrical system could overload
causing damage to the blower mo-
tor.
Rear Temperature Control
To change the temperature in the rear
of the vehicle, rotate the temperature
knob counterclockwise to lower the
temperature, and clockwise to in-
crease the temperature. The rear tem-
perature settings are displayed in the
front ATC panel.
When rear controls are locked by the
front system, the Rear Temperature
Lock symbol on the temperature
knob is illuminated and any rear over-
head adjustments are ignored. Rear Mode Control
Auto Mode
The rear system automatically main-
tains the correct mode and comfort
level desired by the rear seat occu-
pants.
Headliner Mode
Air comes from the outlets in
the headliner. Each of these
outlets can be individually adjusted to
direct the flow of air. Moving the air
vanes of the outlets to one side will
shut off the airflow.
Bi-Level Mode
Air comes from both the head-
liner outlets and the floor out-
lets.
NOTE: In many temperature po-
sitions, the Bi-Level mode is de-
signed to provide cooler air out of
the headliner outlets and warmer
air from the floor outlets.
Floor Mode Air comes from the floor out-
lets. Recirculation Control
When outside air contains
smoke, odors, or high hu-
midity, or if rapid cooling is
desired, you may wish to
recirculate interior air by pressing the
Recirculation control button. Recir-
culation mode should only be used
temporarily. The recirculation LED
will illuminate when this button is
selected. Push the button a second
time to turn off the Recirculation
mode LED and allow outside air into
the vehicle.
NOTE: In cold weather, use of the
Recirculation mode may lead to
excessive window fogging. The Re-
circulation mode is not allowed in
Defrost mode to improve window
clearing operation. Recirculation
will be disabled automatically if
this mode is selected.
SUMMER OPERATION
The engine cooling system in air con-
ditioned vehicles must be protected
with a high-quality antifreeze coolant
to provide proper corrosion protection
224
Page 239 of 364
EVIC will display a “Vehicle Not In
Park” message and the engine will
remain running. Never leave a vehicle
out of the PARK position, or it could
roll.
NOTE: If the ignition switch is left
in the ACC or RUN (engine not run-
ning) position and the transmis-
sion is in PARK, the system will
automatically time out after 30
minutes of inactivity and the igni-
tion will switch to the OFF posi-
tion.
Keyless Enter-N-Go™ Functions –
With Driver’s Foot OFF The
Brake Pedal (In PARK Or
NEUTRAL Position)
The Keyless Enter-N-Go™ feature
operates similar to an ignition switch.
It has four positions, OFF, ACC, RUN
and START. To change the ignition
switch positions without starting the
vehicle and use the accessories follow
these steps. Starting with the ignition switch in
the OFF position:
Press the ENGINE START/STOP button once to change the ignition
switch to the ACC position (EVIC
displays “IGNITION MODE
ACCESSORY”),
Press the ENGINE START/STOP button a second time to change the
ignition switch to the RUN position
(EVIC displays “IGNITION MODE
RUN”),
Press the ENGINE START/STOP button a third time to return the
ignition switch to the OFF position
(EVIC displays “IGNITION MODE
OFF”).
EXTREME COLD
WEATHER (BELOW �29°C)
To ensure reliable starting at these
temperatures, use of an externally
powered electric engine block heater
is recommended.
IF ENGINE FAILS TO
START
WARNING!
Never pour fuel or other flam-mable liquids into the throttle
body air inlet opening in an at-
tempt to start the vehicle. This
could result in a flash fire causing
serious personal injury.
Do not attempt to push or tow your vehicle to get it started. Ve-
hicles equipped with an auto-
matic transmission cannot be
started this way. Unburned fuel
could enter the catalytic con-
verter and once the engine has
started, ignite and damage the
converter and vehicle.
(Continued)
233
Page 243 of 364

KEY IGNITION PARK
INTERLOCK
This vehicle is equipped with a Key
Ignition Park Interlock which re-
quires the transmission to be in PARK
before the ignition switch can be
turned to the LOCK position. The key
fob can only be removed from the
ignition when the ignition is in the
LOCK position, and the transmission
is locked in PARK whenever the igni-
tion switch is in the LOCK position.
NOTE: If a malfunction occurs,
the system will trap the key fob in
the ignition switch to warn you
that this safety feature is inoper-
able. The engine can be started
and stopped but the key fob cannot
be removed until you obtain ser-
vice.
BRAKE/TRANSMISSION
SHIFT INTERLOCK
SYSTEM
This vehicle is equipped with a Brake
Transmission Shift Interlock System
(BTSI) that holds the shift lever in
PARK unless the brakes are applied.To shift the transmission out of PARK,
the ignition switch must be turned to
the ON/RUN position (engine run-
ning or not) and the brake pedal must
be pressed.
SIX-SPEED AUTOMATIC
TRANSMISSION
The transmission gear position dis-
play (located in the instrument clus-
ter) indicates the transmission gear
range. You must press the brake pedal
to move the shift lever out of PARK
(Refer to Brake/Transmission Shift
Interlock System in this section). To
drive, move the shift lever from PARK
or NEUTRAL to the DRIVE position.
The electronically-controlled trans-
mission provides a precise shift sched-
ule. The transmission electronics are
self-calibrating; therefore, the first
few shifts on a new vehicle may be
somewhat abrupt. This is a normal
condition, and precision shifts will de-
velop within a few hundred kilome-
ters.
Only shift from DRIVE to PARK or
REVERSE when the accelerator
pedal is released and the vehicle is
stopped. Be sure to keep your foot on
the brake pedal when shifting be-
tween these gears.
The transmission shift lever has only
PARK, REVERSE, NEUTRAL, and
DRIVE shift positions. Manual down-
shifts can be made using the Elec-
tronic Range Select (ERS) shift con-
trol (described later in this section).
Moving the shift lever to the left or
right (–/ +) while in the DRIVE posi-
tion will select the highest available
transmission gear, and will display
that gear in the instrument cluster as
6, 5, 4, 3, 2, 1.Shift Lever
237
Page 245 of 364
WARNING!(Continued)
When leaving the vehicle, alwaysremove the key fob and lock your
vehicle.
Never leave children alone in a vehicle, or with access to an un-
locked vehicle.
Allowing children to be in a ve- hicle unattended is dangerous for
a number of reasons. A child or
others could be seriously or fa-
tally injured. Children should be
warned not to touch the parking
brake, brake pedal or the shift
lever.
Do not leave the key fob in or near the vehicle, (or in a location ac-
cessible to children), and do not
leave the ignition (in a vehicle
equipped with Keyless Enter-N-
Go™) in the ACC or ON/RUN
position A child could operate
power windows, other controls, or
move the vehicle.
CAUTION!
Before moving the shift lever outof PARK, you must place the ig-
nition from the LOCK/OFF posi-
tion to the ON/RUN position, and
also press the brake pedal. Other-
wise, damage to the shift lever
could result.
DO NOT race the engine when shifting from PARK or NEU-
TRAL into another gear range, as
this can damage the drivetrain.
The following indicators should be
used to ensure that you have engaged
the transmission into the PARK posi-
tion:
When shifting into PARK, firmly move the shift lever all the way
forward and to the left until it stops
and is fully seated.
Look at the transmission gear posi- tion display and verify that it indi-
cates the PARK position.
With brake pedal released, verify that the shift lever will not move out
of PARK.
REVERSE (R)
This range is for moving the vehicle
backward. Shift into REVERSE only
after the vehicle has come to a com-
plete stop.
NEUTRAL (N)
Use this range when the vehicle is
standing for prolonged periods with
the engine running. The engine may
be started in this range. Apply the
parking brake and shift the transmis-
sion into PARK if you must leave the
vehicle.
WARNING!
Do not coast in NEUTRAL and
never turn off the ignition to coast
down a hill. These are unsafe prac-
tices that limit your response to
changing traffic or road conditions.
You might lose control of the ve-
hicle and have a collision.
239
Page 247 of 364
NOTE: Even if the transmission
can be reset, we recommend that
you visit your authorized dealer at
your earliest possible conve-
nience. Your authorized dealer has
diagnostic equipment to deter-
mine if the problem could recur.
If the transmission cannot be reset,
authorized dealer service is required.
Electronic Range Select (ERS)
Operation
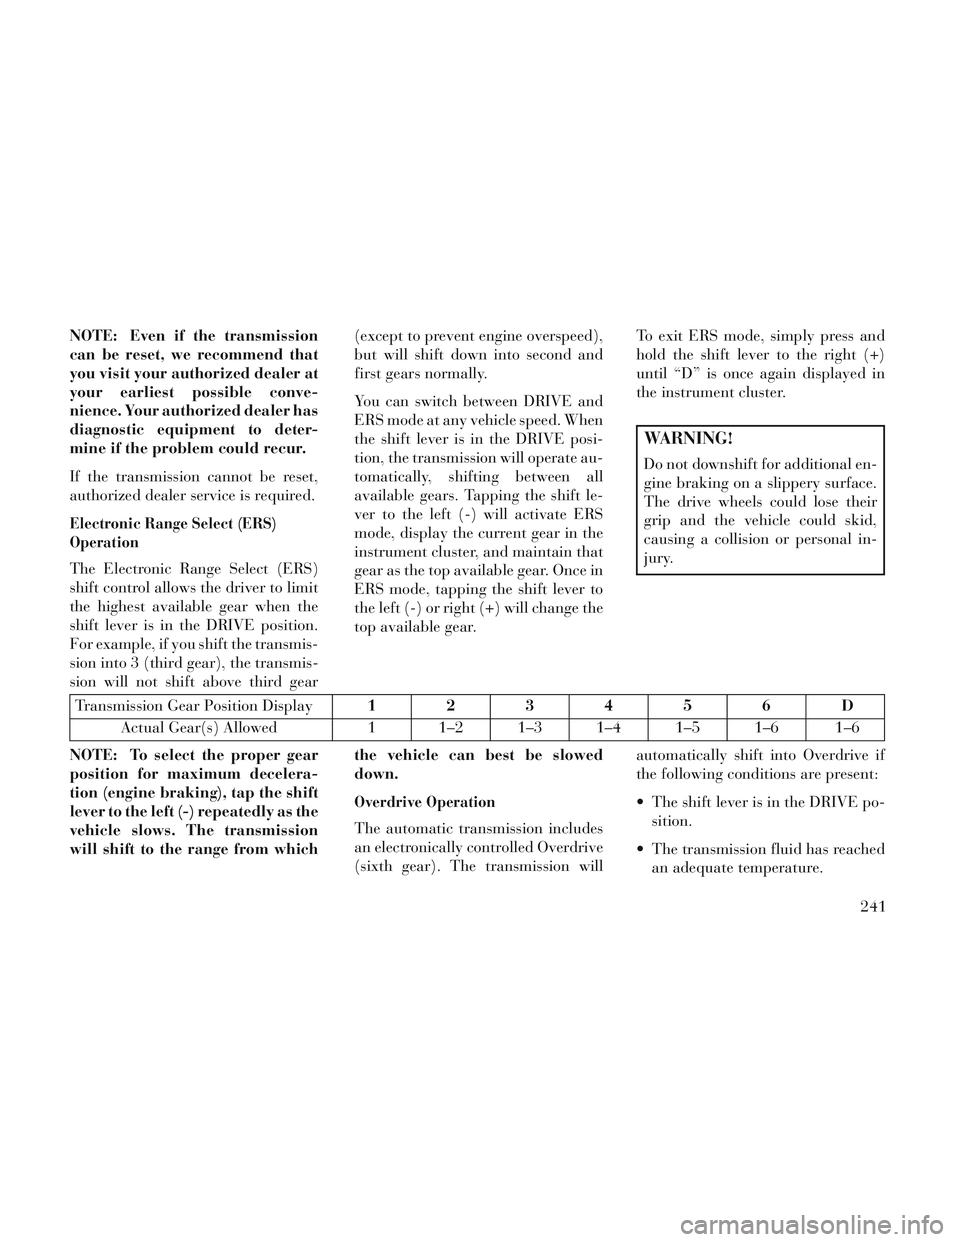
The Electronic Range Select (ERS)
shift control allows the driver to limit
the highest available gear when the
shift lever is in the DRIVE position.
For example, if you shift the transmis-
sion into 3 (third gear), the transmis-
sion will not shift above third gear(except to prevent engine overspeed),
but will shift down into second and
first gears normally.
You can switch between DRIVE and
ERS mode at any vehicle speed. When
the shift lever is in the DRIVE posi-
tion, the transmission will operate au-
tomatically, shifting between all
available gears. Tapping the shift le-
ver to the left (-) will activate ERS
mode, display the current gear in the
instrument cluster, and maintain that
gear as the top available gear. Once in
ERS mode, tapping the shift lever to
the left (-) or right (+) will change the
top available gear.
To exit ERS mode, simply press and
hold the shift lever to the right (+)
until “D” is once again displayed in
the instrument cluster.
WARNING!
Do not downshift for additional en-
gine braking on a slippery surface.
The drive wheels could lose their
grip and the vehicle could skid,
causing a collision or personal in-
jury.
Transmission Gear Position Display
123456D
Actual Gear(s) Allowed 1 1–2 1–3 1–4 1–5 1–6 1–6
NOTE: To select the proper gear
position for maximum decelera-
tion (engine braking), tap the shift
lever to the left (-) repeatedly as the
vehicle slows. The transmission
will shift to the range from which the vehicle can best be slowed
down.
Overdrive Operation
The automatic transmission includes
an electronically controlled Overdrive
(sixth gear). The transmission willautomatically shift into Overdrive if
the following conditions are present:
The shift lever is in the DRIVE po-
sition.
The transmission fluid has reached an adequate temperature.
241
Page 274 of 364
NOTE:
The TPMS is not intended to re-place normal tire care and
maintenance, or to provide
warning of a tire failure or con-
dition.
The TPMS should not be used as a tire pressure gauge while ad-
justing your tire pressure.
Driving on a significantly under- inflated tire causes the tire to
overheat and can lead to tire
failure. Under-inflation also re-
duces fuel efficiency and tire
tread life, and may affect the ve-
hicle’s handling and stopping
ability.
The TPMS is not a substitute for proper tire maintenance, and it
is the driver's responsibility to
maintain correct tire pressure,
using an accurate tire pressure
gage, even if under-inflation has
not reached the level to trigger
illumination of the “Tire Pres-
sure Monitoring Telltale Light.” Seasonal temperature changes
will affect tire pressure, and the
TPMS will monitor the actual
tire pressure in the tire.
BASE SYSTEM
The TPMS uses wireless technology
with wheel rim mounted electronic
sensors to monitor tire pressure levels.
Sensors, mounted to each wheel as
part of the valve stem, transmit tire
pressure readings to the Receiver
Module.
NOTE: It is particularly impor-
tant for you to check the tire pres-
sure in all of your tires regularly
and to maintain the proper pres-
sure.
The Basic TPMS consists of the fol-
lowing components:
Receiver Module
Four Tire Pressure MonitoringSensors
TPMS Telltale Warning Light Tire Pressure Monitoring Low
Tire Pressure Warnings
The “Tire Pressure Moni-
toring Telltale Light” will
illuminate in the instru-
ment cluster, an “Inflate
Tire to XX” message and a "TIRE
LOW PRESSURE" message will dis-
play in the instrument cluster, and an
audible chime will be activated when
one or more of the four active road tire
pressures are low. The recommended
cold placard pressure inflation value
is the pressure value displayed in the
"Inflate Tire to XX" message dis-
played in the EVIC. Should this occur,
you should stop as soon as possible,
check the inflation pressure of each
tire on your vehicle, and inflate each
tire to the vehicle's recommended cold
tire pressure value (located on the
placard on the driver's-side B-Pillar).
The system will automatically update
and the “Tire Pressure Monitoring
Telltale Light” will extinguish once
the updated tire pressures have been
received.
268
Page 276 of 364

next ignition switch cycle, the TPMS
will no longer chime or turn on the
“Tire Pressure Monitoring Telltale
Light.” To reactivate the TPMS, first,
replace all four wheel and tire assem-
blies (road tires) with those equipped
with TPM Sensors. Then, drive the
vehicle for up to 20 minutes above
24 km/h. The TPMS will chime and
the “Tire Pressure Monitoring Telltale
Light” will flash on and off for 75
seconds.
PREMIUM SYSTEM (for
versions/markets, where
provided)
The TPMS uses wireless technology
with wheel rim-mounted electronic
sensors to monitor tire pressure levels.
Sensors mounted to each wheel as
part of the valve stem transmit tire
pressure readings to the Receiver
Module.
NOTE: It is particularly impor-
tant to regularly check and main-
tain proper tire pressure in all the
tires.The Premium TPMS consists of the
following components:
Receiver Module
Four TPMS Sensors
Various TPMS messages, which
display in the Electronic Vehicle In-
formation Center (EVIC), and
graphics displaying tire pressures
TPMS Telltale Warning Light
TPMS Low Pressure Warnings
The “Tire Pressure Monitoring Tell-
tale Light” will illuminate in the in-
strument cluster, and an audible
chime will be activated when one or
more of the four active road tire pres-
sures are low. In addition, the EVIC
will display a “Inflate Tire to XX”
message and a “LOW TIRE” message
in the graphic display with the pres-
sure value(s) with the low tire(s)
flashing. The recommended cold
placard pressure inflation value is the
pressure value displayed in the “In-
flate Tire to XX” message displayed in
the EVIC. Should a low tire condition occur on
any of the four active road tire(s), you
should stop as soon as possible, and
inflate the low tire(s) that is flashing
on the graphic display to the vehicle’s
recommended cold tire pressure
value. The system will automatically
update, the “Inflate Tire to XX” mes-
sage will no longer be displayed, the
graphic display of the pressure val-
ue(s) will stop flashing, and the “Tire
Pressure Monitoring Telltale Light”
will extinguish once the updated tire
pressure(s) have been received. The
vehicle may need to be driven for up
to 20 minutes above 24 km/h to re-
ceive this information.
Low Tire Pressure Display
270