isofix Lancia Voyager 2014 Owner handbook (in English)
[x] Cancel search | Manufacturer: LANCIA, Model Year: 2014, Model line: Voyager, Model: Lancia Voyager 2014Pages: 364, PDF Size: 3.49 MB
Page 42 of 364
desired length to restrain a child seat
or secure a large item in a seat
If you will be carrying children too
small for adult-sized seat belts, the
seat belts or the ISOFIX feature also
can be used to hold infant and child
restraint systems. For more informa-
tion on ISOFIX, see ISOFIX — Child
Seat Anchorage System.
WARNING!
Never place a rear facing infantseat in front of an air bag. A de-
ploying Passenger Advanced
Front Air Bag can cause death or
serious injury to a child 12 years
or younger, including a child in a
rearward facing infant seat.
Only use a rearward-facing child restraint in a vehicle with a rear
seat.
NOTE: The Advanced Front Air
Bags have a multistage inflator de-
sign. This allows the air bag to
have different rates of inflation
based on several factors, including
the severity and type of collision. Please pay close attention to the infor-
mation in this section. It tells you how
to use your restraint system properly,
to keep you and your passengers as
safe as possible.
Buckle up even though you are an
excellent driver, even on short trips.
Someone on the road may be a poor
driver and cause a collision that in-
cludes you. This can happen far away
from home or on your own street.
Research has shown that seat belts
save lives, and they can reduce the
seriousness of injuries in a collision.
Some of the worst injuries happen
when people are thrown from the ve-
hicle. Seat belts reduce the possibility
of ejection and the risk of injury
caused by striking the inside of the
vehicle. Everyone in a motor vehicle
should be belted at all times.
LAP/SHOULDER BELTS
All seating positions in your vehicle
are equipped with combination lap/
shoulder belts.
The belt webbing in the retractor is
designed to lock during very suddenstops or collisions. This feature allows
the shoulder part of the belt to move
freely with you under normal condi-
tions. However, in a collision the belt
will lock and reduce the risk of you
striking the inside of the vehicle or
being thrown out.
The driver is responsible for respect-
ing, and ensuring that all the other
occupants of the car also respect, the
local laws in force in relation to the
use of the seat belts. Always fasten the
seat belts before starting.
WARNING!
It is dangerous to ride in a cargo
area, inside or outside of a ve-
hicle. In a collision, people riding
in these areas are more likely to
be seriously injured or killed.
Do not allow people to ride in any area of your vehicle that is not
equipped with seats and seat
belts.
Be sure everyone in your vehicle is in a seat and using a seat belt
properly.
(Continued)
36
Page 63 of 364
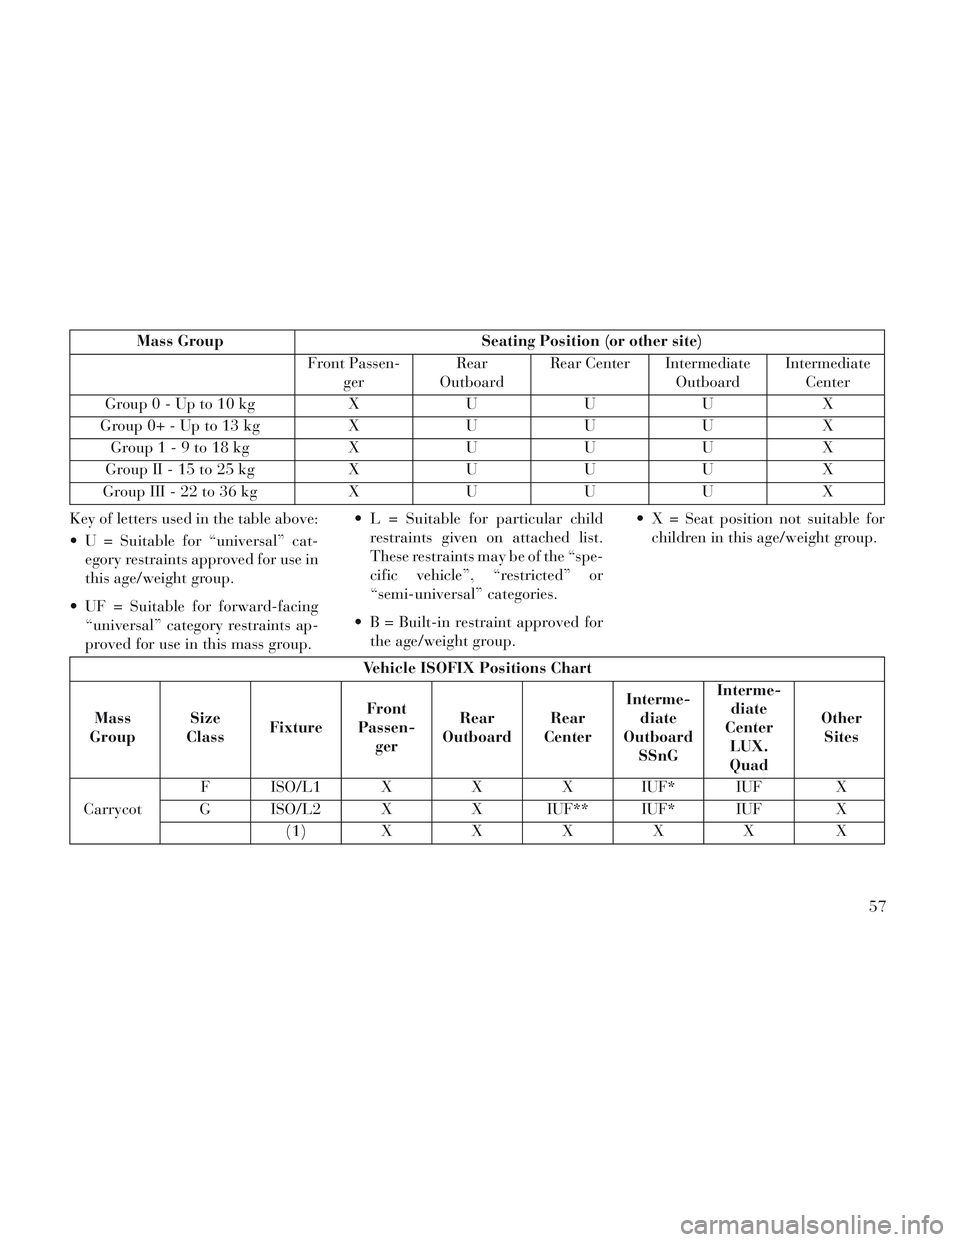
Mass GroupSeating Position (or other site)
Front Passen- ger Rear
Outboard Rear Center Intermediate
OutboardIntermediate
Center
Group0-Upto10kg XUUU X
G ro u p 0+ -U p to 13 kgXUUU X
Group1-9to18kg XUUU X
G ro u p II - 15 to 25 kgXUUU X
G ro u p III - 22 to 36 kgXUUU X
Key of letters used in the table above:
U = Suitable for “universal” cat- egory restraints approved for use in
this age/weight group.
UF = Suitable for forward-facing “universal” category restraints ap-
proved for use in this mass group. L = Suitable for particular child
restraints given on attached list.
These restraints may be of the “spe-
cific vehicle”, “restricted” or
“semi-universal” categories.
B = Built-in restraint approved for the age/weight group. X = Seat position not suitable for
children in this age/weight group.
Vehicle ISOFIX Positions Chart
Mass
Group Size
Class Fixture Front
Passen- ger Rear
Outboard Rear
Center Interme-
diate
Outboard SSnG Interme-
diate
Center LUX.
Quad Other
Sites
Carrycot F ISO/L1 X
XX IUF* IUF X
G ISO/L2 X X IUF** IUF* IUF X
( 1 )XXXXX X
57
Page 64 of 364
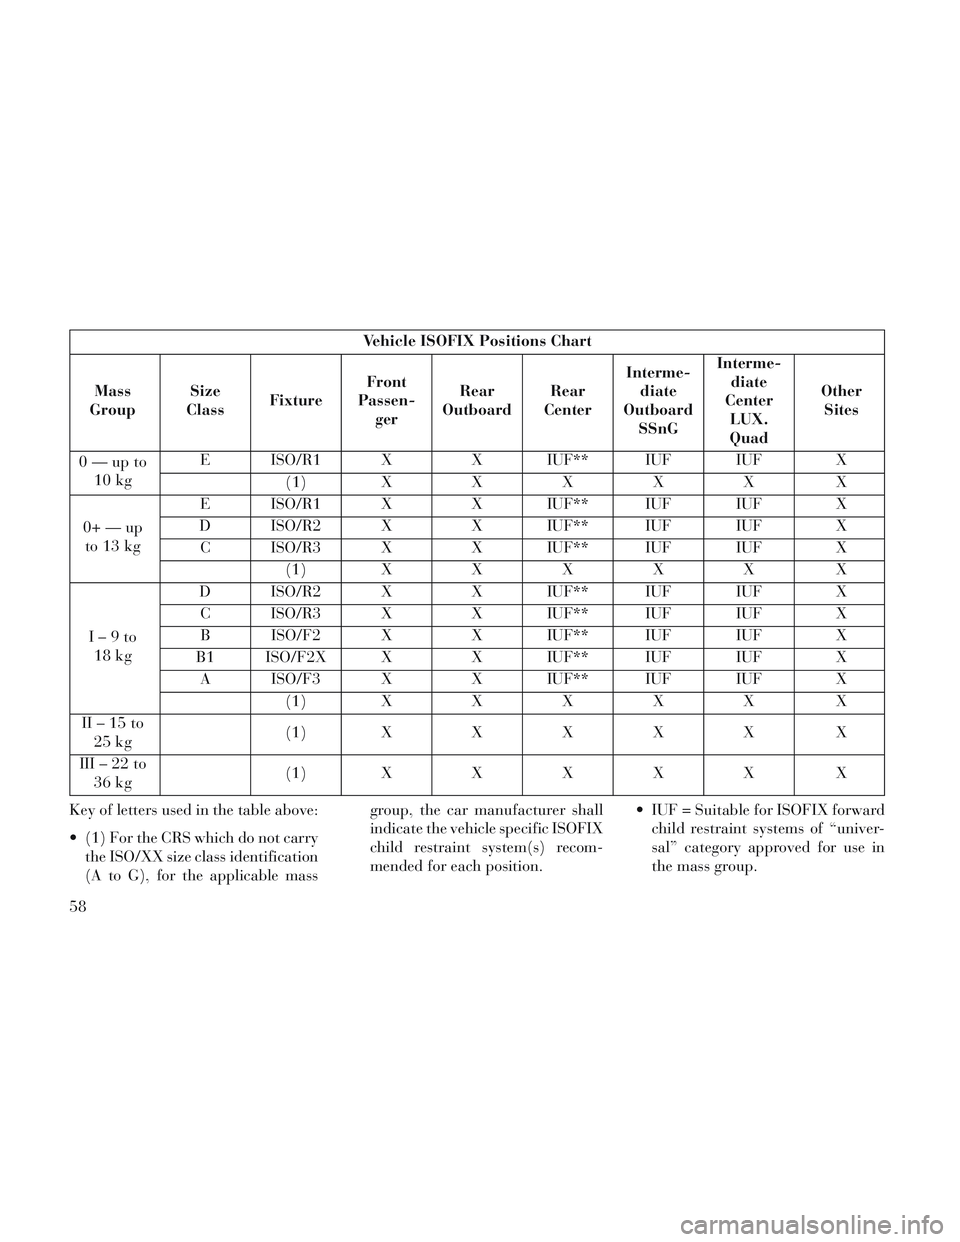
Vehicle ISOFIX Positions Chart
Mass
Group Size
Class Fixture Front
Passen- ger Rear
Outboard Rear
Center Interme-
diate
Outboard SSnG Interme-
diate
Center LUX.
Quad Other
Sites
0—upto 10 kg E ISO/R1 X
X IUF** IUF IUF X
( 1 )XXXXX X
0+—up to 13 kg E ISO/R1 X
X IUF** IUF IUF X
D ISO/R2 X X IUF** IUF IUF X
C ISO/R3 X X IUF** IUF IUF X
( 1 )XXXXX X
I–9to 18 kg D ISO/R2 X
X IUF** IUF IUF X
C ISO/R3 X X IUF** IUF IUF X
B ISO/F2 X X IUF** IUF IUF X
B1 ISO/F2X X X IUF** IUF IUF X
A ISO/F3 X X IUF** IUF IUF X
( 1 )XXXXX X
II–15to 25 kg (
1 )XXXXX X
III–22to 36 kg (
1 )XXXXX X
Key of letters used in the table above:
(1) For the CRS which do not carry the ISO/XX size class identification
(A to G), for the applicable mass group, the car manufacturer shall
indicate the vehicle specific ISOFIX
child restraint system(s) recom-
mended for each position.
IUF = Suitable for ISOFIX forward
child restraint systems of “univer-
sal” category approved for use in
the mass group.
58
Page 65 of 364
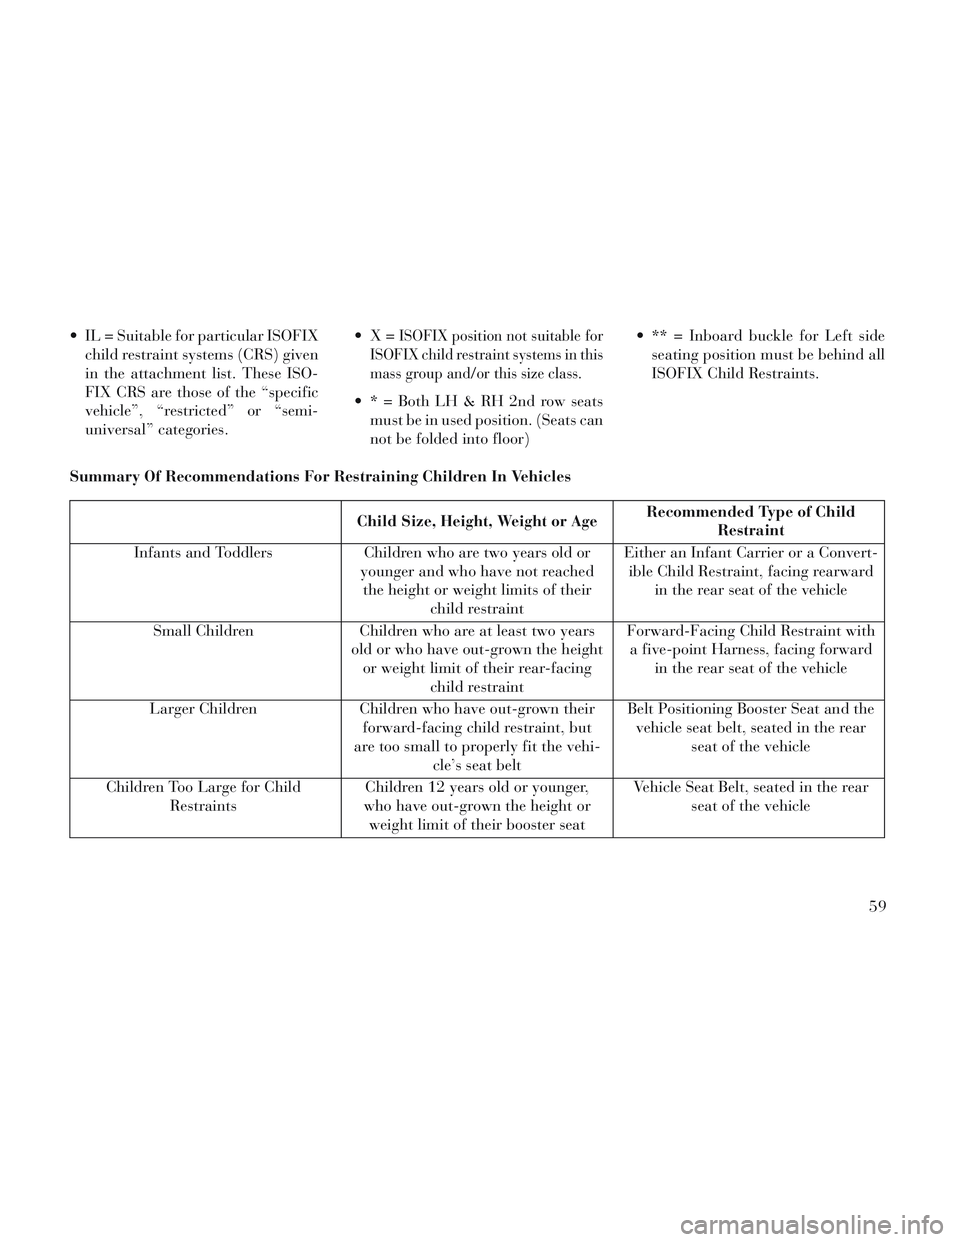
IL = Suitable for particular ISOFIXchild restraint systems (CRS) given
in the attachment list. These ISO-
FIX CRS are those of the “specific
vehicle”, “restricted” or “semi-
universal” categories. ISOFIX position not suitable for
ISOFIX child restraint systems in this
mass group and/or this size class.
* = Both LH & RH 2nd row seats must be in used position. (Seats can
not be folded into floor) ** = Inboard buckle for Left side
seating position must be behind all
ISOFIX Child Restraints.
Summary Of Recommendations For Restraining Children In Vehicles
Child Size, Height, Weight or Age Recommended Type of Child
Restraint
Infants and Toddlers Children who are two years old or
younger and who have not reached the height or weight limits of their child restraint Either an Infant Carrier or a Convert-
ible Child Restraint, facing rearward in the rear seat of the vehicle
Small Children Children who are at least two years
old or who have out-grown the height or weight limit of their rear-facing child restraint Forward-Facing Child Restraint with
a five-point Harness, facing forward in the rear seat of the vehicle
Larger Children Children who have out-grown their
forward-facing child restraint, but
are too small to properly fit the vehi- cle’s seat belt Belt Positioning Booster Seat and the
vehicle seat belt, seated in the rear seat of the vehicle
Children Too Large for Child Restraints Children 12 years old or younger,
who have out-grown the height or weight limit of their booster seat Vehicle Seat Belt, seated in the rear
seat of the vehicle
59
Page 67 of 364
WARNING!(Continued)
When your child restraint is notin use, secure it in the vehicle with
the seat belt or ISOFIX anchor-
ages, or remove it from the ve-
hicle. Do not leave it loose in the
vehicle. In a sudden stop or acci-
dent, it could strike the occupants
or seatbacks and cause serious
personal injury.
Children Too Large For Booster
Seats
Children who are large enough to
wear the shoulder belt comfortably,
and whose legs are long enough to
bend over the front of the seat when
their back is against the seatback, should use the seat belt in a rear seat.
Use this simple 5-step test to decide
whether the child can use the vehicle’s
seat belt alone:
1. Can the child sit all the way back
against the back of the vehicle seat?
2. Do the child’s knees bend comfort-
ably over the front of the vehicle seat –
while they are still sitting all the way
back?
3. Does the shoulder belt cross the
child’s shoulder between their neck
and arm?
4. Is the lap part of the belt as low as
possible, touching the child’s thighs
and not their stomach?
5. Can the child stay seated like this
for the whole trip?
If the answer to any of these questions
was “no,” then the child still needs to
use a booster seat in this vehicle. If the
child is using the lap/shoulder belt,
check belt fit periodically. A child’s
squirming or slouching can move the
belt out of position. If the shoulder
belt contacts the face or neck, move
the child closer to the center of the
vehicle. Never allow a child to put the
shoulder belt under an arm or behind
their back.
61
Page 68 of 364
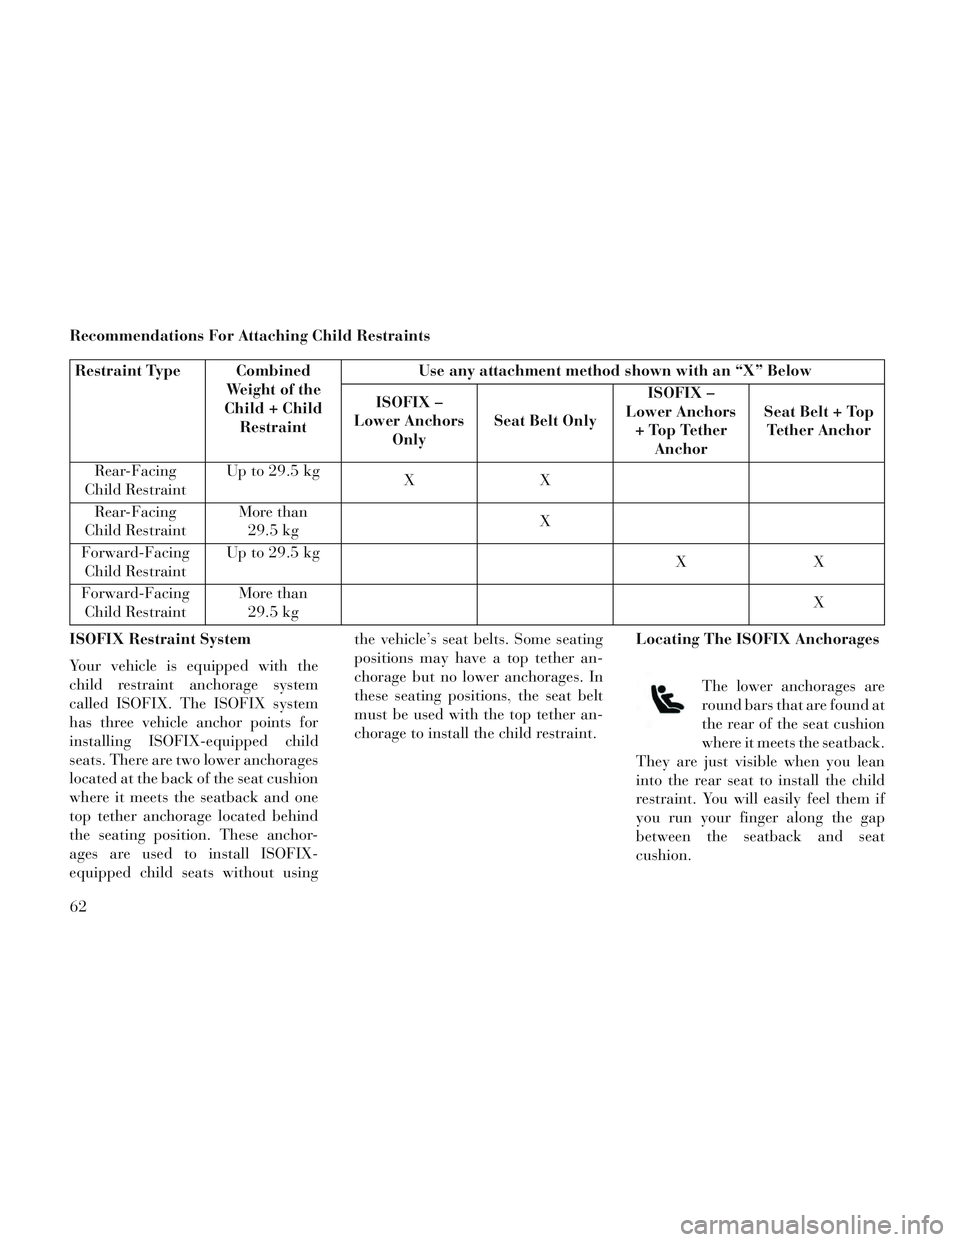
Recommendations For Attaching Child Restraints
Restraint Type CombinedWeight of the
Child + Child Restraint Use any attachment method shown with an “X” Below
ISOFIX –
Lower Anchors Only Seat Belt Only ISOFIX –
Lower Anchors + Top Tether Anchor Seat Belt + Top
Tether Anchor
Rear-Facing
Child Restraint Up to 29.5 kg
XX
Rear-Facing
Child Restraint More than
29.5 kg X
Forward-Facing Child Restraint Up to 29.5 kg
XX
Forward-Facing Child Restraint More than
29.5 kg X
ISOFIX Restraint System
Your vehicle is equipped with the
child restraint anchorage system
called ISOFIX. The ISOFIX system
has three vehicle anchor points for
installing ISOFIX-equipped child
seats. There are two lower anchorages
located at the back of the seat cushion
where it meets the seatback and one
top tether anchorage located behind
the seating position. These anchor-
ages are used to install ISOFIX-
equipped child seats without using the vehicle’s seat belts. Some seating
positions may have a top tether an-
chorage but no lower anchorages. In
these seating positions, the seat belt
must be used with the top tether an-
chorage to install the child restraint.
Locating The ISOFIX Anchorages
The lower anchorages are
round bars that are found at
the rear of the seat cushion
where it meets the seatback.
They are just visible when you lean
into the rear seat to install the child
restraint. You will easily feel them if
you run your finger along the gap
between the seatback and seat
cushion.
62
Page 69 of 364
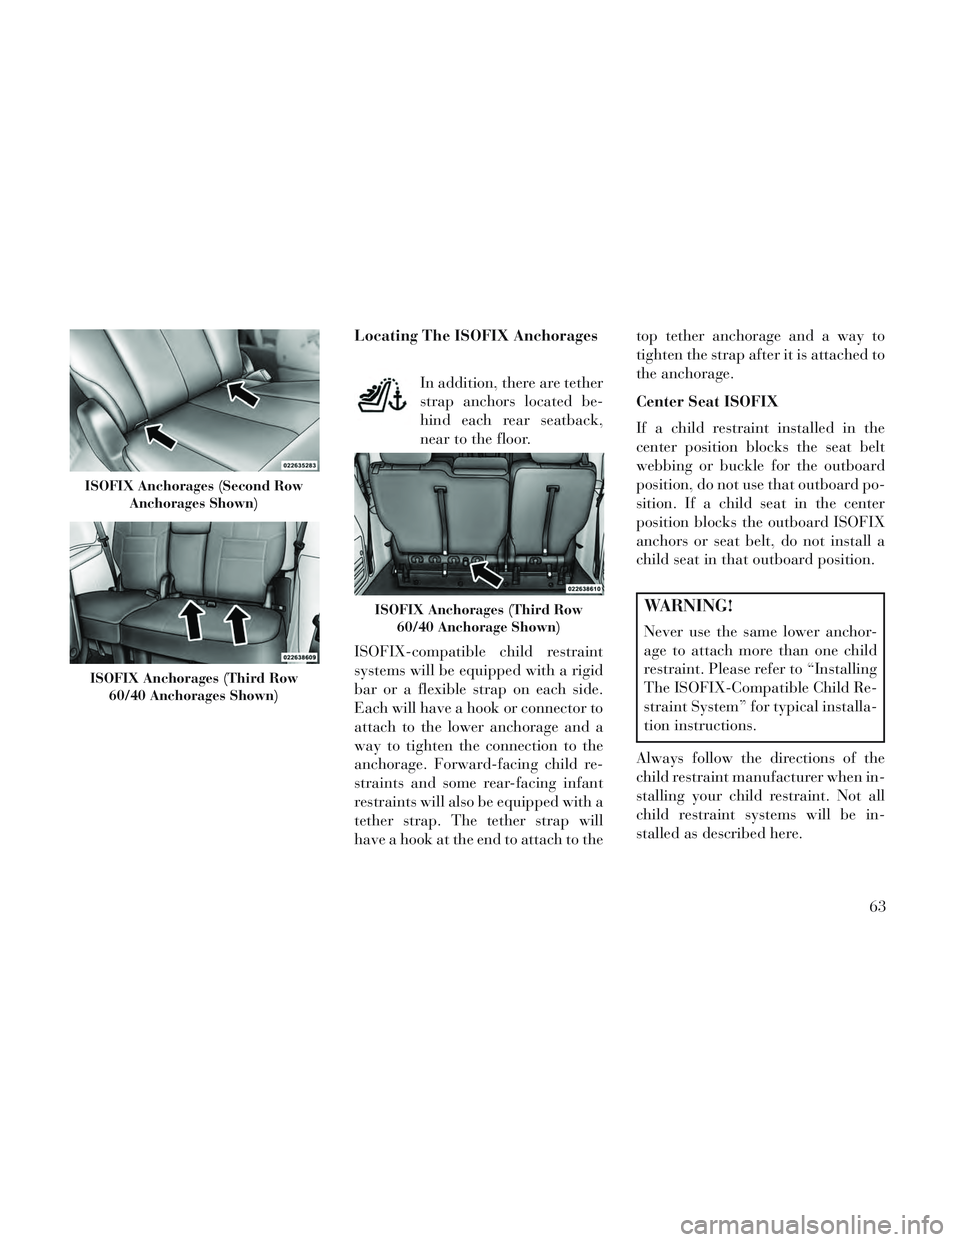
Locating The ISOFIX AnchoragesIn addition, there are tether
strap anchors located be-
hind each rear seatback,
near to the floor.
ISOFIX-compatible child restraint
systems will be equipped with a rigid
bar or a flexible strap on each side.
Each will have a hook or connector to
attach to the lower anchorage and a
way to tighten the connection to the
anchorage. Forward-facing child re-
straints and some rear-facing infant
restraints will also be equipped with a
tether strap. The tether strap will
have a hook at the end to attach to the top tether anchorage and a way to
tighten the strap after it is attached to
the anchorage.
Center Seat ISOFIX
If a child restraint installed in the
center position blocks the seat belt
webbing or buckle for the outboard
position, do not use that outboard po-
sition. If a child seat in the center
position blocks the outboard ISOFIX
anchors or seat belt, do not install a
child seat in that outboard position.
WARNING!
Never use the same lower anchor-
age to attach more than one child
restraint. Please refer to “Installing
The ISOFIX-Compatible Child Re-
straint System” for typical installa-
tion instructions.
Always follow the directions of the
child restraint manufacturer when in-
stalling your child restraint. Not all
child restraint systems will be in-
stalled as described here.
ISOFIX Anchorages (Second Row Anchorages Shown)
ISOFIX Anchorages (Third Row60/40 Anchorages Shown)
ISOFIX Anchorages (Third Row 60/40 Anchorage Shown)
63
Page 70 of 364
To Install An ISOFIX-compatible
Child Restraint
1. If the selected seating position has
a Switchable Automatic Locking Re-
tractor (ALR) seat belt, stow the seat
belt, following the instructions below.
See the section “Installing Child Re-
straints Using the Vehicle Seat Belt”
to check what type of seat belt each
seating position has.
2. Loosen the adjusters on the lower
connectors and on the tether strap of
the child seat so that you can more
easily attach the connectors to the ve-
hicle anchorages.
3. Place the child seat between the
lower anchorages for that seating po-
sition. For some second row seats, you
may need to recline the seat and / or
raise the head restraint to get a better
fit. If the rear seat can be moved for-
ward and rearward in the vehicle, you
may wish to move it to its rear-most
position to make room for the child
seat. You may also move the front seat
forward to allow more room for the
car seat.4. Attach the connectors of the child
restraint to the lower anchorages in
the selected seating position.
5. If the child restraint has a tether
strap, connect it to the top tether an-
chorage. See the section “Installing
Child Restraints Using the Top Tether
Anchorage” for directions to attach a
tether anchor.
6. Tighten all of the straps as you
push the child restraint rearward and
downward into the seat. Remove
slack in the straps according to the
child restraint manufacturer’s in-
structions.
7. Test that the child restraint is in-
stalled tightly by pulling back and
forth on the child seat at the belt path.
It should not move more than 25.4
mm in any direction.WARNING!
Child restraint anchorages are de-
signed to withstand only those
loads imposed by correctly-fitted
child restraints. Under no circum-
stances are they to be used for adult
seat belts, harnesses, or for attach-
ing other items or equipment to the
vehicle.
How To Stow An Unused ALR
Seatbelt
When using the ISOFIX attaching
system to install a child restraint, stow
all ALR seat belts that are not being
used by other occupants or being used
to secure child restraints. An unused
belt could injure a child if they play
with it and accidentally lock the seat-
belt retractor. Before installing a child
restraint using the ISOFIX system,
buckle the seat belt behind the child
restraint and out of the child’s reach.
If the buckled seat belt interferes with
the child restraint installation, instead
of buckling it behind the child re-
straint, route the seat belt through the
child restraint belt path and then
buckle it. Do not lock the seatbelt.
64
Page 71 of 364
Remind all children in the vehicle that
the seat belts are not toys and that
they should not play with them.
WARNING!
Improper installation of a child re-
straint to the ISOFIX anchorages
can lead to failure of an infant or
child restraint. The child could be
badly injured or killed. Follow the
manufacturer's directions exactly
when installing an infant or child
restraint.
Installing Child Restraints Using
The Vehicle Seat Belt
The seat belts in the passenger seating
positions are equipped with either a
Switchable Automatic Locking Re-
tractor (ALR) or a cinching latch
plate or both. Both types of seat belts
are designed to keep the lap portion of
the seat belt tight around the child
restraint so that it is not necessary to
use a locking clip. The ALR retractor
can be “switched” into a locked mode
by pulling all of the webbing out of the retractor and then letting the web-
bing retract back into the retractor. If
it is locked, the ALR will make a
clicking noise while the webbing is
pulled back into the retractor. For
additional information on ALR, refer
to the “Automatic Locking Mode” de-
scription under “Occupant Re-
straints.” The cinching latch plate is
designed to hold the lap portion of the
seatbelt tight when webbing is pulled
tight and straight through a child re-
straint’s belt path.
Installing A Child Restraint With
A Switchable Automatic Locking
Retractor (ALR)
1. Place the child seat in the center of
the seating position. For some second
row seats, you may need to recline the
seat and/or raise the head restraint to
get a better fit. If the rear seat can be
moved forward and rearward in the
vehicle, you may wish to move it to its
rear-most position to make room for
the child seat. You may also move the
front seat forward to allow more room
for the car seat.2. Pull enough of the seat belt web-
bing from the retractor to pass it
through the belt path of the child re-
straint. Do not twist the belt webbing
in the belt path.
3. Slide the latch plate into the
buckle until you hear a “click.”
4. Pull on the webbing to make the
lap portion tight against the child
seat.
5. To lock the seat belt, pull down on
the shoulder part of the belt until you
have pulled all the seat belt webbing
out of the retractor. Then, allow the
webbing to retract back into the re-
tractor. As the webbing retracts, you
will hear a clicking sound. This means
the seat belt is now in the Automatic
Locking mode.
6. Try to pull the webbing out of the
retractor. If it is locked, you should
not be able to pull out any webbing. If
the retractor is not locked, repeat step
5.
65
Page 73 of 364
child restraint. Repeat steps 4 to 6,
above, to complete the installation of
the child restraint.
If the belt still cannot be tightened
after you shorten the buckle, discon-
nect the latch plate from the buckle,
turn the buckle around one half turn,
and insert the latch plate into the
buckle again. If you still cannot make
the child restraint installation tight,
try a different seating position.
Installing Child Restraints Using
The Top Tether Anchorage
1. Look behind the seating position
where you plan to install the child
restraint to find the tether anchorage.
You may need to move the seat for-
ward to provide better access to the
tether anchorage. If there is no top
tether anchorage for that seating po-
sition, move the child restraint to an-
other position in the vehicle if one is
available.2. Route the tether strap to provide
the most direct path for the strap be-
tween the anchor and the child seat. If
your vehicle is equipped with adjust-
able rear head restraints, raise the
head restraint, and where possible,
route the tether strap under the head
restraint and between the two posts. If
not possible, lower the head restraint
and pass the tether strap around the
outboard side of the head restraint.
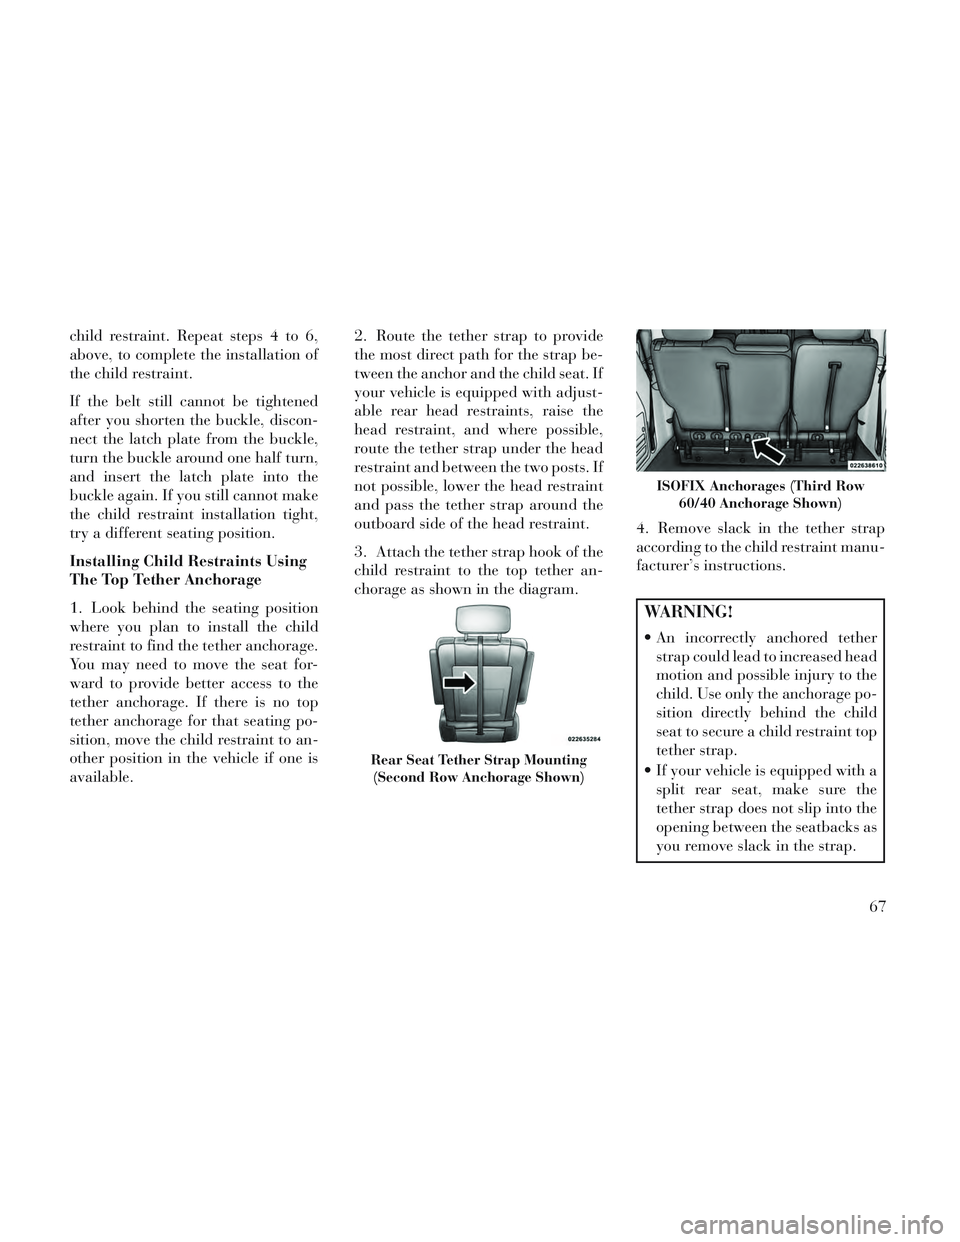
3. Attach the tether strap hook of the
child restraint to the top tether an-
chorage as shown in the diagram.
4. Remove slack in the tether strap
according to the child restraint manu-
facturer’s instructions.
WARNING!
An incorrectly anchored tether
strap could lead to increased head
motion and possible injury to the
child. Use only the anchorage po-
sition directly behind the child
seat to secure a child restraint top
tether strap.
If your vehicle is equipped with a split rear seat, make sure the
tether strap does not slip into the
opening between the seatbacks as
you remove slack in the strap.
Rear Seat Tether Strap Mounting
(Second Row Anchorage Shown)
ISOFIX Anchorages (Third Row 60/40 Anchorage Shown)
67