stop start Lancia Voyager 2014 Owner handbook (in English)
[x] Cancel search | Manufacturer: LANCIA, Model Year: 2014, Model line: Voyager, Model: Lancia Voyager 2014Pages: 364, PDF Size: 3.49 MB
Page 20 of 364
REMOVING KEY FOB
FROM IGNITION
Place the shift lever in PARK. Turn
the Key Fob to the OFF position and
then remove the Key Fob.
NOTE: Power window switches
will also remain active for up to 10
minutes after the ignition switch
has been turned to OFF, depending
upon the accessory delay setting.
Opening either front door will can-
cel this feature.
WARNING!
Before exiting a vehicle, alwaysapply the parking brake, shift the
transmission into PARK, and
push ignition button to place ig-
nition in OFF position. When
leaving the vehicle, always lock
your vehicle.
Never leave children alone in a vehicle, or with access to an un-
locked vehicle.
(Continued)
WARNING!(Continued)
Allowing children to be in a ve-hicle unattended is dangerous for
a number of reasons. A child or
others could be seriously or fa-
tally injured. Children should be
warned not to touch the parking
brake, brake pedal or the shift
lever.
Do not leave the Key Fob in or near the vehicle, or in a location
accessible to children, and do not
leave the ignition of a vehicle
equipped with Keyless Enter-N-
Go™ in the ACC or ON/RUN
mode. A child could operate
power windows, other controls, or
move the vehicle.
Do not leave children or animals inside parked vehicles in hot
weather. Interior heat build-up
may cause serious injury or
death.
CAUTION!
An unlocked car is an invitation to
thieves. Always remove the Key
Fob from the ignition and lock all
doors when leaving the vehicle un-
attended.
KEY-IN-IGNITION
REMINDER
Opening the driver's door when the
Key Fob is in the ignition and the
ignition switch position is OFF or
ACC, a chime will sound to remind
you to remove the key.
NOTE: The Key-In-Ignition re-
minder only sounds when the Key
Fob is placed in the OFF or ACC
ignition position.
If your vehicle is equipped with Key-
less Enter-N-Go™, opening the driv-
er’s door when the vehicle’s ignition
switch is placed in ACC or ON/RUN
(engine stopped) will cause the re-
minder chime to sound. Refer to
“Starting Procedures” in “Starting
And Operating” for further informa-
tion.
14
Page 23 of 364
REARMING OF THE
SYSTEM
If something triggers the alarm, and
no action is taken to disarm it, the
Vehicle Security Alarm will turn off
the horn after 29 seconds, and turn off
all of the visual signals after an addi-
tional 31 seconds, then the Vehicle
Security Alarm will rearm itself.
TO ARM THE SYSTEM
Follow these steps to arm the Vehicle
Security Alarm:
1. Remove the key from the ignition
system (refer to "Starting Proce-
dures" in "Starting And Operating"
for further information).
For vehicles equipped with Keyless
Enter-N-Go™, make sure the vehicle
ignition system is "OFF".
For vehicles not equipped with Key-
less Enter-N-Go™, make sure the ve-
hicle ignition system is "OFF" and the
key is physically removed from the
ignition.2. Perform one of the following
methods to lock the vehicle:
Press LOCK on the interior power
door lock switch with the driver
and/or passenger door open.
Press the LOCK button on the exte-
rior Passive Entry Door Handle with a
valid Key Fob available in the same
exterior zone (refer to "Keyless Enter-
N-Go™" in "Things To Know Before
Starting Your Vehicle" for further in-
formation).
Press the LOCK button on the Re-
mote Keyless Entry (RKE) transmit-
ter.
3. If any doors are open, close them.
TO DISARM THE SYSTEM
The Vehicle Security Alarm can be
disarmed using any of the following
methods:
Press the UNLOCK button on the
Remote Keyless Entry (RKE)
transmitter. Grasp the Passive Entry Unlock
Door Handle (for versions/
markets, where provided), refer to
"Keyless Enter-N-Go™" in
"Things To Know Before Starting
Your Vehicle" for further
information).
Cycle the vehicle ignition system out of the OFF position.
For vehicles equipped with Key- less Enter-N-Go™, press the
Keyless Enter-N-Go™ Start/
Stop button (requires at least one
valid Key Fob in the vehicle).
For vehicles not equipped with Keyless Enter-N-Go™, insert a
valid key into the ignition switch
and turn the key to the ON posi-
tion.
NOTE:
The driver's door key cylinder and the liftgate button on the
RKE transmitter cannot arm or
disarm the Vehicle Security
Alarm.
17
Page 42 of 364
desired length to restrain a child seat
or secure a large item in a seat
If you will be carrying children too
small for adult-sized seat belts, the
seat belts or the ISOFIX feature also
can be used to hold infant and child
restraint systems. For more informa-
tion on ISOFIX, see ISOFIX — Child
Seat Anchorage System.
WARNING!
Never place a rear facing infantseat in front of an air bag. A de-
ploying Passenger Advanced
Front Air Bag can cause death or
serious injury to a child 12 years
or younger, including a child in a
rearward facing infant seat.
Only use a rearward-facing child restraint in a vehicle with a rear
seat.
NOTE: The Advanced Front Air
Bags have a multistage inflator de-
sign. This allows the air bag to
have different rates of inflation
based on several factors, including
the severity and type of collision. Please pay close attention to the infor-
mation in this section. It tells you how
to use your restraint system properly,
to keep you and your passengers as
safe as possible.
Buckle up even though you are an
excellent driver, even on short trips.
Someone on the road may be a poor
driver and cause a collision that in-
cludes you. This can happen far away
from home or on your own street.
Research has shown that seat belts
save lives, and they can reduce the
seriousness of injuries in a collision.
Some of the worst injuries happen
when people are thrown from the ve-
hicle. Seat belts reduce the possibility
of ejection and the risk of injury
caused by striking the inside of the
vehicle. Everyone in a motor vehicle
should be belted at all times.
LAP/SHOULDER BELTS
All seating positions in your vehicle
are equipped with combination lap/
shoulder belts.
The belt webbing in the retractor is
designed to lock during very suddenstops or collisions. This feature allows
the shoulder part of the belt to move
freely with you under normal condi-
tions. However, in a collision the belt
will lock and reduce the risk of you
striking the inside of the vehicle or
being thrown out.
The driver is responsible for respect-
ing, and ensuring that all the other
occupants of the car also respect, the
local laws in force in relation to the
use of the seat belts. Always fasten the
seat belts before starting.
WARNING!
It is dangerous to ride in a cargo
area, inside or outside of a ve-
hicle. In a collision, people riding
in these areas are more likely to
be seriously injured or killed.
Do not allow people to ride in any area of your vehicle that is not
equipped with seats and seat
belts.
Be sure everyone in your vehicle is in a seat and using a seat belt
properly.
(Continued)
36
Page 109 of 364
Uconnect® Phone will prompt you to
say the name or number of the person
you wish to send the message to.
List of Preset Messages:
1. Yes
2. No
3. Where are you?
4. I need more direction.
5. LOL
6. Why
7. I love you
8. Call me
9. Call me later
10. Thanks
11. See You in 15 minutes
12. Iamonmyway
13. I’ll be late14. Are you there yet?
15. Where are we meeting?
16. Can this wait?
17. Bye for now
18. When can we meet
19. Send number to call
20. Start without me
Turn Voice Text Reply Incoming
Announcement ON/OFF
Turning the Voice Text Reply Incom-
ing Announcement OFF will stop the
system from announcing the new in-
coming messages.
Press the
button.
After the “Ready” prompt and the following beep, say “Setup, Incom-
ing Message Announcement”, you
will then be given a choice to
change it.
Bluetooth®
COMMUNICATION LINK
Mobile phones have been found to
lose connection to the Uconnect®
Phone. When this happens, the con-
nection can generally be reestablished
by switching the phone off/on. Your
mobile phone is recommended to re-
main in Bluetooth® ON mode.
POWER-UP
After switching the ignition key from
OFF to either the ON or ACC position,
or after a language change, you must
wait at least fifteen seconds prior to
using the system.
103
Page 123 of 364
WARNING!(Continued)
Active Head Restraints may bedeployed if they are struck by an
object such as a hand, foot or
loose cargo. To avoid accidental
deployment of the Active Head
Restraint ensure that all cargo is
secured, as loose cargo could con-
tact the Active Head Restraint
during sudden stops. Failure to
follow this warning could cause
personal injury if the Active Head
Restraint is deployed.
Head Restraints — Second Row
Quad Seats
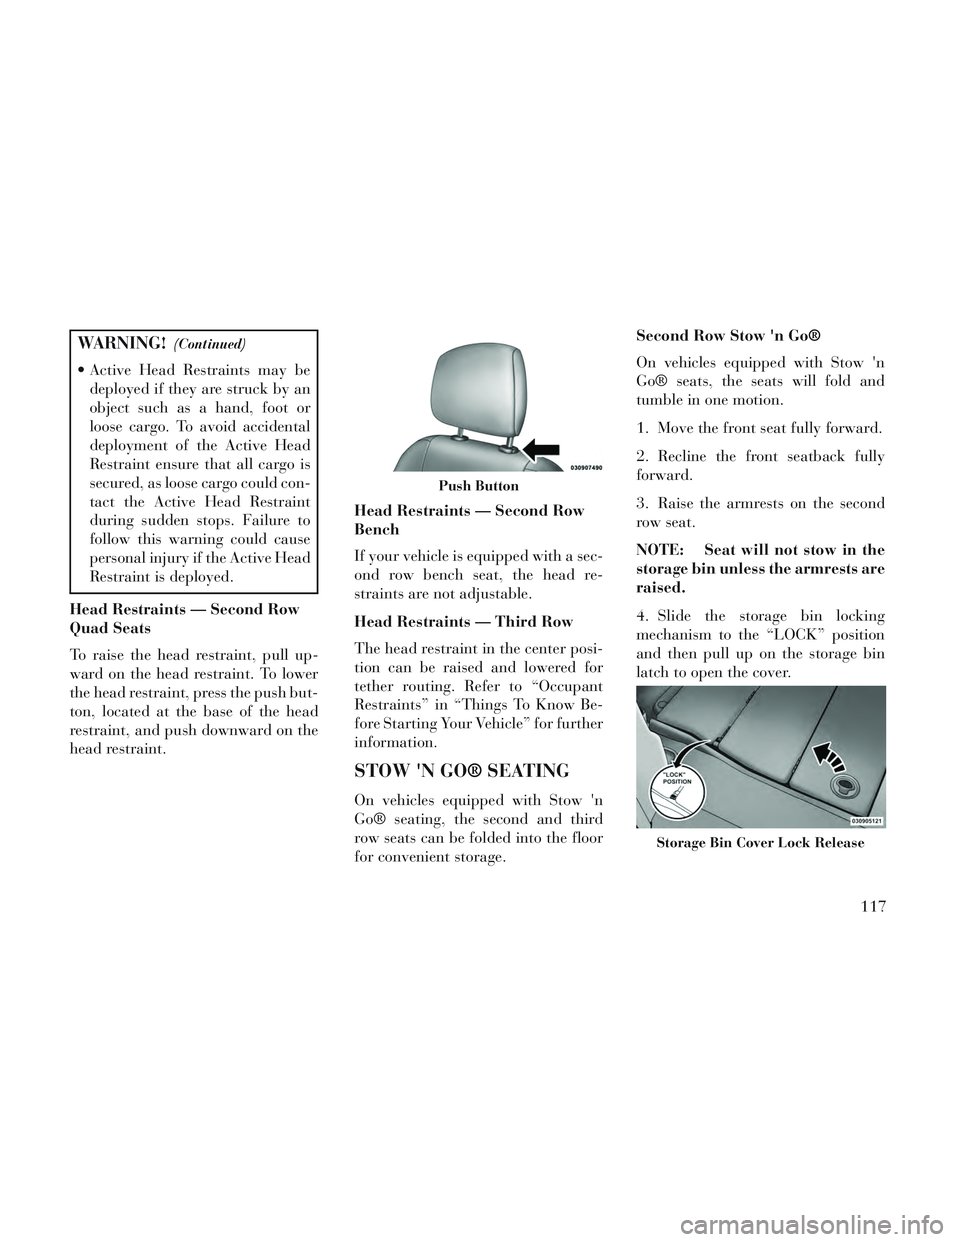
To raise the head restraint, pull up-
ward on the head restraint. To lower
the head restraint, press the push but-
ton, located at the base of the head
restraint, and push downward on the
head restraint. Head Restraints — Second Row
Bench
If your vehicle is equipped with a sec-
ond row bench seat, the head re-
straints are not adjustable.
Head Restraints — Third Row
The head restraint in the center posi-
tion can be raised and lowered for
tether routing. Refer to “Occupant
Restraints” in “Things To Know Be-
fore Starting Your Vehicle” for further
information.
STOW 'N GO® SEATING
On vehicles equipped with Stow 'n
Go® seating, the second and third
row seats can be folded into the floor
for convenient storage.Second Row Stow 'n Go®
On vehicles equipped with Stow 'n
Go® seats, the seats will fold and
tumble in one motion.
1. Move the front seat fully forward.
2. Recline the front seatback fully
forward.
3. Raise the armrests on the second
row seat.
NOTE: Seat will not stow in the
storage bin unless the armrests are
raised.
4. Slide the storage bin locking
mechanism to the “LOCK” position
and then pull up on the storage bin
latch to open the cover.
Push Button
Storage Bin Cover Lock Release
117
Page 157 of 364
the ash receiver, align the receiver so
the thumb grip on the lid is facing
rearward. Press the ash receiver into
either of the cup wells to secure. Pull
upward on the ash receiver to remove
for cleaning and/or storage.
The left rear trim panel cupholder is
designed to accommodate a second
ash receiver, if desired.
POWER INVERTER (for
versions/markets, where
provided)
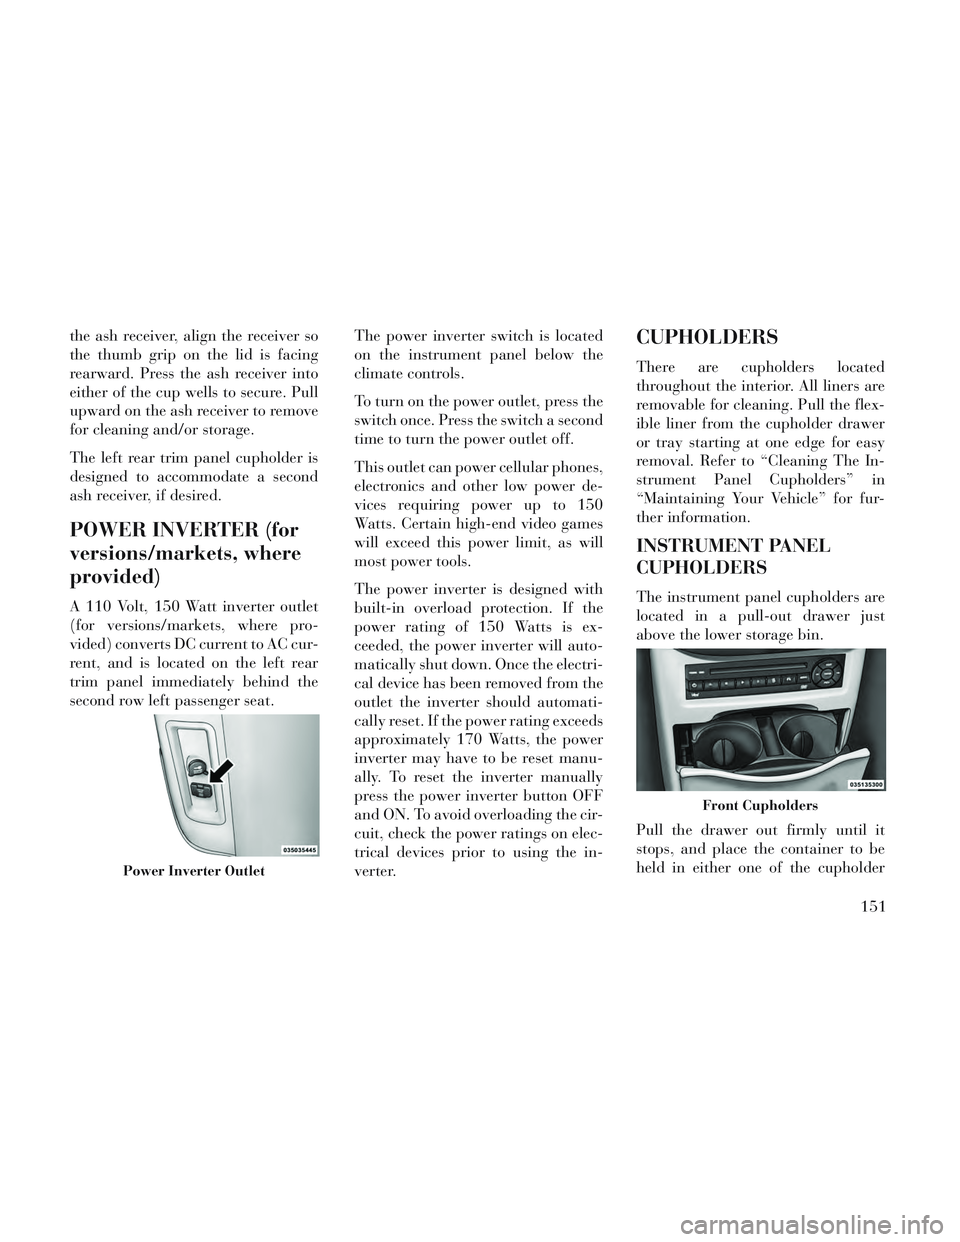
A 110 Volt, 150 Watt inverter outlet
(for versions/markets, where pro-
vided) converts DC current to AC cur-
rent, and is located on the left rear
trim panel immediately behind the
second row left passenger seat.The power inverter switch is located
on the instrument panel below the
climate controls.
To turn on the power outlet, press the
switch once. Press the switch a second
time to turn the power outlet off.
This outlet can power cellular phones,
electronics and other low power de-
vices requiring power up to 150
Watts. Certain high-end video games
will exceed this power limit, as will
most power tools.
The power inverter is designed with
built-in overload protection. If the
power rating of 150 Watts is ex-
ceeded, the power inverter will auto-
matically shut down. Once the electri-
cal device has been removed from the
outlet the inverter should automati-
cally reset. If the power rating exceeds
approximately 170 Watts, the power
inverter may have to be reset manu-
ally. To reset the inverter manually
press the power inverter button OFF
and ON. To avoid overloading the cir-
cuit, check the power ratings on elec-
trical devices prior to using the in-
verter.
CUPHOLDERS
There are cupholders located
throughout the interior. All liners are
removable for cleaning. Pull the flex-
ible liner from the cupholder drawer
or tray starting at one edge for easy
removal. Refer to “Cleaning The In-
strument Panel Cupholders” in
“Maintaining Your Vehicle” for fur-
ther information.
INSTRUMENT PANEL
CUPHOLDERS
The instrument panel cupholders are
located in a pull-out drawer just
above the lower storage bin.
Pull the drawer out firmly until it
stops, and place the container to be
held in either one of the cupholder
Power Inverter Outlet
Front Cupholders
151
Page 180 of 364
that illuminates a low tire pressure
telltale when one or more of your tires
is significantly under-inflated. Ac-
cordingly, when the low tire pressure
telltale illuminates, you should stop
and check your tires as soon as pos-
sible, and inflate them to the proper
pressure. Driving on a significantly
under-inflated tire causes the tire to
overheat and can lead to tire failure.
Under-inflation also reduces fuel effi-
ciency and tire tread life, and may
affect the vehicle’s handling and stop-
ping ability.
Please note that the TPMS is not a
substitute for proper tire mainte-
nance, and it is the driver’s responsi-
bility to maintain correct tire pres-
sure, even if under-inflation has not
reached the level to trigger illumina-
tion of the TPMS low tire pressure
telltale.
Your vehicle has also been equipped
with a TPMS malfunction indicator to
indicate when the system is not oper-
ating properly. The TPMS malfunc-
tion indicator is combined with the
low tire pressure telltale. When thesystem detects a malfunction, the tell-
tale will flash for approximately one
minute and then remain continuously
illuminated. This sequence will con-
tinue upon subsequent vehicle start-
ups as long as the malfunction exists.
When the malfunction indicator is il-
luminated, the system may not be
able to detect or signal low tire pres-
sure as intended. TPMS malfunctions
may occur for a variety of reasons,
including the installation of replace-
ment or alternate tires or wheels on
the vehicle that prevent the TPMS
from functioning properly. Always
check the TPMS malfunction telltale
after replacing one or more tires or
wheels on your vehicle, to ensure that
the replacement or alternate tires and
wheels allow the TPMS to continue to
function properly.CAUTION!
The TPMS has been optimized for
the original equipment tires and
wheels. TPMS pressures and warn-
ing have been established for the
tire size equipped on your vehicle.
Undesirable system operation or
sensor damage may result when us-
ing replacement equipment that is
not of the same size, type, and/or
style. Aftermarket wheels can cause
sensor damage. Do not use tire seal-
ant from a can or balance beads if
your vehicle is equipped with a
TPMS, as damage to the sensors
may result.
9. Malfunction Indicator Light
(MIL) The Malfunction Indicator
Light (MIL) is part of an on-
board diagnostic system,
called OBD, that monitors engine and
automatic transmission control sys-
tems. The light will illuminate when
the key is in the ON/RUN position,
before engine start. If the bulb does
174
Page 181 of 364
not come on when turning the key
from OFF to ON/RUN, have the con-
dition checked promptly.
Certain conditions, such as a loose or
missing gas cap, poor fuel quality,
etc., may illuminate the MIL after en-
gine start. The vehicle should be ser-
viced if the light stays on through
several of your typical driving cycles.
In most situations, the vehicle will
drive normally and will not require
towing.
CAUTION!
Prolonged driving with the Mal-
function Indicator Light (MIL) on
could cause damage to the engine
control system. It also could affect
fuel economy and driveability. If
the MIL is flashing, severe catalytic
converter damage and power loss
will soon occur. Immediate service
is required.
WARNING!
A malfunctioning catalytic con-
verter, as referenced above, can
reach higher temperatures than in
normal operating conditions. This
can cause a fire if you drive slowly
or park over flammable substances
such as dry plants, wood, card-
board, etc. This could result in
death or serious injury to the driver,
occupants or others.
10. Electronic Stability Control
(ESC) Activation/Malfunction Indi-
cator Light (for versions/markets,
where provided) The “ESC Activation/
Malfunction Indicator
Light” in the instrument
cluster will come on when
the ignition switch is turned to the
ON/RUN position. It should go out
with the engine running. If the “ESC
Activation/Malfunction Indicator
Light” comes on continuously with
the engine running, a malfunction has
been detected in the ESC system. If this light remains on after several ig-
nition cycles, and the vehicle has been
driven several kilometers at speeds
greater than 48 km/h, see your autho-
rized dealer as soon as possible to
have the problem diagnosed and cor-
rected.
NOTE:
The “ESC Off Indicator Light”
and the “ESC Activation/
Malfunction Indicator Light”
come on momentarily each time
the ignition switch is turned to
ON/RUN.
Each time the ignition is turned to ON/RUN, the ESC system will
be ON, even if it was turned off
previously.
The ESC system will make buzz- ing or clicking sounds when it is
active. This is normal; the
sounds will stop when ESC be-
comes inactive following the
maneuver that caused the ESC
activation.
175
Page 183 of 364
corrected. If the problem is related to
the brake booster, the ABS pump will
run when applying the brake and a
brake pedal pulsation may be felt dur-
ing each stop.
The dual brake system provides a re-
serve braking capacity in the event of
a failure to a portion of the hydraulic
system. A leak in either half of the
dual brake system is indicated by the
Brake Warning Light, which will turn
on when the brake fluid level in the
master cylinder has dropped below a
specified level.
The light will remain on until the
cause is corrected.
NOTE: The light may flash mo-
mentarily during sharp cornering
maneuvers, which change fluid
level conditions. The vehicle
should have service performed,
and the brake fluid level checked.
If brake failure is indicated, immedi-
ate repair is necessary.WARNING!
Driving a vehicle with the red brake
light on is dangerous. Part of the
brake system may have failed. It
will take longer to stop the vehicle.
You could have a collision. Have the
vehicle checked immediately.
Vehicles equipped with the Anti-Lock
Brake System (ABS), are also
equipped with Electronic Brake Force
Distribution (EBD). In the event of an
EBD failure, the Brake Warning Light
will turn on along with the ABS Light.
Immediate repair to the ABS system is
required.
Operation of the Brake Warning Light
can be checked by turning the ignition
switch from the OFF position to the
ON/RUN position. The light should
illuminate for approximately two sec-
onds. The light should then turn off
unless the parking brake is applied or
a brake fault is detected. If the light
does not illuminate, have the light
inspected by an authorized dealer. The light also will turn on when the
parking brake is applied with the ig-
nition switch in the ON/RUN posi-
tion.
NOTE: This light shows only
that the parking brake is applied.
It does not show the degree of
brake application.
19. Seat Belt Reminder Light
When the ignition switch is
first turned to ON/RUN, this
light will turn on for four to
eight seconds as a bulb check. During
the bulb check, if the driver or front
passenger's seat belt is unbuckled, a
chime will sound. After the bulb
check or when driving, if the driver's
seat belt remains unbuckled, the Seat
Belt Reminder Light will illuminate
and the chime will sound. Refer to
“Occupant Restraints” in “Things To
Know Before Starting Your Vehicle”
for further information.
177
Page 189 of 364
Door AjarThis light will turn on to
indicate that one or more
doors may be ajar.
Oil Pressure Warning Light This light indicates low engine
oil pressure. The light should
turn on momentarily when the engine
is started. If the light turns on while
driving, stop the vehicle and shut off
the engine as soon as possible. A
chime will sound when this light turns
on.
Do not operate the vehicle until the
cause is corrected. This light does not
show how much oil is in the engine.
The engine oil level must be checked
under the hood.
Charging System Light
This light shows the status of
the electrical charging system.
The light should come on when the
ignition switch is first turned ON and
remain on briefly as a bulb check. If
the light stays on or comes on while
driving, turn off some of the vehicle's non-essential electrical devices or in-
crease engine speed (if at idle). If the
charging system light remains on, it
means that the vehicle is experiencing
a problem with the charging system.
Obtain SERVICE IMMEDIATELY.
See an authorized dealer.
If jump starting is required, refer to
“Jump Starting Procedures” in “What
To Do In Emergencies”.
Electronic Throttle Control
(ETC) Light
This light informs you of a
problem with the Electronic
Throttle Control (ETC) sys-
tem. The light will come on
when the ignition is first turned ON
and remain on briefly as a bulb check.
If the light does not come on during
starting, have the system checked by
an authorized dealer.
If a problem is detected, the light will
come on while the engine is running.
Cycle the ignition key when the ve-
hicle has completely stopped and the
shift lever is placed in the PARK posi-
tion. The light should turn off. If the light remains lit with the engine
running, your vehicle will usually be
drivable. However, see an authorized
dealer for service as soon as possible.
If the light is flashing when the engine
is running, immediate service is re-
quired. You may experience reduced
performance, an elevated/rough idle
or engine stall and your vehicle may
require towing.
Engine Temperature Warning
Light
This light warns of an over-
heated engine condition. As
temperatures rise and the gauge ap-
proaches H,this indicator will illumi-
nate and a single chime will sound
after reaching a set threshold. Further
overheating will cause the tempera-
ture gauge to pass H,a continuous
chime will occur until the engine is
allowed to cool.
If the light turns on while driving,
safely pull over and stop the vehicle. If
the A/C system is on, turn it off. Also,
shift the transmission into NEUTRAL
183