lights Lancia Ypsilon 2002 Owner handbook (in English)
[x] Cancel search | Manufacturer: LANCIA, Model Year: 2002, Model line: Ypsilon, Model: Lancia Ypsilon 2002Pages: 191, PDF Size: 2.45 MB
Page 39 of 191
36
G
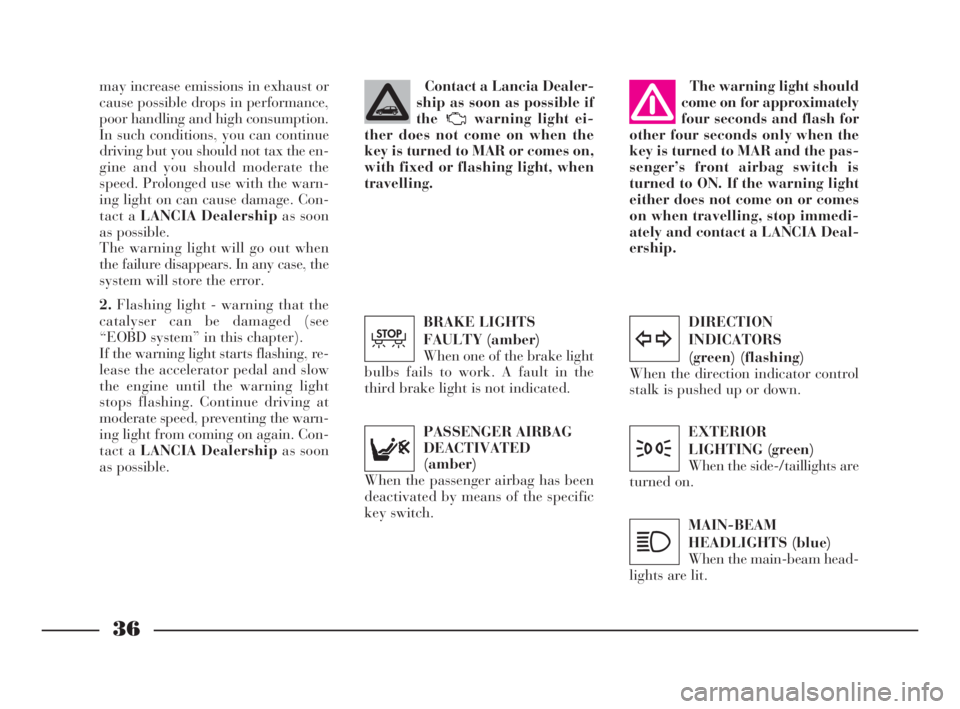
DIRECTION
INDICATORS
(green) (flashing)
When the direction indicator control
stalk is pushed up or down.
y
EXTERIOR
LIGHTING (green)
When the side-/taillights are
turned on.
3
MAIN-BEAM
HEADLIGHTS (blue)
When the main-beam head-
lights are lit.
1
may increase emissions in exhaust or
cause possible drops in performance,
poor handling and high consumption.
In such conditions, you can continue
driving but you should not tax the en-
gine and you should moderate the
speed. Prolonged use with the warn-
ing light on can cause damage. Con-
tact a LANCIA Dealershipas soon
as possible.
The warning light will go out when
the failure disappears. In any case, the
system will store the error.
2.Flashing light - warning that the
catalyser can be damaged (see
“EOBD system” in this chapter).
If the warning light starts flashing, re-
lease the accelerator pedal and slow
the engine until the warning light
stops flashing. Continue driving at
moderate speed, preventing the warn-
ing light from coming on again. Con-
tact a LANCIA Dealershipas soon
as possible.PASSENGER AIRBAG
DEACTIVATED
(amber)
When the passenger airbag has been
deactivated by means of the specific
key switch.The warning light should
come on for approximately
four seconds and flash for
other four seconds only when the
key is turned to MAR and the pas-
senger’s front airbag switch is
turned to ON. If the warning light
either does not come on or comes
on when travelling, stop immedi-
ately and contact a LANCIA Deal-
ership.Contact a Lancia Dealer-
ship as soon as possible if
the warning light ei-
ther does not come on when the
key is turned to MAR or comes on,
with fixed or flashing light, when
travelling.
BRAKE LIGHTS
FAULTY (amber)
When one of the brake light
bulbs fails to work. A fault in the
third brake light is not indicated.
T
4C001-067 ING 11-03-2008 11:57 Pagina 36
Page 44 of 191
41
G
IMPORTANTThe climate control
is very useful for speeding up demist-
ing because it dries the air. Simply
adjust the controls for the demisting
function and turn on the climate con-
trol by pressing button
√.
IMPORTANTThe versions with cli-
mate control have a factory-fitted
pollen filter.
IMPORTANTThe climate control
compressor will be temporarily ex-
cluded when accelerating sharply, and
reengaged after an established period
of time.STEERING
COLUMN STALKS
LEFT-HAND STALK
This stalk controls the following out-
side lights:
– side/taillights;
– dipped beam headlights;
– main beam headlights;
– direction indicators.
The outside lights can only be lit up
with the control stalk when the igni-
tion key is at MAR.
When the outside lights are turned
on, the instrument panel and the var-
ious controls located in the dashboard
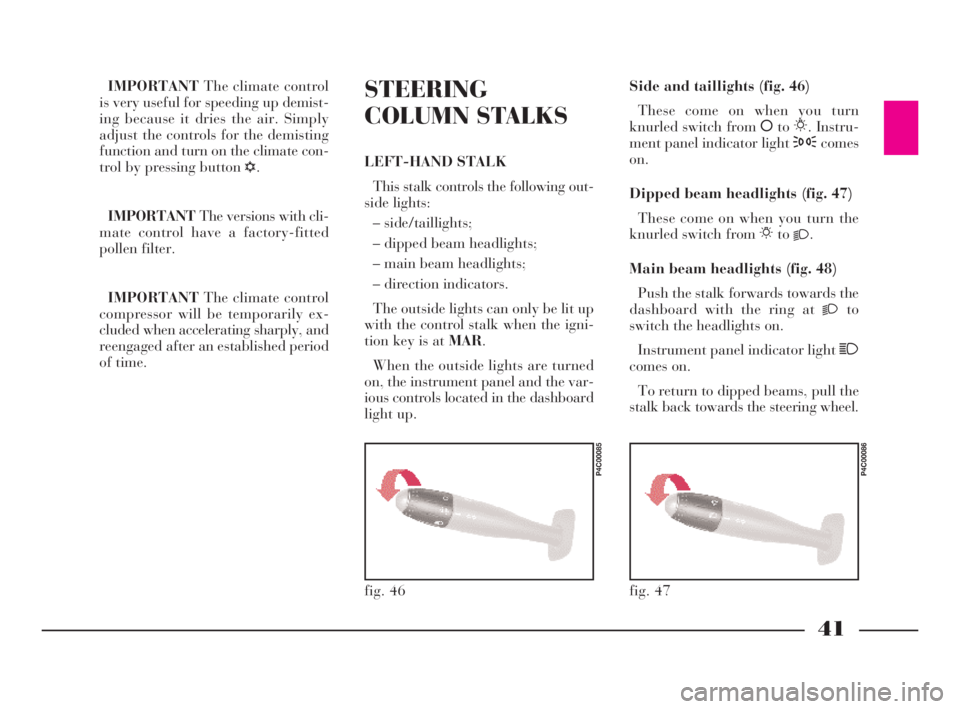
light up.Side and taillights (fig. 46)
These come on when you turn
knurled switch from åto6. Instru-
ment panel indicator light 3comes
on.
Dipped beam headlights (fig. 47)
These come on when you turn the
knurled switch from 6to
2.
Main beam headlights (fig. 48)
Push the stalk forwards towards the
dashboard with the ring at
2to
switch the headlights on.
Instrument panel indicator light 1
comes on.
To return to dipped beams, pull the
stalk back towards the steering wheel.
fig. 46
P4C00085
fig. 47
P4C00086
4C001-067 ING 11-03-2008 11:57 Pagina 41
Page 45 of 191

42
G
RIGHT-HAND STALK
Windscreen wash/wipe (fig. 51)
This feature can only work when the
ignition key is at MAR.
Controls:
0- windscreen wiper off;
1- flick wipe;
2- slow continuous wipe;
3- fast continuous wipe;
4- temporary function: when you
release the stalk it returns to position
0and automatically turns off the
windscreen wiper.
fig. 51
P4C00090
To flash the lights (fig. 49)
Pull the stalk towards the steering
wheel (temporary position).Direction indicators (fig. 50)
Move the stalk as follows to turn on
the direction indicators:
up - for the right indicator;
down - for the left indicator.
Instrument panel indicator light y
flashes.
The direction indicators automati-
cally return to the neutral position
when the car straightens up.
If you want the indicator to flash
briefly, move the stalk up or down
without it clicking into position. When
you let it go it will return to its origi-
nal position.
fig. 48
P4C00087
fig. 49
P4C00088
fig. 50
P4C00089
4C001-067 ING 11-03-2008 11:57 Pagina 42
Page 46 of 191

43
G
When you pull the lever towards the
steering wheel (fig. 52), a jet of liquid
shoots out from the windscreen
washer.Rear window wash/wipe (fig. 53)
This function is only possible when
the ignition key is at MAR.
Controls:
1)turn the control from åto'for
continous wiper operation;
2)when you push the control stalk
forward (temporary position), a jet of
liquid shoots out from the rear win-
dow washer and the rear window
wiper comes into operation. When you
let the lever go again the rear window
washer/ wiper ceases to function.
fig. 52
P4C00091
fig. 53
P4C00092
CONTROLS
HAZARD LIGHTS
These come on when switch A
(fig. 54)is pressed, regardless of the
position of the ignition key.
When these lights are on, the panel
warning light
rflashes.
Press the switch again to turn the
lights off.
fig. 54
P4C00343
4C001-067 ING 11-03-2008 11:57 Pagina 43
Page 47 of 191
44
G
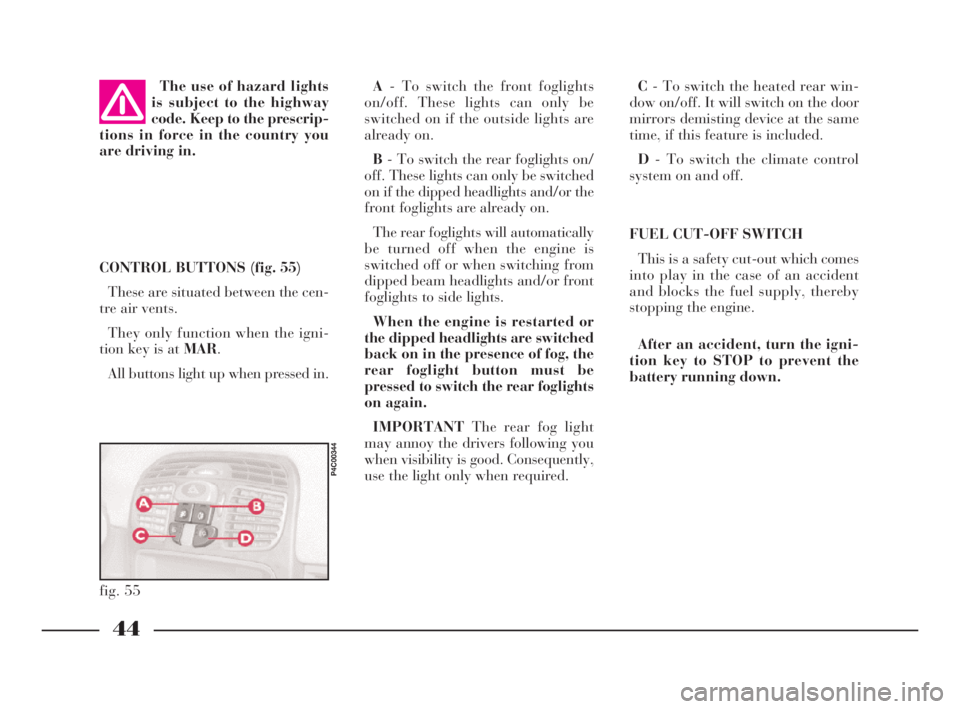
C- To switch the heated rear win-
dow on/off. It will switch on the door
mirrors demisting device at the same
time, if this feature is included.
D- To switch the climate control
system on and off.
FUEL CUT-OFF SWITCH
This is a safety cut-out which comes
into play in the case of an accident
and blocks the fuel supply, thereby
stopping the engine.
After an accident, turn the igni-
tion key to STOP to prevent the
battery running down. CONTROL BUTTONS (fig. 55)
These are situated between the cen-
tre air vents.
They only function when the igni-
tion key is at MAR.
All buttons light up when pressed in. The use of hazard lights
is subject to the highway
code. Keep to the prescrip-
tions in force in the country you
are driving in.
fig. 55
P4C00344
A- To switch the front foglights
on/off. These lights can only be
switched on if the outside lights are
already on.
B- To switch the rear foglights on/
off. These lights can only be switched
on if the dipped headlights and/or the
front foglights are already on.
The rear foglights will automatically
be turned off when the engine is
switched off or when switching from
dipped beam headlights and/or front
foglights to side lights.
When the engine is restarted or
the dipped headlights are switched
back on in the presence of fog, the
rear foglight button must be
pressed to switch the rear foglights
on again.
IMPORTANTThe rear fog light
may annoy the drivers following you
when visibility is good. Consequently,
use the light only when required.
4C001-067 ING 11-03-2008 11:57 Pagina 44
Page 49 of 191

46
G
sition and the cigar lighter is ready to
use.
The ashtray can be removed.
IMPORTANTMake sure that the
cigar lighter does in fact pop out af-
ter it has been pushed in.
The rear seats have a concealed ash-
tray in the right side panel.
Follow the direction of the arrow to
use and extract the ashtray (fig. 61).
fig. 61
P4C00099
CEILING LAMP (fig. 59)
SwitchesAandBswitch the ceiling
lights on and off.
The following conditions are created
according to the position of these
switches:
–with switch A in the centre po-
sition, light Cin the ceiling lamp will
come on when the doors are opened;
–with switch A moved to the left,
lightCin the ceiling lamp is off and
will not light up if the doors are
opened;
–with switch A moved to the
right, light Cin the ceiling lamp will
light up regardless of whether the
doors are open or not.SwitchBwill switch the map-read-
ing light Don/off (spot light).
IMPORTANTBefore getting out of
the car, make sure that switch Ais in
the centre position; the ceiling light will
then go out when the doors are closed
and you will not drain the battery.
ASHTRAY AND CIGAR LIGHTER
How to use them:
1)Open flap A (fig. 60)in the di-
rection of the arrow to reach the cigar
lighter and the ashtray.
2)Press button B: after around fif-
teen seconds it returns to its initial po-
fig. 60
P4C00215
fig. 59
P4C00097
4C001-067 ING 11-03-2008 11:57 Pagina 46
Page 54 of 191

51
G
BOOT
OPENING/CLOSING
THE TAILGATE
To open the boot from the outside,
unlock it with the ignition key A
(fig. 72).
To open it from inside the car, pull
leverA (fig. 73)at the side of the dri-
ver’s seat.
To lift the tailgate, use the grip lo-
cated between the two number plate
lights.When the tailgate is closed, it will
lock automatically, and can only be
reopened by using the key or pulling
leverA (fig. 73)inside the car.
IMPORTANTNever leave the keys
in the boot.
Use the handle situated in the inte-
rior trim of the tailgate A (fig. 74)to
lower it without getting your hands
dirty.
To close the tailgate, lower it and
press in the centre until you hear it
lock.
fig. 72
P4C00021
fig. 73
P4C00015
Do not work boot release
lever when the car is in
motion.
The addition of objects to
the rear parcel shelf or
tailgate (loudspeakers,
spoiler, etc.) may prevent the gas-
filled struts at the sides of the tail-
gate working properly. Items
arranged on the rear window shelf
could be thrown forwards and in-
jure passengers should you brake
sharply.
fig. 74
P4C00037
When using the boot,
make sure the load you are
carrying does not exceed
the permitted weight (see the
“Technical specifications” sec-
tion). Also ensure the items in the
boot are arranged properly to pre-
vent them being thrown forward
and injurying passengers should
you brake sharply.
4C001-067 ING 11-03-2008 11:57 Pagina 51
Page 56 of 191
53
G
2)Tip back the cushion while hold-
ing up the ends of the seat belts
(tongues and buckles) and passing
them between cushion and seat back.
In this way, the seat belts will be im-
mediately ready to be used.
Some versions fit a split rear seat. In
this case, the left-hand side and the
right-hand side of the seat can be
tipped separately.IMPORTANTWhen driving at
night with a load in the boot, adjust
the height of the dipped headlight
beam as shown in “Headlights” in
this chapter.
For correct adjustment, make sure
the load does not exceed the values in-
dicated in the relevant section.
fig. 78
P4C00160
fig. 79
P4C00051
If the backrest is not fas-
tened properly, heavy
loose luggage behind it
could cause serious harm to pas-
sengers in the event of an accident.If you wish to carry a re-
serve can of petrol, it is
important to comply to the
laws in force. Use only a homolo-
gated can and fasten it securely.
Even so, there is a greater fire risk
in the event of an accident.
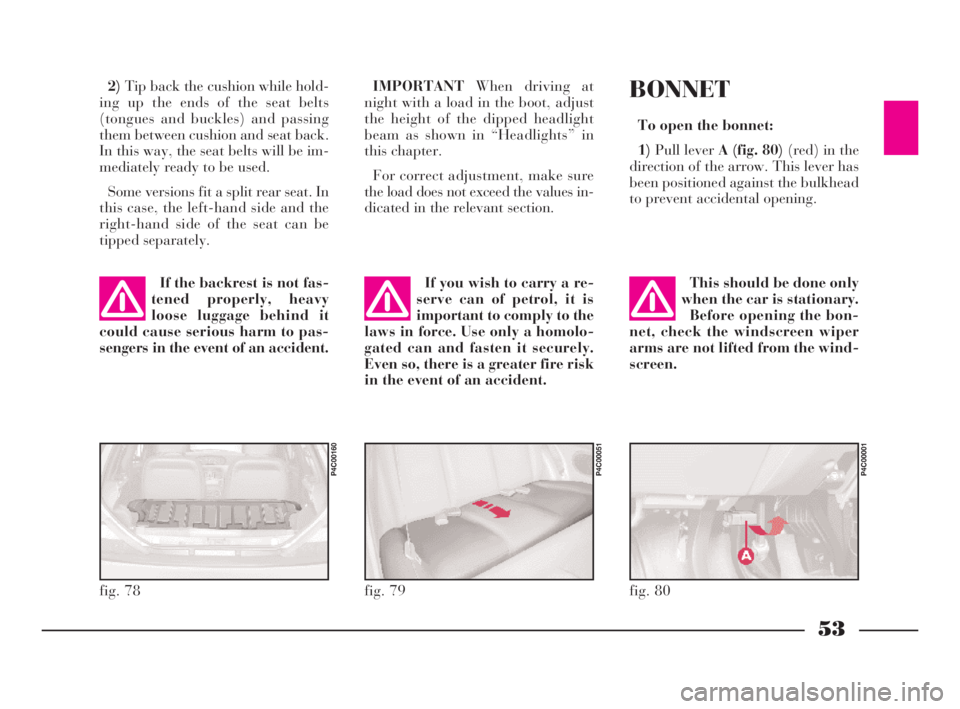
BONNET
To open the bonnet:
1)Pull lever A (fig. 80)(red) in the
direction of the arrow. This lever has
been positioned against the bulkhead
to prevent accidental opening.
fig. 80
P4C00001
This should be done only
when the car is stationary.
Before opening the bon-
net, check the windscreen wiper
arms are not lifted from the wind-
screen.
4C001-067 ING 11-03-2008 11:57 Pagina 53
Page 58 of 191
55
G
SKI AND
ROOF RACKS
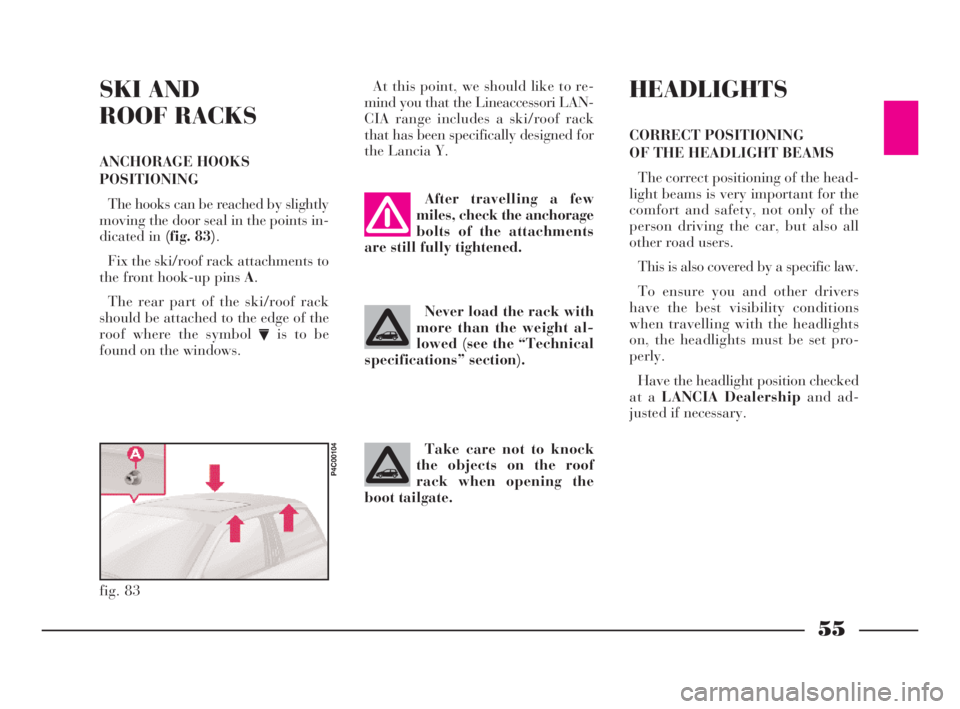
ANCHORAGE HOOKS
POSITIONING
The hooks can be reached by slightly
moving the door seal in the points in-
dicated in (fig. 83).
Fix the ski/roof rack attachments to
the front hook-up pins A.
The rear part of the ski/roof rack
should be attached to the edge of the
roof where the symbol
Vis to be
found on the windows.At this point, we should like to re-
mind you that the Lineaccessori LAN-
CIA range includes a ski/roof rack
that has been specifically designed for
the Lancia Y.
fig. 83
P4C00104
After travelling a few
miles, check the anchorage
bolts of the attachments
are still fully tightened.
Never load the rack with
more than the weight al-
lowed (see the “Technical
specifications” section).
Take care not to knock
the objects on the roof
rack when opening the
boot tailgate.
HEADLIGHTS
CORRECT POSITIONING
OF THE HEADLIGHT BEAMS
The correct positioning of the head-
light beams is very important for the
comfort and safety, not only of the
person driving the car, but also all
other road users.
This is also covered by a specific law.
To ensure you and other drivers
have the best visibility conditions
when travelling with the headlights
on, the headlights must be set pro-
perly.
Have the headlight position checked
at a LANCIA Dealershipand ad-
justed if necessary.
4C001-067 ING 11-03-2008 11:57 Pagina 55
Page 59 of 191

56
G
ABS
The car is fitted with an ABS brak-
ing system that prevents the wheels
locking when braking, it exploits the
grip on the road surface holding the
car in the case of sudden braking.
The driver becomes aware of the
ABS activation through a slight throb-
bing of the brake pedal and the rele-
vant noise it makes.
This does not indicate brake mal-
functioning, it is an indication to the
driver that the ABS is operating. It is
a warning that the car is travelling at
borderline road grip and therefore the
speed should be adjusted to the type
of road surface.
The ABS is an addition to the basic
braking system; in the case of a fail-
ure it disables, leaving the braking
system in the same conditions as a ve-
hicle without ABS installed. COMPENSATION
FOR THE UPWARD SLANT
OF THE HEADLIGHT BEAMS
When the car is loaded, it “slopes”
backwards. This means that the head-
light beam rises. In this case it is nec-
essary to return it to the correct posi-
tion.
The car is fitted with an electric ad-
juster(fig. 84)situated at the side of
the handbrake:
Position0- one or two people on the
front seats.
Position1- five people.
Position2- five people + load in
luggage compartment.
Position3- driver + maximum per-
missible load all in the boot.
fig. 84
P4C00105
Check the positioning of
the headlight beams every
time you change the load
to be carried.
IMPORTANTIn order that the ad-
juster operates properly, the load in
the boot must not exceed the maxi-
mum values indicated.
ADJUSTING THE BEAM
OF THE FRONT FOGLIGHTS
Ask a LANCIA Dealershipto check
and, if necessary, adjust the beam for
you.
4C001-067 ING 11-03-2008 11:57 Pagina 56