display Lancia Ypsilon 2011 Owner handbook (in English)
[x] Cancel search | Manufacturer: LANCIA, Model Year: 2011, Model line: Ypsilon, Model: Lancia Ypsilon 2011Pages: 299, PDF Size: 13.35 MB
Page 44 of 299

Manual selections always have higher priority over
automatic settings and are stored until the user
switches the system back to automatic control
expect for cases in which the system intervenes for
particular safety-related reasons. You can adjust
one function manually without affecting the
automatic control of the others.
The amount of air introduced into the passenger
compartment is not affected by car speed; it is
regulated by the fan, which is controlled
electronically.
The temperature of the air introduced is always
controlled automatically, according to the
temperature set in the display for the driver and
the front passenger (except when the system is off
or in certain conditions when the compressor is
deactivated).
The system allows the following to be set or
adjusted manually:
❒driver/front passenger side air temperature
❒fan speed (continuous variation)
❒air distribution to 5 positions (driver/passenger)
❒compressor activation
❒rapid defrosting/demisting function
❒air recirculation
❒heated rear window
❒system deactivation.SWITCHING ON THE CLIMATE CONTROL
SYSTEM
The system can be switched on in various ways; it
is however advisable to press the AUTO button
and set the desired temperature on the display.
The climate control system allows you to
customise the temperatures requested (driver side
and passenger side) with a maximum difference
of 7°C.
The climate control system compressor works only
with the engine running and with an outside
temperature of above 4°C.
AUTOMATIC CLIMATE CONTROL SYSTEM
OPERATION
Press the AUTO button; the system will
automatically adjust:
❒the amount of air introduced into the passenger
compartment;
❒the distribution of the air in the passenger
compartment;
cancelling all previous manual adjustments.
During climate control system automatic
operation, the word AUTO appears on the display.
During automatic operation it is still possible to
adjust the temperatures set and carry out the
following operations manually:
❒fan speed adjustment
❒air distribution selection
42GETTING TO
KNOW YOUR CAR
SAFETY
STARTING
AND
DRIVING
WARNING LIGHTS
AND MESSAGES
IN AN EMERGENCY
SERVICING AND
MAINTENANCE
TECHNICAL
SPECIFICATIONS
INDEX
Page 45 of 299

❒internal air recirculation and AQS function
activation/deactivation
❒climate control compressor activation.
WARNING
It is advisable not to use the internal
air recirculation function
when the
outside temperature is low, because the
windows could mist rapidly.
ADJUSTING THE FAN SPEED
Press button
to increase/decrease the fan speed.
The possible speeds are indicated by bars lighting
up on the display:
❒maximum fan speed = all bars lit
❒minimum fan speed = one bar lit.
The fan can be disabled (no bars lit) only if the
climate control compressor has been switched off
by pressing button
.
To restore automatic fan speed control after a
manual adjustment, press the AUTO button.
RAPID FRONT WINDOW DEMISTING/
DEFROSTING (MAX-DEF function)
Press buttonMAXto automatically activate
the timed operation of all the functions required to
rapidly demist/defrost the windscreen and front
side windows.The functions are:
❒climate control compressor activation (with an
outside temperature of above 4°C)
❒deactivation, if previously activated, of the
internal air recirculation
❒activation of heated rear window (LED on
buttonMAX
on) and door mirror heater
coils
❒setting maximum air temperature
❒activation of air flow.
DEMISTING/DEFROSTING OF HEATED
REAR WINDOW AND DOOR MIRRORS
Press button
to activate: when this function is
activated, the button LED switches on.
This function is timed and will deactivate
automatically after 20 minutes. Press button
again to switch the function off in advance.
IMPORTANT Do not apply stickers on the inside
of the rear window over the heating filaments
to avoid damage.
IMPORTANT To draw in air from outside, press
button
.
43GETTING TO
KNOW YOUR CARSAFETY
STARTING
AND
DRIVING
WARNING LIGHTS
AND MESSAGES
IN AN EMERGENCY
SERVICING AND
MAINTENANCE
TECHNICAL
SPECIFICATIONS
INDEX
Page 46 of 299

ACTIVATION OF INTERIOR AIR
RECIRCULATION AND ENABLEMENT OF
AQS FUNCTION (Air Quality System)
Press button
.
Internal air recirculation is carried out according
to three possible operating modes:
❒automatic control;
❒forced deactivation (air recirculation always
deactivated, air taken from the outside)
❒forced activation (internal air circulation always
activated).
When the OFF button is pressed, the climate
control system automatically activates internal air
recirculation. External air recirculation can always
be activated by pressing button
and vice
versa.
With the OFF button pressed, it is not possible to
activate the AQS (Air Quality System) function.IMPORTANT Internal air recirculation makes it
possible to reach the required heating or cooling
conditions more quickly depending on the mode
selected. It is not advisable to switch the air
recirculation on when it is rainy/cold to prevent
the windows from misting, especially if the climate
control system has not been activated. It is
advisable to switch the internal air recirculation
on whilst queuing or in tunnels to prevent the
introduction of polluted air. Do not use the
function for a long time, particularly if there are
several passengers on board, to prevent the
windows from misting.
AQS (Air Quality System) function activation
The AQS function automatically activates internal
air recirculation when the outside air is polluted
(e.g. in traffic queues and tunnels).
IMPORTANT With the AQS function active, after
15 consecutive minutes of the internal air
recirculation system functioning, the climate
control system enables the intake of outside air for
approximately 1 minute to freshen the air in the
passenger compartment. This takes place
regardless of the pollution level of the outside air.
CLIMATE CONTROL COMPRESSOR
ACTIVATION/DEACTIVATION
Press button
to switch on the climate control
compressor.
Compressor activation:
symbol appears on
display.
44GETTING TO
KNOW YOUR CAR
SAFETY
STARTING
AND
DRIVING
WARNING LIGHTS
AND MESSAGES
IN AN EMERGENCY
SERVICING AND
MAINTENANCE
TECHNICAL
SPECIFICATIONS
INDEX
Page 47 of 299

Compressor deactivation
❒
symbol on display disappears;
❒internal air recirculation excluded;
❒AQS function disabled.
With the climate control compressor switched off,
air cannot be introduced into the passenger
compartment that has a lower temperature than
the outside air; in this case the
symbol in the
display will flash.
The deactivation of the climate control compressor
is memorised even after the engine has stopped.
To reactivate the climate control compressor, press
button
or AUTO again: if you press AUTO,
the other manual settings will be cancelled.
AIR DISTRIBUTION SELECTION
Press one or more of buttons A fig. to manually
select one of the possible air distribution settings
for the passenger compartment:
Air flow to the windscreen and front side
window diffusers to demist/defrost them.Air flow to the front and rear footwell
diffusers. This air distribution allows the
passenger compartment to be warmed up
quickly.+
+
Air flow distribution between
front and rear diffusers,
centre/side dashboard diffusers,
rear diffuser and windscreen
and front side window
demisting/defrosting diffusers.
Air flow distribution to centre/side dashboard
diffusers (passenger's body).+
Air flow distributed between footwell
diffusers and windscreen and front side
window defrosting/demisting diffusers.
This distribution setting allows the
passenger compartment to be warmed
effectively and prevents the windows
from misting.
+
Air flow distribution between footwell
diffusers (hotter air) and centre/side
dashboard diffusers and rear diffuser
(cooler air).
+
Air flow distribution between
centre/side dashboard vents, rear
diffuser and windscreen and front side
window demisting/defrosting diffusers.
This distribution setting ventilates
the passenger compartment well and
prevents the windows from misting up.
IMPORTANT For the climate control system to
function, at least one of the buttons A must be
operated fig. . The system does not allow the
deactivation of all the buttons A.
IMPORTANT Push the OFF button to turn the
climate control system back on: in this way, all
operating conditions memorised before switching
off are restored.
To restore automatic control of the air distribution
after a manual selection, press the AUTO button.
45GETTING TO
KNOW YOUR CARSAFETY
STARTING
AND
DRIVING
WARNING LIGHTS
AND MESSAGES
IN AN EMERGENCY
SERVICING AND
MAINTENANCE
TECHNICAL
SPECIFICATIONS
INDEX
33 33
Page 48 of 299

SWITCHING OFF THE CLIMATE CONTROL
SYSTEM
Press the OFF button.
The following information is shown on the
display:
❒OFF
❒outside temperature indication
❒internal air recirculation active indication.
SYSTEM MAINTENANCE
In winter, the climate control system must be
turned on at least once a month for about
10 minutes.
Before summer, have the system checked at a
Lancia Dealership.
The system uses R134a refrigerant
fluid which does not pollute the
environment in the event of accidental
leakage. Never use R12 fluid, which is not
compatible with the system components.HEATED REAR WINDOW
DEMISTING/DEFROSTING
Press button
to activate: when this function is
activated, the button LED switches on.
This function is timed and it will turn off
automatically after about 20 minutes.
Press buttonagain to switch the function off in
advance.
IMPORTANT Do not apply stickers on the inside
of the rear window over the heating filaments
to avoid damage.
46GETTING TO
KNOW YOUR CAR
SAFETY
STARTING
AND
DRIVING
WARNING LIGHTS
AND MESSAGES
IN AN EMERGENCY
SERVICING AND
MAINTENANCE
TECHNICAL
SPECIFICATIONS
INDEX
Page 50 of 299

When the ignition key is turned to STOP or
removed and the ring nut is turned from O to
,
all the side lights and number plate lights switch
on. The
warning light will come on in the
instrument panel.
PARKING LIGHTS
These lights can only be turned on with ignition
key in STOP position or removed, by moving
the ring nut A first to positionOand then to
position.
The warning light
switches on on the
instrument panel. When the direction indicator
stalk is activated the side for the lights (left or
right) can be selected.
AUTOMATIC LIGHTING CONTROL
(AUTOLIGHT) (Dusk sensor)
(for versions/markets,
where provided)
This infrared LED sensor, combined with the rain
sensor and located on the windscreen, detects
the variations in outside brightness depending on
the light sensitivity set with the Setup Menu:
the greater the sensitivity, the less external light is
required to activate the exterior lights.
Activation
The dusk sensor activates when ring nut A fig. 34
is turned to
. In this way the side lights and
dipped headlights are activated automatically
according to the external light level.When the lights are turned on by the sensor, the
fog lights (for versions/markets, where provided)
and the rear fog lights may be turned on. When
the lights are automatically switched off, the front
and rear fog lights (if activated) are also switched
off. The next time the lights are switched on
automatically, the fog lights must be reactivated
manually (if required).
With the sensor active, it is possible to flash the
headlights but the main beam headlights cannot
be switched on. To activate these lights, turn
the ring nut A to
and activate the fixed dipped
beam headlights.
When the lights have been activated automatically
and are then switched off by the sensor, the
dipped beam headlights are switched off first,
followed by the side lights a few seconds later. If
the sensor is activated but is malfunctioning,
the side lights and dipped beam headlights are
switched on irrespective of the outside light level
and the sensor failure is indicated on the
instrument panel display. It is also possible to
deactivate the sensor and switch on the side lights
and dipped beam headlights.
IMPORTANT The sensor is unable to detect the
presence of fog. Under these circumstances, these
lights are therefore turned on manually.
48GETTING TO
KNOW YOUR CAR
SAFETY
STARTING
AND
DRIVING
WARNING LIGHTS
AND MESSAGES
IN AN EMERGENCY
SERVICING AND
MAINTENANCE
TECHNICAL
SPECIFICATIONS
INDEX
Page 51 of 299

MAIN BEAM HEADLIGHTS
To switch on the main beam headlights, with ring
nut in position
, push the stalk forward toward
the dashboard (unstable position). The
warning light will come on in the instrument
panel.
When the stalk is released, the lights deactivate,
the main beam headlights reactivate and thewarning light switches off.
It is not possible to switch on the main beam
headlights in fixed mode if the automatic lighting
control system is active.
FLASHING
You can flash the headlights by pulling the stalk
towards the wheel (unstable position). Thewarning light will come on in the instrument
panel.
DIRECTION INDICATORS
Bring the stalk to the (stable) position:
upwards:right-hand direction indicator
activation;
downwards:left-hand direction indicator
activation.
Warning light
or
should flash in the
instrument panel. The indicators switch off
automatically when the steering wheel is
straightened.Lane change function
If you wish to signal a lane change, put the left
stalk in the unstable position for less than half a
second. The direction indicator on the selected
side flashes three times and then switches off
automatically.
“FOLLOW ME HOME” DEVICE
This allows the space in front of the car to be lit
up for a certain period of time.
Activation:with the ignition key on STOP or
removed, pull the stalk towards the steering wheel
within 2 minutes from when the engine is turned
off.
At each single movement of the stalk, the lights
will remain on for an extra 30 seconds up to a
maximum of 210 seconds; then the lights are
switched off automatically.
Each time the stalk is operated, the
warning
light on the instrument panel switches on and the
display also shows a message and how long the
function will remain active.
The
warning light switches on when the stalk
is first moved and stays on until the function is
automatically deactivated. Each time the stalk is
activated it increases the time that the lights
remain on.
Deactivation:keep the stalk pulled towards the
steering wheel for more than two seconds.
49GETTING TO
KNOW YOUR CARSAFETY
STARTING
AND
DRIVING
WARNING LIGHTS
AND MESSAGES
IN AN EMERGENCY
SERVICING AND
MAINTENANCE
TECHNICAL
SPECIFICATIONS
INDEX
Page 56 of 299

CRUISE CONTROL(for versions/markets, where provided)
This is an electronically controlled driving
assistance device which allows the car to be driven
at a chosen speed above 30 km/h on long
stretches of dry, straight roads with few variations
(e.g. motorways), without having to depress the
accelerator pedal. It is therefore not recommended
to use this device on extra-urban roads with
traffic. Do not use the device in town.
Activating the device
Activation is indicated by warning light
switching on and, on some versions, by a
message on the display.
The speed adjustment function cannot be
activated in 1
stor reverse gear; it is advisable to
activate the function in 4
th
or higher gears.
When travelling downhill with the device active,
the car speed may slightly exceed the stored one.
Storing car speed
Proceed as follows:
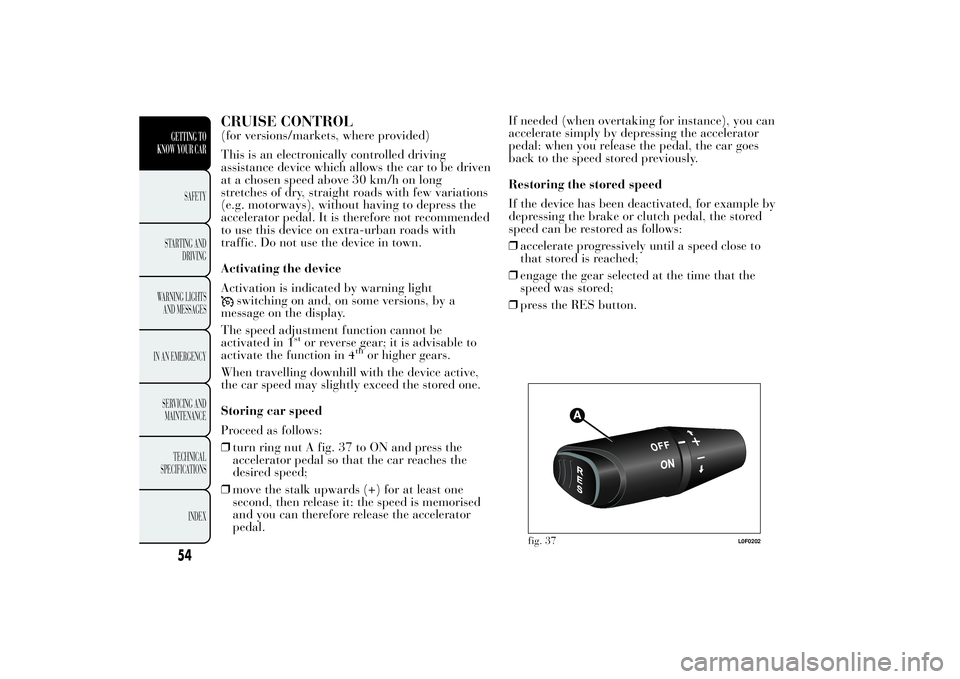
❒turn ring nut A fig. 37 to ON and press the
accelerator pedal so that the car reaches the
desired speed;
❒move the stalk upwards (+) for at least one
second, then release it: the speed is memorised
and you can therefore release the accelerator
pedal.If needed (when overtaking for instance), you can
accelerate simply by depressing the accelerator
pedal: when you release the pedal, the car goes
back to the speed stored previously.
Restoring the stored speed
If the device has been deactivated, for example by
depressing the brake or clutch pedal, the stored
speed can be restored as follows:
❒accelerate progressively until a speed close to
that stored is reached;
❒engage the gear selected at the time that the
speed was stored;
❒press the RES button.
fig. 37
L0F0202
54GETTING TO
KNOW YOUR CAR
SAFETY
STARTING
AND
DRIVING
WARNING LIGHTS
AND MESSAGES
IN AN EMERGENCY
SERVICING AND
MAINTENANCE
TECHNICAL
SPECIFICATIONS
INDEX
Page 62 of 299

CENTRAL LOCKING
Press button
fig. 45 to lock all the doors
simultaneously (the LED on the button will light
up when the doors are locked). Locking takes
place irrespective of the position of the ignition
key.
DUALDRIVE ELECTRIC POWER STEERING
(for versions/markets, where provided)
Press the CITY button fig. 46 to activate the
function (see paragraph "Dualdrive electric power
steering" in this chapter). When this function is
active, the word CITY on the instrument panel
will light up. To deactivate the function press the
button again.ECO FUNCTION
(for versions/markets, where provided)
Press the ECO button fig. 47 for at least 5 seconds
to activate the function.
When the ECO function is activated, the car is set
for city driving, characterised by less effort on
the steering wheel (Dualdrive system on) and
reduced fuel consumption. When this function is
activated, the word ECO on the display will light
up on some versions.
This function stays in the memory and, when the
vehicle is started again, the system keeps the
setting it had before the engine was stopped. Press
the ECO button again to deactivate the function
and restore the normal driving setting.
fig. 45
L0F0081
fig. 46
L0F0043
60GETTING TO
KNOW YOUR CAR
SAFETY
STARTING
AND
DRIVING
WARNING LIGHTS
AND MESSAGES
IN AN EMERGENCY
SERVICING AND
MAINTENANCE
TECHNICAL
SPECIFICATIONS
INDEX
Page 63 of 299

FUEL CUT-OFF SYSTEM
This intervenes in the case of an impact causing:
❒the interruption of the fuel supply with the
engine consequently cutting out
❒the automatic unlocking of the doors
❒the automatic switching on of the interior lights
❒the switching on of the hazard warning lights.
On some versions, the intervention of the system is
indicated by a message shown on the display.
IMPORTANT Carefully check the car for fuel
leaks, for instance in the engine compartment,
under the car or near the tank area. After a
collision, turn the ignition key to STOP to prevent
the battery from running down.
To restore the correct operation of the car, proceed
as follows:❒turn the ignition key to the MAR position;
❒activate the right direction indicator;
❒deactivate the right direction indicator;
❒activate the left direction indicator;
❒deactivate the left direction indicator;
❒activate the right direction indicator;
❒deactivate the right direction indicator;
❒activate the left direction indicator;
❒deactivate the left direction indicator;
❒turn the ignition key to the STOP position.
WARNING
If, after an impact, you smell fuel or
notice leaks from
the fuel system,
do not reactivate the system to avoid the risk
of fire.
fig. 47
L0F0039
61GETTING TO
KNOW YOUR CARSAFETY
STARTING
AND
DRIVING
WARNING LIGHTS
AND MESSAGES
IN AN EMERGENCY
SERVICING AND
MAINTENANCE
TECHNICAL
SPECIFICATIONS
INDEX