boot Lancia Ypsilon 2011 Owner handbook (in English)
[x] Cancel search | Manufacturer: LANCIA, Model Year: 2011, Model line: Ypsilon, Model: Lancia Ypsilon 2011Pages: 299, PDF Size: 13.35 MB
Page 27 of 299

Unlocking the doors and the tailgate
Briefly press button
: for unlocking of doors and
luggage compartment, timed switching-on of
internal roof lights and double flashing of
direction indicators (for versions/markets, where
provided).
Door lock is automatically released if the fuel
cut-off system trips.
Once the doors are locked, if one or more doors or
the boot are not closed correctly, the LED and
direction indicators start flashing quickly.
Locking the doors and the tailgate
Briefly press button: for locking of doors and
luggage compartment, with switching-off of roof
light and single flashing of direction indicators
(for versions/markets, where provided).If one or more doors are open, the doors will not
be locked. This is indicated by a rapid flashing of
the direction indicators (for versions/markets,
where provided). The doors are locked if the
luggage compartment is open
When a speed of over 20 km/h is reached, the
doors are automatically locked if this specific
function has been set (only on versions with
multi-function reconfigurable display).
When the doors are locked from outside the car
(using the remote control), A LED above the
button will switch on for a few seconds and
then start flashing (deterrent function).
When the doors are locked from inside the car (by
pressing the
button) the LED will remain on
constantly.
Opening the luggage compartment
Press thebutton to open the luggage
compartment using the remote control.
The direction indicators will flash twice to indicate
that the luggage compartment has been opened.
The electronic components inside the
key may be damaged if the key is
subjected to strong shocks. In order to
ensure complete efficiency of the electronic
devices inside the key, it should never be
exposed to direct sunlight.
fig. 14
L0F0075
25GETTING TO
KNOW YOUR CARSAFETY
STARTING
AND
DRIVING
WARNING LIGHTS
AND MESSAGES
IN AN EMERGENCY
SERVICING AND
MAINTENANCE
TECHNICAL
SPECIFICATIONS
INDEX
Page 52 of 299

EXTERNAL COURTESY LIGHTS
This function lights up the car and the space
around it when the doors are unlocked.
Activation:when the car is parked and the doors
are unlocked by pressing the
button on the
remote control (or the luggage compartment is
unlocked by pressing
), the dipped beam
headlights, side lights and number plate lights are
activated.
The lights remain lit for approximately 25 seconds
unless the doors and boot are locked again with
the remote control or the doors or boot are opened
and reclosed. In these cases they go out after 5
seconds.
The exterior courtesy lights can be enabled/
disabled using the Setup Menu (see the paragraph
“Menu Items” in this chapter).
WINDOW CLEANINGThe right stalk controls windscreen wiper/washer
and heated rear window wiper/washer operation.
WINDSCREEN WASHER/WIPER
They can be operated only with the ignition key
turned to MAR.
The ring nut A fig. 35 can be moved to four
different positions:
windscreen wiper off.intermittent operation.continuous slow operation.continuous fast operation.
fig. 35
L0F0126
50GETTING TO
KNOW YOUR CAR
SAFETY
STARTING
AND
DRIVING
WARNING LIGHTS
AND MESSAGES
IN AN EMERGENCY
SERVICING AND
MAINTENANCE
TECHNICAL
SPECIFICATIONS
INDEX
Page 138 of 299

WARNING
Press the clutch pedal fully to change
gears correctly.
It is therefore
essential that there is nothing under the
pedals: make sure the mats are lying flat and
do not get in the way of the pedals.Do not drive with your hand resting on
the gear lever as the force exerted,
even if slight, could lead over time to
premature wear of the gearbox internal
components.
FUEL SAVINGSHere are some suggestions which may help you to
save fuel and lower the amount of harmful
emissions released into the atmosphere.
GENERAL CONSIDERATIONS
Car maintenance
Have checks and adjustments carried out in
accordance with the “Scheduled Servicing Plan”.
Tyres
Check the tyre pressure at least once every 4
weeks: if the pressure is too low, consumption
levels increase as resistance to rolling is higher.
Unnecessary loads
Do not travel with an overloaded boot. The weight
of the car and its arrangement greatly affect fuel
consumption and stability.
Roof rack/ski rack
Remove the roof rack or the ski rack from the roof
after use. These accessories lower aerodynamic
penetration and adversely affect consumption
levels. When transporting particularly large
objects, use a trailer if possible.
136
GETTING TO KNOW
YOUR CAR
SAFETY
STARTING AND
DRIVINGWARNING LIGHTS
AND
MESSAGES
IN AN
EMERGENCY
SERVICING AND
MAINTENANCE
TECHNICAL
SPECIFICATIONS
INDEX
Page 155 of 299

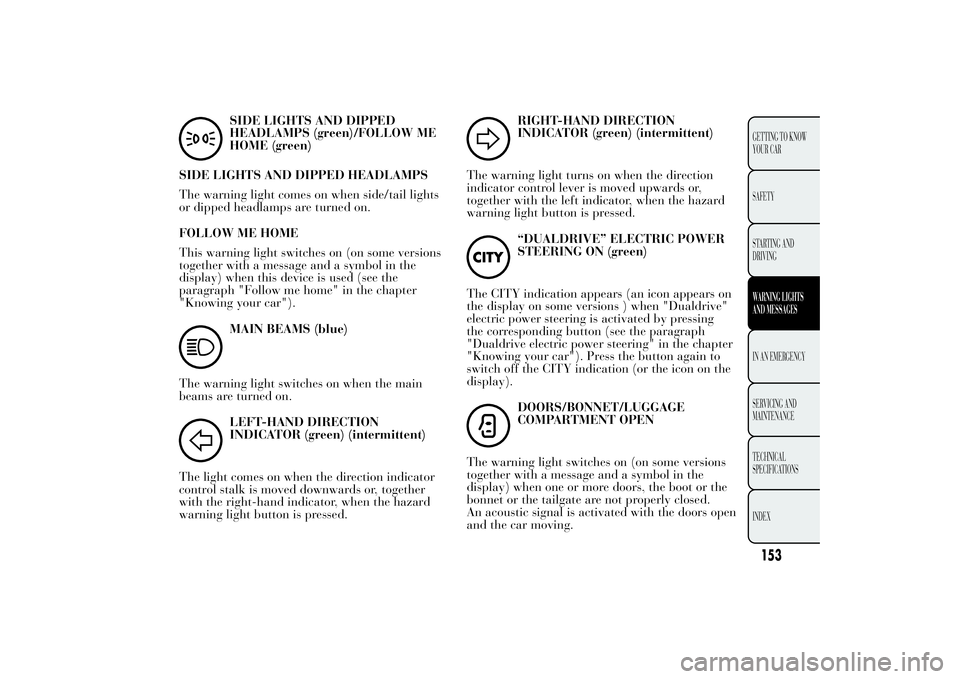
SIDE LIGHTS AND DIPPED
HEADLAMPS (green)/FOLLOW ME
HOME (green)
SIDE LIGHTS AND DIPPED HEADLAMPS
The warning light comes on when side/tail lights
or dipped headlamps are turned on.
FOLLOW ME HOME
This warning light switches on (on some versions
together with a message and a symbol in the
display) when this device is used (see the
paragraph "Follow me home" in the chapter
"Knowing your car").MAIN BEAMS (blue)
The warning light switches on when the main
beams are turned on.LEFT-HAND DIRECTION
INDICATOR (green) (intermittent)
The light comes on when the direction indicator
control stalk is moved downwards or, together
with the right-hand indicator, when the hazard
warning light button is pressed.
RIGHT-HAND DIRECTION
INDICATOR (green) (intermittent)
The warning light turns on when the direction
indicator control lever is moved upwards or,
together with the left indicator, when the hazard
warning light button is pressed.“DUALDRIVE” ELECTRIC POWER
STEERING ON (green)
The CITY indication appears (an icon appears on
the display on some versions ) when "Dualdrive"
electric power steering is activated by pressing
the corresponding button (see the paragraph
"Dualdrive electric power steering" in the chapter
"Knowing your car"). Press the button again to
switch off the CITY indication (or the icon on the
display).DOORS/BONNET/LUGGAGE
COMPARTMENT OPEN
The warning light switches on (on some versions
together with a message and a symbol in the
display) when one or more doors, the boot or the
bonnet or the tailgate are not properly closed.
An acoustic signal is activated with the doors open
and the car moving.
153GETTING TO KNOW
YOUR CAR
SAFETY
STARTING AND
DRIVINGWARNING LIGHTS
AND
MESSAGESIN AN
EMERGENCY
SERVICING AND
MAINTENANCE
TECHNICAL
SPECIFICA
TIONS
INDEX
Page 164 of 299

REFITTING THE STANDARD WHEEL
Following the procedure described previously,
raise the car and remove the space-saver wheel.
Versions with steel rims
Proceed as follows:
❒make sure the contact surfaces between
standard wheel and hub are clean so that the
fastening bolts will not come loose;
❒fit the standard wheel inserting the 4 bolts into
the holes;
❒using the wrench provided, tighten the fastening
bolts;
❒press-fit the hub cap, aligning the special
splining (on the cap) with the inflation valve;
❒lower the car and remove the jack;
❒using the wrench provided, fully tighten the
bolts in the sequence shown previously.
Versions with alloy wheels
❒insert the wheel on the hub and using the
wrench provided tighten the bolts;
❒lower the car and remove the jack;
❒using the wrench provided, fully tighten the
bolts in the sequence shown ;
❒reinstall the pressure-fitted hub cap, making
sure that the reference hole on the wheel is
aligned with the reference hole on the cap.IMPORTANT If it is not fitted properly, the hub
cap may detach itself when the car is running.
After tyre replacement
❒stow the space-saver wheel in the compartment
provided in the boot;
❒insert the jack and the other tools in the
container;
❒arrange the container and tools on the
space-saver wheel;
❒correctly reposition the boot stiff cover.
162
GETTING TO KNOW
YOUR CAR
SAFETY
STARTING AND
DRIVING
WARNING LIGHTS
AND MESSAGESIN AN EMERGENCYSERVICING AND
MAINTENANCE
TECHNICAL
SPECIFICA
TIONS
INDEX
Page 200 of 299

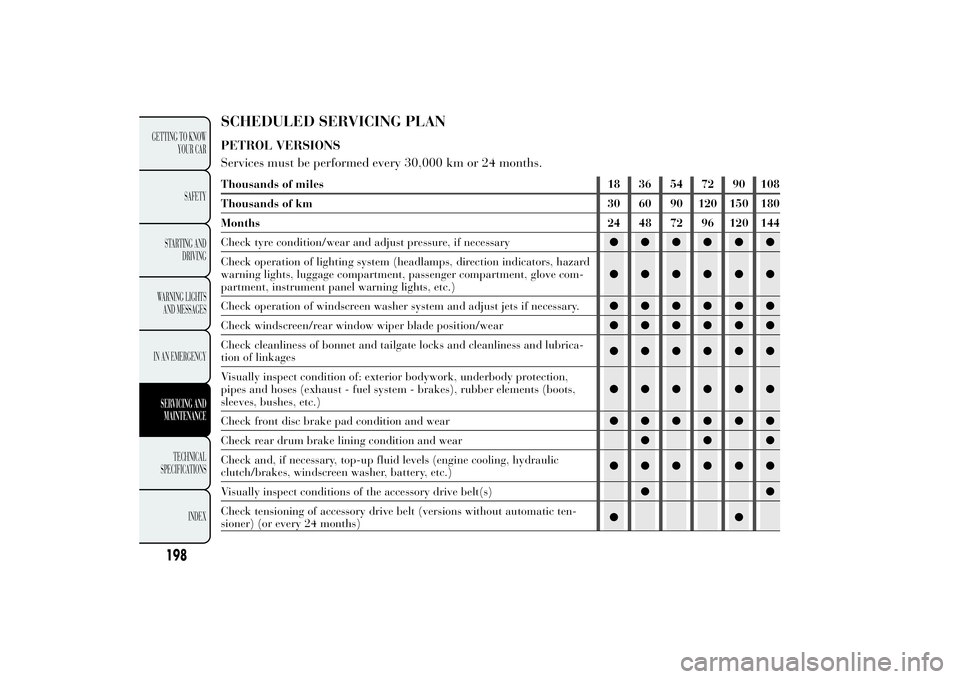
SCHEDULED SERVICING PLANPETROL VERSIONS
Services must be performed every 30,000 km or 24 months.Thousands of miles 18 36 54 72 90 108
Thousands of km 30 60 90 120 150 180
Months 24 48 72 96 120 144
Check tyre condition/wear and adjust pressure, if necessary●●●●●●
Check operation of lighting system (headlamps, direction indicators, hazard
warning lights, luggage compartment, passenger compartment, glove com-
partment, instrument panel warning lights, etc.)●●●●●●
Check operation of windscreen washer system and adjust jets if necessary.●●●●●●
Check windscreen/rear window wiper blade position/wear●●●●●●
Check cleanliness of bonnet and tailgate locks and cleanliness and lubrica-
tion of linkages●●●●●●
Visually inspect condition of: exterior bodywork, underbody protection,
pipes and hoses (exhaust - fuel system - brakes), rubber elements (boots,
sleeves, bushes, etc.)●●●●●●
Check front disc brake pad condition and wear●●●●●●
Check rear drum brake lining condition and wear●●●
Check and, if necessary, top-up fluid levels (engine cooling, hydraulic
clutch/brakes, windscreen washer, battery, etc.)●●●●●●
Visually inspect conditions of the accessory drive belt(s)●●
Check tensioning of accessory drive belt (versions without automatic ten-
sioner) (or every 24 months)●●
198
GETTING TO KNOW
YOUR CAR
SAFETY
STARTING AND
DRIVING
WARNING LIGHTS
AND MESSAGES
IN AN EMERGENCYSERVICING AND
MAINTENANCE
TECHNICAL
SPECIFICA
TIONS
INDEX
Page 202 of 299

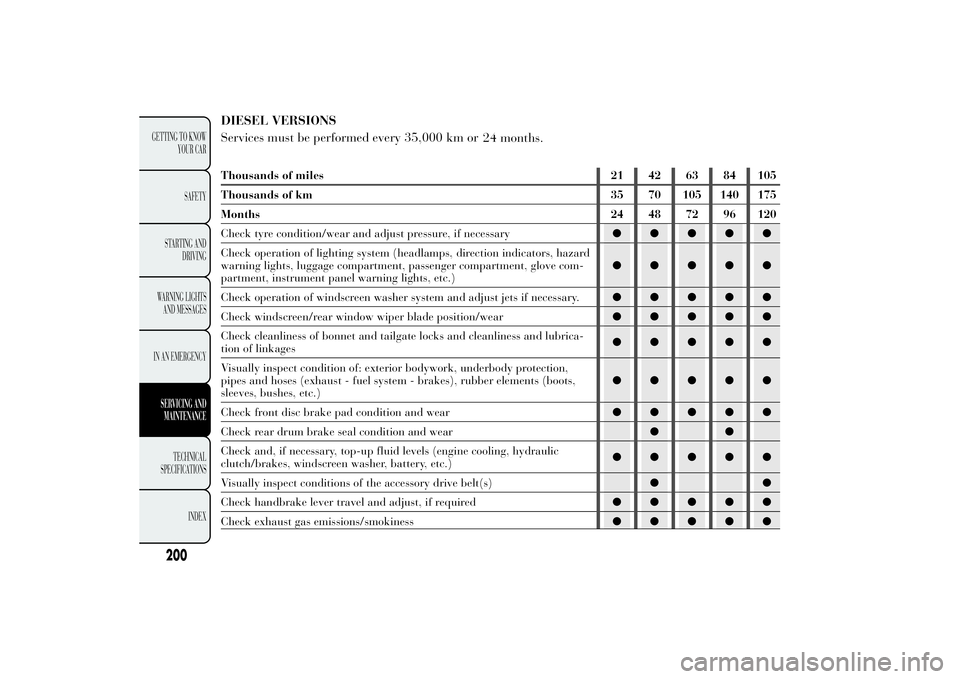
DIESEL VERSIONS
Services must be performed every 35,000 km or
24 months.Thousands of miles 21 42 63 84 105
Thousands of km 35 70 105 140 175
Months 24 48 72 96 120
Check tyre condition/wear and adjust pressure, if necessary●●●●●
Check operation of lighting system (headlamps, direction indicators, hazard
warning lights, luggage compartment, passenger compartment, glove com-
partment, instrument panel warning lights, etc.)●●●●●
Check operation of windscreen washer system and adjust jets if necessary.●●●●●
Check windscreen/rear window wiper blade position/wear●●●●●
Check cleanliness of bonnet and tailgate locks and cleanliness and lubrica-
tion of linkages●●●●●
Visually inspect condition of: exterior bodywork, underbody protection,
pipes and hoses (exhaust - fuel system - brakes), rubber elements (boots,
sleeves, bushes, etc.)●●●●●
Check front disc brake pad condition and wear●●●●●
Check rear drum brake seal condition and wear●●
Check and, if necessary, top-up fluid levels (engine cooling, hydraulic
clutch/brakes, windscreen washer, battery, etc.)●●●●●
Visually inspect conditions of the accessory drive belt(s)●●
Check handbrake lever travel and adjust, if required●●●●●
Check exhaust gas emissions/smokiness●●●●●
200
GETTING TO KNOW
YOUR CAR
SAFETY
STARTING AND
DRIVING
WARNING LIGHTS
AND MESSAGES
IN AN EMERGENCYSERVICING AND
MAINTENANCE
TECHNICAL
SPECIFICA
TIONS
INDEX
Page 204 of 299

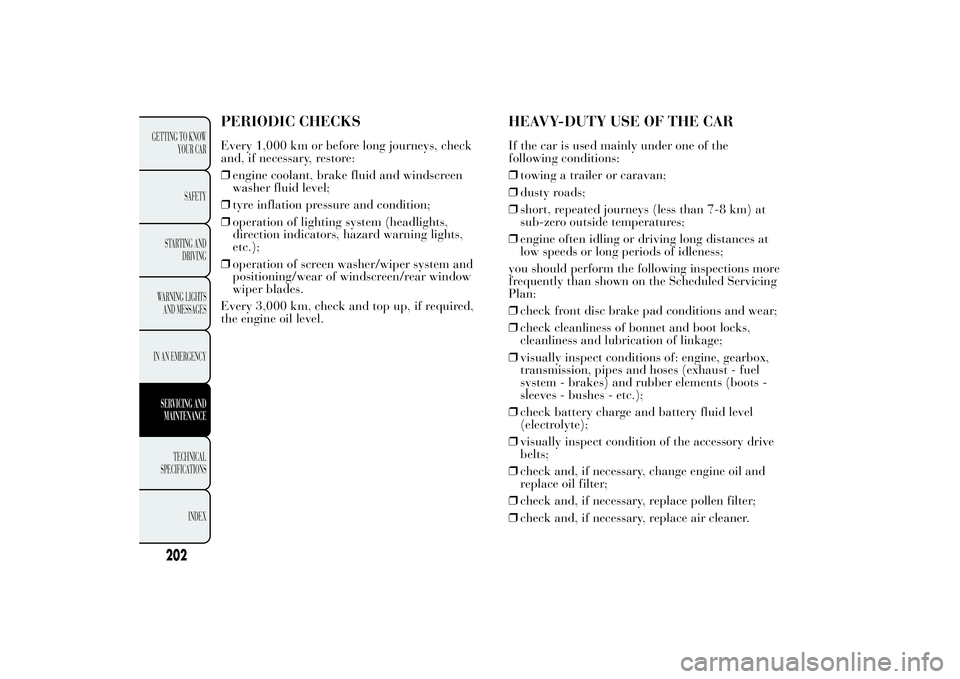
PERIODIC CHECKSEvery 1,000 km or before long journeys, check
and, if necessary, restore:
❒engine coolant, brake fluid and windscreen
washer fluid level;
❒tyre inflation pressure and condition;
❒operation of lighting system (headlights,
direction indicators, hazard warning lights,
etc.);
❒operation of screen washer/wiper system and
positioning/wear of windscreen/rear window
wiper blades.
Every 3,000 km, check and top up, if required,
the engine oil level.
HEAVY-DUTY USE OF THE CARIf the car is used mainly under one of the
following conditions:
❒towing a trailer or caravan;
❒dusty roads;
❒short, repeated journeys (less than 7-8 km) at
sub-zero outside temperatures;
❒engine often idling or driving long distances at
low speeds or long periods of idleness;
you should perform the following inspections more
frequently than shown on the Scheduled Servicing
Plan:
❒check front disc brake pad conditions and wear;
❒check cleanliness of bonnet and boot locks,
cleanliness and lubrication of linkage;
❒visually inspect conditions of: engine, gearbox,
transmission, pipes and hoses (exhaust - fuel
system - brakes) and rubber elements (boots -
sleeves - bushes - etc.);
❒check battery charge and battery fluid level
(electrolyte);
❒visually inspect condition of the accessory drive
belts;
❒check and, if necessary, change engine oil and
replace oil filter;
❒check and, if necessary, replace pollen filter;
❒check and, if necessary, replace air cleaner.
202
GETTING TO KNOW
YOUR CAR
SAFETY
STARTING AND
DRIVING
WARNING LIGHTS
AND MESSAGES
IN AN EMERGENCYSERVICING AND
MAINTENANCE
TECHNICAL
SPECIFICA
TIONS
INDEX
Page 235 of 299

DIMENSIONSThe dimensions are expressed in mm fig. 171 and refer to the vehicle equipped with its original tyres.
Height is measured with vehicle unladen.
Boot capacity:capacity (V.D.A. standards)= 217 litres.Versions A B C D E F G H
0.9 TwinAir 85 HP3842 816 2390 636
15201414 1676 1408
1.2 8V 69 HP3842 816 2390 636
151414 1676 140
1.3 MultiJet3842 816 2390 636
1520141 1676 1408
fig. 171
L0F0003
233GETTING TO KNOW
YOUR CAR
SAFETY
STARTING AND
DRIVING
WARNING LIGHTS
AND MESSAGES
IN AN EMERGENCY
SERVICING AND
MAINTENANCETECHNICAL
SPECIFICA
TIONSINDEX
8
4 20