interior lights Lancia Ypsilon 2011 Owner handbook (in English)
[x] Cancel search | Manufacturer: LANCIA, Model Year: 2011, Model line: Ypsilon, Model: Lancia Ypsilon 2011Pages: 299, PDF Size: 13.35 MB
Page 15 of 299

MENU ITEMSMenu
This item allows you to access the Setup Menu.
Press the
or
button to select the various
Menu items. Hold down the
button to return to
the standard screen.
Lighting (Interior light adjustment) (with side
lights on only)
With the side lights on, this function is used to set
the brightness of the instrument panel, radio
controls and automatic climate control system
controls (for versions/markets where provided) to
8 levels.
Proceed as follows to adjust the brightness:
briefly press button
, the previously set level will
flash on the display;
press button
or
to adjust the brightness
level;
briefly press buttonto return to the menu screen
or hold the button down to return to the standard
screen without saving.
Speed Beep (Speed limit)
This function is used to set the car speed limit
(km/h or mph); the driver is immediately alerted
when this limit is exceeded.
To set the desired speed limit, proceed as follows:
❒briefly press button
: the display will show the
wording "Speed Beep";❒press button
or
to select speed limit
activation (On) or deactivation (Off);
❒if the function is on, press
or
to select
the required speed limit and then press
to
confirm.
NoteSetting is possible between 30 and 200
km/h, or 20 and 125 mph, according to the
previously set unit. See the "Measurement unit
adjustment (Measurement unit)" paragraph
described below. The setting will increase/decrease
by five units each time button
/
is
pressed. Hold down the
/
button to
automatically increase/decrease the setting
rapidly. Complete the setting by briefly pressing
the button when you approach the required value.
❒press the
button briefly to return to the menu
screen or hold the button down to return to the
standard screen without storing.
To cancel the setting, proceed as follows:
❒briefly press the
button: "On" will flash on
the display;
❒press button: "Off" will flash on the
display;
❒press the
button briefly to return to the menu
screen or give the button a long press to return
to the standard screen without storing.
13GETTING TO
KNOW YOUR CARSAFETY
STARTING
AND
DRIVING
WARNING LIGHTS
AND MESSAGES
IN AN EMERGENCY
SERVICING AND
MAINTENANCE
TECHNICAL
SPECIFICATIONS
INDEX
Page 28 of 299

REQUEST FOR ADDITIONAL REMOTE
CONTROLS
The system can recognise up to 8 remote controls.
Should a new remote control be necessary, contact
a Lancia Dealership and be ready to present the
CODE card, a personal identity document and the
car's ownership documents.
REPLACING THE BATTERY IN THE KEY
WITH REMOTE CONTROL
To replace the battery, proceed as follows:
❒press button A fig. 15 and open the metal insert
B;
❒turn the screw C to
using a fine bit
screwdriver;❒take out the battery case D and replace the
battery E making sure that polarities are
correct;
❒refit the battery case D inside the key and lock
it turning the screw C to
.
Used batteries should be disposed of,
as specified by law, in special
containers, otherwise take them to a
Lancia Dealership, which will deal with their
disposal.
SAFE LOCK DEVICE
(for versions/markets, where provided)
This safety device inhibits the operation of the
interior door handles and the door locking/
unlocking button. We recommend that you
activate this device each time you park your car.
Activating the device
The device is enabled on all the doors by quickly
double-pressing the
button on the key.
The direction indicators flash 3 times and the
LED above the
fig. 16 button flashes to
indicate that the device has been activated. The
device does not come on if one or more doors
is not properly shut.
fig. 15
L0F0189
26GETTING TO
KNOW YOUR CAR
SAFETY
STARTING
AND
DRIVING
WARNING LIGHTS
AND MESSAGES
IN AN EMERGENCY
SERVICING AND
MAINTENANCE
TECHNICAL
SPECIFICATIONS
INDEX
Page 35 of 299

WARNING
It is absolutely forbidden to carry out
any after-market
operation involving
steering system or steering column
modifications (e.g. installation of anti-theft
device) that could badly affect performance
and safety, invalidate the warranty and
also result in the car not meeting type-
approval requirements.
REAR VIEW MIRRORSINTERIOR MIRROR
The mirror is fitted with a safety device that
causes its release in the event of a violent impact
with the passenger. Operate lever A fig. 25 to
adjust the mirror into two different positions:
normal or anti-glare.
fig. 25
L0F0054
33GETTING TO
KNOW YOUR CARSAFETY
STARTING
AND
DRIVING
WARNING LIGHTS
AND MESSAGES
IN AN EMERGENCY
SERVICING AND
MAINTENANCE
TECHNICAL
SPECIFICATIONS
INDEX
Page 46 of 299

ACTIVATION OF INTERIOR AIR
RECIRCULATION AND ENABLEMENT OF
AQS FUNCTION (Air Quality System)
Press button
.
Internal air recirculation is carried out according
to three possible operating modes:
❒automatic control;
❒forced deactivation (air recirculation always
deactivated, air taken from the outside)
❒forced activation (internal air circulation always
activated).
When the OFF button is pressed, the climate
control system automatically activates internal air
recirculation. External air recirculation can always
be activated by pressing button
and vice
versa.
With the OFF button pressed, it is not possible to
activate the AQS (Air Quality System) function.IMPORTANT Internal air recirculation makes it
possible to reach the required heating or cooling
conditions more quickly depending on the mode
selected. It is not advisable to switch the air
recirculation on when it is rainy/cold to prevent
the windows from misting, especially if the climate
control system has not been activated. It is
advisable to switch the internal air recirculation
on whilst queuing or in tunnels to prevent the
introduction of polluted air. Do not use the
function for a long time, particularly if there are
several passengers on board, to prevent the
windows from misting.
AQS (Air Quality System) function activation
The AQS function automatically activates internal
air recirculation when the outside air is polluted
(e.g. in traffic queues and tunnels).
IMPORTANT With the AQS function active, after
15 consecutive minutes of the internal air
recirculation system functioning, the climate
control system enables the intake of outside air for
approximately 1 minute to freshen the air in the
passenger compartment. This takes place
regardless of the pollution level of the outside air.
CLIMATE CONTROL COMPRESSOR
ACTIVATION/DEACTIVATION
Press button
to switch on the climate control
compressor.
Compressor activation:
symbol appears on
display.
44GETTING TO
KNOW YOUR CAR
SAFETY
STARTING
AND
DRIVING
WARNING LIGHTS
AND MESSAGES
IN AN EMERGENCY
SERVICING AND
MAINTENANCE
TECHNICAL
SPECIFICATIONS
INDEX
Page 49 of 299

EXTERNAL LIGHTSThe left-hand stalk operates most of the external
lights.
The ignition key has to be in the MAR position for
the exterior lights to come on.
The instrument panel and the various dashboard
controls will come on with the external lights.
DAY LIGHTS (DRL)
″Daytime Running Lights″
(for versions/markets, where provided)
With the ignition key turned to MAR and the ring
nut A fig. 34 turned to positionOthe daytime
running lights are automatically activated; the
other lights and interior lighting remain off. If the
daytime running lights are deactivated, no light
switches on when the ring nut A is turned toO.
WARNING
The daytime running lights are an
alternative to the
dipped beam
headlights for driving during the daytime in
countries where it is compulsory to have
lights on during the day, and they are also
permitted in those countries where this not
obligatory.
WARNING
Daytime running lights cannot
replace dipped headlights
when
driving at night or through tunnels. The use
of daytime running lights is governed by
the highway code of the country in which
you are driving. Comply with legal
requirements.
SIDE LIGHTS AND DIPPED BEAM
HEADLIGHTS
With the ignition key turned to MAR, turn the ring
nut A fig. 34 to
. If dipped beams are
activated, the daytime running lights go out and
the side lights and dipped headlights come on.
The
warning light will come on in the
instrument panel.
fig. 34
L0F0127
47GETTING TO
KNOW YOUR CARSAFETY
STARTING
AND
DRIVING
WARNING LIGHTS
AND MESSAGES
IN AN EMERGENCY
SERVICING AND
MAINTENANCE
TECHNICAL
SPECIFICATIONS
INDEX
Page 63 of 299

FUEL CUT-OFF SYSTEM
This intervenes in the case of an impact causing:
❒the interruption of the fuel supply with the
engine consequently cutting out
❒the automatic unlocking of the doors
❒the automatic switching on of the interior lights
❒the switching on of the hazard warning lights.
On some versions, the intervention of the system is
indicated by a message shown on the display.
IMPORTANT Carefully check the car for fuel
leaks, for instance in the engine compartment,
under the car or near the tank area. After a
collision, turn the ignition key to STOP to prevent
the battery from running down.
To restore the correct operation of the car, proceed
as follows:❒turn the ignition key to the MAR position;
❒activate the right direction indicator;
❒deactivate the right direction indicator;
❒activate the left direction indicator;
❒deactivate the left direction indicator;
❒activate the right direction indicator;
❒deactivate the right direction indicator;
❒activate the left direction indicator;
❒deactivate the left direction indicator;
❒turn the ignition key to the STOP position.
WARNING
If, after an impact, you smell fuel or
notice leaks from
the fuel system,
do not reactivate the system to avoid the risk
of fire.
fig. 47
L0F0039
61GETTING TO
KNOW YOUR CARSAFETY
STARTING
AND
DRIVING
WARNING LIGHTS
AND MESSAGES
IN AN EMERGENCY
SERVICING AND
MAINTENANCE
TECHNICAL
SPECIFICATIONS
INDEX
Page 64 of 299
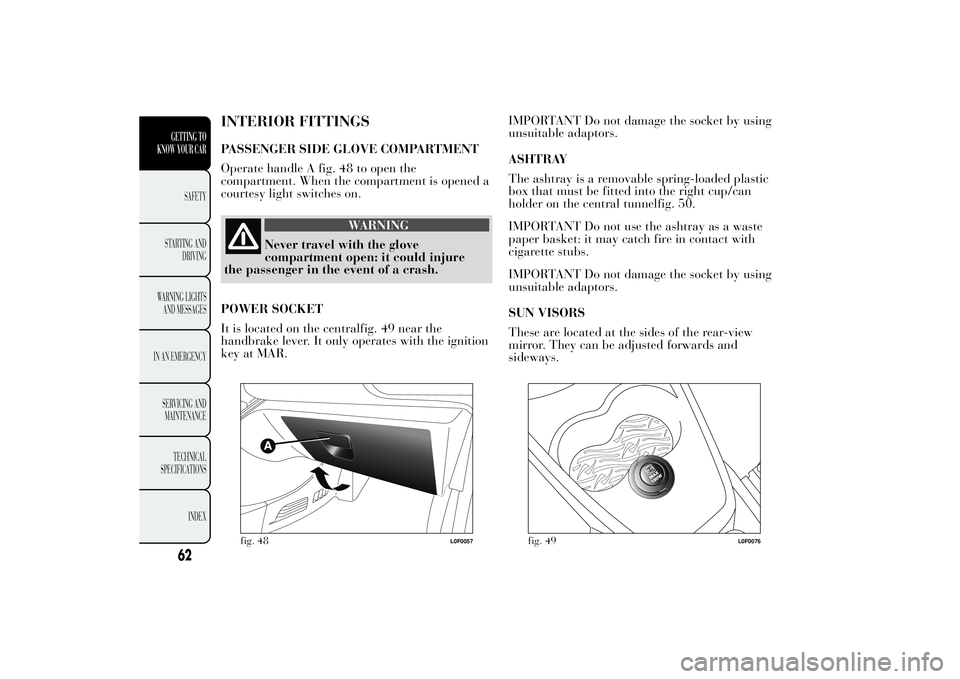
INTERIOR FITTINGSPASSENGER SIDE GLOVE COMPARTMENT
Operate handle A fig. 48 to open the
compartment. When the compartment is opened a
courtesy light switches on.
WARNING
Never travel with the glove
compartment open: it
could injure
the passenger in the event of a crash.
POWER SOCKET
It is located on the centralfig. 49 near the
handbrake lever. It only operates with the ignition
key at MAR.IMPORTANT Do not damage the socket by using
unsuitable adaptors.
ASHTRAY
The ashtray is a removable spring-loaded plastic
box that must be fitted into the right cup/can
holder on the central tunnelfig. 50.
IMPORTANT Do not use the ashtray as a waste
paper basket: it may catch fire in contact with
cigarette stubs.
IMPORTANT Do not damage the socket by using
unsuitable adaptors.
SUN VISORS
These are located at the sides of the rear-view
mirror. They can be adjusted forwards and
sideways.
fig. 48
L0F0057
fig. 49
L0F0076
62GETTING TO
KNOW YOUR CAR
SAFETY
STARTING
AND
DRIVING
WARNING LIGHTS
AND MESSAGES
IN AN EMERGENCY
SERVICING AND
MAINTENANCE
TECHNICAL
SPECIFICATIONS
INDEX
Page 180 of 299
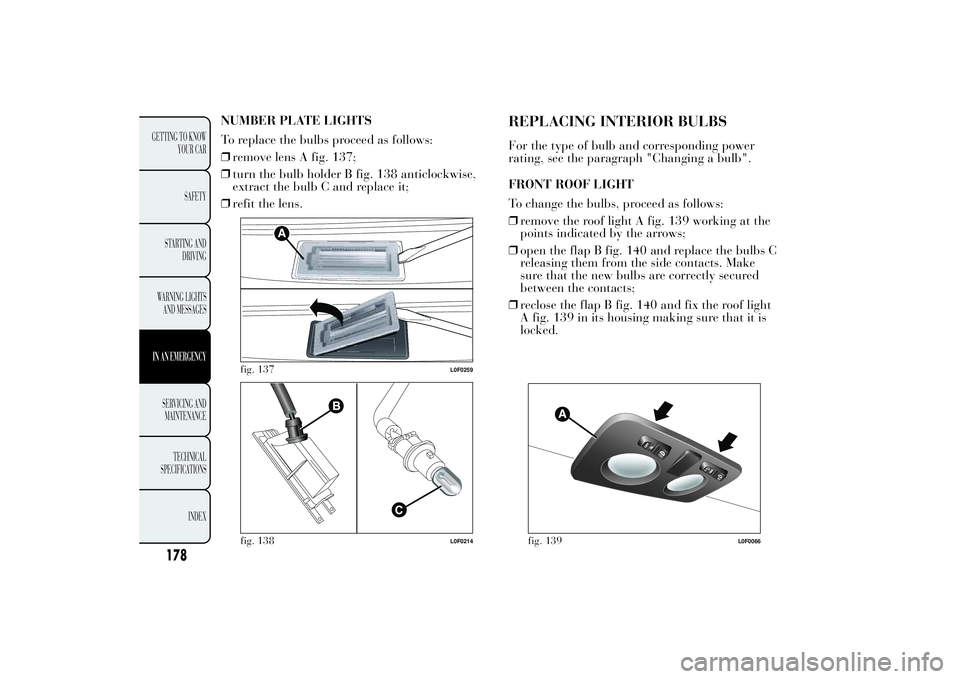
NUMBER PLATE LIGHTS
To replace the bulbs proceed as follows:
❒remove lens A fig. 137;
❒turn the bulb holder B fig. 138 anticlockwise,
extract the bulb C and replace it;
❒refit the lens.
REPLACING INTERIOR BULBSFor the type of bulb and corresponding power
rating, see the paragraph "Changing a bulb".
FRONT ROOF LIGHT
To change the bulbs, proceed as follows:
❒remove the roof light A fig. 139 working at the
points indicated by the arrows;
❒open the flap B fig. 140 and replace the bulbs C
releasing them from the side contacts. Make
sure that the new bulbs are correctly secured
between the contacts;
❒reclose the flap B fig. 140 and fix the roof light
A fig. 139 in its housing making sure that it is
locked.
fig. 137
L0F0259
fig. 138
L0F0214
fig. 139
L0F0066
178
GETTING TO KNOW
YOUR CAR
SAFETY
STARTING AND
DRIVING
WARNING LIGHTS
AND MESSAGESIN AN EMERGENCYSERVICING AND
MAINTENANCE
TECHNICAL
SPECIFICA
TIONS
INDEX
Page 218 of 299

BODYWORKPROTECTION FROM ATMOSPHERIC
AGENTS
The car is equipped with the best available
technological solutions to protect the bodywork
against corrosion.
These are the most important:
❒painting products and systems which give the
car particular resistance to corrosion and
abrasion
❒use of galvanised (or pretreated) steel sheets,
with high resistance to corrosion
❒spraying the underbody, engine compartment,
wheel arch interiors and other parts with highly
protective wax products
❒spraying of plastic parts, with a protective
function in the more exposed points: underdoor,
inner wing, edges, etc.
❒use of “open” boxed sections to prevent
condensation and pockets of moisture from
triggering rust inside.
BODY AND UNDERBODY WARRANTY
Your car is covered by warranty against
perforation due to corrosion of any original
element of the structure or body.
For the general terms of this warranty, refer to
your Warranty Booklet.PRESERVING THE BODYWORK
Paint
Touch up abrasions and scratches immediately to
prevent the formation of rust.
Maintenance of paintwork consists of washing the
car: the frequency depends on the conditions
and environment where the car is used. For
example, in highly polluted areas, or if the roads
are spread with salt, it is advisable to wash the car
more frequently.
To correctly wash the car, proceed as follows:
❒remove the aerial from the roof to prevent
damage to it if the car is washed in an
automatic system;
❒if high pressure jets or cleaners are used to wash
the car, keep a distance of at least 40 cm from
the bodywork to avoid damage or alteration.
It should be remembered that the build up
of water can damage the car over a period of
time;
❒wash the body using a low pressure jet of water;
❒wipe the bodywork using a sponge with a
slightly soapy solution, frequently rinsing the
sponge;
❒rinse well with water and dry with a jet of air or
a chamois leather.
216
GETTING TO KNOW
YOUR CAR
SAFETY
STARTING AND
DRIVING
WARNING LIGHTS
AND MESSAGES
IN AN EMERGENCYSERVICING AND
MAINTENANCE
TECHNICAL
SPECIFICA
TIONS
INDEX
Page 220 of 299

INTERIORSPeriodically check for water puddles under the
mats that could cause the panels to rust.
WARNING
Never use flammable products, such
as petrol ether
or rectified petrol to
clean the inside of the car. The electrostatic
charges which are generated by rubbing
during the cleaning operation may cause a
fire.
WARNING
Do not keep aerosol cans in the car:
they might explode.
Aerosol cans
must not be exposed to a temperature
exceeding 50°C. When the car is exposed to
sunlight, internal temperature can greatly
exceed this value.
SEATS AND FABRIC PARTS
Remove dust with a soft brush or a vacuum
cleaner. It is advisable to use a moist brush on
velvet upholstery.
Rub the seats with a sponge and a solution of
water and mild soap.PLASTIC AND COATED PARTS
Clean interior plastic parts with a damp cloth (if
possible made from microfibre), and a solution
of water and neutral, non-abrasive detergent. To
clean oily or persistent stains, use specific
products free from solvents and designed to
maintain the original appearance and colour of
the components.
Remove any dust using a microfibre cloth, if
necessary moistened with water. The use of paper
tissues is not recommended as these may leave
residues.
IMPORTANT Never use spirits or petroleum to
clean the instrument panel.
LEATHER SEATS
(for versions/markets, where provided)
Remove the dry dirt with a buckskin or slightly
damp cloth, without exercising too much pressure.
Remove any liquid or grease stains using an
absorbent dry cloth, without rubbing. Then clean
with a soft cloth or buckskin cloth dampened
with water and neutral soap. If the stain persists,
use specific products and observe the instructions
carefully.
IMPORTANT Never use alcohol. Make sure that
the cleaning products used contain no alcohol
or alcohol derivatives, even in small quantities.
218
GETTING TO KNOW
YOUR CAR
SAFETY
STARTING AND
DRIVING
WARNING LIGHTS
AND MESSAGES
IN AN EMERGENCYSERVICING AND
MAINTENANCE
TECHNICAL
SPECIFICA
TIONS
INDEX