stop start Lancia Ypsilon 2011 Owner handbook (in English)
[x] Cancel search | Manufacturer: LANCIA, Model Year: 2011, Model line: Ypsilon, Model: Lancia Ypsilon 2011Pages: 299, PDF Size: 13.35 MB
Page 10 of 299
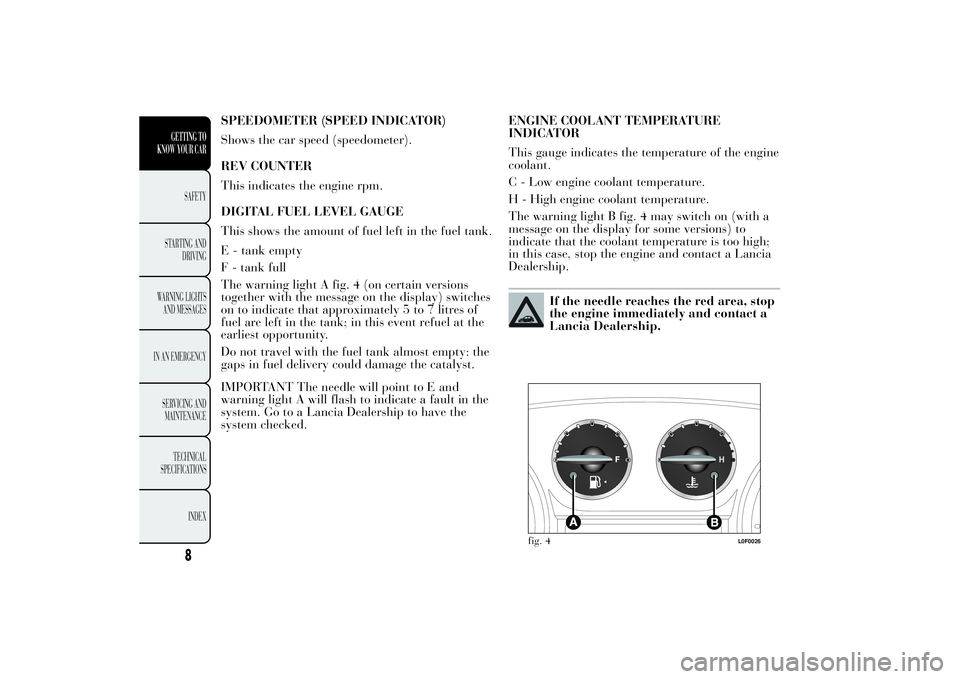
SPEEDOMETER (SPEED INDICATOR)
Shows the car speed (speedometer).
REV COUNTER
This indicates the engine rpm.
DIGITAL FUEL LEVEL GAUGE
This shows the amount of fuel left in the fuel tank.
E - tank empty
F - tank full
The warning light A fig. 4 (on certain versions
together with the message on the display) switches
on to indicate that approximately 5 to 7 litres of
fuel are left in the tank; in this event refuel at the
earliest opportunity.
Do not travel with the fuel tank almost empty: the
gaps in fuel delivery could damage the catalyst.
IMPORTANT The needle will point to E and
warning light A will flash to indicate a fault in the
system. Go to a Lancia Dealership to have the
system checked.ENGINE COOLANT TEMPERATURE
INDICATOR
This gauge indicates the temperature of the engine
coolant.
C - Low engine coolant temperature.
H - High engine coolant temperature.
The warning light B fig. 4 may switch on (with a
message on the display for some versions) to
indicate that the coolant temperature is too high;
in this case, stop the engine and contact a Lancia
Dealership.
If the needle reaches the red area, stop
the engine immediately and contact a
Lancia Dealership.
fig. 4
L0F0026
8
GETTING TO
KNOW YOUR CAR
SAFETY
STARTING
AND
DRIVING
WARNING LIGHTS
AND MESSAGES
IN AN EMERGENCY
SERVICING AND
MAINTENANCE
TECHNICAL
SPECIFICATIONS
INDEX
Page 11 of 299

DISPLAYThe car may be provided with a multifunction/
reconfigurable multifunction display that shows
useful information, according to the previous
settings, when driving.
With the ignition key removed, the display
activates and shows the time and total milometer
reading (in km or miles) for a few seconds when
a door is opened/closed.MULTIFUNCTION DISPLAY "STANDARD"
SCREEN
The following information is shown on the display
fig. 5 :
ADateBGear Shift Indicator (for versions/markets,
where provided)CStart&Stop function indication (for versions/
markets, where provided)D
Time (always displayed, even with key removed
and doors closed)
EMilometer (display of distance travelled in
kilometres/miles)FOutside temperatureG
Headlamp alignment position (only with dipped
headlights on)
H
Activation of Dualdrive electric power steering
(CITY indication) or of ECO driving mode
(ECO indication)
fig. 5
L0F1008
9GETTING TO
KNOW YOUR CARSAFETY
STARTING
AND
DRIVING
WARNING LIGHTS
AND MESSAGES
IN AN EMERGENCY
SERVICING AND
MAINTENANCE
TECHNICAL
SPECIFICATIONS
INDEX
Page 12 of 299

RECONFIGURABLE MULTIFUNCTION
DISPLAY "STANDARD" SCREEN
The following information is shown on the display
fig. 6 :ATimeBDate or trip distance display in kilometres (or
miles)CGear Shift Indicator (for versions/markets,
where provided)D
Start&Stop function indication (for versions/
markets, where provided)
EMilometer (display of distance travelled in
kilometres/miles)FHeadlamp alignment position (only with dipped
headlights on)G
Outside temperature
H
Car status indications (e.g. doors open, possible
ice on road, etc.)On some versions the display shows the turbine
pressure.
GEAR SHIFT INDICATOR
The GSI (Gear Shift Indicator) system advises the
driver to change gear through a specific indication
on the control panel fig. 7. Through the GSI, the
driver is notified that changing gear will allow
a reduction in fuel consumption.
When the SHIFT UP icon (
SHIFT) is shown on
the display, the GSI is advising the driver to
engage a higher gear, while the SHIFT DOWN (
SHIFT) icon advises the driver to engage a
lower gear.
The indication in the instrument panel remains on
until the driver changes gear or the driving
conditions return to a situation where changing
gear is not required to improve consumption.
fig. 6
L0F1007
fig. 7
L0F1010
10GETTING TO
KNOW YOUR CAR
SAFETY
STARTING
AND
DRIVING
WARNING LIGHTS
AND MESSAGES
IN AN EMERGENCY
SERVICING AND
MAINTENANCE
TECHNICAL
SPECIFICATIONS
INDEX
Page 13 of 299
WELCOME MOVEMENT
On some versions, when the key is turned to MAR,
the following occurs:
❒quick movement (up and down) of the
speedometer and rpm gauge
❒lighting of graphic symbols/display
❒display of the Lancia logo.
Gauge movement
If the key is removed from the ignition switch
whilst the gauges are moving, they immediately
return to their initial position.
Once they have reached the full scale values, the
gauges rest on the value indicated by the car.
The movement of the gauges stops when the
engine is started.
Lighting of graphic symbols/display
A few seconds after the key is inserted, the gauges,
graphic symbols and display light up in sequence.
Lancia logo display
When the key is removed from the ignition switch
(with the doors closed), the display remains lit
and shows the Lancia logo. The display lighting is
then dimmed gradually until it switches off
completely.CONTROL BUTTONS
NOTE Buttons
and
are described in the
following pages fig. 8. The buttons are
and
on
some versions.
To scroll up through the screen and the
related options or to increase the displayed
value.Press briefly to access the menu and/or go to
next screen or confirm the desired menu
selection.
Hold down to go back to the standard screen.To scroll down through the screen and the
related options or to decrease the displayed
value.
Buttons
and
activate different functions
according to the following situations:
❒within the menu, they allow you to scroll up and
down;
❒during setting operations, they increase or
decrease values.
SETUP MENU
The menu comprises a series of options which can
be selected using buttons
and
to access
the different selection and setting operations
(Setup) indicated below. Some options have a
submenu. The menu can be activated by briefly
pressing button
.
11GETTING TO
KNOW YOUR CARSAFETY
STARTING
AND
DRIVING
WARNING LIGHTS
AND MESSAGES
IN AN EMERGENCY
SERVICING AND
MAINTENANCE
TECHNICAL
SPECIFICATIONS
INDEX
Page 25 of 299
THE LANCIA CODE SYSTEMTo further protect your car from theft, it has been
fitted with an engine immobilising system. It is
automatically activated when the ignition key
is removed.
Each key contains an electronic device which
modulates the signal emitted during ignition by an
antenna built into the ignition device. The signal
is the "password", different every time the car
is started, through which the control unit
recognises the key and enables starting.
OPERATION
Each time the car is started by turning the ignition
key to MAR, the Lancia CODE system control
unit sends an acknowledgement code to the engine
control unit to deactivate the immobilizer. The
code is sent only if the control unit of the Lancia
CODE system has acknowledged the code received
from the key.
Each time the ignition key is turned to STOP, the
Lancia CODE system deactivates the functions
of the engine management control unit. If, during
starting, the code is not correctly recognised, the
warning light switches on in the instrument
panel. In this case, turn the key to STOP and then
to MAR; if it is still locked, try again with the
other keys that come with the vehicle. Contact a
Lancia Dealership if you still cannot start the
engine.Warning light
switching on while driving
If the
warning light switches on, this means
that the system is running a self-diagnosis (for
example for a voltage drop). If the problem
persists, contact a Lancia Dealership.
23GETTING TO
KNOW YOUR CARSAFETY
STARTING
AND
DRIVING
WARNING LIGHTS
AND MESSAGES
IN AN EMERGENCY
SERVICING AND
MAINTENANCE
TECHNICAL
SPECIFICATIONS
INDEX
Page 29 of 299
Deactivating the device
The device deactivates automatically:
❒by pressing the
button on the remote control;
❒by turning the ignition key to the MAR position.
WARNING
Once the safe lock system is engaged,
it is impossible
to open the doors
from inside the car. Before getting out of the
car, please therefore check that there is
no-one left on board.
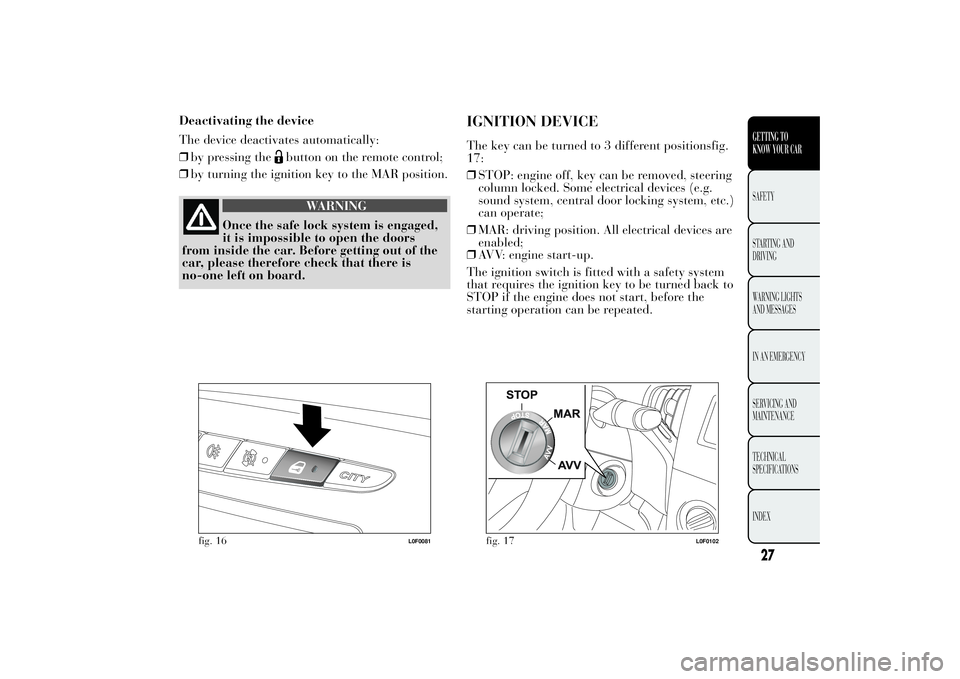
IGNITION DEVICEThe key can be turned to 3 different positionsfig.
17:
❒STOP: engine off, key can be removed, steering
column locked. Some electrical devices (e.g.
sound system, central door locking system, etc.)
can operate;
❒MAR: driving position. All electrical devices are
enabled;
❒AVV: engine start-up.
The ignition switch is fitted with a safety system
that requires the ignition key to be turned back to
STOP if the engine does not start, before the
starting operation can be repeated.
fig. 16
L0F0081
fig. 17
L0F0102
27GETTING TO
KNOW YOUR CARSAFETY
STARTING
AND
DRIVING
WARNING LIGHTS
AND MESSAGES
IN AN EMERGENCY
SERVICING AND
MAINTENANCE
TECHNICAL
SPECIFICATIONS
INDEX
Page 30 of 299
WARNING
If the ignition device has been
tampered with (e.g.
an attempted
theft), have it checked over by a Lancia
Dealership before driving again.
WARNING
Always remove the key when you
leave your car
to prevent someone
from accidentally operating the controls.
Remember to engage the handbrake. Engage
1
stgear if the car is parked uphill or reverse
if the car is parked downhill. Never leave
children unattended in the car.
STEERING LOCK
Engagement:when the key is in position STOP,
remove the key and turn the steering wheel until it
is locked.
Disengagement:move the steering wheel slightly
as you turn the ignition key to MAR.
WARNING
It is absolutely forbidden to carry out
any after-market
operation involving
steering system or steering column
modifications (e.g.: installation of anti-theft
device) that could badly affect performance
and safety, invalidate the warranty and
also result in non-compliance of the car
with type-approval requirements.
WARNING
Never remove the key while the car is
moving. The steering
wheel will lock
as soon as it is turned. This holds true for
cars being towed as well.
28GETTING TO
KNOW YOUR CAR
SAFETY
STARTING
AND
DRIVING
WARNING LIGHTS
AND MESSAGES
IN AN EMERGENCY
SERVICING AND
MAINTENANCE
TECHNICAL
SPECIFICATIONS
INDEX
Page 40 of 299

C Air distribution knob fig. 32
toward the body and the side windowstoward the body, the side windows and the
feettoward the feet onlytoward the feet and the windscreentoward the windscreen only
D Heated rear window activation/deactivation
button fig. 32.
When the function is active, the LED on the
button is lit up.
In order to maintain battery efficiency, the
function is automatically deactivated after about
20 minutes.
E Fan speed knob and climate control system
activation/deactivation fig. 32. Press the knob
to activate the climate control system; the
LED on the knob switches on. This enables
rapid cooling of the passenger compartment.
NoteTo stop the air flow from the vents turn the
knob to 0.
F climate control compressor activation/
deactivation button fig. 32.
Fast windscreen and front side window
demisting/defrosting (MAX-DEF)
Proceed as follows:
❒turn knob A to the red section;❒move slider B to
;
❒turn knob C to
;
❒turn knob E to 4 (maximum fan speed).
IMPORTANT The climate control system is very
useful for speeding up demisting since it
dehumidifies the air. Adjust the controls as
described above and press button
to activate the
climate control system (the LED on the button
will light up).
ADDITIONAL HEATER
(for versions/markets, where provided)
This device speeds up passenger compartment
warming when it is very cold. The additional
heater turns off automatically after reaching the
required comfort conditions.
The heater only works if the outside temperature
and engine coolant temperature are low. The
heater will not activate if the battery voltage is too
low.
SYSTEM MAINTENANCE
In winter, the climate control system must be
turned on at least once a month for about
10 minutes. Have the system inspected at a
Lancia Dealership before the summer.
38GETTING TO
KNOW YOUR CAR
SAFETY
STARTING
AND
DRIVING
WARNING LIGHTS
AND MESSAGES
IN AN EMERGENCY
SERVICING AND
MAINTENANCE
TECHNICAL
SPECIFICATIONS
INDEX
Page 47 of 299

Compressor deactivation
❒
symbol on display disappears;
❒internal air recirculation excluded;
❒AQS function disabled.
With the climate control compressor switched off,
air cannot be introduced into the passenger
compartment that has a lower temperature than
the outside air; in this case the
symbol in the
display will flash.
The deactivation of the climate control compressor
is memorised even after the engine has stopped.
To reactivate the climate control compressor, press
button
or AUTO again: if you press AUTO,
the other manual settings will be cancelled.
AIR DISTRIBUTION SELECTION
Press one or more of buttons A fig. to manually
select one of the possible air distribution settings
for the passenger compartment:
Air flow to the windscreen and front side
window diffusers to demist/defrost them.Air flow to the front and rear footwell
diffusers. This air distribution allows the
passenger compartment to be warmed up
quickly.+
+
Air flow distribution between
front and rear diffusers,
centre/side dashboard diffusers,
rear diffuser and windscreen
and front side window
demisting/defrosting diffusers.
Air flow distribution to centre/side dashboard
diffusers (passenger's body).+
Air flow distributed between footwell
diffusers and windscreen and front side
window defrosting/demisting diffusers.
This distribution setting allows the
passenger compartment to be warmed
effectively and prevents the windows
from misting.
+
Air flow distribution between footwell
diffusers (hotter air) and centre/side
dashboard diffusers and rear diffuser
(cooler air).
+
Air flow distribution between
centre/side dashboard vents, rear
diffuser and windscreen and front side
window demisting/defrosting diffusers.
This distribution setting ventilates
the passenger compartment well and
prevents the windows from misting up.
IMPORTANT For the climate control system to
function, at least one of the buttons A must be
operated fig. . The system does not allow the
deactivation of all the buttons A.
IMPORTANT Push the OFF button to turn the
climate control system back on: in this way, all
operating conditions memorised before switching
off are restored.
To restore automatic control of the air distribution
after a manual selection, press the AUTO button.
45GETTING TO
KNOW YOUR CARSAFETY
STARTING
AND
DRIVING
WARNING LIGHTS
AND MESSAGES
IN AN EMERGENCY
SERVICING AND
MAINTENANCE
TECHNICAL
SPECIFICATIONS
INDEX
33 33
Page 50 of 299
When the ignition key is turned to STOP or
removed and the ring nut is turned from O to
,
all the side lights and number plate lights switch
on. The
warning light will come on in the
instrument panel.
PARKING LIGHTS
These lights can only be turned on with ignition
key in STOP position or removed, by moving
the ring nut A first to positionOand then to
position.
The warning light
switches on on the
instrument panel. When the direction indicator
stalk is activated the side for the lights (left or
right) can be selected.
AUTOMATIC LIGHTING CONTROL
(AUTOLIGHT) (Dusk sensor)
(for versions/markets,
where provided)
This infrared LED sensor, combined with the rain
sensor and located on the windscreen, detects
the variations in outside brightness depending on
the light sensitivity set with the Setup Menu:
the greater the sensitivity, the less external light is
required to activate the exterior lights.
Activation
The dusk sensor activates when ring nut A fig. 34
is turned to
. In this way the side lights and
dipped headlights are activated automatically
according to the external light level.When the lights are turned on by the sensor, the
fog lights (for versions/markets, where provided)
and the rear fog lights may be turned on. When
the lights are automatically switched off, the front
and rear fog lights (if activated) are also switched
off. The next time the lights are switched on
automatically, the fog lights must be reactivated
manually (if required).
With the sensor active, it is possible to flash the
headlights but the main beam headlights cannot
be switched on. To activate these lights, turn
the ring nut A to
and activate the fixed dipped
beam headlights.
When the lights have been activated automatically
and are then switched off by the sensor, the
dipped beam headlights are switched off first,
followed by the side lights a few seconds later. If
the sensor is activated but is malfunctioning,
the side lights and dipped beam headlights are
switched on irrespective of the outside light level
and the sensor failure is indicated on the
instrument panel display. It is also possible to
deactivate the sensor and switch on the side lights
and dipped beam headlights.
IMPORTANT The sensor is unable to detect the
presence of fog. Under these circumstances, these
lights are therefore turned on manually.
48GETTING TO
KNOW YOUR CAR
SAFETY
STARTING
AND
DRIVING
WARNING LIGHTS
AND MESSAGES
IN AN EMERGENCY
SERVICING AND
MAINTENANCE
TECHNICAL
SPECIFICATIONS
INDEX